1 概述
Hibernate是实现,JPA是接口。最早在大学的时候就知道Hibernate是个大坑,复杂,配置多,上手曲线异常复杂,直至现在国内都很少使用Hibernate的厂商。但是在DDD的实现中,均推荐使用Hibernate作为透明持久化层,我才狠心决心好好这本大部头。不过这本书比较旧了,没有讲如何与现代的Spring框架如何结合,要配搭着《Spring Data Jpa从入门到精通》这本书一起看。
总体来说,Hibernate其实是个好东西,精巧,省心。只是,我们都一直都误解他的用法了。
Hibernate相比MyBatis的主要优势在于:
- 透明更新,有自动脏检查进行update的能力,已经不再需要像MyBatis一样写update语句了。
- 关联关系批量拉取,我已经记不清有多少次写不好的程序都是在一个for循环里面逐个拉db数据,效率太差了。Hibernate能很优雅地解决这个问题,注意,N+1不是个问题。
- 一级缓存,MyBatis的一级缓存固定在单个方法上面的,不能跨方法对特定实体的一级缓存。Hibernate很好地解决这个问题,实现了优雅的批量写问题。
2 HelloWorld
2.1 原生
代码在这里
<?xml version="1.0" encoding="UTF-8"?>
<persistence version="2.1"
             xmlns="http://xmlns.jcp.org/xml/ns/persistence"
             xmlns:xsi="http://www.w3.org/2001/XMLSchema-instance"
             xsi:schemaLocation="http://xmlns.jcp.org/xml/ns/persistence http://xmlns.jcp.org/xml/ns/persistence/persistence_2_1.xsd">
    <persistence-unit name="HelloWorldPU" transaction-type="RESOURCE_LOCAL">
        <class>spring_test.Country</class>
        <exclude-unlisted-classes>true</exclude-unlisted-classes>
        <properties>
            <property name="hibernate.hbm2ddl.auto" value="create-drop"/>
            <property name="hibernate.format_sql" value="true"/>
            <property name="hibernate.use_sql_comments" value="true"/>

            <!--show_sql可以打开sql看-->
            <property name="hibernate.show_sql" value="true"/>

            <property name="javax.persistence.jdbc.driver" value="com.mysql.cj.jdbc.Driver"/>
            <property name="javax.persistence.jdbc.url" value="jdbc:mysql://localhost:3306/test2"/>
            <property name="javax.persistence.jdbc.user" value="root"/>
            <property name="javax.persistence.jdbc.password" value="1"/>
        </properties>
    </persistence-unit>
</persistence>
首先在resources/META-INF下面,固定建立一个persistence.xml的文件
package spring_test;

import javax.persistence.*;

/**
 * Created by fish on 2021/4/12.
 */
@Entity
@Table(name="t_country")
public class Country {

    @Id
    @GeneratedValue(strategy = GenerationType.IDENTITY)
    private Long id;

    private String countryName;

    private String countryCode;

    protected  Country(){

    }

    public Long getId(){
        return this.id;
    }

    public Country(String countryName,String countryCode){
        this.countryCode = countryCode;
        this.countryName = countryName;
    }

    public void mod(String countryName,String countryCode){
        this.countryCode = countryCode;
        this.countryName = countryName;
    }

    @Override
    public String toString(){

        return String.format("Country{id:%d,name:%s,code:%s}",id,countryName,countryCode);
    }
}
然后我们建立一个实体对象
package spring_test;


import javax.persistence.EntityManager;
import javax.persistence.EntityManagerFactory;
import javax.persistence.Persistence;
import java.util.List;
//import org.apache.log4j.Logger;
//import org.apache.log4j.Level;

public class App
{


    public static void main( String[] args )
    {
        new App().go();
    }

    private EntityManagerFactory emf;

    private void go(){
        emf = Persistence.createEntityManagerFactory("HelloWorldPU");
        this.go1();
        this.go2();
    }

    private void go2(){
        System.out.println("------------  go2 ------------");

        showAll();

        add2(new Country("我国1","WO"),new Country("我国2","WO2"));

        showAll();

        mod2();

        mod3();
    }

    private void mod3(){
        EntityManager em = emf.createEntityManager();

        //没有开事务,但是依然会开一级缓存和脏检查
        Country country1 = em.find(Country.class,4L);
        System.out.println("before mod country : "+country1);
        country1.mod("我国3","WO3");

        System.out.println("after memory mod country : "+country1);

        //即使没有开事务,读的依然是一级事务,
        Country country2 = em.find(Country.class,4L);
        System.out.println("after memory mod country2 : "+country2);

        showOne(4L);
    }

    private void mod2(){
        EntityManager em = emf.createEntityManager();
        em.getTransaction().begin();

        Country country4 = em.find(Country.class,4L);
        country4.mod("我国3","WO3");

        //这里走了一级缓存,因为在同一个事务里面
        Country country5 = em.find(Country.class,4L);
        System.out.println("reused EntityManager1 Country 4 : "+country5);

        //事务回滚,或者提交后,自动清空一级缓存
        em.getTransaction().rollback();

        //数据库的旧数据,因为是rollback
        showOne(4L);

        //一级缓存被清空,所以,依然为旧数据
        Country country6 = em.find(Country.class,4L);
        System.out.println("reused EntityManager2 Country 4 : "+country6);
    }

    private void add2(Country country1,Country country2){
        EntityManager em = emf.createEntityManager();
        //没有transaction的时候,无法用
        em.getTransaction().begin();

        //执行修改操作的时候,必须打开transaction
        em.persist(country1);

        em.getTransaction().commit();

        //一旦EntityManager关闭以后,就不能再继续使用EntityManager
        //em.close();
        //未关闭的情况下你可以继续使用EntityManager

        em.getTransaction().begin();

        em.persist(country2);

        em.getTransaction().commit();

        em.close();
    }

    private void go1(){
        System.out.println("------------ go1 ------------ ");

        showAll();
        add("中国","CN");
        add("美国","US");
        add("英国","UK");

        showAll();

        showOne(1L);
        showOne(2L);
        showOne(3L);

        del(2L);

        mod(3L,"澳洲","AS");

        showAll();
    }

    private void showAll(){
        EntityManager em = emf.createEntityManager();
        List<Country> countryList = em.createQuery("select c from Country c ",Country.class).getResultList();
        System.out.println("allCountry "+countryList.toString());
        //记得手动关闭EntityManager
        em.close();
    }

    private void showOne(Long id){
        EntityManager em = emf.createEntityManager();
        Country country = em.find(Country.class,id);
        System.out.println("country "+id+" : "+country);
        em.close();
    }

    private void add(String countryName,String countryCode){
        EntityManager em = emf.createEntityManager();
        //没有transaction的时候,无法添加
        em.getTransaction().begin();

        //执行修改操作的时候,必须打开transaction
        Country country = new Country(countryName,countryCode);
        em.persist(country);

        em.getTransaction().commit();
        em.close();
    }

    private void del(Long id){
        EntityManager em = emf.createEntityManager();
        //没有transaction的时候,无法删除
        em.getTransaction().begin();

        //删除操作
        Country country = em.find(Country.class,id);
        em.remove(country);

        em.getTransaction().commit();
        em.close();
    }

    private void mod(Long id,String countryName,String countryCode){
        EntityManager em = emf.createEntityManager();
        //没有transaction的时候,无法修改
        em.getTransaction().begin();

        //修改操作,直接读出来改就行,EntityManager存放有内存快照,commit的时候会进行脏检查后update
        Country country = em.find(Country.class,id);
        country.mod(countryName,countryCode);

        em.getTransaction().commit();
        em.close();
    }
}
然后是一系列的CURD的操作,注意,JPA必须要在开启的事务的情况才能使用更新操作。它会将事务提交的时候,与内存的数据进行脏检查,然后执行对应的insert,delete和update操作。要点如下:
- 删除,添加,更新,依赖于事务开启
- 事务与EntityManager是独立的,事务提交以后,脏检查依然在EntityManager里面会自动清空
- EntityManager关闭以后就无法重新打开。所以每次事务都要使用一个新的EntityManager
- 在事务未开启时,EntityManager能开启一级缓存和脏检查,但是无法提交。
2.2 Spring
代码在这里
/**
 * Created by fish on 2021/3/15.
 */
spring.datasource.driver-class-name = com.mysql.cj.jdbc.Driver
spring.datasource.url = jdbc:mysql://localhost:3306/Test
spring.datasource.username = root
spring.datasource.password = 1

logging.level.org.hibernate=INFO

spring.jpa.properties.hibernate.format_sql=true
spring.jpa.properties.hibernate.type=trace
spring.jpa.properties.hibernate.use_sql_comments=true
spring.jpa.properties.hibernate.show_sql=true
spring.jpa.properties.hibernate.hbm2ddl.auto=create-drop
配置application.properties文件
package spring_test;

import javax.persistence.*;

/**
 * Created by fish on 2021/4/12.
 */
@Entity
@Table(name="t_country")
public class Country {

    @Id
    @GeneratedValue(strategy = GenerationType.AUTO)
    private Long id;

    private String countryName;

    private String countryCode;

    protected  Country(){

    }

    public Long getId(){
        return this.id;
    }

    public Country(String countryName,String countryCode){
        this.countryCode = countryCode;
        this.countryName = countryName;
    }

    public void mod(String countryName,String countryCode){
        this.countryCode = countryCode;
        this.countryName = countryName;
    }

    @Override
    public String toString(){

        return String.format("Country{id:%d,name:%s,code:%s}",id,countryName,countryCode);
    }
}
配置相同的实体
package spring_test;


import org.springframework.stereotype.Component;

import javax.persistence.EntityManager;
import javax.persistence.PersistenceContext;
import java.util.List;

/**
 * Created by fish on 2021/4/12.
 */
@Component
public class CountryRepository{

    //在无事务的情况下,每次find,query,persist等操作对应的entityManager都是全新的
    //在有事务的情况下,每次find,query,persist等操作对应的是同一个entityManager
    @PersistenceContext
    private EntityManager entityManager;

    public List<Country> getAll(){
        return entityManager.createQuery("select c from Country c",Country.class).getResultList();
    }

    public Country find(Long id){
        return entityManager.find(Country.class,id);
    }

    public void add(Country country){
        entityManager.persist(country);
    }

    public void del(Country country){
        entityManager.remove(country);
    }
}
Spring对于EntityManager的第一步是,将EntityManager更改为不是与固定的事务绑定的,它的含义是:
- 在无事务的情况下,每次find,query,persist等操作对应的entityManager都是全新的
- 在有事务的情况下,每次find,query,persist等操作对应的是同一个entityManager
这样做,避免了每次都要重新创建EntityManager,而且事务结束时要注意关掉EntityManager的问题。在Spring中不再需要调用EntityManager的close了。这其实就是和MyBatis的SqlSessionTemplate同一个套路,可以看这里。注意,必须添加上PersistenceContext注解。
package spring_test;

import org.slf4j.Logger;
import org.slf4j.LoggerFactory;
import org.springframework.aop.framework.AopContext;
import org.springframework.beans.factory.annotation.Autowired;
import org.springframework.boot.ApplicationArguments;
import org.springframework.boot.ApplicationRunner;
import org.springframework.boot.SpringApplication;
import org.springframework.boot.autoconfigure.SpringBootApplication;
import org.springframework.context.annotation.Bean;
import org.springframework.context.annotation.EnableAspectJAutoProxy;
import org.springframework.orm.jpa.JpaTransactionManager;
import org.springframework.orm.jpa.LocalContainerEntityManagerFactoryBean;
import org.springframework.transaction.annotation.EnableTransactionManagement;
import org.springframework.transaction.annotation.Transactional;

import java.util.List;
import java.util.Optional;

/**
 * Hello world!
 *
 */
@SpringBootApplication
@EnableTransactionManagement(proxyTargetClass = true)
@EnableAspectJAutoProxy(exposeProxy = true)
public class App implements ApplicationRunner
{
    private Logger logger = LoggerFactory.getLogger(getClass());

    public static void main( String[] args )
    {
        SpringApplication.run(App.class,args);
    }

    @Autowired
    private CountryRepository countryRepository;

    @Transactional
    public void add(Country country){
        this.countryRepository.add(country);
    }

    @Transactional
    public void mod(Long id,String countryName,String countryCode){
        Country country = this.countryRepository.find(id);
        country.mod(countryName,countryCode);
    }

    @Transactional
    public void del(Long id){
        Country country = this.countryRepository.find(id);
        this.countryRepository.del(country);
    }

    public void showOne(Long id){
        Country country = this.countryRepository.find(id);
        logger.info("country {} : {}",id,country);
    }

    public void showAll(){
        List<Country> countryList = countryRepository.getAll();

        logger.info("countryList:{}",countryList);
    }

    public void go1(){
        //调用自身类的其他方法,要用AopContext的currentProxy来做,否则AOP增强没有打开
        App app = (App) (AopContext.currentProxy());

        logger.info("------- go1 -----");

        app.showAll();

        app.add(new Country("中国","CN"));
        app.add(new Country("美国","US"));
        app.add(new Country("英国","UK"));

        app.showAll();

        app.showOne(1L);
        app.showOne(2L);
        app.showOne(3L);

        app.del(2L);

        app.mod(3L,"澳洲","AS");

        app.showAll();
    }


    public void mod3(){
        //没有开事务,但是依然会开一级缓存和脏检查
        Country country1 = this.countryRepository.find(3L);
        System.out.println("before mod country : "+country1);
        country1.mod("我国3","WO3");

        System.out.println("after memory mod country : "+country1);

        //即使没有开事务,读的依然是一级事务
        //但是PersistenceContext注入的EntityManager的生命周期与事务是是一一对应的,第二次执行find的时候已经是新的entityManager
        Country country2 = this.countryRepository.find(3L);
        System.out.println("after memory mod country2 : "+country2);

        showOne(4L);
    }

    @Transactional
    public void mod2Inner(){
        Country country4 = this.countryRepository.find(4L);
        country4.mod("我国3","WO3");
        logger.info("reused EntityManager1 Country 4 : {}",country4);

        //这里走了一级缓存,因为在同一个事务里面
        Country country5 = this.countryRepository.find(4L);
        logger.info("reused EntityManager2 Country 5 : {}",country5);

        throw new RuntimeException("mm");
    }

    public void mod2(){
        //调用自身类的其他方法,要用AopContext的currentProxy来做,否则AOP增强没有打开
        App app = (App) (AopContext.currentProxy());

        try{
            app.mod2Inner();
        }catch(Exception e){
            //e.printStackTrace();
        }

        //数据库的旧数据,因为是rollback
        showOne(4L);
    }

    @Transactional
    public void add2(Country country1,Country country2){

        this.countryRepository.add(country1);
        this.countryRepository.add(country2);
    }

    public void go2() {
        //调用自身类的其他方法,要用AopContext的currentProxy来做,否则AOP增强没有打开
        App app = (App) (AopContext.currentProxy());

        logger.info("------- go2 -----");

        app.showAll();

        app.add2(new Country("我国1","WO"),new Country("我国2","WO2"));

        app.showAll();

        app.mod2();

        app.mod3();
    }

    public   void run(ApplicationArguments arguments) throws Exception {
        go1();

        go2();
    }

    /*
    @Bean
    public JpaTransactionManager transactionManager(LocalContainerEntityManagerFactoryBean localContainerEntityManagerFactoryBean){
        JpaTransactionManager transactionManager = new JpaTransactionManager();
        transactionManager.setEntityManagerFactory(localContainerEntityManagerFactoryBean.getObject());

    }
    */
}
然后是例子代码,我们可以看到:
- 开事务可以简单地使用@Transactional注解,Spring会为我们创建一个新的EntityManager,在事务结束的时候,这个EntityManager会进行自动的脏检查更新操作,我们不再需要手动update了。
- 在开事务的时候,每次的EntityManager都是同一个,所以对find执行同样参数的操作,第一次要查数据库,第二次就不用查数据库了,走的是一级缓存。详情看mod2Inner方法。
- 在没有开事务的时候,每次的EntityManager都是全新的,每次一级缓存都是空的。所以,所以对find执行同样参数的操作,每一次都要查数据库。详情看mod3方法。
2.3 Spring Boot
代码在这里
/**
 * Created by fish on 2021/3/15.
 */
spring.datasource.driver-class-name =  com.mysql.jdbc.Driver
spring.datasource.url = jdbc:mysql://localhost:3306/Test
spring.datasource.username = root
spring.datasource.password = 1

logging.level.mybatis_test.mapper=DEBUG
Spring Boot的配置文件
package spring_test;

import javax.persistence.*;

/**
 * Created by fish on 2021/4/12.
 */
@Entity
@Table(name="t_country")
public class Country {

    @Id
    @GeneratedValue(strategy = GenerationType.IDENTITY)
    private Long id;

    private String countryName;

    private String countryCode;

    protected  Country(){

    }

    public Long getId(){
        return this.id;
    }

    public Country(String countryName,String countryCode){
        this.countryCode = countryCode;
        this.countryName = countryName;
    }

    public void mod(String countryName,String countryCode){
        this.countryCode = countryCode;
        this.countryName = countryName;
    }

    @Override
    public String toString(){

        return String.format("Country{id:%d,name:%s,code:%s}",id,countryName,countryCode);
    }
}
写一个实体
package spring_test;

import org.springframework.data.repository.CrudRepository;

/**
 * Created by fish on 2021/4/12.
 */
public interface CountryRepository extends CrudRepository<Country,Long>{
}
SpringBoot更进一步,使用了CrudRepository就能生成仓库,一行代码都不用写
package spring_test;

import org.slf4j.Logger;
import org.slf4j.LoggerFactory;
import org.springframework.aop.framework.AopContext;
import org.springframework.beans.factory.annotation.Autowired;
import org.springframework.boot.ApplicationArguments;
import org.springframework.boot.ApplicationRunner;
import org.springframework.boot.SpringApplication;
import org.springframework.boot.autoconfigure.SpringBootApplication;
import org.springframework.context.annotation.EnableAspectJAutoProxy;
import org.springframework.transaction.annotation.EnableTransactionManagement;
import org.springframework.transaction.annotation.Transactional;

import java.util.List;
import java.util.Optional;

/**
 * Hello world!
 *
 */
@SpringBootApplication
@EnableTransactionManagement(proxyTargetClass = true)
@EnableAspectJAutoProxy(exposeProxy = true)
public class App implements ApplicationRunner
{
    private Logger logger = LoggerFactory.getLogger(getClass());

    public static void main( String[] args )
    {
        SpringApplication.run(App.class,args);
    }

    @Autowired
    private CountryRepository countryRepository;

    @Transactional
    public Long add()  {
        Country country = new Country("MyCountry","UK");
        logger.info("countryRepository:{}",countryRepository);
        countryRepository.save(country);
        return country.getId();
    }

    @Transactional
    public void del(Long id){
        countryRepository.deleteById(id);
    }

    @Transactional
    public void mod(Long id,String name,String code){
        //不需要显式的save
        Optional<Country> country = countryRepository.findById(id);
        country.get().mod(name,code);
    }

    @Transactional
    public void showAll(){
        Iterable<Country> countryList = countryRepository.findAll();

        logger.info("countryList:{}",countryList);
    }

    @Transactional
    public void show(Long id){
        Optional<Country> country = countryRepository.findById(id);
        logger.info("country findById:{},{}",id,country);
    }

    public   void run(ApplicationArguments arguments) throws Exception{
        //调用自身类的其他方法,要用AopContext的currentProxy来做,否则AOP增强没有打开
        App app = (App)(AopContext.currentProxy());

        app.showAll();

        Long newId = app.add();

        app.show(newId);

        app.mod(newId,"MyCountry2","UK2");

        app.show(newId);

        app.del(newId);

        app.showAll();
    }
}
用法跟原来的一样。不过我不怎么喜欢org.springframework.data.repository.CrudRepository的实现,因为:
- 它默认把每个方法都带上了Transactional注解,让程序员把事务这件事变得透明化了。这是不对的,事务注解应该要让程序员显式指定,让他自己清楚为什么要这样做才对。
- CrudRepository的save方法也不好,它总是先find,然后决定是insert还是update操作,这是太傻的设计。你不能因为方便就把JPA的精髓盖住了,JPA里面只有一个persist方法,没有update方法。因为它认为程序员自己就能清楚这个实体是否要insert的。当一个已经持久化的实体,再次执行persist方法时,JPA会报错。但是Spring的CrudRepository方法就会执行update操作,这是把可能的错误盖住了。
3 基本类型
代码在这里
3.1 id与列
package spring_test.business;

import lombok.Getter;
import lombok.ToString;

import javax.persistence.*;

/**
 * Created by fish on 2021/4/16.
 */
@Entity
@ToString
@Getter
//重写表名
@Table(name="t_people")
public class People {
    //直接在hibernate_sequence获取下一个自增值,所有表共用一个自增值
    //这样比IDENTITY的好处是,persist的时候不需要insert,而且可以批量在内存缓存多个主键,提高插入效率
    @Id
    @GeneratedValue(strategy = GenerationType.AUTO)
    private Long id;

    //重写列名
    @Column(name="people_name")
    private String name;

    //数据库有CreateTime和ModifyTime字段,但是修改操作的时候没有取出来,所以不用
    //可以只在query的时候才用这个字段

    protected People(){

    }

    public People(String name){
        this.name = name;
    }
}@Id注解表达这个列的主键,注意,尽可能使用名称id,以及只有单列。对于列名为驼峰如wageId,它会自动转换为wage_id的名称保存下来。
@Column(name = "`key`")
private String key;
有时候我们会遇到GammerException,Sql报错的时候,可能是列名刚好是SQL关键字导致的,这个时候要显式地告诉Hibernate,这个列名需要用特殊字符包围起来。
3.2 时间戳
package spring_test.business;

import lombok.Getter;
import lombok.ToString;
import org.hibernate.annotations.Generated;
import org.hibernate.annotations.GenerationTime;

import javax.persistence.*;
import java.util.Date;

/**
 * Created by fish on 2021/4/12.
 */
@ToString
@Getter
@Entity
//默认的表名为country
//默认的实体名为Country
public class Country {

    @Id
    @GeneratedValue(strategy = GenerationType.IDENTITY)
    private Long id;

    //默认的列名为下划线形式,country_name
    private String countryName;

    private String countryCode;

    //create_time字段是数据库自动生成的,所以insertable和updatable都为false,然后插入以后,要求hibernate从数据库取回这一行的列值
    //如果不关注CreateTime,可以扔掉Generated注解
    @Temporal(TemporalType.TIMESTAMP)
    @Column(insertable = false,updatable = false)
    @Generated(GenerationTime.INSERT)
    private Date CreateTime;

    //create_time字段是数据库自动生成的,所以insertable和updatable都为false,然后插入以后,要求hibernate从数据库取回这一行的列值
    //如果不关注ModifyTime,可以扔掉Generated注解
    @Temporal(TemporalType.TIMESTAMP)
    @Column(insertable = false,updatable = false)
    @Generated(GenerationTime.ALWAYS)
    private Date ModifyTime;

    protected  Country(){

    }

    public Long getId(){
        return this.id;
    }

    public Country(String countryName,String countryCode){
        this.countryCode = countryCode;
        this.countryName = countryName;
    }

    public void mod(String countryName,String countryCode){
        this.countryCode = countryCode;
        this.countryName = countryName;
    }

}时间戳类型需要用@Temporal注解,因为JPA需要知道Date类型对应的是SQL里面的时间戳,还是日期类型。@Generated注解,这个注解是由数据库自动插入或更新的,需要在insert以后进行一次select操作取回这个数据。@Column注解的insertable=false与,updatable = false,表明JPA不会传递这个列的值
package spring_test.business;

import lombok.Getter;
import lombok.ToString;
import org.hibernate.annotations.CreationTimestamp;
import org.hibernate.annotations.UpdateTimestamp;

import javax.persistence.*;
import java.math.BigDecimal;
import java.util.Date;

/**
 * Created by fish on 2021/4/16.
 */
@Entity
@ToString
@Getter
public class Car2 {
    private static Long globalId = 20001L;

    //改用自己的id生成算法
    @Id
    private Long id;

    private String name;

    //可以设置为由Hibernate来生成时间戳
    @Temporal(TemporalType.TIMESTAMP)
    @CreationTimestamp
    @Column(updatable = false)
    private Date createTime;

    @Temporal(TemporalType.TIMESTAMP)
    @UpdateTimestamp
    private Date modifyTime;

    private Long generateId(){
        Long id = Car2.globalId++;
        return id;
    }
    protected Car2(){

        //这个不要设置id,这个protected是由JPA读取数据后自动填充用的
        //即使设置了generateId,JPA也不会将id使用update语句写入到数据库,因为JPA默认id是不可改变的。但是,这样做会让id增长不是连续的。
        //this.id = generateId();
    }

    public Car2(String name){
        this.id = generateId();
        this.name = name;
    }

    public void mod(String name){
        this.name = name;
    }
}另外一种办法是用@CreationTimestamp和@UpdateTimestamp注解,这样的时间戳是由JPA生成放进去的,避免了插入后的select操作。。而且,另外一个,使用自己生成的id,能高效地避免再一次select主键,或者读取hibernate_sequence的开销。
3.3 枚举值
package spring_test.business;

/**
 * Created by fish on 2021/4/17.
 */
public enum CarBrand {
    Toyota,
    Honda,
    BMW,
    LEXUS,
}
我们定义一个枚举值
package spring_test.business;

import lombok.Getter;
import lombok.ToString;
import org.hibernate.annotations.CreationTimestamp;
import org.hibernate.annotations.UpdateTimestamp;

import javax.persistence.*;
import java.math.BigDecimal;
import java.util.Date;

/**
 * Created by fish on 2021/4/16.
 */
@Entity
@ToString
@Getter
public class Car {
    @Id
    @GeneratedValue(strategy = GenerationType.AUTO)
    private Long id;

    private String name;

    //使用enum作为映射对象,将枚举的字符串写入数据库,注意,枚举的值是区分大小写的.
    @Enumerated(EnumType.STRING)
    private CarBrand brand;

    private BigDecimal price;

    //可以设置为由Hibernate来生成时间戳
    @Temporal(TemporalType.TIMESTAMP)
    @CreationTimestamp
    @Column(updatable = false)
    private Date createTime;

    @Temporal(TemporalType.TIMESTAMP)
    @UpdateTimestamp
    private Date modifyTime;

    protected Car(){

    }

    public Car(CarBrand carBrand,String name,BigDecimal price){
        this.brand = carBrand;
        this.name = name;
        this.price = price;
    }

    public void mod(CarBrand carBrand,String name,BigDecimal price){
        this.brand = carBrand;
        this.name = name;
        this.price = price;
    }
}
我们发现:
- 另外一种使用时间戳的方式, @CreationTimestamp注解与@UpdateTimestamp注解,它与@Generated注解的区别是,时间戳是由JPA生成的,而不是依赖于数据库机制生成的
- 枚举值,可以用@Enumerated(EnumType.STRING)来表明使用枚举值的字符串来保存,而不是使用默认的枚举值的ordinal来保存。
- 大数,BigDecimal直接就能存取,不需要任何注解
4 嵌入与继承
嵌入与继承是JPA里面一个重要的机制。代码在这里
4.1 嵌入类
package spring_test.business;

import lombok.AllArgsConstructor;
import lombok.EqualsAndHashCode;
import lombok.Getter;
import lombok.ToString;

import javax.persistence.Embeddable;

/**
 * Created by fish on 2021/4/18.
 */
//Embeddable默认会继承实体的访问方式,因为User是按字段赋值的,所以Address也是用字段赋值的
@Embeddable
@ToString
@EqualsAndHashCode
@AllArgsConstructor
@Getter
public class Address {

    private String country;

    private String city;

    private String street;

    private String zipcode;

    protected Address(){

    }
}
我们先使用一个Address类型在嵌入,注意必须要用@Embeddable注解
package spring_test.business;

import lombok.AllArgsConstructor;
import lombok.Getter;
import lombok.ToString;

import javax.persistence.Entity;
import javax.persistence.GeneratedValue;
import javax.persistence.GenerationType;
import javax.persistence.Id;

/**
 * Created by fish on 2021/4/18.
 */
@Entity
@ToString
@Getter
public class User {
    @Id
    @GeneratedValue(strategy = GenerationType.AUTO)
    private Long id;

    private String name;

    private Address address;

    protected User(){

    }

    public User(String name,Address address){
        this.name = name;
        this.address = address;
    }

    public void mod(String name,Address address){
        this.name = name;
        this.address = address;
    }
}
然后我们在User实体(带有@Entity注解)上,直接使用这个Address类型。那么,JPA存取数据库的时候,就会直接将Address类型的字段都平摊在user表上面了。就是说,user表用id,name,country,city,street,和zipcode这几个字段。
4.2 嵌入类的字段改名
package spring_test.business;

import lombok.Getter;
import lombok.ToString;

import javax.persistence.*;

/**
 * Created by fish on 2021/4/18.
 */
@Entity
@ToString
@Getter
public class Student {
    @Id
    @GeneratedValue(strategy = GenerationType.AUTO)
    private Long id;

    private String school;

    private String name;

    //重写Address的某一个字段名,其他字段名保持不变
    @AttributeOverrides({
            @AttributeOverride(name="street",column=@Column(name="student_street"))
    })
    private Address address;

    protected Student(){

    }

    public Student(String school,String name,Address address){
        this.school = school;
        this.name = name;
        this.address = address;
    }

    public void mod(String school,String name,Address address){
        this.school = school;
        this.name = name;
        this.address = address;
    }
}
我们可以在实体Student里面,修改嵌入类在数据库里面的字段名,用的是@AttributeOverrides属性。
4.3 继承类
package spring_test.business;

import lombok.Getter;
import lombok.ToString;

import javax.persistence.MappedSuperclass;

/**
 * Created by fish on 2021/4/18.
 */
@MappedSuperclass
@ToString
@Getter
public class Order {
    private String total;

    private String remark;

    private String owner;

    protected Order(){

    }

    public Order(String total,String owner,String remark){
        this.total = total;
        this.owner = owner;
        this.remark = remark;
    }

    public void setRemark(String remark){
        this.remark = remark;
    }
}
使用@MappedSuperclass声明一个基类,注意用这种方法声明的类,不能作为JPA里面的多态类,纯粹就是用来减少代码的。不能在一个@ElementCollection注解里面存放Order类。
package spring_test.business;

import lombok.Getter;
import lombok.ToString;

import javax.persistence.Entity;
import javax.persistence.GeneratedValue;
import javax.persistence.GenerationType;
import javax.persistence.Id;

/**
 * Created by fish on 2021/4/18.
 */
//注意ToString,要调用父类的方法,否则会输出不了
@Entity
@ToString(callSuper = true)
@Getter
public class SalesOrder extends Order{
    @Id
    @GeneratedValue(strategy = GenerationType.AUTO)
    private Long id;

    private String salesName;

    protected SalesOrder(){

    }

    public SalesOrder(String salesName,String total,String owner,String remark){
        super(total,owner,remark);
        this.salesName = salesName;
    }

    public void modSalesName( String salesName){
        this.salesName = salesName;
    }
}
然后我们声明一个SalesOrder类,继承于含有@MappedSuperclass注解的Order类。那么JPA就会将sales_order表的字段定义为id,sales_name,total,remark,owner。注意,你可以将id字段放入到基类Order中。
继承类与嵌入类不同的是,嵌入类是组合关系,没有继承方法的,继承类是派生关系,有继承方法的。
4.4 继承类的字段改名
package spring_test.business;

import lombok.Getter;
import lombok.ToString;

import javax.persistence.*;

/**
 * Created by fish on 2021/4/18.
 */
@Entity
@ToString(callSuper = true)
@Getter
//修改了父级的列名,其他列保持不变
@AttributeOverrides({
        @AttributeOverride(name="remark",column = @Column(name="purchase_remark"))
})
public class PurchaseOrder extends Order{
    @Id
    @GeneratedValue(strategy = GenerationType.AUTO)
    private Long id;

    private String company;

    protected PurchaseOrder(){

    }

    public PurchaseOrder(String company,String total,String owner,String remark){
        super(total,owner,remark);
        this.company = company;
    }

    public void modCompany( String company){
        this.company = company;
    }
}
同理,我们可以用@AttributeOverrides属性修改列属性。
4.5 组合主键
package spring_test.business;

import lombok.EqualsAndHashCode;
import lombok.Getter;
import lombok.ToString;

import javax.persistence.Embeddable;
import javax.persistence.EmbeddedId;
import javax.persistence.Entity;
import javax.persistence.Id;
import java.io.Serializable;

/**
 * Created by fish on 2021/4/18.
 */
@Entity
@ToString
@Getter
public class UserFollow {
    //使用复合主键的时候,必须要重写equals和hashCode代码,否则会有问题
    @Embeddable
    @ToString
    @EqualsAndHashCode
    @Getter
    public static class Id implements Serializable{
        private Long userId;

        private Long followUserId;

        protected Id(){

        }
        public Id(Long userId,Long followUserId){
            this.userId = userId;
            this.followUserId = followUserId;
        }
    }

    @EmbeddedId
    private Id id;

    protected  UserFollow(){

    }

    public UserFollow(Long userId,Long followUserId){
        this.id = new Id(userId,followUserId);
    }
}
当我们需要多个字段来成为组合主键的时候,就需要使用@Embeddable注解,和@EmbeddedId注解。注意,必须要重写组合主键的equals和hashCode方法。
5 集合
集合是JPA里面最重要的关系,也是比一般手写SQL代码要大幅减少代码的一种抽象方式。集合可以认为是DDD中的一个聚合根(绝大部分的情况)。代码在这里
5.1 Set集合
package spring_test.business;

import lombok.Getter;
import lombok.ToString;
import org.hibernate.annotations.BatchSize;
import org.hibernate.annotations.Fetch;
import org.hibernate.annotations.FetchMode;
import org.hibernate.annotations.Table;
import org.springframework.data.repository.cdi.Eager;

import javax.persistence.*;
import java.util.Collections;
import java.util.HashSet;
import java.util.Set;

/**
 * Created by fish on 2021/4/19.
 */
@Entity
@ToString
@Getter
public class SalesOrder {
    @Id
    @GeneratedValue
    private Long id;

    //eager加batchSize能有效避免N+1的问题
    @ElementCollection(fetch= FetchType.EAGER)
    @BatchSize(size=100)
    @CollectionTable(
            name="sales_order_user",
            joinColumns = @JoinColumn(name="sales_order_id")
    )
    @Column(name="user_id")
    @Fetch(FetchMode.SELECT)
    private Set<Long> users = new HashSet<Long>();

    public SalesOrder(){

    }

    //注意,lombok自动生成getter方法返回的是可修改Set
    public Set<Long> getUsers(){
        //返回禁止被修改的set列表,外部只能进行读取操作
        return Collections.unmodifiableSet(users);
    }

    public void addUser(Long userId){
        this.users.add(userId);
    }
}对于一个普通的Set<Long>类型users,我们可以用@ElementCollection来指定这个Set是集合类型的,另外,因为默认集合都是LAZY加载,我们要强制指定为EAGER加载。最后我们可以用@CollectionTable和@Column来强行指定默认的命名。默认没有这两个字段的时候,会产生sales_order_users表,以及sales_order_users表下的sales_order_id列与user列
当我们有了@ElementCollection类型以后,我们对Set类型的添加和修改操作,JPA会自动进行脏检查,进行对应的insert与delete的SQL操作,我们不需要额外干预。
5.2 List集合
package spring_test.business;

import lombok.AllArgsConstructor;
import lombok.Getter;
import lombok.ToString;
import org.hibernate.annotations.BatchSize;
import org.hibernate.annotations.Fetch;
import org.hibernate.annotations.FetchMode;

import javax.persistence.*;
import java.math.BigDecimal;
import java.util.ArrayList;
import java.util.Collections;
import java.util.List;

/**
 * Created by fish on 2021/4/19.
 */
@Entity
@ToString
@Getter
public class PurchaseOrder {
    //List嵌入对象的时候,要用Embeddable,且必须为static class
    @Embeddable
    @ToString
    protected static class Item {
        private Long itemId;

        private BigDecimal price;

        private BigDecimal amount;

        private BigDecimal total;

        protected Item(){

        }

        public Item(Long itemId,BigDecimal price,BigDecimal amount){
            this.itemId = itemId;
            this.price = price;
            this.amount = amount;
            this.total = this.price.multiply(this.amount);
        }

        public BigDecimal getTotal(){
            return this.total;
        }
    }

    @Id
    @GeneratedValue
    private Long id;

    //会生成items_order列,作为排序的依据
    //默认为Join拉取,要改为SELECT拉取,才能避免笛卡尔积
    //不要用SUBSELECT,会产生嵌套子查询复制原sql的问题
    @ElementCollection(fetch = FetchType.EAGER)
    @BatchSize(size=1000)
    @Fetch(FetchMode.SELECT)
    @OrderColumn
    private List<Item> items = new ArrayList<>();

    private BigDecimal total = new BigDecimal("0");

    public PurchaseOrder(){

    }

    public void addItem(Long itemId,BigDecimal price,BigDecimal amount){
        Item newItem = new Item(itemId,price,amount);
        this.items.add(newItem);
        this.total = this.total.add(newItem.getTotal());
    }

    public void remove(int index){
        //删除的时候会生成多个sql
        //第一个sql为删除所在行
        //第二个sql为给后面的行的orderColumn减去1
        this.items.remove(index);
    }

    public List<Item> getItems(){
        return Collections.unmodifiableList(this.items);
    }
}我们也可以用List集合,@OrderColumn会产生一个items_order列,来标记每个记录的顺序,保证下次取出的时候也会保持原来的顺序,相当省事和重要。另外,注意Item必须要用@Embeddable注解,并且是static class的类型。
最后,由于有items_order列来标记记录的顺序,所以当你删除头部数据的时候,会产生多条SQL。首先会delete一行,然后会update后面的多个行。
5.3 Map集合
package spring_test.business;

import lombok.AllArgsConstructor;
import lombok.Getter;
import lombok.ToString;
import org.hibernate.annotations.BatchSize;
import org.hibernate.annotations.Fetch;
import org.hibernate.annotations.FetchMode;

import javax.persistence.*;
import java.math.BigDecimal;
import java.util.HashMap;
import java.util.Map;

/**
 * Created by fish on 2021/4/19.
 */
@Entity
@ToString
@Getter
public class MaterialStockOrder {
    @Embeddable
    @ToString
    @Getter
    public static class Material{
        private Long materialId;

        private BigDecimal amount;

        private Long unitId;

        protected Material(){

        }

        public Material(Long materialId,BigDecimal amount,Long unitId){
            this.materialId = materialId;
            this.amount = amount;
            this.unitId = unitId;
        }
    }

    @Id
    @GeneratedValue
    private Long id;

    //默认列名为items_key,可以用@MapKeyColumn注解修改
    @ElementCollection(fetch = FetchType.EAGER)
    @BatchSize(size=1000)
    @Fetch(FetchMode.SELECT)
    //@MapKeyColumn(name="key")
    private Map<Long,Material> items = new HashMap<>();

    private int itemSize;

    public MaterialStockOrder(){

    }

    public void removeItem(Long id){
        this.items.remove(id);
        this.itemSize = this.items.size();
    }

    public void addItem(Material material){
        this.items.put(material.getMaterialId(),material);
        this.itemSize = this.items.size();
    }
}
Map集合,默认Key的列名为items_key,我们可以用@MapKeyColumn注解来覆盖这个设定
5.4 Collection集合
package spring_test.business;

import lombok.AllArgsConstructor;
import lombok.Getter;
import lombok.ToString;
import org.hibernate.annotations.CollectionId;
import org.hibernate.annotations.Fetch;
import org.hibernate.annotations.FetchMode;
import org.hibernate.annotations.Type;

import javax.persistence.*;
import java.math.BigDecimal;
import java.util.ArrayList;
import java.util.Collection;

/**
 * Created by fish on 2021/4/20.
 */
@Entity
@ToString
@Getter
public class ItemStockOrder {
    @Embeddable
    @ToString
    @Getter
    @AllArgsConstructor
    public static class Item{
        private Long itemId;

        private BigDecimal amount;

        private String itemName;

        protected Item(){

        }
    }

    @Id
    @GeneratedValue(strategy = GenerationType.AUTO)
    private Long id;

    //Collection的主键可以设置为自增的
    //也可以自定义主键生成策略
    //Collection的主键是隐形的,所以每次数据更新的时候,Hibernate总是清空整个collection,再重新插入数据
    //注意插入的时候不是用insert values,而是用多个insert ... value (),然后用jdbc.batch_size来优化
    @ElementCollection(fetch = FetchType.EAGER)
    @Fetch(FetchMode.SELECT)
    //@CollectionId(columns = @Column(name="item_stock_order_item_id"),
    //    type=@Type(type="long"),
    //    generator = "global_identity")
    private Collection<Item> items = new ArrayList<>();

    public ItemStockOrder(){

    }

    public void addItem(Item item){
        this.items.add(item);
    }

    public void removeItem(Item item){this.items.remove(item);}

    public void removeFirst(){
        if( this.items.size() != 0){
            this.items.remove(this.items.iterator().next());
        }
    }

    public void clearItem(){this.items.clear();}
}
Collection集合的特点是,它总是有一个CollectionId的自增列。另外,Collection的脏检查相当暴力,总是清除原来的所有数据,然后重新insert新数据。
5.5 原则
5.5.1 原理
原理:
- JPA的集合自动生成SQL依赖于各个集合的脏检查机制,当集合的地址发生变化时,它总是认为数据已经全部变化了,所以不要试图将新的集合赋值到原来的集合上。
- 不同集合的脏检查机制不同,要了解它的变化,也要理解生成的SQL是怎样的。
5.5.2 集合注解
在使用集合的时候,我们有以下原则:
- fetch必须指定为eager方式,不能指定为lazy方式。因为懒加载在脱离了@Transciation以后就无法加载了,而且站在DDD的角度,如果使用懒加载来加载一个聚合根的其他实体,那么这个聚合根是不合理的(聚合根太大,也缺乏内聚性),你应该切分为多个聚合根。
- 必须指定BatchSize,当然你也可以在JPA配置文件中全局指定。没有BatchSize的加载会产生N+1的问题,严重拉低性能
- 必须指定SELECT的加载方式,SUBSELECT会产生子查询的问题,复杂查询时会产生问题。JOIN加载会产生冗余的笛卡尔积(当一个实体有多个集合时,JOIN查询产生的加载会造成数据集过大而且大幅冗余浪费)的问题。
- Map的key,Set的内容,都必须使用基础类型,Int,Long或者String,尽可能避免自己新建的类型,否则坑很多。
5.5.3 全局配置
#每个请求一条数据库连接,并不建议用,当遇到第三方外部请求时,会拖垮数据库连接资源
#spring.jpa.open-in-view=true

#开启在非事务位置,打开lazy_load,不建议用,会产生N+1问题
#spring.jpa.properties.hibernate.enable_lazy_load_no_trans=true

#https://prasanthmathialagan.wordpress.com/2017/04/20/beware-of-hibernate-batch-fetching,关键问题
#default_batch_fetch_size描述的是OneToMany,和ManyToMany的时候,单次批量拉取的数量,越大越好,但是会占用多一点内存,这是解决N+1问题的关键
#https://blog.csdn.net/weixin_30484739/article/details/94986283
#batch_fetch_style为LEGACY的时候,固定的SQL参数数量,总是为分裂为多条SQL执行,39条数据用14+14+10+1的方法拉取
#batch_fetch_style为PADDED的时候,会用固定填充的方法拉取,39条数据用14+14+14(填充3个)的方法拉取
#batch_fetch_style为DYNAMIC的时候,会用动态填充参数的方法拉取,39条数据用1次39条的方法拉取
spring.jpa.properties.hibernate.batch_fetch_style = DYNAMIC
spring.jpa.properties.hibernate.default_batch_fetch_size=1000

#https://blog.csdn.net/seven_3306/article/details/9303879
#读取数据的时候,使用游标读取,每次fetch_size为50条数据.
#在mysql中,不设置fetch_size就会每次一次性拉数据,其实问题也不大.
#spring.jpa.properties.hibernate.jdbc.fetch_size = 50

#https://github.com/JavaWiz/sb-jpa-batch-insert
#写入数据的时候,可以将多条SQL语句合并一次性发送给服务器,这个参数就是batch_size,可以大幅提高写入效率,减少数据库与应用层的网络来回次数
spring.jpa.properties.hibernate.jdbc.batch_size = 30

#按照不同的表,将表排序后,将同一个表的数据批量提交,这个意义比较大,建议打开
#https://www.baeldung.com/jpa-hibernate-batch-insert-update#:~:text=Batch%20Insert%2FUpdate%20with%20Hibernate%2FJPA%201%20Overview.%20In%20this,7%20%40Id%20Generation%20Strategy.%20...%208%20Summary.%20
spring.jpa.properties.hibernate.order_inserts = true

#按照批量更新行的主键进行排序,这样能有效避免高并发下的死锁,超高并发才有意义
#spring.jpa.properties.hibernate.order_updates=true
JPA配置文件的全局配置项如上
6 关联
JPA的关联是噩梦之源,我们应该尽可能避免使用关联机制。代码在这里。JPA关联机制的问题在于:
- 需要仔细知道谁是关系的写入端,谁是关系的读取端。JPA根据写入端进行脏检查,读取端需要开发者仔细手动维护。开发者在写入端写入后,如果忘了在读取端同步维护就会产生隐晦的bug。
- Cascade与orphalRemove机制复杂
6.1 单向无persist关系
package spring_test.business;

import org.hibernate.annotations.Proxy;

import javax.persistence.Entity;
import javax.persistence.GeneratedValue;
import javax.persistence.GenerationType;
import javax.persistence.Id;

/**
 * Created by fish on 2021/4/22.
 */
@Entity
@Proxy(lazy=false)
public class People {
    @Id
    @GeneratedValue(strategy = GenerationType.AUTO)
    private Long id;

    private String name;

    protected  People(){

    }

    public People(String name){
        this.name = name;
    }
}
首先,我们声明一个People实体
package spring_test.business;

import lombok.ToString;

import javax.persistence.*;
import java.util.ArrayList;
import java.util.List;

/**
 * Created by fish on 2021/4/22.
 */
@Entity
@ToString
public class Country {
    @Id
    @GeneratedValue(strategy = GenerationType.AUTO)
    private Long id;

    private String name;

    //OneToMany额外的@JoinColumn字段指定了peopleList是在关系的写入端
    @OneToMany(fetch = FetchType.LAZY)
    @JoinColumn(name = "country_id")
    private List<People> peopleList = new ArrayList<>();

    protected Country(){

    }

    public Country(String name){
        this.name = name;
    }

    public void addPeople(People people){
        this.peopleList.add(people);
    }
}然后我们使用@OneToMany来包含这个People类型,但是注意,People实体里面并没有对Country引用的字段。由于@OneToMany中包含了@JoinColumn的字段,所以Country是对peopleList这段关系的写入端,people没有对Country的读取端。
@Transactional
public void add1(){
    //org.hibernate.TransientObjectException: object references an unsaved transient instance
    //这个测试会报出以上的异常,因为people加进了Country里面,但是people没有进行persist操作
    //Country的List检查到了添加People的操作,但是People自身没有进行persist
    Country country = new Country("中国");
    countryRepository.add(country);

    People people1 = new People("fish");
    People people2 = new People("cat");
    country.addPeople(people1);
    country.addPeople(people2);
}
以上测试代码会报错,因为People是一个实体,而不是嵌入类,在提交的时候,必须要将people持久化了以后放入people_list里面才能进行有效的脏检查。
@Transactional
public void add2(){
    //这样就正确了,不仅需要添加进country,会要对people自身进行persist操作
    //但是,报错了这个错误Field 'country_id' doesn't have a default value,因为People缺少country_id的字段
    Country country = new Country("中国");
    countryRepository.add(country);

    People people1 = new People("fish");
    People people2 = new People("cat");
    peopleRepository.add(people1);
    peopleRepository.add(people2);
    country.addPeople(people1);
    country.addPeople(people2);
}
我们对放入到people_list里面放入已经持久化的People,依然会报错。因为People是一个实体,已经被外部persist了。脏检查的时候发现它是新增的数据,同时已经被持久化了,所以country就会忽略它,没有设置它的country_id字段,导致插入数据库的时候,这个字段为空,报错了。
从中,我们可以看出,脏检查发现该数据是新增的时候,流程为:
- 如果该集合元素是Embeddable,那么肯定由父实体执行insert操作
- 如果该集合元素是Entity,没有cascade的时候,只能由子实体(元素Entity自身)来执行insert操作。父集合无法在插入的时候修改它的字段。
- 如果该集合元素是Entity,有cascade的时候,由父实体执行insert操作。
最终,我们从add1与add2的两个实验得出结论,如果要实现单向的一对多关系,集合必须加上cascade属性,表明由父实体来执行persist操作,而不是由子实体来执行persist操作。
6.2 单向有cascade关系
package spring_test.business;

import lombok.ToString;

import javax.persistence.*;
import java.util.ArrayList;
import java.util.List;

/**
 * Created by fish on 2021/4/22.
 */
@Entity
@ToString
public class Country4 {
    @Id
    @GeneratedValue(strategy = GenerationType.AUTO)
    private Long id;

    private String name;

    //OneToMany额外的@JoinColumn字段指定了peopleList是在关系的写入端
    @OneToMany(fetch = FetchType.EAGER,cascade = CascadeType.ALL)
    @JoinColumn(name = "country_id",nullable = false)
    private List<People4> peopleList = new ArrayList<>();

    protected Country4(){

    }

    public Country4(String name){
        this.name = name;
    }

    public void addPeople(People4 people){
        this.peopleList.add(people);
    }
}
我们创建一个Country4的类,这次,除了有@JoinColumn注解以外,还有cascade与nullable的属性,没有这两个属性会报错。
package spring_test.business;

import lombok.Getter;
import lombok.ToString;
import org.hibernate.annotations.Proxy;

import javax.persistence.Entity;
import javax.persistence.GeneratedValue;
import javax.persistence.GenerationType;
import javax.persistence.Id;

/**
 * Created by fish on 2021/4/22.
 */
@Entity
@ToString
@Getter
public class People4 {
    @Id
    @GeneratedValue(strategy = GenerationType.AUTO)
    private Long id;

    private String name;

    protected  People4(){

    }

    public People4(String name){
        this.name = name;
    }
}
People4的定义与原来一样
package spring_test;

import lombok.extern.slf4j.Slf4j;
import org.springframework.aop.framework.AopContext;
import org.springframework.beans.factory.annotation.Autowired;
import org.springframework.stereotype.Component;
import org.springframework.transaction.annotation.Transactional;
import spring_test.business.Country;
import spring_test.business.Country4;
import spring_test.business.People4;
import spring_test.infrastructure.Country4Repository;
import spring_test.infrastructure.CountryRepository;
import spring_test.infrastructure.People4Repository;
import spring_test.infrastructure.PeopleRepository;

import java.util.List;

/**
 * Created by fish on 2021/4/22.
 */
@Component
@Slf4j
public class OneWayWithCascadeTest {
    @Autowired
    private Country4Repository countryRepository;

    @Autowired
    private People4Repository peopleRepository;

    @Transactional
    public void clearAll() {
        countryRepository.clearAll();
        peopleRepository.clearAll();
    }

    public void showAll() {
        List<Country4> countryList = countryRepository.getAll();
        log.info("all country {} ", countryList);

        List<People4> peopleList = peopleRepository.getAll();
        log.info("all people {} ", peopleList);
    }

    @Transactional
    public void add1() {
        Country4 country = new Country4("中国");
        countryRepository.add(country);

        People4 people1 = new People4("fish");
        People4 people2 = new People4("cat");
        country.addPeople(people1);
        country.addPeople(people2);
    }

    public void go() {
        OneWayWithCascadeTest app = (OneWayWithCascadeTest) AopContext.currentProxy();

        app.clearAll();
        app.add1();
        app.showAll();
    }
}
这次测试就相当简单了,直接插入country的people_list集合,JPA会自动对People4实体进行persist操作,而且People4实体虽然没有显式的country_id字段,JPA也会帮我们自动设置。
注意,这种方法可行,最终是归结于,我们将country与people看成是组合关系了,由country来决定people的生命周期,当people插入country_list的时候,我们就对people执行persist。当people移出country_list的时候,我们就对people执行delete。
但是,大部分情况下,country与people并不是组合关系,而是关联关系。因为people是独立存在的,不能因为country没有了这个people就对他执行删除操作,因为people可能是无国籍的浪荡人物呀。
6.3 双向无persist关系
在JPA中,要表达关联关系,你必须使用双向的一对多,多对一映射。
package spring_test.business;

import lombok.ToString;

import javax.persistence.*;
import java.util.ArrayList;
import java.util.List;

/**
 * Created by fish on 2021/4/22.
 */
@Entity
@ToString
public class Country2 {
    @Id
    @GeneratedValue(strategy = GenerationType.AUTO)
    private Long id;

    private String name;

    //mappedBy字段指定了peopleList字段处于只读端,与触发添加与删除people无关
    @OneToMany(fetch = FetchType.EAGER,mappedBy = "country2")
    private List<People2> peopleList = new ArrayList<>();

    protected Country2(){

    }

    public Country2(String name){
        this.name = name;
    }

    public void addPeople(People2 people){
        this.peopleList.add(people);
    }
}
首先创建一个Country2类,然后集合peopleList使用mappedBy来描述对方的关系,注意,mappedBy指的是People2的country2属性。这种写法意味着,peopleList仅仅是该关系的读取端,不是写入端。
package spring_test.business;

import lombok.ToString;

import javax.persistence.*;

/**
 * Created by fish on 2021/4/22.
 */
@Entity
//必须去掉country2的toString,否则会造成死循环
@ToString(exclude = "country2")
public class People2 {
    @Id
    @GeneratedValue(strategy = GenerationType.AUTO)
    private Long id;

    private String name;

    //ManyToOne默认含有的@JoinColumn指定了这个是关系的写入端
    @ManyToOne(fetch = FetchType.EAGER)
    private Country2 country2;

    protected  People2(){

    }

    public People2(String name){
        this.name = name;
    }

    public void setCountry(Country2 country){
        this.country2 = country;
    }
}
然后我们在People2上面新增一个country2属性,它意味着是这段关系的写入端。
package spring_test;

import lombok.extern.slf4j.Slf4j;
import org.springframework.aop.framework.AopContext;
import org.springframework.beans.factory.annotation.Autowired;
import org.springframework.stereotype.Component;
import org.springframework.transaction.annotation.Transactional;
import spring_test.business.Country;
import spring_test.business.Country2;
import spring_test.business.People;
import spring_test.business.People2;
import spring_test.infrastructure.Country2Repository;
import spring_test.infrastructure.CountryRepository;
import spring_test.infrastructure.People2Repository;
import spring_test.infrastructure.PeopleRepository;

import java.util.List;

/**
 * Created by fish on 2021/4/22.
 */
@Component
@Slf4j
public class TwoWayNoPersistTest {
    @Autowired
    private Country2Repository countryRepository;

    @Autowired
    private People2Repository peopleRepository;

    @Transactional
    public void clearAll(){
        countryRepository.clearAll();
        peopleRepository.clearAll();
    }

    public void showAll(){
        List<Country2> countryList = countryRepository.getAll();
        log.info("all country {} ",countryList);

        List<People2> peopleList = peopleRepository.getAll();
        log.info("all people {} ",peopleList);
    }

    @Transactional
    public void add1(){
        //现在Country是只读端,即使写入的时候添加了people进去,也不会触发peopleList的添加
        //Country里面的PeopleList仅仅只是触发读取时的行为
        Country2 country = new Country2("中国");
        countryRepository.add(country);

        People2 people1 = new People2("fish");
        People2 people2 = new People2("cat");
        country.addPeople(people1);
        country.addPeople(people2);

        //这个例子最终的结果是,country里面的peopleList依然是空的,并且没有触发people1和people2的insert操作
    }

    public void go1(){
        TwoWayNoPersistTest app = (TwoWayNoPersistTest) AopContext.currentProxy();

        app.clearAll();
        app.add1();

        app.showAll();
    }

    @Transactional
    public void add2(){
        //Country是只读端,而People是写入端
        Country2 country = new Country2("中国");
        countryRepository.add(country);

        //我们将people进行persist以后,只是得到了people的id
        People2 people1 = new People2("fish");
        People2 people2 = new People2("cat");
        peopleRepository.add(people1);
        peopleRepository.add(people2);

        //将people写入到内存的country,仅仅是为了让内存的country拥有了这个people而已
        //写入端的people里面的country字段依然为null,因此JPA并不认为,people需要指向Country
        country.addPeople(people1);
        country.addPeople(people2);

        //这个例子最终的结果是,country里面的peopleList依然是空的,并且触发了people1和people2的insert操作
        //但是people1与people2的country字段依然为null,下次读取的country依然为空
    }

    public void go2(){
        TwoWayNoPersistTest app = (TwoWayNoPersistTest) AopContext.currentProxy();

        app.clearAll();
        app.add2();
        app.showAll();
    }

    @Transactional
    public void add3(){
        //Country是只读端,而People是写入端
        Country2 country = new Country2("中国");
        countryRepository.add(country);

        //我们将people进行persist以后,只是得到了people的id
        People2 people1 = new People2("fish");
        People2 people2 = new People2("cat");


        //正确的方法,我们需要设置三个地方,
        //* persist(people)
        //* people的setCountry
        //* country的addPeople
        //这个就是JPA中最为迷惑和容易出错的地方,缺少任意一个,我们都会出错
        peopleRepository.add(people1);
        peopleRepository.add(people2);
        country.addPeople(people1);
        country.addPeople(people2);
        people1.setCountry(country);
        people2.setCountry(country);
    }

    public void go3(){
        TwoWayNoPersistTest app = (TwoWayNoPersistTest) AopContext.currentProxy();

        app.clearAll();
        app.add3();
        app.showAll();
    }

    public void go(){
        //go1();

        //go2();

        go3();
    }
}
留意上面的add1,add2与add3的实现。它说明着,要正确地使用这段关系需要满足:
- 对新增的people进行persist操作
- 对写入端的people进行setCountry操作,这里决定了写入到数据库的结果
- 对读取端的country进行add操作
每一步都不能缺少,否则会出错。这就是JPA在关联实现里面的迷惑之处,要新增一段关系需要记住修改三个地方。在普通的SQL操作,我们依赖于直接对people的country_id的字段写入即可,仅仅修改一处。
6.4 双向有persist关系
代码在这里
它说明了,为啥用双向+cascade来实现是不对的,它依然会有可能产生隐晦bug的问题。
6.5 原则
- 尽可能不使用JPA的关联机制,除非是在Immutable的实体上。
- 组合关系尽可能使用@Embeddable,多重组合关系时就需要使用单向+cascade+nullable的写法来委婉表达。用关联来模拟组合@OneToMany,与@Embeddable的区别在于,关联有固定的id字段,而且脏检查也不同。
- 关联关系就直接用Long字段表达,不要用JPA的@ManyToOne与@OneToMany来表达,只会产生更多复杂性。
- 尽可能用单向的关系,万不得已不要使用双向关系。写入端一般只需要单向关系。当需要双向关系的时候你就重建一个@Immutable的实体。
7 多对多关联
多对多关联,是一种较少用到的关联模式。我们在第6节已经探讨过,无论是一对多,还是多对多的关联关系应该是用Long来表达,而不是用JPA的@OneToMany和@ManyToMany来表达。只有当组合关系的时候,我们才会提倡用@ElementCollection和@OneToMany来表达。
同理,@ManyToMany机制应该是表达一种类似组合关系的时候才应该使用。像人与人之间关注关系,国家与国家之间的盟友关系,都不应该使用@ManyToMany的机制。
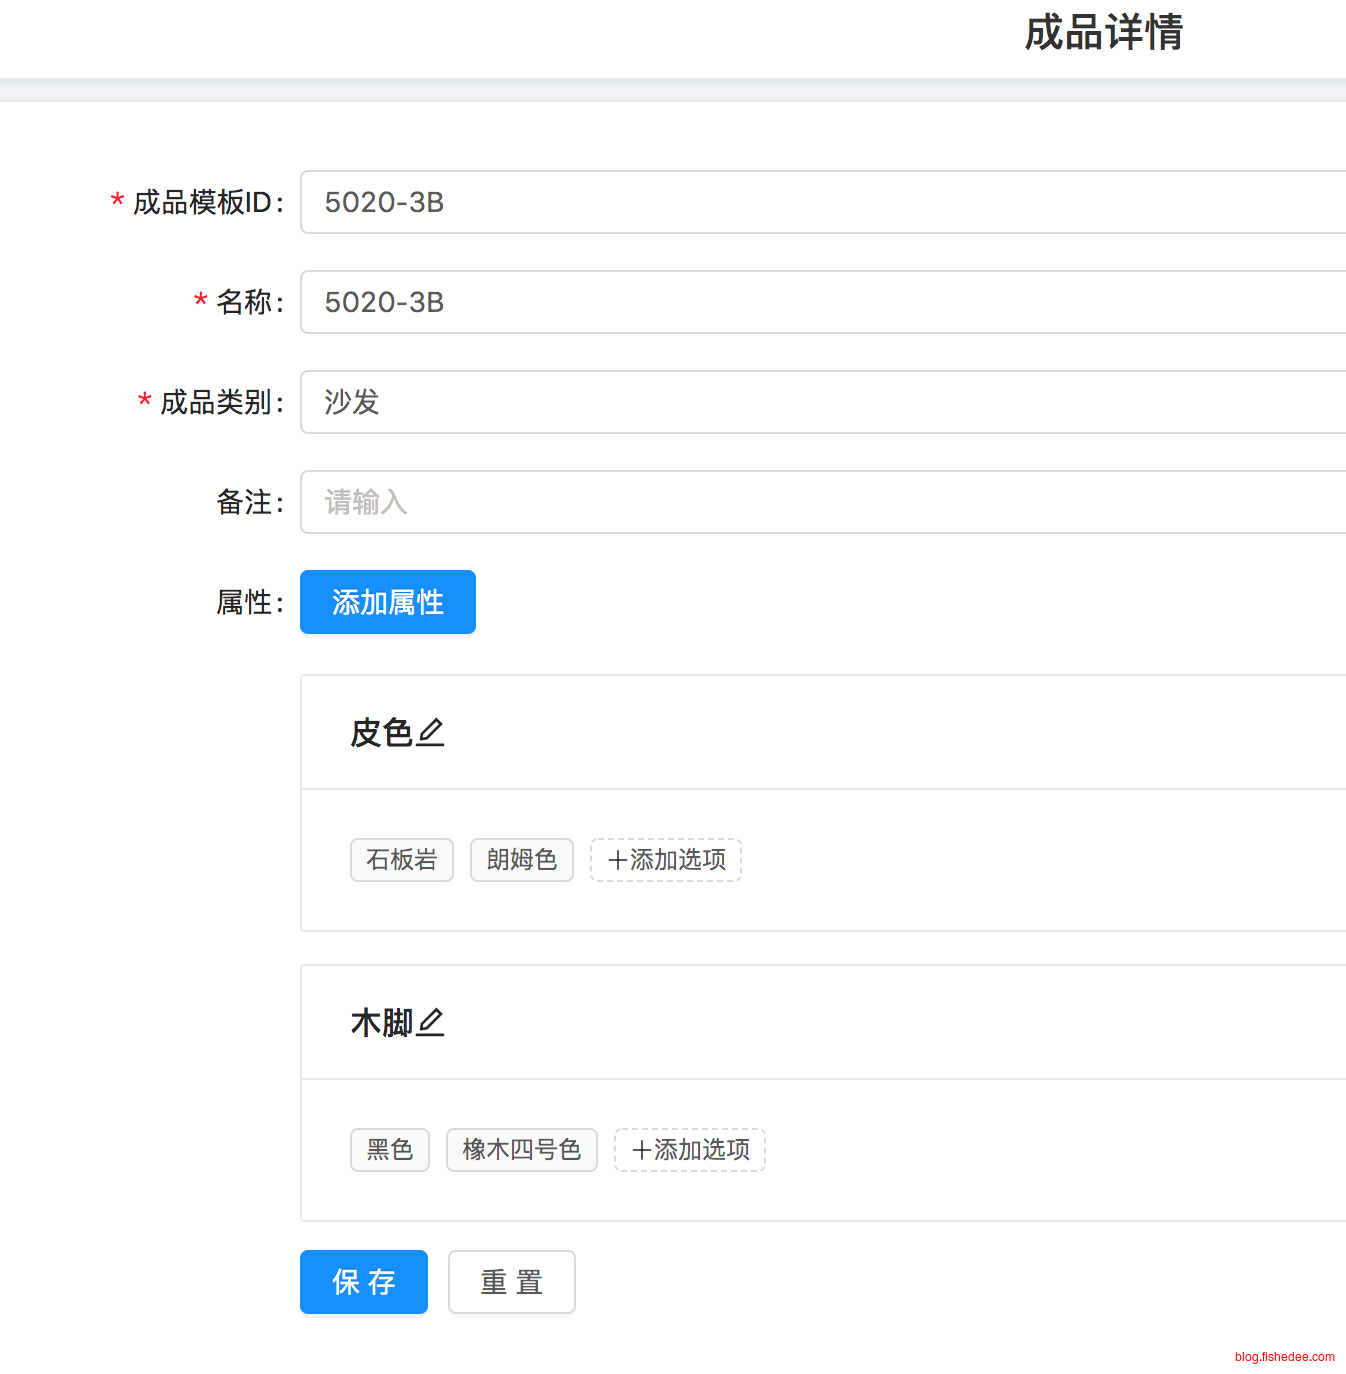
例如,像上面的这个页面,一个成品下包含多个属性,一个属性下包含多个选项,我们会显然使用组合关系。但是组合关系只能两级,所以我们改用@OneToMany来模拟表达这种组合关系。后来,需求发生变化,客户希望多个成品可以直接引用同一类的属性,这样就能避免重复输入。这个时候,显然一个成品可以对应多个属性,而一个属性也可以对应多个成品。成品与属性之间成为了多对多的关系,并且这种关系是类似组合的关系。
我们探讨一下,在这种情况下,怎么用JPA机制来表达。
代码在这里
7.1 双向多对多
package spring_test.business;

import lombok.Getter;
import lombok.ToString;
import org.hibernate.annotations.Fetch;
import org.hibernate.annotations.FetchMode;
import org.hibernate.annotations.Proxy;

import javax.persistence.*;
import java.util.ArrayList;
import java.util.Collections;
import java.util.List;

/**
 * Created by fish on 2021/4/22.
 */
@Entity
@ToString(exclude = "countryList")
@Getter
public class People {
    @Id
    @GeneratedValue(strategy = GenerationType.AUTO)
    private Long id;

    private String name;

    @ManyToMany(fetch = FetchType.EAGER,mappedBy = "peopleList")
    @Fetch(FetchMode.SELECT)
    private List<Country> countryList = new ArrayList<>();

    protected  People(){

    }

    public People(String name){
        this.name = name;
    }

    public List<Country> getCountryList(){
        return Collections.unmodifiableList(this.countryList);
    }
    public List<Country> dangerous_getCountryList(){
        return this.countryList;
    }
}
像一对多关系一样,多对多关系做双向的时候,只有一端是写入端,另外一端是读取端。People实体就是对Country关系的读取端,因为它用的是mappedBy属性。
package spring_test.business;

import lombok.Getter;
import lombok.ToString;
import org.hibernate.annotations.Fetch;
import org.hibernate.annotations.FetchMode;

import javax.persistence.*;
import java.util.ArrayList;
import java.util.List;

/**
 * Created by fish on 2021/4/22.
 */
@Entity
@ToString
@Getter
public class Country {
    @Id
    @GeneratedValue(strategy = GenerationType.AUTO)
    private Long id;

    private String name;

    //因为是多对多关联,所以你不应该加orphalRemove,和cascade为remove的设置。
    // 一个people可以隶属于多个country的。不能因为某个country不要这个people,就去把这个people删除掉
    @ManyToMany(fetch = FetchType.EAGER,cascade = CascadeType.PERSIST)
    @Fetch(FetchMode.SELECT)
    @JoinTable(
        name="country_people",
        joinColumns = @JoinColumn(name="country_id"),
        inverseJoinColumns = @JoinColumn(name="people_id")
    )
    @OrderColumn(name="people_order")//允许使用OrderColumn
    private List<People> peopleList = new ArrayList<>();

    protected Country(){

    }

    public Country(String name){
        this.name = name;
    }

    public void addPeople(People people){
        this.peopleList.add(people);

        //双向关系的补,关系读端的手动数据同步
        people.dangerous_getCountryList().add(this);
    }

    public void removePeopleIndex(int index){
        People people = this.peopleList.get(index);
        this.peopleList.remove(index);
        people.dangerous_getCountryList().remove(this);
    }
}
而Country对People的引用,就是关系的写入端。注意,我们用了List来表达这个关系,并且用@JoinTable来引入关系的中间表。另外,addPeople和removePeople的时候,都随手更新读取端的数据。
package spring_test;

import lombok.extern.java.Log;
import lombok.extern.slf4j.Slf4j;
import org.springframework.aop.framework.AopContext;
import org.springframework.beans.factory.annotation.Autowired;
import org.springframework.stereotype.Component;
import spring_test.business.Country;
import spring_test.business.People;
import spring_test.infrastructure.CountryRepository;
import spring_test.infrastructure.PeopleRepository;

import javax.transaction.TransactionScoped;
import javax.transaction.Transactional;
import java.util.List;

@Component
@Slf4j
public class TwoWayManyToManyTest {

    @Autowired
    private CountryRepository countryRepository;

    @Autowired
    private PeopleRepository peopleRepository;

    @Transactional
    public Long addCountry(String name){
        Country country = new Country(name);
        this.countryRepository.add(country);
        return country.getId();
    }

    @Transactional
    public void addExistPeopleToCountry(Long peopleId,Long countryId){
        People people = this.peopleRepository.find(peopleId);
        Country country = this.countryRepository.find(countryId);
        country.addPeople(people);
    }

    @Transactional
    public void addNewPeopleToCountry(String name,Long countryId){
        People people = new People(name);
        Country country = this.countryRepository.find(countryId);
        country.addPeople(people);
    }

    @Transactional
    public void removeCountryPeople(Long countryId,int index){
        Country country = this.countryRepository.find(countryId);

        country.removePeopleIndex(index);
    }

    @Transactional
    public Long addPeople(String name){
        People people = new People(name);
        this.peopleRepository.add(people);
        return people.getId();
    }

    public void printCountry(Long id){
        //因为是双向映射,每次读取Country都需要经过三个select
        //第一个读取国家
        /*
    select
        country0_.id as id1_0_0_,
        country0_.name as name2_0_0_
    from
        country country0_
    where
        country0_.id=?
         */
        //第二个读取国家关联的people
        /*
    select
        peoplelist0_.country_id as country_1_1_1_,
        peoplelist0_.people_id as people_i2_1_1_,
        peoplelist0_.people_order as people_o3_1_,
        people1_.id as id1_2_0_,
        people1_.name as name2_2_0_
    from
        country_people peoplelist0_
    inner join
        people people1_
            on peoplelist0_.people_id=people1_.id
    where
        peoplelist0_.country_id=?
         */
        //第三个读取people关联的国家,反向关联
        /*
    select
        countrylis0_.people_id as people_i2_1_1_,
        countrylis0_.country_id as country_1_1_1_,
        country1_.id as id1_0_0_,
        country1_.name as name2_0_0_
    from
        country_people countrylis0_
    inner join
        country country1_
            on countrylis0_.country_id=country1_.id
    where
        countrylis0_.people_id=?
         */
        Country country = this.countryRepository.find(id);
        log.info("country id:{} country:{}",id,country);
    }

    public void printPeople(Long id){
        People people = this.peopleRepository.find(id);
        log.info("people id:{} people:{} countryList:{}",id,people,people.getCountryList());
    }

    public void go(){
        TwoWayManyToManyTest app = (TwoWayManyToManyTest) AopContext.currentProxy();

        //添加Country
        log.info("new country");
        Long countryId1 = app.addCountry("中国");
        Long countryId2 = app.addCountry("韩国");

        app.printCountry(countryId1);
        app.printCountry(countryId2);


        //新建People到Country
        log.info("addNewPeopleToCountry");
        app.addNewPeopleToCountry("李雷",countryId1);
        app.addNewPeopleToCountry("韩梅",countryId1);
        app.printCountry(countryId1);


        //沿用已有的People到Country
        log.info("addExistPeopleToCountry");
        Long people1 = app.addPeople("张三");
        Long people2 = app.addPeople("李四");
        app.addExistPeopleToCountry(people1,countryId1);
        app.addExistPeopleToCountry(people2,countryId1);
        app.addExistPeopleToCountry(people2,countryId2);
        app.printCountry(countryId1);
        app.printCountry(countryId2);

        app.printPeople(people1);
        app.printPeople(people2);

        //删除
        log.info("removeCountryPeople");
        //执行两条sql,先删除第4条数据
        /*
        delete
        from
            country_people
        where
            country_id=?
            and people_order=?
         */
        //然后将第3条数据更新people_id
        /*
        update
            country_people
        set
            people_id=?
        where
            country_id=?
            and people_order=?
         */
        //注意,不会删除people的数据,自会删除关系表country_people的数据
        app.removeCountryPeople(countryId1,2);
        app.printCountry(countryId1);
        app.printPeople(people2);
    }
}
当我们添加一段关系的时候,相当简单,就是在Country里面调用addPeople方法。当移除这段关系的时候,我们就在Country里面调用removePeople的方法。addPeople的方法直接对集合操作就可以了,写代码的时候好像就不需要知道中间表country_people的存在,就能维护了多对多的关系,实在方便。
我们不能做的就是,在People里面直接删除Country,这样是不对的。因为People对Country的引用是读取端,JPA不会对这个集合进行脏检查,更不会由此产生对应的SQL语句。双向关系的读取端的使用,仅仅是方便我们在拿到People实体以后,导航到它所在的Country实体而已,而且读取端的集合数据JPA不会帮我们维护,我们必须要自己手动维护,这一点我们在第6节已经看到了。
最后,我们注意产生的SQL,对一个Country的读取操作反复了查询了三次数据库。另外一方面,由于我们只是要实现类似组合的关系,我们是不需要从People导航Country的选择,所以,我们更需要的是单向的多对多关系。
7.2 单向多对多
package spring_test.business;

import lombok.Getter;
import lombok.ToString;
import org.hibernate.annotations.Fetch;
import org.hibernate.annotations.FetchMode;
import org.hibernate.annotations.Proxy;

import javax.persistence.*;
import java.util.ArrayList;
import java.util.Collections;
import java.util.List;

/**
 * Created by fish on 2021/4/22.
 */
@Entity
@ToString
@Getter
public class People2 {
    @Id
    @GeneratedValue(strategy = GenerationType.AUTO)
    private Long id;

    private String name;

    protected  People2(){

    }

    public People2(String name){
        this.name = name;
    }
}
建立一个People2实体,没有对Country的引用。
package spring_test.business;

import lombok.Getter;
import lombok.ToString;
import org.hibernate.annotations.Fetch;
import org.hibernate.annotations.FetchMode;

import javax.persistence.*;
import java.util.ArrayList;
import java.util.List;

/**
 * Created by fish on 2021/4/22.
 */
@Entity
@ToString
@Getter
public class Country2 {
    @Id
    @GeneratedValue(strategy = GenerationType.AUTO)
    private Long id;

    private String name;

    //因为是多对多关联,所以你不应该加orphalRemove,和cascade为remove的设置。
    // 一个people可以隶属于多个country的。不能因为某个country不要这个people,就去把这个people删除掉
    @ManyToMany(fetch = FetchType.EAGER,cascade = CascadeType.PERSIST)
    @Fetch(FetchMode.SELECT)
    @JoinTable(
            name="country_people2",
            joinColumns = @JoinColumn(name="country_id"),
            inverseJoinColumns = @JoinColumn(name="people_id")
    )
    //没指名列名的话,列名就是people_list_order
    @OrderColumn
    private List<People2> peopleList = new ArrayList<>();

    protected Country2(){

    }

    public Country2(String name){
        this.name = name;
    }

    public void addPeople(People2 people){
        this.peopleList.add(people);
    }

    public void removePeopleIndex(int index){
        this.peopleList.remove(index);
    }
}
Country2的代码没变,我们也不再需要维护读取端,代码干净整洁。
package spring_test;

import lombok.extern.java.Log;
import lombok.extern.slf4j.Slf4j;
import org.springframework.aop.framework.AopContext;
import org.springframework.beans.factory.annotation.Autowired;
import org.springframework.stereotype.Component;
import spring_test.business.Country2;
import spring_test.business.People2;
import spring_test.infrastructure.Country2Repository;
import spring_test.infrastructure.CountryRepository;
import spring_test.infrastructure.People2Repository;
import spring_test.infrastructure.PeopleRepository;

import javax.transaction.TransactionScoped;
import javax.transaction.Transactional;
import java.util.List;

@Component
@Slf4j
public class OneWayManyToManyTest {

    @Autowired
    private Country2Repository countryRepository;

    @Autowired
    private People2Repository peopleRepository;

    @Transactional
    public Long addCountry(String name){
        Country2 country = new Country2(name);
        this.countryRepository.add(country);
        return country.getId();
    }

    @Transactional
    public void addExistPeopleToCountry(Long peopleId,Long countryId){
        People2 people = this.peopleRepository.find(peopleId);
        Country2 country = this.countryRepository.find(countryId);
        country.addPeople(people);
    }

    @Transactional
    public void addNewPeopleToCountry(String name,Long countryId){
        People2 people = new People2(name);
        Country2 country = this.countryRepository.find(countryId);
        country.addPeople(people);
    }

    @Transactional
    public void removeCountryPeople(Long countryId,int index){
        Country2 country = this.countryRepository.find(countryId);

        country.removePeopleIndex(index);
    }

    @Transactional
    public Long addPeople(String name){
        People2 people = new People2(name);
        this.peopleRepository.add(people);
        return people.getId();
    }

    public void printCountry(Long id){
        //因为是双向映射,每次读取Country都需要经过2个select
        //第一个读取国家
        /*
    select
        country2x0_.id as id1_1_0_,
        country2x0_.name as name2_1_0_
    from
        country2 country2x0_
    where
        country2x0_.id=?
         */
        //第二个读取国家关联的people
        /*
    select
        peoplelist0_.country_id as country_1_3_1_,
        peoplelist0_.people_id as people_i2_3_1_,
        peoplelist0_.people_list_order as people_l3_1_,
        people2x1_.id as id1_5_0_,
        people2x1_.name as name2_5_0_
    from
        country_people2 peoplelist0_
    inner join
        people2 people2x1_
            on peoplelist0_.people_id=people2x1_.id
    where
        peoplelist0_.country_id=?
         */
        Country2 country = this.countryRepository.find(id);
        log.info("country id:{} country:{}",id,country);
    }

    public void printPeople(Long id){
        People2 people = this.peopleRepository.find(id);
        log.info("people id:{} people:{}",id,people);
    }

    public void go(){
        OneWayManyToManyTest app = (OneWayManyToManyTest) AopContext.currentProxy();

        //添加Country
        log.info("new country");
        Long countryId1 = app.addCountry("中国");
        Long countryId2 = app.addCountry("韩国");

        app.printCountry(countryId1);
        app.printCountry(countryId2);


        //新建People到Country
        log.info("addNewPeopleToCountry");
        app.addNewPeopleToCountry("李雷",countryId1);
        app.addNewPeopleToCountry("韩梅",countryId1);
        app.printCountry(countryId1);


        //沿用已有的People到Country
        log.info("addExistPeopleToCountry");
        Long people1 = app.addPeople("张三");
        Long people2 = app.addPeople("李四");
        app.addExistPeopleToCountry(people1,countryId1);
        app.addExistPeopleToCountry(people2,countryId1);
        app.addExistPeopleToCountry(people2,countryId2);
        app.printCountry(countryId1);
        app.printCountry(countryId2);

        app.printPeople(people1);
        app.printPeople(people2);

        //删除
        log.info("removeCountryPeople");
        //执行两条sql,先删除第4条数据
        /*
        delete
        from
            country_people2
        where
            country_id=?
            and people_list_order=?
         */
        //然后将第3条数据更新people_id
        /*
        update
            country_people2
        set
            people_id=?
        where
            country_id=?
            and people_list_order=?
         */
        app.removeCountryPeople(countryId1,2);
        app.printCountry(countryId1);
        app.printPeople(people2);
    }
}
测试的代码和刚才的一样,基本没变。这个时候,对一个Country的读取下降到只需要2条SQL,比刚才少了1条SQL,因为没有读取端的关系了。
到这里,几乎能解决大部分的场景。但是,用户有更进一步的需求,它希望维护创建这个多对多关系的时候是由哪个用户触发的。例如,成品1关联到属性2,那么这个关联操作是谁触发的?
在刚才的单向多对多关系的时候,我们写代码时感觉不到中间表的存在,那是因为JPA帮我们维护了。但是,在这个需求中,显然谁触发这段关系需要一个用户字段,而这个用户字段是需要存放在中间表里面的。也就是说,在部分场景中,我们需要显式使用这个中间表来维护这段多对多的关系。
JPA默认没有提供这样的机制,但是我们可以模拟一下,因为我们只需要多对多的单向关系,那么能不能将Country与CountryPeople看成是一对多关系,然后CountryPeople与People看成是一对一关系,这样既显式展示了中间表,又维护了多对多关系。
7.3 模拟单向多对多
package spring_test.business;

import lombok.Getter;
import lombok.ToString;
import org.hibernate.annotations.Fetch;
import org.hibernate.annotations.FetchMode;

import javax.persistence.*;
import java.util.ArrayList;
import java.util.List;

@Entity
@ToString
@Getter
public class Category {
    @Id
    @GeneratedValue(strategy = GenerationType.AUTO)
    private Long id;

    private String name;

    protected Category(){

    }
    public Category(String name) {
        this.name = name;
    }
}
先新建一个Category,这个就是类似People的角色。
package spring_test.business;

import lombok.Getter;
import lombok.ToString;
import org.hibernate.annotations.Fetch;
import org.hibernate.annotations.FetchMode;

import javax.persistence.*;
import java.util.ArrayList;
import java.util.List;

@Entity
@ToString
@Getter
public class Item {
    @Id
    @GeneratedValue(strategy = GenerationType.AUTO)
    private Long id;

    private String name;

    //一对多映射的时候,@JoinColumn是指对方表的字段
    @OneToMany(fetch = FetchType.EAGER,cascade = CascadeType.ALL,orphanRemoval = true)
    @Fetch(FetchMode.SELECT)
    @OrderColumn
    @JoinColumn(name="item_id",nullable = false)
    private List<ItemCategory> categorys = new ArrayList<>();

    protected Item(){

    }
    public Item(String name){
        this.name = name;
    }

    public void addItemCategory(Category category,People2 people2){
        this.categorys.add(new ItemCategory(category,people2));
    }

    public void removeItemCategory(int index){
        this.categorys.remove(index);
    }

    public void setCategoryPeople2(int index,People2 people2){
        this.categorys.get(index).setPeople2(people2);
    }
}
创建一个Item实体,这次用@OneToMany来关联中间表
package spring_test.business;

import lombok.Getter;
import lombok.ToString;

import javax.persistence.*;

@Entity
@ToString
@Getter
public class ItemCategory {
    @Id
    @GeneratedValue(strategy = GenerationType.AUTO)
    private Long id;

    //一对一映射的时候,@JoinColumn就是指当前表的字段
    //OneToOne的optional为false,就是字段不能为null
    @OneToOne(optional = false,cascade = CascadeType.PERSIST)
    @JoinColumn(name="category_id")
    private Category category;

    //OneToOne的optional为true,就是字段可以为null,默认值为true,就是可以为null。
    @OneToOne(optional = true)
    @JoinColumn(name="people2_id")
    private People2 people2;

    protected ItemCategory(){

    }

    public ItemCategory(Category category,People2 people2){
        this.category = category;
    }

    public void setPeople2(People2 people2){
        this.people2 = people2;
    }

}
创建一个ItemCategory中间表,描述了这段多对多的关系。然后用@OneToOne来关联实际的Category实体。
package spring_test;

import lombok.extern.slf4j.Slf4j;
import org.springframework.aop.framework.AopContext;
import org.springframework.beans.factory.annotation.Autowired;
import org.springframework.stereotype.Component;
import spring_test.business.Category;
import spring_test.business.Item;
import spring_test.business.People2;
import spring_test.infrastructure.CategoryRepository;
import spring_test.infrastructure.ItemRepository;
import spring_test.infrastructure.People2Repository;

import javax.transaction.Transactional;

@Component
@Slf4j
public class OneWayManyToManySimulateTest {
    @Autowired
    private ItemRepository itemRepository;

    @Autowired
    private CategoryRepository categoryRepository;

    @Autowired
    private People2Repository peopleRepository;

    @Transactional
    public Long addItem(String name){
        Item item = new Item(name);
        this.itemRepository.add(item);
        return item.getId();
    }

    @Transactional
    public void addExistCategoryToItem(Long categoryId,Long itemId){
        Category category = this.categoryRepository.find(categoryId);
        Item item = this.itemRepository.find(itemId);
        item.addItemCategory(category,null);
    }

    @Transactional
    public void addNewCategoryToItem(String name,Long itemId){
        //分2步sql
        //首先,插入ItemCategory信息
        /*
        insert
        into
            item_category
            (category_id, people2_id, item_id, categorys_order, id)
        values
            (?, ?, ?, ?, ?)
         */
        //然后,根据id,更新item_id和categorys_order,我觉得这一步没啥用
        /*
        update
            item_category
        set
            item_id=?,
            categorys_order=?
        where
            id=?
         */
        Category category = new Category(name);
        Item item = this.itemRepository.find(itemId);
        item.addItemCategory(category,null);
    }

    @Transactional
    public void removeItemCategory(Long itemId,int index){
        Item item = this.itemRepository.find(itemId);

        item.removeItemCategory(index);
    }

    @Transactional
    public void setItemCategoryPeople2(Long itemId,int index,Long peopleId){
        //需要1条sql
        /*
        update
            item_category
        set
            category_id=?,
            people2_id=?
        where
            id=?
         */
        People2 people2 = this.peopleRepository.find(peopleId);
        Item item = this.itemRepository.find(itemId);

        item.setCategoryPeople2(index,people2);
    }

    @Transactional
    public Long addPeople(String name){
        People2 people = new People2(name);
        this.peopleRepository.add(people);
        return people.getId();
    }

    @Transactional
    public Long addCategory(String name){
        Category category = new Category(name);
        this.categoryRepository.add(category);
        return category.getId();
    }

    public void printItem(Long id){
        //读取item需要2条sql
        /*首先,读取item的基础信息
    select
        item0_.id as id1_5_0_,
        item0_.name as name2_5_0_
    from
        item item0_
    where
        item0_.id=?
         */
        //然后,通过中间表,一起拉了category和people的信息。
        // 注意,category的optional为false,所以用inner join。
        //而people的optional为true,所以用left outer join
        /*
    select
        categorys0_.item_id as item_id4_6_3_,
        categorys0_.id as id1_6_3_,
        categorys0_.categorys_order as category5_3_,
        categorys0_.id as id1_6_2_,
        categorys0_.category_id as category2_6_2_,
        categorys0_.people2_id as people3_6_2_,
        category1_.id as id1_0_0_,
        category1_.name as name2_0_0_,
        people2x2_.id as id1_8_1_,
        people2x2_.name as name2_8_1_
    from
        item_category categorys0_
    inner join
        category category1_
            on categorys0_.category_id=category1_.id
    left outer join
        people2 people2x2_
            on categorys0_.people2_id=people2x2_.id
    where
        categorys0_.item_id=?
         */
        Item item = this.itemRepository.find(id);
        log.info("item id:{} item:{}",id,item);
    }

    public void go(){
        OneWayManyToManySimulateTest app = (OneWayManyToManySimulateTest) AopContext.currentProxy();

        //添加Item
        log.info("new item");
        Long itemId1 = app.addItem("沙发");
        Long itemId2 = app.addItem("床垫");

        app.printItem(itemId1);
        app.printItem(itemId2);


        //新建Category到Item
        log.info("addNewCategoryToItem");
        app.addNewCategoryToItem("重点产品",itemId1);
        app.addNewCategoryToItem("优质产品",itemId1);
        app.printItem(itemId1);


        //沿用已有的People到Country
        log.info("addExistCategoryToItem");
        Long categoryId1 = app.addCategory("3A产品");
        Long categoryId2 = app.addCategory("环保产品");
        app.addExistCategoryToItem(categoryId1,itemId1);
        app.addExistCategoryToItem(categoryId2,itemId1);
        app.addExistCategoryToItem(categoryId1,itemId2);
        app.printItem(itemId1);
        app.printItem(itemId2);

        //设置category的people信息
        log.info("setCategoryPeople");
        Long people1 = app.addPeople("张三");
        Long people2 = app.addPeople("李四");
        app.setItemCategoryPeople2(itemId1,0,people1);
        app.setItemCategoryPeople2(itemId1,2,people2);
        app.setItemCategoryPeople2(itemId2,0,people1);
        app.printItem(itemId1);
        app.printItem(itemId2);

        //删除
        log.info("removeItemCategory");
        //需要2条sql,首先更新删除位之后categorys_order对应的信息
        /*
   update
        item_category
    set
        item_id=?,
        categorys_order=?
    where
        id=?
         */
        //然后,删除末端数据
        /*
        delete
        from
            item_category
        where
            id=?
         */
        app.removeItemCategory(itemId1,2);
        app.printItem(itemId1);
        app.printItem(itemId2);
    }
}
这是测试代码,相比于addPeople的写法,我们这里需要先用Category创建出ItemCategory,然后再将ItemCategory加入到Item的categorys集合中。步骤多了,但接口没变,并且我们可以任意在ItemCategory中新加字段。因此,需求达成。
8 查询
代码在这里
8.1 悲观锁操作
public T findForLock(U id){
    //PESSIMISTIC_WRITE为for update悲观锁
    //PESSIMISTIC_READ为for share悲观锁
    //OPTIMISTIC_FORCE_INCREMENT为执行find后,使用乐观锁自动递增version字段
    //PESSIMISTIC_FORCE_INCREMENT为执行find后,使用悲观锁自动递增version字段
    return (T)entityManager.find(itemClass,id,LockModeType.PESSIMISTIC_WRITE);
}
查询的时候,我们可以指定for update选项
public List<T> findBatch(Collection<U> id){
    Metamodel metadata = entityManager.getMetamodel();
    EntityType t = metadata.entity(itemClass);
    return (List<T>)entityManager.createQuery("select i from "+t.getName()+" i where i.id in (:ids)")
            .setParameter("ids",id)
            .setHint(org.hibernate.jpa.QueryHints.HINT_READONLY,true)
            .getResultList();
}
HINT_READONLY选项关闭脏检查,更快更省内存。当取出的数据集不是用来修改的时候,相当有用
8.2 自定义输出集
package spring_test.query;

import lombok.Data;
import org.hibernate.annotations.Immutable;

import javax.persistence.Embeddable;
import javax.persistence.Entity;
import javax.persistence.Id;

/**
 * Created by fish on 2021/4/25.
 */
//必须要加entity才能映射
@Data
@Entity
public class CountryCount {

    private Long Count;

    @Id
    private String state;
}
我们先定义一个输出集
public List<CountryCount> count(){
    Query query = entityManager.createNativeQuery("select count(*) as count,state from country where name like :name group by state", CountryCount.class);
    query.setFirstResult(pageIndex);
    query.setMaxResults(pageSize);

    return query.getResultList();
}
然后我们自定义一个查询,将数据映射到我们定义的输出结构体上。
8.3 命名查询
<?xml version="1.0" encoding="UTF-8" ?>
<entity-mappings xmlns="http://java.sun.com/xml/ns/persistence/orm"
                 xmlns:xsi="http://www.w3.org/2001/XMLSchema-instance" xsi:schemaLocation="http://java.sun.com/xml/ns/persistence/orm http://java.sun.com/xml/ns/persistence/orm_1_0.xsd"
                 version="1.0">
    <!--没有result-class的话无法运行,报ArrayIndexOutOfBoundsException错误-->
    <named-native-query name="countByName" result-class="spring_test.query.CountryCount">
        <query>
            select count(*) as count,state from country where name like :name group by state
        </query>
    </named-native-query>
    <named-query name="findByIds">
        <query><![CDATA[
            select i from Country i where i.id in (:ids)
        ]]>
        </query>
    </named-query>
</entity-mappings>
我们可以将特别长的SQL写入到xml文件上,注意,SQL上可以带参数。也可以用JPQL语句,也可以用标准的SQL语句。
spring.jpa.mapping-resources = query/testSQL.xml要在配置文件中,指定这个xml文件
package spring_test.infrastructure;

import org.springframework.stereotype.Component;
import spring_test.business.Country;
import spring_test.query.CountryCount;

import javax.persistence.EntityManager;
import javax.persistence.PersistenceContext;
import java.util.List;

/**
 * Created by fish on 2021/4/25.
 */
@Component
public class CountryRepository extends CurdRepository<Country,Long>{
    @PersistenceContext
    private EntityManager entityManager;

    public List<Country> findByIds(List<Long> ids) {
        return entityManager.createNamedQuery("findByIds",Country.class)
                .setParameter("ids",ids)
                .getResultList();
    }

    public List<CountryCount> countByName(String name){
        return entityManager.createNamedQuery("countByName")
                .setParameter("name",name)
                .getResultList();
    }
}
然后我们用createNamedQuery就可以使用了
8.4 JPQL
//JPQL查询
public List<SalesOrder> search(SalesOrderWhere where){
    String sql = "select c from SalesOrder c where";

    ArrayList<String> whereSql = new ArrayList<>();
    HashMap<String,Object> argsSql = new HashMap<>();
    if(where.getBeginTime() != null ){
        whereSql.add(" c.createTime > :beginDate");
        argsSql.put("beginDate",where.getBeginTime());
    }

    if(where.getEndTime() != null ){
        whereSql.add(" c.createTime < :endDate");
        argsSql.put("endDate",where.getEndTime());
    }

    if(where.getSalesOrderIds() != null && where.getSalesOrderIds().size() != 0){
        whereSql.add(" c.id in (:ids)");
        argsSql.put("ids",where.getSalesOrderIds());
    }

    if(where.getName() != null){
        whereSql.add(" c.name like :nameLike");
        argsSql.put("nameLike","%"+where.getName()+"%");
    }

    Query query =  entityManager.createQuery(sql+String.join(" and ",whereSql));

    for( Map.Entry<String,Object> entry : argsSql.entrySet()){
        query.setParameter(entry.getKey(),entry.getValue());
    }

    return (List<SalesOrder>)query.getResultList();
}
JPQL是一个特殊的SQL语句,只有JPA框架能够理解和运行它。它的意义在于简化SQL语句,并且在框架层就能提前检验到SQL语句的语法问题。
8.5 CriteriaQuery
//CriteriaBuilder查询
public List<SalesOrder> search2(SalesOrderWhere where) {
    CriteriaBuilder cb = entityManager.getCriteriaBuilder();
    CriteriaQuery<SalesOrder> criteria = cb.createQuery(SalesOrder.class);
    Root<SalesOrder> item = criteria.from(SalesOrder.class);
    List<Predicate> predicates = new ArrayList<>();

    if(where.getBeginTime() != null ){
        predicates.add(
                cb.greaterThanOrEqualTo(
                        item.get("createTime"),
                        where.getBeginTime()
                )
        );
    }

    if(where.getEndTime() != null ){
        predicates.add(
                cb.lessThanOrEqualTo(
                        item.get("createTime"),
                        where.getEndTime()
                )
        );
    }

    if( where.getSalesOrderIds() != null ){
        predicates.add(
                cb.in(
                        item.get("id")).value(where.getSalesOrderIds()
                )
        );
    }

    if(where.getName() != null){
        predicates.add(
                cb.like(
                        item.get("name"),
                        "%"+where.getName()+"%"
                )
        );
    }

    criteria.select(item).where(predicates.toArray(new Predicate[]{}));

    return entityManager.createQuery(criteria).getResultList();
}
CriteriaQuery是强类型化的JPQL写法,更加灵活和复杂。
8.6 同步Flush
 @Transactional
public void nativeAndMod(){
    SalesOrder salesOrder = salesOrderRepository.find(10001L);
    salesOrder.setName("我A去");

    //在nativeSQL执行的时候,它默认会Flush所有实体的数据到数据库
    List<SalesOrder> salesOrderList = salesOrderRepository.serachByName("A");

    log.info("salesOrder nativeAndMod where cat = {}",salesOrderList);

}
要注意的是,由于JPA有脏检查的机制。如果我们对一个实体进行了修改操作,这个实体是不会马上update到数据库的。一般情况下,只有在事务结束的时候,才update到数据库。但是这样做就会有Flush滞后的问题,因为对实体进行修改以后,马上对这个实体查询就会依然读到数据库的旧实例,会产生bug。
所以,JPA有一个Flush时机的默认补充实现:
- 当JPQL中除了find操作以外,任意的select操作,都会触发select里面包含的实体马上Flush到数据库上。
- 当SQL执行时,由于JPA无法分辨它是哪个实体,所以它会将所有的实体到马上Flush到数据库上。
8.7 手动Flush
@Component
@Slf4j
public class EasyQueryRepository {
    @Autowired
    private JdbcTemplate jdbcTemplate;

    @Autowired
    private EntityManager em;

    public <T> List<T> query(Class<T> clazz,EasyQuerySchema schema){
        if( em.isJoinedToTransaction()){
            //将所有实体刷新到数据库中
            em.flush();
        }

        //jdbcTemplate查询
    }
}
我们在进行jdbc查询之前,必须有一个注意动作,先进行手动Flush数据,将内存中Hibernate实体写入到数据库中才能进行jdbc的查询操作,否则会导致数据库上的数据依然是旧的。
9 缓存与锁
代码在这里
9.1 一级缓存
package spring_test.business;

import lombok.Getter;
import lombok.ToString;

import javax.persistence.Entity;
import javax.persistence.GeneratedValue;
import javax.persistence.GenerationType;
import javax.persistence.Id;

/**
 * Created by fish on 2021/4/24.
 */
@Entity
@ToString
@Getter
public class Car {

    @Id
    @GeneratedValue(strategy = GenerationType.AUTO)
    private Long id;

    private String name;

    protected Car(){}

    public Car(String name){
        this.name = name;
    }

    public void setName(String name){
        this.name = name;
    }
}
定义一个Car实体
package spring_test;

import lombok.extern.slf4j.Slf4j;
import org.springframework.aop.framework.AopContext;
import org.springframework.beans.factory.annotation.Autowired;
import org.springframework.stereotype.Component;
import org.springframework.transaction.annotation.Transactional;
import spring_test.business.Car;
import spring_test.infrastructure.CarRepository;

import javax.smartcardio.Card;
import java.util.ArrayList;
import java.util.Arrays;
import java.util.List;

/**
 * Created by fish on 2021/4/24.
 */
@Component
@Slf4j
public class CarCacheTest {
    @Autowired
    private CarRepository carRepository;

    @Transactional
    public Long add(Car car){
        this.carRepository.add(car);
        return car.getId();
    }

    @Transactional
    public void mod(Long carId1,Long carId2){
        Car car1 = this.carRepository.find(carId1);
        car1.setName("新车1");

        List<Car> cars= this.carRepository.findBatch(Arrays.asList(carId1,carId2));

        //用carId1读取出来的Card,依然是car1的实例的,可以看出一级缓存是跨方法的,这个比MyBatis好用多了
        log.info("all cars {}",cars);

        //即使carId2+10的数据不存在,也不会报错
        List<Car> cars2= this.carRepository.findBatch(Arrays.asList(carId1,carId2,carId2+10));
        log.info("all cars {}",cars2);
    }

    @Transactional
    public void mod2(Long carId,String name){
        //先用ReadOnly的方式读取Car出来
        Car car = this.carRepository.findForReadOnly(carId);

        //然后用findBatch的方式读取出来,修改
        Car car2 = this.carRepository.findBatch(Arrays.asList(carId)).get(0);
        car2.setName(name);
    }

    public String getName(Long carId){
        return this.carRepository.find(carId).getName();
    }

    public void go(){
        CarCacheTest app = (CarCacheTest) AopContext.currentProxy();

        Long carId1 = app.add(new Car("车1"));
        Long carId2 = app.add(new Car("车2"));

        app.mod(carId1,carId2);

        //以下的实验相当诡异,以forRead的方式读取数据到一级缓存以后,即使以后的数据不是forRead的方式,也会导致数据无法更新
        app.mod2(carId2,"车3");
        //这里输出的数据是,车2,而不是车3。结论是,永远不要使用forRead读取数据,因为这样可能导致失去脏检查没有写入数据。
        log.info("carId2 name {}",app.getName(carId2));
    }
}
对car1进行修改以后,对findBatch或者find的查询,都会同步指向到这个car1的内存实例。注意这个与MyBatis的不同,MyBatis无法理解不同方法下的一级缓存。归根到底,JPQL语句是可以理解实体的,但是SQL不行。
但是,要注意的是,一级缓存搭配只读查询会出问题:
- 先用只读查询读取实体的时候,实体放在了一级缓存
- 而后即使用普通查询,非只读查询的时候,Hibernate也只会到一级缓存中拉数据,导致这个实体依然是只读实例,缺少脏检查,无法自动更新。
9.2 只读查询
package spring_test.business;

import jdk.nashorn.internal.ir.annotations.Immutable;
import lombok.Getter;
import lombok.ToString;

import javax.persistence.*;
import java.math.BigDecimal;

/**
 * Created by fish on 2021/4/24.
 */
@Entity
@ToString
@Getter
//注意,不是JPA的Immutable注解,是Hibernate的Immutable注解
@org.hibernate.annotations.Immutable
public class People {
    @Id
    @GeneratedValue(strategy = GenerationType.AUTO)
    private Long id;

    private String name;

    protected People(){

    }
    public People(String name){
        this.name = name;
    }

    public void setName(String name){
        this.name = name;
    }
}
我们定义一个Immutable的实体,注意是@org.hibernate.annotations.Immutable注解,不是JPA.Immutable注解。
package spring_test.business;

import lombok.Getter;
import lombok.ToString;

import javax.persistence.Entity;
import javax.persistence.GeneratedValue;
import javax.persistence.GenerationType;
import javax.persistence.Id;

/**
 * Created by fish on 2021/4/24.
 */
@Entity
@ToString
@Getter
public class People2 {

    @Id
    @GeneratedValue(strategy = GenerationType.AUTO)
    private Long id;

    private String name;

    protected People2(){

    }
    public People2(String name){
        this.name = name;
    }

    public void setName(String name){
        this.name = name;
    }
}
我们在定义一个普通的实体
package spring_test;

import lombok.AllArgsConstructor;
import lombok.extern.slf4j.Slf4j;
import org.springframework.aop.framework.AopContext;
import org.springframework.beans.factory.annotation.Autowired;
import org.springframework.stereotype.Component;
import org.springframework.transaction.annotation.Transactional;
import spring_test.business.People;
import spring_test.business.People2;
import spring_test.infrastructure.People2Repository;
import spring_test.infrastructure.PeopleRepository;

/**
 * Created by fish on 2021/4/24.
 */
@Component
@Slf4j
public class ImmutablePeopleTest {

    @Autowired
    private PeopleRepository peopleRepository;

    @Autowired
    private People2Repository people2Repository;

    @Transactional
    public Long addPeople(){
        People people = new People("未命名");
        this.peopleRepository.add(people);
        return people.getId();
    }

    @Transactional
    public void modPeople(Long peopleId,String name){
        People people = this.peopleRepository.find(peopleId);
        people.setName(name);
    }

    public void showOnePeople(Long peopleId){
        People people = this.peopleRepository.find(peopleId);

        log.info("people {} is {}",peopleId,people);
    }

    @Transactional
    public Long addPeople2(){
        People2 people2 = new People2("未命名");
        this.people2Repository.add(people2);
        return people2.getId();
    }

    @Transactional
    public void modPeople2(Long peopleId,String name){
        People2 people = this.people2Repository.find(peopleId);
        people.setName(name);
    }

    @Transactional(readOnly = true)
    public void modPeople2_WithReadOnlyTrans(Long peopleId,String name){
        People2 people = this.people2Repository.find(peopleId);
        people.setName(name);
    }

    @Transactional
    public void modPeople2_FindForReadOnly(Long peopleId,String name){
        People2 people = this.people2Repository.findForReadOnly3(peopleId);
        people.setName(name);
    }

    public void modPeople2_NoTransaction(Long peopleId,String name){
        People2 people = this.people2Repository.find(peopleId);
        people.setName(name);
    }

    public void showOnePeople2(Long peopleId){
        People2 people = this.people2Repository.find(peopleId);

        log.info("people2 {} is {}",peopleId,people);
    }

    public void go(){
        ImmutablePeopleTest app = (ImmutablePeopleTest) AopContext.currentProxy();

        //Immutable测试
        Long peopleId = app.addPeople();
        log.info("---------- immutable test ----------");
        //因为People是Immutable的,所以修改会不成功
        app.modPeople(peopleId,"新名1");
        app.showOnePeople(peopleId);

        //mod测试
        Long peopleId2 = app.addPeople2();
        log.info("---------- mod test ----------");
        //修改成功
        app.modPeople2(peopleId2,"新名1");
        app.showOnePeople2(peopleId2);

        log.info("---------- mod readOnlyTrans test ----------");
        //因为Transiaction是ReadOnly的,所以修改会不成功
        app.modPeople2_WithReadOnlyTrans(peopleId2,"新名2");
        app.showOnePeople2(peopleId2);

        log.info("---------- mod readOnlySession test ----------");
        //因为Session是ReadOnly的,所以修改会不成功
        app.modPeople2_FindForReadOnly(peopleId2,"新名3");
        app.showOnePeople2(peopleId2);

        log.info("---------- mod no transaction test ----------");
        //因为没有开事务,所以修改是不会成功的
        app.modPeople2_FindForReadOnly(peopleId2,"新名4");
        app.showOnePeople2(peopleId2);
    }
}
这个实验告诉我们:
- 实体是Immutable的时候,对实体的修改不会同步到数据库。
- 事务是readOnly的时候,对实体的修改不会同步到数据库。
- session是readOnly的时候,对实体的修改不会同步到数据库。
- 没有开事务,对实体的修改不会同步到数据库。
为什么我们需要只读查询,因为:
- 脏检查是十分昂贵的,它需要读取数据以后,在内存上保存一份。当事务结束以后,与内存上的数据比较来执行CURD操作,这个时候才会释放内存。如果我们所有读取的数据都进行脏检查,我们会很快因为内存不足而被迫宕机。
- 只读查询保证了使用方没有意外的修改操作。
9.3 实体倾听器
package spring_test.business;

import lombok.Getter;
import lombok.ToString;
import lombok.extern.slf4j.Slf4j;
import spring_test.StandardListener;

import javax.persistence.*;

/**
 * Created by fish on 2021/4/24.
 */
@Entity
@Getter
@ToString
@EntityListeners(StandardListener.class)
@Slf4j
public class Country {

    @Id
    @GeneratedValue(strategy = GenerationType.AUTO)
    private Long id;

    private String name;

    protected Country(){

    }

    public Country(String name){
        this.name = name;
    }

    public void setName(String name){
        this.name =name;
    }

    //可以在entity自身添加倾听器,使用protected访问器较为安全
    @PostRemove
    protected void k(){
        log.info("country remove {}",this);
    }
}
我们可以实体上面加入@EntityListeners来添加额外的倾听器,也可以在实体自身加入@PostRemove加入倾听器
@Slf4j
public class StandardListener<T> {

    @PrePersist
    public void notifyAdd(T entity){
        //PrePersist是没有标识符的,因为persist之前
        log.info("notify add {}",entity);
    }

    @PreUpdate
    public void notifyUpdate(T entity){
        log.info("notify update {}",entity);
    }

    @PreRemove
    public void notifyRemove(T entity){
        log.info("notify remove {}",entity);
    }

    @PostPersist
    public void notifyAdd2(T entity){
        log.info("notify add post {}",entity);
    }

    @PostUpdate
    public void notifyUpdate2(T entity){
        log.info("notify update post {}",entity);
    }

    @PostRemove
    public void notifyRemove2(T entity){
        log.info("notify remove post {}",entity);
    }
}
这是倾听器自身,这个方法可以辅助实现DDD中的事件模型。
9.4 脏检查
package spring_test.business;

import lombok.AllArgsConstructor;
import lombok.Getter;
import lombok.Setter;
import lombok.ToString;
import org.hibernate.annotations.Fetch;
import org.hibernate.annotations.FetchMode;
import org.hibernate.annotations.common.util.StringHelper;

import javax.persistence.*;
import java.math.BigDecimal;
import java.util.ArrayList;
import java.util.List;

/**
 * Created by fish on 2021/4/23.
 */
@Entity
@ToString
@Getter
public class SalesOrder {

    @Embeddable
    @Getter
    @Setter
    @ToString
    @AllArgsConstructor
    public static class Address{
        private String city;

        private String street;

        protected Address(){

        }
    }

    @Embeddable
    @ToString
    public static class Item {
        private Long itemId;

        private String name;

        private BigDecimal amount;

        protected Item() {

        }

        public Item(Long itemId, String name, BigDecimal amount) {
            this.itemId = itemId;
            this.name = name;
            this.amount = amount;
        }
    }

    @Id
    @GeneratedValue(strategy = GenerationType.AUTO)
    private Long id;

    @ElementCollection(fetch = FetchType.EAGER)
    @Fetch(FetchMode.SELECT)
    @OrderColumn
    private List<Item> items = new ArrayList<Item>();

    private Address address;

    private String name;

    public SalesOrder(){

    }

    public void addItem( Item item){
        this.items.add(item);
    }

    public void addItem2(Item item){
        List<Item> newItemList = new ArrayList<>(this.items);
        newItemList.add(item);
        //改变了原有的list指向
        this.items = newItemList;
    }

    public void setName(String name){
        this.name = name;
    }

    public void setAddress(Address address){
        this.address = address;
    }
}
这是一个SalesOrder实体,既有嵌入类Address,也有集合List<Item>
package spring_test;

import lombok.extern.slf4j.Slf4j;
import org.springframework.aop.framework.AopContext;
import org.springframework.beans.factory.annotation.Autowired;
import org.springframework.stereotype.Component;
import org.springframework.transaction.annotation.Transactional;
import spring_test.business.SalesOrder;
import spring_test.infrastructure.SalesOrderRepository;

import java.math.BigDecimal;

/**
 * Created by fish on 2021/4/23.
 */
@Component
@Slf4j
public class SalesOrderDirtyCheckTest {

    @Autowired
    SalesOrderRepository salesOrderRepository;

    @Transactional
    public Long newSalesOrder(){
        SalesOrder salesOrder = new SalesOrder();
        salesOrder.setAddress(new SalesOrder.Address("城市","大街"));
        salesOrder.setName("我的");
        this.salesOrderRepository.add(salesOrder);
        return salesOrder.getId();
    }

    @Transactional
    public void addItem(Long salesOrderId ,SalesOrder.Item item){
        SalesOrder salesOrder = this.salesOrderRepository.find(salesOrderId);
        //直接在原来的list上面添加,JPA仅执行一次insert
        salesOrder.addItem(item);
    }

    @Transactional
    public void addItem2(Long salesOrderId ,SalesOrder.Item item){
        SalesOrder salesOrder = this.salesOrderRepository.find(salesOrderId);
        //直接在新的list上面添加,JPA会先执行一次delete,然后执行两次insert.
        //因为JPA认为引用变化了,所有数据都不同了
        salesOrder.addItem2(item);
    }

    @Transactional
    public void setName(Long salesOrderId){
        SalesOrder salesOrder = this.salesOrderRepository.find(salesOrderId);

        //没有触发更新,即使String的引用变了,因为String的equals和原来的一样
        salesOrder.setName("我的");
    }

    @Transactional
    public void setAddress(Long salesOrderId){
        SalesOrder salesOrder = this.salesOrderRepository.find(salesOrderId);

        //没有触发更新,即使Embeddable没有equals,而且引用也变了.因为Embeddable会进行内部基础类型的对比
        salesOrder.setAddress(new SalesOrder.Address("城市","大街"));
    }

    @Transactional
    public void setAddress2(Long salesOrderId){
        SalesOrder salesOrder = this.salesOrderRepository.find(salesOrderId);

        //没有触发更新,引用没变,数据没变,当然没变
        salesOrder.getAddress().setCity("城市");
        salesOrder.getAddress().setStreet("大街");
    }

    public void showOne(Long saleOrderId){
        SalesOrder salesOrder =this.salesOrderRepository.find(saleOrderId);
        log.info("salesOrder {} is {}",saleOrderId,salesOrder);
    }

    public void go(){
        SalesOrderDirtyCheckTest app = (SalesOrderDirtyCheckTest) AopContext.currentProxy();

        Long salesOrderId = app.newSalesOrder();

        app.addItem(salesOrderId,new SalesOrder.Item(10001L,"商品1",new BigDecimal("12.3")));
        app.addItem2(salesOrderId,new SalesOrder.Item(10002L,"商品2",new BigDecimal("8.8")));

        app.setName(salesOrderId);

        app.setAddress(salesOrderId);
        app.setAddress2(salesOrderId);

        showOne(salesOrderId);
    }
}
这是脏检查的实验,我们得出:
- 基础类型,Int,Long,String,赋值不同的引用,只要值不变,就不会触发脏检查
- 嵌入类型,Address,即使赋值不同的Address引用,只要Address的各个字段值不变,就不会触发脏检查
- 集合类型,List<Item>,如果List引用发生变化,即使值不边,也会触发脏检查
10 缓存与异常
代码在这里
10.1 一级缓存与数据库查询
package spring_test.business;

import lombok.Getter;
import lombok.ToString;

import javax.persistence.Entity;
import javax.persistence.GeneratedValue;
import javax.persistence.GenerationType;
import javax.persistence.Id;

/**
 * Created by fish on 2021/4/24.
 */
@Entity
@ToString
@Getter
public class Car {

    @Id
    @GeneratedValue(strategy = GenerationType.AUTO)
    private Long id;

    private String name;

    protected Car(){}

    public Car(String name){
        this.name = name;
    }

    public void setName(String name){
        this.name = name;
    }
}
定义一个Car实体
package spring_test;

import lombok.extern.slf4j.Slf4j;
import org.springframework.aop.framework.AopContext;
import org.springframework.beans.factory.annotation.Autowired;
import org.springframework.stereotype.Component;
import org.springframework.transaction.annotation.Transactional;
import spring_test.business.Car;
import spring_test.infrastructure.CarRepository;

import javax.persistence.EntityManager;
import javax.persistence.PersistenceContext;
import java.util.Arrays;
import java.util.Date;
import java.util.List;

/**
 * Created by fish on 2021/5/4.
 */
@Component
@Slf4j
public class CarCacheTest {

    @Autowired
    private CarRepository carRepository;

    @PersistenceContext
    private EntityManager entityManager;

    @Transactional
    public void add(Car car){
        this.carRepository.add(car);
    }

    @Transactional
    public void get1(){
        //两次单独的get以后
        Car car1 = this.carRepository.find(10001L);
        Car car2 = this.carRepository.find(10002L);
        car2.setName(new Date().toString());

        //再执行一次getBatch,依然会向数据库发出select请求,只是返回的结果会取本地的数据
        //注意,由于car2有修改,所以也会产生一次update的操作以后,才进行select操作
        //这个叫FlushMode.AUTO模式
        List<Car> cars = this.carRepository.findBatch(Arrays.asList(10001L,10002L));
        log.info("debug {} {}",car2,cars.get(1));
    }

    @Transactional
    public void get2(){
        //执行一个getBatch以后
        List<Car> cars = this.carRepository.findBatch(Arrays.asList(10001L,10002L));

        cars.get(1).setName(new Date().toString());

        //之后的两次单独的get,都没有发送实际的select请求,真正地省略了发送
        Car car1 = this.carRepository.find(10001L);
        Car car2 = this.carRepository.find(10002L);

        log.info("debug {} {}",car2,cars.get(1));
    }

    @Transactional
    public void get3(){
        //执行一个add以后
        Car newCar = new Car(new Date().toString()+"cc");
        this.carRepository.add(newCar);

        //之后的get不需要发送select请求
        Car car1 = this.carRepository.find(newCar.getId());
    }

    @Transactional
    public void get4(){
        //两次单独的get以后
        Car car1 = this.carRepository.find(10001L);
        Car car2 = this.carRepository.find(10002L);

        //JPA会发现car有修改的地方,而select又需要重新查数据库,就会先将脏数据落地
        car2.setName("ez");
        //car2.setName("cc");

        //这句sql不仅会产生一次select操作,还会将car2的修改执行update操作
        List<Car> cars = entityManager.createQuery("select c from Car c where c.name= :name")
                .setParameter("name","cc")
                .getResultList();
        log.info("all data {}",cars);
    }

    public void go(){
        CarCacheTest app = (CarCacheTest) AopContext.currentProxy();

        app.add(new Car("车1"));
        app.add(new Car("车2"));
        app.add(new Car("车3"));
        app.add(new Car("车4"));
        app.add(new Car("车5"));

        log.info("get1 begin ...");
        app.get1();

        log.info("get2 begin ...");
        app.get2();

        log.info("get3 begin ...");
        app.get3();

        log.info("get4 begin ...");
        app.get4();
    }
}
从上面实验,我们得知:
- 只有find在遇到一级缓存匹配时,才不需要查找数据库。
- 其他JPQL语句,即使一级缓存匹配,都会去查找数据库,只是取回数据以后,拿本地一级缓存引用。
- JPQL查询语句,总是会触发相关实体的Flush操作
10.2 缓存与异常
package spring_test.business;

import jdk.nashorn.internal.ir.annotations.Immutable;
import lombok.Getter;
import lombok.ToString;

import javax.persistence.*;
import java.math.BigDecimal;

/**
 * Created by fish on 2021/4/24.
 */
@Entity
@ToString
@Getter
public class People {
    @Id
    @GeneratedValue(strategy = GenerationType.AUTO)
    private Long id;

    private String name;

    protected People(){

    }
    public People(String name){
        this.name = name;
    }

    public void setName(String name){
        this.name = name;
    }
}
定义一个People实体
package spring_test;

import lombok.extern.slf4j.Slf4j;
import org.springframework.aop.framework.AopContext;
import org.springframework.beans.factory.annotation.Autowired;
import org.springframework.stereotype.Component;
import org.springframework.transaction.annotation.Transactional;
import spring_test.business.Car;
import spring_test.business.People;
import spring_test.infrastructure.PeopleRepository;

/**
 * Created by fish on 2021/5/4.
 */
@Component
@Slf4j
public class PeopleExceptionTest {
    @Autowired
    private PeopleRepository peopleRepository;


    @Transactional
    public void add(People people){
        this.peopleRepository.add(people);
    }

    @Transactional
    public void run2(){
        throw new RuntimeException("123");
    }

    @Transactional
    public void run(Long id){
        //插入数据
        People people = this.peopleRepository.find(id);
        log.info(" people name {}",people.getName());
        people.setName("cc");

        //里面发送了异常
        try {
            PeopleExceptionTest app = (PeopleExceptionTest) AopContext.currentProxy();
            app.run2();
        }catch(Exception e){
            //强行捕捉异常
            e.printStackTrace();
        }
        //内存的数据不会自动回滚,但数据库已经回滚了
        //如果后续的流程依然依赖这个People的cc的值,就会有问题
        log.info(" people name2 {}",people.getName());

        //EntityManager没有回滚,它在一级缓存存放的值依然是cc,新值
        People people2 = this.peopleRepository.find(id);
        log.info(" people name3 {}",people2.getName());
    }

    public void print(Long id){
        //这个时候读取出来的依然是mk,因为数据库已经回滚了
        log.info(" people name4 {}",peopleRepository.find(id));
    }

    public void go(){
        PeopleExceptionTest app = (PeopleExceptionTest) AopContext.currentProxy();

        People people = new People("mk");
        app.add(people);
        try{
            app.run(people.getId());
        }catch (Exception e){

        }

        app.print(people.getId());
    }
}发生异常时,数据库会回滚,但是一级缓存不会回滚。所以,我们必须留意,当发生异常时,不要试图再读写相关内存上的数据,这些数据都是过时和不准确的。
11 组合关系的脏检查
代码在这里
11.1 嵌入类实现组合关系
package spring_test.business;

import lombok.*;
import org.hibernate.annotations.BatchSize;
import org.hibernate.annotations.Fetch;
import org.hibernate.annotations.FetchMode;
import org.hibernate.annotations.Table;
import org.springframework.core.annotation.Order;
import org.springframework.data.repository.cdi.Eager;

import javax.persistence.*;
import java.util.*;

/**
 * Created by fish on 2021/4/19.
 */
@Entity
@ToString
@Getter
public class SalesOrder {

    @Data
    @Embeddable
    @AllArgsConstructor
    @NoArgsConstructor
    public static class User{
        String name;
    }

    @Id
    @GeneratedValue
    private Long id;

    //Embeddable的脏检查通过数据本身
    @ElementCollection(fetch= FetchType.EAGER)
    @Fetch(FetchMode.SELECT)
    @OrderColumn
    private List<User> users = new ArrayList<User>();

    public SalesOrder(){

    }

    public void addUser(String name){
        ArrayList<User> newUser = new ArrayList<>(this.users);
        newUser.add(new User(name));
        this.users.clear();
        this.users.addAll(newUser);
    }

    public void addUser2(String name){
        this.users.add(new User(name));
    }

    public void modUserName(int index,String name){
        this.users.remove(index);
        this.users.add(index,new User(name));
    }

    public void modUserName2(int index,String name){
        this.users.get(index).setName(name);
    }

    public void remove(int index){
        this.users.remove(index);
    }
}使用嵌入类实现组合关系,@ElementCollection注解
package spring_test;

import lombok.extern.slf4j.Slf4j;
import org.springframework.aop.framework.AopContext;
import org.springframework.beans.factory.annotation.Autowired;
import org.springframework.stereotype.Component;
import spring_test.business.SalesOrder;
import spring_test.infrastructure.SalesOrderRepository;

import org.springframework.transaction.annotation.Transactional;

/**
 * Created by fish on 2021/5/2.
 */
@Component
@Slf4j
public class SalesOrderTest {
    @Autowired
    private SalesOrderRepository salesOrderRepository;

    @Transactional
    public Long addOne(){
        SalesOrder salesOrder = new SalesOrder();
        this.salesOrderRepository.add(salesOrder);
        return salesOrder.getId();
    }

    @Transactional
    public void add1(Long id,String name){
        SalesOrder salesOrder = this.salesOrderRepository.find(id);
        salesOrder.addUser(name);
    }

    @Transactional
    public void add2(Long id,String name){
        SalesOrder salesOrder = this.salesOrderRepository.find(id);
        salesOrder.addUser2(name);
    }

    @Transactional
    public void mod1(Long id,int index,String name){
        SalesOrder salesOrder = this.salesOrderRepository.find(id);
        salesOrder.modUserName(index,name);
    }

    @Transactional
    public void mod2(Long id,int index,String name){
        SalesOrder salesOrder = this.salesOrderRepository.find(id);
        salesOrder.modUserName2(index,name);
    }

    @Transactional
    public void remove(Long id,int index){
        SalesOrder salesOrder = this.salesOrderRepository.find(id);
        salesOrder.remove(index);
    }

    public void go1(){
        log.info("go1 begin.......");
        SalesOrderTest app = (SalesOrderTest) AopContext.currentProxy();


        Long salesOrderId = app.addOne();
        app.add1(salesOrderId,"fish");
        //只增加一次,即使是将数据清空了以后重新插入
        app.add1(salesOrderId,"cat");

        //即使将数据删掉后,重新插入,只有名字没有改变,那么就不会产生update操作
        log.info("go1 mod name.......");
        app.mod1(salesOrderId,0,"fish");

        //原地更改的,更不会产生update操作
        log.info("go1 mod2 name.......");
        app.mod2(salesOrderId,0,"fish");
    }

    public void go2(){
        log.info("go2 begin.......");
        SalesOrderTest app = (SalesOrderTest) AopContext.currentProxy();

        Long salesOrderId = app.addOne();
        app.add2(salesOrderId,"fish");
        app.add2(salesOrderId,"dog");
        //只增加一次,即使是将数据清空了以后重新插入
        log.info("go2 add3 begin.......");
        app.add2(salesOrderId,"cat");

        log.info("go2 remove.......");
        //删除第一个的时候,会生成3个sql
        //第一个是删除后面的
        //另外2个是原地update order的
        app.remove(salesOrderId,0);
    }

    public void go(){
        go1();
        go2();
    }
}
我们从实验中可以看出:
- 嵌入类集合List的引用变化,必然产生脏检查
- 嵌入类集合List的元素User,即使引用变化,只要值不变,也不会产生脏检查
11.2 实体类实现组合关系
package spring_test.business;

import lombok.AllArgsConstructor;
import lombok.Getter;
import lombok.NoArgsConstructor;
import lombok.ToString;
import org.hibernate.annotations.BatchSize;
import org.hibernate.annotations.Fetch;
import org.hibernate.annotations.FetchMode;

import javax.persistence.*;
import java.math.BigDecimal;
import java.util.ArrayList;
import java.util.Collections;
import java.util.List;

/**
 * Created by fish on 2021/4/19.
 */
@Entity
@ToString
@Getter
public class PurchaseOrder {
    @Entity
    @ToString
    @Table(name="purchase_order_items")
    protected static class Item {

        //实体,必须带有id
        @Id
        @GeneratedValue(strategy = GenerationType.AUTO)
        private Long id;

        private String name;

        protected Item(){

        }

        public Item(String name){
            this.name = name;
        }

        public void setName(String name){
            this.name = name;
        }
    }

    @Id
    @GeneratedValue(strategy = GenerationType.AUTO)
    private Long id;

    //这次嵌套的实体,不是Embedable
    //实体的脏检查通过数据本身,和地址本身,两个都一致才不会触发脏更新
    //另外每次插入都需要2次sql,插入一次,更新order一次.
    @OneToMany(fetch = FetchType.EAGER,cascade = CascadeType.ALL,orphanRemoval = true)
    @JoinColumn(name="purchase_order_id",nullable = false)
    @Fetch(FetchMode.SELECT)
    @OrderColumn
    private List<Item> items = new ArrayList<>();

    public PurchaseOrder(){

    }

    public void addItemWrong(String name){

        ArrayList<Item> newUser = new ArrayList<>(this.items);
        newUser.add(new Item(name));
        this.items = newUser;
    }

    public void addItem(String name){
        ArrayList<Item> newUser = new ArrayList<>(this.items);
        newUser.add(new Item(name));
        this.items.clear();
        this.items.addAll(newUser);
    }

    public void addItem2(String name){
        this.items.add(new Item(name));
    }

    public void modItemName(int index,String name){
        //删除了原来的实体,会触发脏更新
        this.items.remove(index);
        this.items.add(index,new Item(name));
    }

    public void modItemName2(int index,String name){
        this.items.get(index).setName(name);
    }

    public void remove(int index){
        this.items.remove(index);
    }

}使用实体类实现组合关系,@OneToMany注解,
A collection with cascade="all-delete-orphan" was no longer referenced by the owning entity instance: spring_test.business.PurchaseOrder.items注意addItemWrong的实现,和ElementCollection不同,实体的集合,不能修改集合的引用,否则会报出以上错误。切记,必须原地修改集合。
package spring_test;

import lombok.extern.slf4j.Slf4j;
import org.springframework.aop.framework.AopContext;
import org.springframework.beans.factory.annotation.Autowired;
import org.springframework.stereotype.Component;
import org.springframework.transaction.annotation.Transactional;
import spring_test.business.PurchaseOrder;
import spring_test.business.SalesOrder;
import spring_test.infrastructure.PurchaseOrderRepositoy;
import spring_test.infrastructure.SalesOrderRepository;

/**
 * Created by fish on 2021/5/2.
 */
@Component
@Slf4j
public class PurchaseOrderTest {
    @Autowired
    private PurchaseOrderRepositoy purchaseOrderRepositoy;

    @Transactional
    public Long addOne(){
        PurchaseOrder purchaseOrder = new PurchaseOrder();
        this.purchaseOrderRepositoy.add(purchaseOrder);
        return purchaseOrder.getId();
    }

    @Transactional
    public void add1(Long id,String name){
        PurchaseOrder purchaseOrder = this.purchaseOrderRepositoy.find(id);
        purchaseOrder.addItem(name);
    }

    @Transactional
    public void add2(Long id,String name){
        PurchaseOrder purchaseOrder = this.purchaseOrderRepositoy.find(id);
        purchaseOrder.addItem2(name);
    }

    @Transactional
    public void mod1(Long id,int index,String name){
        PurchaseOrder purchaseOrder = this.purchaseOrderRepositoy.find(id);
        purchaseOrder.modItemName(index,name);
    }

    @Transactional
    public void mod2(Long id,int index,String name){
        PurchaseOrder purchaseOrder = this.purchaseOrderRepositoy.find(id);
        purchaseOrder.modItemName2(index,name);
    }

    @Transactional
    public void remove(Long id,int index){
        PurchaseOrder purchaseOrder = this.purchaseOrderRepositoy.find(id);
        purchaseOrder.remove(index);
    }

    public void go1(){
        log.info("go1 begin.......");
        PurchaseOrderTest app = (PurchaseOrderTest) AopContext.currentProxy();


        Long purchaseOrderId = app.addOne();
        //每次增加都需要2个sql
        //首先插入数据,然后再更新order
        app.add1(purchaseOrderId,"fish");
        //只增加一次,即使是将数据清空了以后重新插入!即使是实体也和Embeddable一样,只是sql数量一样
        app.add1(purchaseOrderId,"cat");

        //这个时候会产生删除再重新插入的问题,即使名字一样.因为实体容器的比较是通过地址
        log.info("go1 mod name.......");
        app.mod1(purchaseOrderId,0,"fish");

        //原地更改的,更不会产生update操作,且实体的地址也没有改变
        log.info("go1 mod2 name.......");
        app.mod2(purchaseOrderId,0,"fish");
    }

    public void go2(){
        log.info("go2 begin.......");
        PurchaseOrderTest app = (PurchaseOrderTest) AopContext.currentProxy();

        Long purchaseOrderId = app.addOne();
        app.add2(purchaseOrderId,"fish");
        app.add2(purchaseOrderId,"dog");

        log.info("go2 add3 begin.......");
        //每次增加都需要2个sql
        //首先插入数据,然后再更新order
        app.add2(purchaseOrderId,"cat");

        log.info("go2 remove.......");
        //删除第一个的时候,会生成3个sql
        //第一个是删除后面的
        //另外2个是原地update order的,和Embeddable一样
        app.remove(purchaseOrderId,0);
    }

    public void go(){
        go1();
        go2();
    }
}
我们从实验中可以看出:
- 实体类集合List的引用变化,必然产生脏检查
- 实体类集合List的元素User,如果引用变化,即使值不变,也会产生脏检查
- 实体类集合List的元素User,引用不变,值不变,才不会产生脏检查
11.3 按需List组合关系
package spring_test.business;

import lombok.AllArgsConstructor;
import lombok.Getter;
import lombok.NoArgsConstructor;
import lombok.ToString;
import org.hibernate.annotations.BatchSize;
import org.hibernate.annotations.Fetch;
import org.hibernate.annotations.FetchMode;
import org.hibernate.annotations.Where;

import javax.persistence.*;
import java.math.BigDecimal;
import java.util.*;
import java.util.stream.Collectors;

/**
 * Created by fish on 2021/4/19.
 */
@Entity
@ToString
@Getter
public class Good {

    public interface RemainService {
        Remain find(Long id);
        void add(Remain country);
    }
    @Entity
    @Getter
    @ToString
    @Table(name="remain")
    public static class Remain {

        private static Long idGenerator = 10001L;

        //实体,必须带有id
        @Id
        private Long id;

        private Long goodId;

        private int count;

        private byte hasData;

        protected Remain(){

        }

        private void refreshHasData(){
            if( this.count > 0 ){
                this.hasData = 1;
            }else{
                this.hasData = 0;
            }
        }
        public Remain(Long goodId,int count){
            idGenerator++;
            this.id = idGenerator;
            this.goodId = goodId;
            this.count = count;
            this.refreshHasData();
        }

        public void incCount(int inc){
            this.count = this.count +inc;
            this.refreshHasData();
        }
    }

    @Id
    @GeneratedValue(strategy = GenerationType.AUTO)
    private Long id;

    //将itemsMap看成是非组合关系,但是add与remove由Good自己来全权操控
    //因为@Where条件中不存在的数据,不等于要删除的数据,所以不能使用cascade,也不能使用orphalRemove
    @OneToMany(fetch = FetchType.EAGER)
    @JoinColumn(name="goodId")
    @Fetch(FetchMode.SELECT)
    @Where(clause = "has_data = 1")
    private List<Remain> itemsList = new ArrayList<>();

    @Transient
    private  RemainService remainService;

    public Good(){

    }

    public void setRemainService(RemainService remainService){
        this.remainService = remainService;
    }

    public Long addRemain(int count){
        Remain remain = new Remain(this.id,count);
        this.remainService.add(remain);
        this.itemsList.add(remain);
        return remain.getId();
    }

    public void incRemain(Long remainId, int incCount){
        //首先从本地拿去
        Remain remain = null;
        List<Remain> memoryRemainList = this.itemsList.stream().filter((single)->{
            return single.getId().longValue() == remainId.longValue();
        }).collect(Collectors.toList());
        if( memoryRemainList.size() != 0 ){
            remain = memoryRemainList.get(0);
        }
        if( remain == null ){
            //拿不到就向sql拿
            remain = this.remainService.find(remainId);
            this.itemsList.add(remain);
        }
        remain.incCount(incCount);
    }

}
我们可以用@Where来实现按需的组合关系,默认拉取的子数据用@Where过滤过的。注意,这种方法,只能手动保存子实体,不能用cascade与orphalRemove,会有问题的。
11.4 按需Map组合关系
package spring_test.business;

import lombok.AllArgsConstructor;
import lombok.Getter;
import lombok.NoArgsConstructor;
import lombok.ToString;
import org.hibernate.annotations.BatchSize;
import org.hibernate.annotations.Fetch;
import org.hibernate.annotations.FetchMode;
import org.hibernate.annotations.Where;

import javax.persistence.*;
import java.math.BigDecimal;
import java.util.*;
import java.util.stream.Collectors;

/**
 * Created by fish on 2021/4/19.
 */
@Entity
@ToString
@Getter
public class Good2 {

    public interface RemainService {
        Remain2 find(Long id);
        void add(Remain2 country);
    }
    @Entity
    @Getter
    @ToString
    @Table(name="remain2")
    public static class Remain2 {

        private static Long idGenerator = 10001L;

        //实体,必须带有id
        @Id
        private Long id;

        private Long goodId;

        private int count;

        private byte hasData;

        protected Remain2(){

        }

        private void refreshHasData(){
            if( this.count > 0 ){
                this.hasData = 1;
            }else{
                this.hasData = 0;
            }
        }
        public Remain2(Long goodId,int count){
            idGenerator++;
            this.id = idGenerator;
            this.goodId = goodId;
            this.count = count;
            this.refreshHasData();
        }

        public void incCount(int inc){
            this.count = this.count +inc;
            this.refreshHasData();
        }
    }

    @Id
    @GeneratedValue(strategy = GenerationType.AUTO)
    private Long id;

    //将itemsMap看成是非组合关系,但是add与remove由Good自己来全权操控
    //因为@Where条件中不存在的数据,不等于要删除的数据,所以不能使用cascade,也不能使用orphalRemove
    @OneToMany(fetch = FetchType.EAGER)
    @JoinColumn(name="goodId")
    @Fetch(FetchMode.SELECT)
    @MapKeyColumn(name="id")
    @Where(clause = "has_data = 1")
    private Map<Long,Remain2> itemsList = new HashMap<>();

    @Transient
    private  RemainService remainService;

    public Good2(){

    }

    public void setRemainService(RemainService remainService){
        this.remainService = remainService;
    }

    public Long addRemain(int count){
        Remain2 remain = new Remain2(this.id,count);
        this.remainService.add(remain);
        this.itemsList.put(remain.getId(),remain);
        return remain.getId();
    }

    public void incRemain(Long remainId, int incCount){
        //首先从本地拿去
        Remain2 remain = null;
        remain = this.itemsList.get(remainId);
        if( remain == null ){
            //拿不到就向sql拿
            remain = this.remainService.find(remainId);
            this.itemsList.put(remainId,remain);
        }
        remain.incCount(incCount);
    }

}
同理,也可以实现按需的Map组合关系
12 批量插入与更新
代码在这里
参考资料:
12.1 配置
打开批量插入与更新之前,先做好配置
spring.datasource.url = jdbc:mysql://localhost:3306/Test?traceProtocol=false&cachePrepStmts=true&useServerPrepStmts=true&rewriteBatchedStatements=true&useUnicode=true&characterEncoding=utf-8&useLegacyDatetimeCode=false&serverTimezone=Asia/Shanghai

logging.level.org.hibernate.type.descriptor.sql = trace
spring.jpa.properties.hibernate.jdbc.batch_size = 50
spring.jpa.properties.hibernate.order_inserts = true

spring.jpa.properties.hibernate.cache.use_second_level_cache = false
spring.jpa.properties.hibernate.generate_statistics=true
首先是在连接URL里面,配置好cachePrepStmts,useServerPrepStmts和rewriteBatchedStatements参数。然后配置好hibernate.jdbc.batch_size,hibernate.order_inserts和hibernate.cache.use_second_level_cache配置项。
<dependency>
    <groupId>net.ttddyy</groupId>
    <artifactId>datasource-proxy</artifactId>
    <version>1.7</version>
</dependency>
加入datasource-proxy的依赖,这个依赖可以分析出到底执行了多少条JDBC
package spring_test;
import net.ttddyy.dsproxy.listener.logging.SLF4JLogLevel;
import net.ttddyy.dsproxy.support.ProxyDataSourceBuilder;
import org.aopalliance.intercept.MethodInterceptor;
import org.aopalliance.intercept.MethodInvocation;
import org.springframework.aop.framework.ProxyFactory;
import org.springframework.beans.factory.annotation.Autowired;
import org.springframework.beans.factory.config.BeanPostProcessor;
import org.springframework.context.annotation.Bean;
import org.springframework.context.annotation.Configuration;
import org.springframework.stereotype.Component;
import org.springframework.util.ReflectionUtils;

import javax.sql.DataSource;
import java.lang.reflect.Method;
import java.util.logging.Logger;


@Component
public class DatasourceProxyBeanPostProcessor implements BeanPostProcessor {

    private static final Logger logger
            = Logger.getLogger(DatasourceProxyBeanPostProcessor.class.getName());

    @Override
    public Object postProcessAfterInitialization(Object bean, String beanName) {

        if (bean instanceof DataSource) {

            logger.info(() -> "DataSource bean has been found: " + bean);

            final ProxyFactory proxyFactory = new ProxyFactory(bean);

            proxyFactory.setProxyTargetClass(true);
            proxyFactory.addAdvice(new ProxyDataSourceInterceptor((DataSource) bean));

            return proxyFactory.getProxy();
        }
        return bean;
    }

    @Override
    public Object postProcessBeforeInitialization(Object bean, String beanName) {
        return bean;
    }

    private static class ProxyDataSourceInterceptor implements MethodInterceptor {

        private final DataSource dataSource;

        public ProxyDataSourceInterceptor(final DataSource dataSource) {
            super();
            this.dataSource = ProxyDataSourceBuilder.create(dataSource)
                    .name("DATA_SOURCE_PROXY")
                    .logQueryBySlf4j(SLF4JLogLevel.INFO)
                    .asJson()
                    .countQuery()
                    .multiline()
                    .build();
        }

        @Override
        public Object invoke(final MethodInvocation invocation) throws Throwable {

            final Method proxyMethod = ReflectionUtils.
                    findMethod(this.dataSource.getClass(),
                            invocation.getMethod().getName());

            if (proxyMethod != null) {
                return proxyMethod.invoke(this.dataSource, invocation.getArguments());
            }

            return invocation.proceed();
        }
    }
}
然后使用PostProcessor来将这个dataSource加进去
traceProtocol=true把mysql连接串的traceProtocol打开,我们就能在控制台清楚看到实际运行的SQL语句是什么。
12.2 批量插入
package spring_test.business;

import lombok.Getter;
import lombok.ToString;
import org.hibernate.annotations.CreationTimestamp;
import org.hibernate.annotations.UpdateTimestamp;

import javax.persistence.*;
import java.util.Date;

/**
 * Created by fish on 2021/4/16.
 */
@Entity
@ToString
@Getter
public class Car {
    private static Long globalId = 20001L;

    //改用自己的id生成算法
    @Id
    private Long id;

    private String name;

    //可以设置为由Hibernate来生成时间戳
    @Temporal(TemporalType.TIMESTAMP)
    @CreationTimestamp
    @Column(updatable = false)
    private Date createTime;

    @Temporal(TemporalType.TIMESTAMP)
    @UpdateTimestamp
    private Date modifyTime;

    private Long generateId(){
        Long id = Car.globalId++;
        return id;
    }
    protected Car(){

        //这个不要设置id,这个protected是由JPA读取数据后自动填充用的
        //即使设置了generateId,JPA也不会将id使用update语句写入到数据库,因为JPA默认id是不可改变的。但是,这样做会让id增长不是连续的。
        //this.id = generateId();
    }

    public Car(String name){
        this.id = generateId();
        this.name = name;
    }

    public void setName(String name){
        this.name = name;
    }
}
先创建一个Car的实体
@Transactional
public void addCarBatch(Car[] cars){
    for( int i = 0 ;i != cars.length;i++){
        this.car2Repository.add(cars[i]);
    }
}
使用addCarBatch来for插入
仅执行了一次insert操作,Hibernate也表达了仅运行了1次的Batch。
但是执行日志中是会出现多次的insert操作,因为Hibernate的语句都是初始化时就设定好的,不能动态生成insert values(,,,)(,,,)这种批量语句。将多条语句合并到一个批量上,是通过Mysql的驱动库rewriteBatchedStatements选项实现的。
12.3 批量更新
package spring_test.business;

import lombok.Generated;
import lombok.Getter;
import lombok.ToString;
import org.hibernate.annotations.CreationTimestamp;
import org.hibernate.annotations.UpdateTimestamp;

import javax.persistence.*;
import java.util.Date;

/**
 * Created by fish on 2021/4/16.
 */
@Entity
@ToString
@Getter
public class People {

    //改用自己的id生成算法
    @Id
    @GeneratedValue(strategy = GenerationType.AUTO)
    private Long id;

    private String name;

    //可以设置为由Hibernate来生成时间戳
    @Temporal(TemporalType.TIMESTAMP)
    @CreationTimestamp
    @Column(updatable = false)
    private Date createTime;

    @Temporal(TemporalType.TIMESTAMP)
    @UpdateTimestamp
    private Date modifyTime;

    protected People(){
    }

    public People(String name){
        this.name = name;
    }

    public void setName(String name){
        this.name = name;
    }
}
先定义一个People实体,注意用的是AUTO的键生成器
@Transactional
public void modAll(String name){
    List<People> peoples = this.repository.getAll();
    for( int i = 0 ;i != peoples.size();i++){
        peoples.get(i).setName(name+i);
    }
    log.info("mod Car {}",peoples);
}
然后执行批量更新
仅执行了1次的JDBC操作和1次的flush操作,这个真的就相当6了。一般情况下,update是无法进行batch操作,我现在也不知道它是怎么实现的。
看mysql的trace输出,也的确只发送了一次的update语句。
12.3 混合插入与更新
@Transactional
public void addBatch(){
    carRepository.add(new Car("A1"));
    peopleRepository.add(new People("B1"));
    carRepository.add(new Car("A2"));
    peopleRepository.add(new People("B2"));
    Car car3 = new Car("A3");
    carRepository.add(car3);
    People people3 = (new People("B3"));
    peopleRepository.add(people3);
    peopleRepository.add(new People("B4"));
    people3.setName("B5");
    car3.setName("A5");
}
然后我们来查看混合添加car和people,同时添加以后对其中1条Car和其中1条People修改,会产生什么。
一共运行了4个Batch
第一个Batch,是批量添加Car
第二个Batch,是批量添加People
第三个Batch,是修改Car
第四个Batch,是修改People。
这是因为order_inserts=true起了作用,他会将不同表的insert操作放在一起执行在1个Batch里面,这个也是相当牛逼好用了。
另外一点就是,在一个事务里面,add与mod操作不会合并,它依然分为两步操作来执行。
12.4 原则
可惜的是,在JProfiler 9中并不能看到这种变化,它依然是以JDBC触发来计算数量,所以不要以JProfiler里面的evt数来去确定JDBC的SQL执行次数。
@Id
@GeneratedValue(strategy = GenerationType.IDENTITY)
private Long id;
另外,就是不要以IDENTITY作为主键,这样会让单元测试变得困难,而且Hibernate无法优化为批量插入操作。
对于Hibernate的主键选择,我们要遵循,尽可能使用自己本地生成ID,如果用数据库模拟Sequence的,要注意加上cache大小,这样性能也好,而且方便单元测试。不要使用IDENTITY(不能批量插入)和AUTO(获取主键总是需要额外的两条SQL操作)。
13 查询
13.1 jpamodelgen
代码在这里
<dependency>
    <groupId>org.hibernate</groupId>
    <artifactId>hibernate-jpamodelgen</artifactId>
    <version>5.4.32.Final</version>
    <scope>provided</scope>
</dependency>
首先加入以上的依赖
在Annotation Processors中,选择模块,然后选择generated source位置为Module content root
将Model里面指定target文件夹的spring_test作为编译位置
那么就能使用强类型的Country_的元信息,在Critieria查询中相当有用
注意,这种方法与lombok不能协同使用,元信息只能在每一次编译以后才会生成,并不是像lombok这种的有IDE支持的即时生成
13.2 QueryDSL
Critieria查询还是不太好用,复杂查询建议使用QueryDSL或者Jooq
14 json类型
代码在这里
Hibernate原生没有支持json类型,有一个神人写了一个库支持JSON类型,看这里
<dependency>
    <groupId>com.vladmihalcea</groupId>
    <artifactId>hibernate-types-52</artifactId>
    <version>2.13.0</version>
</dependency>
Hibernate为5.2,5.3和5.4版本用以上的依赖
<dependency>
    <groupId>com.vladmihalcea</groupId>
    <artifactId>hibernate-types-55</artifactId>
    <version>2.13.0</version>
</dependency>
Hibernate为5.5版本用以上的依赖
@TypeDefs({
        @TypeDef(name = "json", typeClass = JsonStringType.class)
})
package spring_test;

import com.vladmihalcea.hibernate.type.json.JsonStringType;
import com.vladmihalcea.hibernate.type.json.JsonType;
import org.hibernate.annotations.TypeDef;
import org.hibernate.annotations.TypeDefs;
package-info.java,定义一个类型
package spring_test.business;

import lombok.Getter;
import lombok.ToString;
import org.hibernate.annotations.*;
import org.hibernate.annotations.Table;
import org.springframework.data.repository.cdi.Eager;

import javax.persistence.*;
import javax.persistence.Entity;
import java.util.Collections;
import java.util.HashSet;
import java.util.Set;

/**
 * Created by fish on 2021/4/19.
 */
@Entity
@ToString
@Getter
public class SalesOrder {

    public static Long globalId = 20001L;
    @Id
    private Long id;

    @Type(type = "json")
    private Set<Long> users = new HashSet<Long>();

    protected SalesOrder(){

    }
    public static SalesOrder create(){
        SalesOrder salesOrder = new SalesOrder();
        salesOrder.id = globalId++;
        return salesOrder;
    }

    public void addUser(Long userId){
        this.users.add(userId);
    }
}
使用如上即可,还是比较简单的,对嵌套类型的JSON也是支持的。但是这样做有几个问题:
- 额外的学习成本,映射到JSON类型以后,怎样做脏检查,这需要我们配合地在嵌套类型中加入equals和hashCode方法,否则可能产生不必要的update操作
- 额外的学习成本,JSON类型另外一套映射,枚举类型,时间类型,日期类型,Embeddable类型,都与原来的Hibernate方式都不一样,带来更多的复杂性。
- h2数据库没有JSON类型,只有生产级别数据库,mysql和pg有json类型,这使得单元测试的时候带来困难
- JPQL查询问题,映射字段为字符串类型事,会出现无法用JPQL的like查询的问题,因为数据库字段是String类型,但是实际代码类型为Set。映射字段为json类型,会出现无法用JPQL查询的问题,因为JPQL没有原生的json查询,不能带上箭头函数,只能用nativeSQL查询,但是nativeSQL会导致提前刷新的问题。
我们尽量使用JPQL查询,而不是nativeSQL查询的原因是:
- JPQL查询会清楚我们在查询哪一个表,尽可能地避免提前刷新,这对事务性能优化影响较大。
- JPQL查询支持实体嵌套的Embeddable对象的查询,但是nativeSQL会丢失这些实体信息。
总结,不要用,因为:
- Hibernate没有原生支持JSON类型,所以第三库实现JSON类型的方式,都会带来对JPQL查询带来影响。
- 这个库能解决JSON类型的写入问题,无法优雅解决JSON类型的读取问题。
- 太多的额外学习成本
15 性能测试
代码在这里
15.1 数据准备
一共三个表,主表大概1500行数据,子表大概6000行数据,共2M数据,数据在这里,以postgresql来存储
15.2 golang
package main

import (
    "encoding/json"
    "fmt"
    . "github.com/fishedee/app/log"
    . "github.com/fishedee/app/sqlf"
    . "github.com/fishedee/language"
    _ "github.com/lib/pq"
    "io/ioutil"
    "strconv"
    "strings"
    "time"
)

type Item struct {
    Id                int `sqlf:"autoincr"`
    Number            string
    Name              string
    IsCategory        byte      `sqlname:"is_category"`
    IsSystem          byte      `sqlname:"is_system"`
    TreeLevel         int       `sqlname:"tree_level"`
    TreePath          string    `sqlname:"tree_path"`
    ParentId          int       `sqlname:"parent_id"`
    ModelRemark       string    `sqlname:"model_remark"`
    SpecsRemark       string    `sqlname:"specs_remark"`
    Remark            string    `sqlname:"remark"`
    BasicUnitId       int       `sqlname:"basic_unit_id"`
    BasicUnitName     string    `sqlname:"basic_unit_name"`
    CommonUnitId      int       `sqlname:"common_unit_id"`
    CommonUnitName    string    `sqlname:"common_unit_name"`
    CommonUnitConvert Decimal   `sqlname:"common_unit_convert"`
    UnitConvertDesc   string    `sqlname:"unit_convert_desc"`
    IsRegularType     int       `sqlname:"is_regular_type"`
    HasBusinessLink   int       `sqlname:"has_business_link"`
    IsEnabled         string    `sqlname:"is_enabled"`
    CreateTime        time.Time `sqlf:"created" sqlname:"create_time"`
    ModifyTime        time.Time `sqlf:"updated" sqlname:"modify_time"`

    UnitConverts []ItemUnitConvert
    Aliases      []ItemContactAlias
}

type ItemUnitConvert struct {
    Id                string
    CreateTime        time.Time `sqlf:"created" sqlname:"create_time"`
    ModifyTime        time.Time `sqlf:"updated" sqlname:"modify_time"`
    ItemId            int       `sqlname:"item_id"`
    UnitId            int       `sqlname:"unit_id"`
    UnitName          string    `sqlname:"unit_name"`
    UnitConvert       Decimal   `sqlname:"unit_convert"`
    IsBasic           int       `sqlname:"is_basic"`
    IsCommon          int       `sqlname:"is_common"`
    CanBusinessLink   int       `sqlname:"can_business_link"`
    HasBusinessLink   int       `sqlname:"has_business_link"`
    IsEnabled         string    `sqlname:"is_enabled"`
    WholeSalesPrice   *Decimal  `sqlname:"whole_sales_price"`
    UnitConvertsOrder int       `sqlname:"unit_converts_order"`
    UnitConvertDesc   string    `sqlname:"unit_convert_desc"`
}

type ItemContactAlias struct {
    Id              string
    CreateTime      time.Time `sqlf:"created" sqlname:"create_time"`
    ModifyTime      time.Time `sqlf:"updated" sqlname:"modify_time"`
    ItemId          int       `sqlname:"item_id"`
    ContactId       int       `sqlname:"contact_id"`
    AliasItemName   string    `sqlname:"alias_item_name"`
    AliasItemNumber string    `sqlname:"alias_item_number"`
    AliasOrder      string    `sqlname:"aliases_order"`
}

func getData(db SqlfDB) []Item {
    items := []Item{}
    db.MustQuery(&items, "select * from item")

    itemIds := make([]string, len(items), len(items))
    for i, item := range items {
        itemIds[i] = strconv.Itoa(item.Id)
    }

    itemUnitConverts := []ItemUnitConvert{}
    sql1 := fmt.Sprintf("select * from item_unit_convert where item_id in (%s)", strings.Join(itemIds, ","))
    db.MustQuery(&itemUnitConverts, sql1)
    itemUnitConvertsMap := map[int][]ItemUnitConvert{}
    for _, single := range itemUnitConverts {
        oldList, isExist := itemUnitConvertsMap[single.ItemId]
        if !isExist {
            oldList = []ItemUnitConvert{}
        }
        oldList = append(oldList, single)
        itemUnitConvertsMap[single.ItemId] = oldList
    }

    itemContactAlias := []ItemContactAlias{}
    sql2 := fmt.Sprintf("select * from item_contact_alias where item_id in (%s)", strings.Join(itemIds, ","))
    db.MustQuery(&itemContactAlias, sql2)
    itemContactAliasMap := map[int][]ItemContactAlias{}
    for _, single := range itemContactAlias {
        oldList, isExist := itemContactAliasMap[single.ItemId]
        if !isExist {
            oldList = []ItemContactAlias{}
        }
        oldList = append(oldList, single)
        itemContactAliasMap[single.ItemId] = oldList
    }
    for i, item := range items {
        itemId := item.Id
        item.UnitConverts = itemUnitConvertsMap[itemId]
        item.Aliases = itemContactAliasMap[itemId]
        items[i] = item
    }
    return items
}

func goBenchmark(db SqlfDB){
    beginTime := time.Now()
    list := getData(db)
    endTime := time.Now()

    duration := endTime.Sub(beginTime)
    json, err := json.Marshal(list)
    if err != nil {
        panic(err)
    }
    fmt.Printf("duration [%v], dataSize:[%v], dataLength:[%v]\n", duration, len(list), len(json))
    ioutil.WriteFile("output.txt", json, 0666)
}

func main() {
    log, err := NewLog(LogConfig{
        Driver: "console",
    })
    if err != nil {
        panic(err)
    }
    db, err := NewSqlfDB(log, nil, SqlfDBConfig{
        Driver:     "postgres",
        SourceName: "host=localhost port=5432 user=postgres password=123 dbname=trade_erp client_encoding=utf8 sslmode=disable",
        Debug:      false,
    })
    if err != nil {
        panic(err)
    }
    for i := 0 ;i != 10;i++{
        goBenchmark(db);
    }
}
golang的性能比较炸裂,2334行,2.85M的数据,全部拉完只需32ms
15.2 Hibernate和jdbc
Hibernate和jdbc拉相同数据的代码就不贴了,直接看代码吧。
在开发模式下,jpa首次和jdbc首次的速度是一样的,但是第二次以后,jpa会显然出较强的优化,这是因为hibernate会缓存查询计划,这样postgresql在对相同语句查询的时候,不需要花时间去做查询计划的安排。第二次以后,jpa性能为118ms,jdbc的BeanPropertyRowMapper性能为262ms,jdbc的手动RowMapper为40ms,jdbc的反射版本RowMapper为50ms。可以看到,jdbc的BeanPropertyRowMapper性能真的很差,强烈不建议使用。
spring.jpa.properties.hibernate.query.plan_cache_max_size = 4096
spring.jpa.properties.hibernate.query.plan_parameter_metadata_max_size = 256
hibernate通过以上两个参数来配置查询计划缓存的大小。
mvn package
java -jar target/benchmark-1.0-SNAPSHOT.jar
通过打包以后,重新启动jar文件,这个时候的是发布模式。可以看到,性能有了大幅的提高,jpa性能大概为78ms,jdbc性能为30ms,总体而言,jpa的获取数据依然有较大损耗,大概为jdbc的反射版本2倍有多。jdbc的BeanPropertyRowMapper性能非常差,大概为jdbc的反射版本的3倍。java的总体拉取性能和golang基本上是一致的,没什么区别。
15.3 dragonwell
阿里云提供了透明协程的Dragonwell jdk,仅支持Linux系统,暂时就懒得测试了。
Dragonwell大概能提升10%的吞吐量提升
15.4 优化总结
在实际使用过程中,对JPA的优化心得:
- 全部实体都必须是Eager拉取,不能使用Lazy抓取。
- 性能测试的时候,先把日志关掉,然后放到mvn package模式下,才是真实的性能
- JProfiler性能工具对JPA的实际性能取样不正确,我也不知道为什么差异这么大。
- 查询业务的时候,避免用JPA拉取,而要使用jdbc拉取。因为jdbc可以在数据库进行一对一关系join以后一次拉取,jdbc也能按需拉取字段,按需拉取部分实体,jdbc的灵活性要比JPA要好得多。
- 修改业务的时候,尽量用JPA拉取,JPA的自动刷新到数据库非常好用,代码直观好理解,且减少bug。但是,批量插入和批量修改业务的时候,避免用JPA来运行,这样做的性能较差。
- 返回给前端的数据,尽可能刚好够数,而不要太多。
代码合理,无需奇淫技巧的情况下,JPA的性能已经足够,适合写入业务,不太会成为系统的瓶颈,不需要为了极致性能而优化,毫无必要。在查询业务,更适合用JdbcTemplate来做。
16 多租户
代码在这里
Hibernate支持多租户的特性,包括三种方式:
- Separate database,默认支持
- Separate schema,默认支持
- Partitioned (discriminator) data,仅在Hibernate 6的时候支持
实现Hibernate的多租户特性需要以下几步:
- 实现MultiTenantConnectionProvider,让Hibernate传入tenantId,我们返回它对应租户的Connection.
- 实现CurrentTenantIdentifierResolver,让Hibernate主动查询当前的所在租户ID
16.1 配置
# 手动指定dialect,以及关闭默认的open-in-view
spring.jpa.open-in-view=false
spring.jpa.properties.hibernate.temp.use_jdbc_metadata_defaults=false
spring.jpa.properties.hibernate.dialect=org.hibernate.dialect.PostgreSQL10Dialect
spring.jpa.properties.hibernate.hbm2ddl.auto=none

# 指定多租户的数据隔离方式
spring.jpa.properties.hibernate.multiTenancy=SCHEMA
spring.jpa.properties.hibernate.tenant_identifier_resolver=spring_test.config.MultiTenantIdentifierResolver
spring.jpa.properties.hibernate.multi_tenant_connection_provider=spring_test.config.MultiTenantConnectionProvider
启动的时候由于没有租户ID,Hibernate无法知道自己的Dialect,所以需要手动传入dialect。tenant_identifier_resolver和multi_tenant_connection_provider,传入到自己的实现就可以了
16.2 代码
package spring_test.config;

import lombok.extern.slf4j.Slf4j;
import org.hibernate.context.spi.CurrentTenantIdentifierResolver;

@Slf4j
public class MultiTenantIdentifierResolver implements CurrentTenantIdentifierResolver {
    @Override
    public String resolveCurrentTenantIdentifier() {
        //这个仅在事务打开的时候才进行一次调用,如果在单个@Transiactonal切换租户的话,不会触发该接口,因此不会产生效果
        String dataSourceKey = CurrentTenantHolder.getDataSourceKey();
        log.info("resolveCurrentTenantIdentifier trigger [{}]",dataSourceKey);
        return dataSourceKey;
    }

    //If we want Hibernate to validate all the existing sessions belong to the same tenant identifier,
    // the method validateExistingCurrentSessions should return true.
    //在SpringBoot中,这个SessionContext没有用到这个特性
    @Override
    public boolean validateExistingCurrentSessions() {
        return true;
    }
}
当前租户的解析器,注意,单个事务内部会复用同一个Connection,所以仅查询一次resolveCurrentTenantIdentifier。
package spring_test.config;

import org.hibernate.engine.jdbc.connections.spi.AbstractDataSourceBasedMultiTenantConnectionProviderImpl;
import org.hibernate.engine.jdbc.connections.spi.AbstractMultiTenantConnectionProvider;

import javax.sql.DataSource;
import java.sql.Connection;
import java.sql.SQLException;

//另外一种实现是继承AbstractMultiTenantConnectionProvider,其实与AbstractDataSourceBasedMultiTenantConnectionProviderImpl是大同小异的
public class MultiTenantConnectionProvider extends AbstractDataSourceBasedMultiTenantConnectionProviderImpl {
    private DynamicDataSource dynamicDataSource;

    // 在没有提供tenantId的情况下返回默认数据源
    @Override
    protected DataSource selectAnyDataSource() {
        throw new Error("no default resource");
    }

    private DynamicDataSource getDynamicDataSource(){
        if( dynamicDataSource != null ){
            return dynamicDataSource;
        }
        dynamicDataSource = IocHelper.getBean(DynamicDataSource.class);
        return dynamicDataSource;
    }

    // 提供了tenantId的话就根据ID来返回数据源
    @Override
    protected DataSource selectDataSource(String tenantIdentifier) {
        DataSource targetDataSource = getDynamicDataSource().getResolvedDataSources().get(tenantIdentifier);
        if( targetDataSource == null ){
            throw new Error("找不到数据源"+tenantIdentifier);
        }
        return targetDataSource;
    }

    //设置Schema
    @Override
    public Connection getConnection(String tenantIdentifier) throws SQLException {
        Connection connection = super.getConnection(tenantIdentifier);
        connection.setSchema(CurrentTenantHolder.getDataSchema());
        return connection;
    }

}
MultiTenantConnectionProvider就是实现MultiTenantConnectionProvider的方式,没啥难度
16.3 注入租户ID
package spring_test.config;

import lombok.extern.slf4j.Slf4j;
import org.apache.logging.log4j.util.Strings;
import org.springframework.stereotype.Component;
import org.springframework.web.servlet.handler.HandlerInterceptorAdapter;
import org.springframework.web.servlet.handler.WebRequestHandlerInterceptorAdapter;

import javax.servlet.*;
import javax.servlet.http.HttpServletRequest;
import javax.servlet.http.HttpServletResponse;
import java.io.IOException;
import java.util.List;
import java.util.Map;
import java.util.stream.Collectors;

//需要在@Transiactional之前就配置好
//之前对于静态文件,icon文件的拉取是没有租户标识的
@Slf4j
@Component
public class RequestFilter extends HandlerInterceptorAdapter {
    @Override
    public boolean preHandle(HttpServletRequest request, HttpServletResponse response, Object handler) throws Exception {
        String tenantId = request.getParameter("tenantId");
        if (tenantId != null && Strings.isNotBlank(tenantId) ){
            CurrentTenantHolder.setTenantId(tenantId);
        }
        return true;
    }
}
在@Transactonal启动的时候,就会触发获取租户的Connection,所以注入租户ID的步骤需要提前到HandlerInterceptor来处理。
16.5 小结
- 在Separate database和Separate schema的数据隔离下,强烈不建议使用Hibernate的多租户特性,直接使用Spring的动态数据源来实现就可以了。Hibernate的多租户毫无意义,在同一个事务内依然无法对多个租户的数据进行获取和处理,而且相比Spring的动态数据源功能受限多了。
- 在Partitioned (discriminator) data的数据隔离下,才需要用Hibernate的多租户特性来实现。
20 总结
JPA是遇到目前最复杂的ORM框架,我觉得它在国内的没落有点可惜,其实它的组合实现,和透明SQL生成还是十分方便。我认为,在大型复杂的业务中,JPA其实可以很优雅地实现DDD,大大提高可维护性,和减少代码量,但必须要在DDD聚合根的规则约束之下。
参考资料:
- 本文作者: fishedee
- 版权声明: 本博客所有文章均采用 CC BY-NC-SA 3.0 CN 许可协议,转载必须注明出处!
