0 概述
一些比较简单,但是常用的标准库使用经验汇总
1 基础类型
代码在这里
1.1 Box
package java_standard_test;

import org.junit.jupiter.api.Test;

import static org.junit.jupiter.api.Assertions.*;

public class TestLong {

    @Test
    public void test1(){
        //两个box类型,不能用指针比较,必须要用equals比较
        Long a = new Long(11L);
        Long b = 11L;
        assertFalse(a == b );
        assertTrue(a.equals(b));
    }

    @Test
    public void test2(){
        //box类型,无论是用字面值,还是类型,都需要类型相同才是为true
        //一个是Long类型,另外一个是Integer类型,用equals肯定为false的
        Long a = 11L;
        assertFalse(a.equals(11));

        Integer b = 11;
        assertFalse(a.equals(b));

        //这个是显然错误的,但是因为equals的参数是Object类型,所以编译器不会报错
        assertFalse(a.equals(true));
    }

    @Test
    public void test3(){
        //更好的办法是用longValue转换为基础类型,再去比较,这样能适应不同类型的比较
        Long a = 11L;
        assertTrue(a.longValue()==11);

        Integer b = 11;
        assertTrue(a.longValue()==b);

        //转换为基础类型以后,这段话会在编译时报错
        //assertTrue(a.longValue()==true);

        //当Box类型为null的时候,转换为基础类型,会抛出NullPointerException,这个符合预期
        assertThrows(NullPointerException.class,()->{
            Long c = null;
            assertTrue(c.longValue()==3);
        });
    }
}
注意Box类型的比较,先拆箱再比较是最安全稳当的方法
1.2 String
package java_standard_test;

import org.junit.jupiter.api.Test;
import static org.junit.jupiter.api.Assertions.*;

public class TestString {
    @Test
    public void stringToInt(){
        //普通方法
        int data = Integer.valueOf("123").intValue();
        assertEquals(data,123);

        //另外一种的解析方法
        int data2 = Integer.parseInt("123");
        assertEquals(data2,123);
    }


    @Test
    public void stringToInt_radix(){
        //普通方法,带基数的处理
        int data = Integer.valueOf("100",16).intValue();
        assertEquals(data,256);

        //另外一种的解析方法,带基数的处理
        int data2 = Integer.parseInt("100",16);
        assertEquals(data2,256);
    }


    @Test
    public void stringToInt_invalid(){
        //没有字符是不行的
        assertThrows(NumberFormatException.class,()-> {
            int data4 = Integer.valueOf("").intValue();
            assertEquals(data4,123);
        });

        //前或者后有空格也是不行的
        assertThrows(NumberFormatException.class,()-> {
            int data3 = Integer.valueOf(" 123 ").intValue();
            assertEquals(data3,123);
        });

        //尾部有其他字符也是不行的
        assertThrows(NumberFormatException.class,()-> {
            int data2 = Integer.valueOf("123k").intValue();
            assertEquals(data2, 123);
        });

        //前部有其他字符也是不行的
        assertThrows(NumberFormatException.class,()->{
            int data = Integer.valueOf("k123").intValue();
            assertEquals(data,123);
        });
    }
    @Test
    public void intToString(){
        //有装箱操作,但可能会被优化成没有,这个比较省事
        String data = 123+"";
        assertEquals(data,"123");

        //没有装箱和拆箱操作,效率最好
        String data2 = String.valueOf(123);
        assertEquals(data2,"123");
    }
}
string转int,与int转string,这些方法简直用到烂了,我们要注意的是:
- int转string,用Box类型的parseInt,或者valueOf都可以。格式要求比较严格,空格都不行。
- string转int,直接用加空字符串就可以了
1.3 Map
package java_standard_test;

import org.junit.jupiter.api.Test;

import java.math.BigDecimal;
import java.util.*;

import static org.junit.jupiter.api.Assertions.*;

public class TestMap {

    @Test
    public void testMapBasic(){
        Map<Integer,String> map = new HashMap();
        map.put(1,"12");

        //Map的value是泛型,不需要做类型转换
        String data = map.get(1);
        assertEquals(data,"12");
    }

    @Test
    public void testMapGetNoGeneric(){
        Map<Integer,String> map = new HashMap();
        map.put(1,"12");

        //注意,map的Key不是泛型,它总是Object类型,接受任意的参数
        assertNull(map.get("35"));

        //map的contains操作也不是泛型,总是为Object类型
        assertFalse(map.containsKey("35"));
        assertFalse(map.containsValue(new BigDecimal("2")));
    }

    @Test
    public void testMapGet(){
        //Map的Key是ArrayList类型
        Map<ArrayList<Integer>,String> map = new HashMap();

        //我们先放入一个数据,Key为ArrayList类型的
        ArrayList<Integer> list1 = new ArrayList<>();
        list1.add(1);
        list1.add(2);
        map.put(list1,"12");

        assertEquals(map.get(list1),"12");

        //但是,由于map的get是Object类型,我们可以尝试放入一个LinkedList类型,结果数据是可以查询出来的
        //Java这样的设计,是因为不同类型也是允许equals的,所以将get接口的参数设置为Object,而不是泛型T
        LinkedList<Integer> list2 = new LinkedList<>();
        list2.add(1);
        list2.add(2);
        assertEquals(map.get(list2),"12");
    }
}
Map类型考虑到了不同类型的key,执行equals也是可能相同的,所以:
- get,containsKey,containsValue的参数都是Object类型,而不是泛型。传错了类型以后,开发者无法得到编译器的编译时提醒,这点是要注意的。
2 日期与时间
代码在这里
在Java 1.8以前,我们使用Date,Calendar来表达日期和时间的概念,但是这两个类有以下的问题:
- Date和Calendar都是可变类型,运行时可修改的。一旦它们的实例被多个线程共享的时候,就可能产生冲突的问题。
- Date的API设计很糟糕,getYear(),getMonth()都没有做好。Calendar是对Date的补丁,但它的getMonth()是以0开始,不是以1开始的,就是getMonth()返回5的话,代表的是6月,而不是5月。(吐血设计)
- Date的API无法表现以下功能,以当前的Date为基准,获取这个月的最后一个星期五是哪一天。或者,以当前的Date为基准,获取本周的范围。
- Date同时表达了时间和日期的信息,但是业务中会出现只需要日期,或者只需要时间的类型。
- Date没有时区的描述。
- 缺少对时间差的描述,就是Duration。
于是,在Java 1.8以后,提供了LocalDate,LocalTime,LocalDateTime,ZonedDateTime,Duration和Period等类型来表达日期和时间的概念。我们应该尽可能使用这些类型,但是对于Date与Calendar也要必须掌握,毕竟旧代码总是存在的。而且,在所有类型之中,Date的序列化,反序列化,获取当前时间,的操作是最快的。
2.1 Date
package java_standard_test;

import lombok.extern.slf4j.Slf4j;
import org.junit.jupiter.api.Test;

import java.util.Calendar;
import java.util.Date;

import static org.junit.jupiter.api.Assertions.*;

@Slf4j
public class TestDate {

    //Date作为时间的容量
    @Test
    public void testNow(){
        //获取当前时间,注意是java.util.Date,不是java.sql.Date
        Date now = new Date();
        log.info("now {}",now);

        //unix时间戳,以毫秒为单位的
        Long unix = now.getTime();
        log.info("unix time {}",unix);

        Date now2 = new Date(unix+1000);
        log.info("now add 1 second {}",now2);
    }
}
Date类,注意,unix时间戳是以毫秒为单位的,不是秒。
2.2 Calendar
package java_standard_test;

import lombok.extern.slf4j.Slf4j;
import org.junit.jupiter.api.Test;

import java.util.Calendar;
import java.util.Date;

import static org.junit.jupiter.api.Assertions.assertEquals;

@Slf4j
public class TestCalendar {

    //Calendar是时间的处理方法,两者是分开的,不同的存储方式
    @Test
    public void testCalendarGet(){
        //2021年6月30日 16:51:48 CST
        Date now = new Date(1625043108660L);

        //Calendar使用工厂模式生成
        Calendar calendar = Calendar.getInstance();
        calendar.setTime(now);

        //基础信息的获取
        assertEquals(calendar.get(Calendar.YEAR),2021);
        //注意month必须加1,才是正确的month
        assertEquals(calendar.get(Calendar.MONTH)+1,6);
        assertEquals(calendar.get(Calendar.DAY_OF_MONTH),30);
        assertEquals(calendar.get(Calendar.HOUR_OF_DAY),16);
        assertEquals(calendar.get(Calendar.MINUTE),51);
        assertEquals(calendar.get(Calendar.SECOND),48);
        assertEquals(calendar.get(Calendar.MILLISECOND),660);

        //获取这个月的天数范围,注意用getActualMaximum和getActualMinimum,不要用getMaximum和getMinimum
        assertEquals(calendar.getActualMinimum(Calendar.DAY_OF_MONTH),1);
        assertEquals(calendar.getActualMaximum(Calendar.DAY_OF_MONTH),30);
    }

    @Test
    public void testCalendarSet(){
        //2021年6月30日 16:51:48 CST
        Date now = new Date(1625043108660L);
        Calendar calendar = Calendar.getInstance();
        calendar.setTime(now);

        //设置月份为8月
        calendar.set(Calendar.MONTH,8-1);

        //注意month必须加1,才是正确的month
        assertEquals(calendar.get(Calendar.YEAR),2021);
        assertEquals(calendar.get(Calendar.MONTH)+1,8);
        assertEquals(calendar.get(Calendar.DAY_OF_MONTH),30);
        assertEquals(calendar.get(Calendar.HOUR_OF_DAY),16);
        assertEquals(calendar.get(Calendar.MINUTE),51);
        assertEquals(calendar.get(Calendar.SECOND),48);
        assertEquals(calendar.get(Calendar.MILLISECOND),660);

        //从Calendar转换到了Date
        Date now2 = calendar.getTime();
        log.info("now2 {}",now2);
    }

    @Test
    public void testCalendarAdd(){
        //2021年6月30日 16:51:48 CST
        Date now = new Date(1625043108660L);
        Calendar calendar = Calendar.getInstance();
        calendar.setTime(now);

        //对当前时间加1天
        calendar.add(Calendar.DAY_OF_MONTH,1);

        //注意month必须加1,才是正确的month
        assertEquals(calendar.get(Calendar.YEAR),2021);
        assertEquals(calendar.get(Calendar.MONTH)+1,7);
        assertEquals(calendar.get(Calendar.DAY_OF_MONTH),1);
        assertEquals(calendar.get(Calendar.HOUR_OF_DAY),16);
        assertEquals(calendar.get(Calendar.MINUTE),51);
        assertEquals(calendar.get(Calendar.SECOND),48);
        assertEquals(calendar.get(Calendar.MILLISECOND),660);

        //从Calendar转换到了Date
        Date now2 = calendar.getTime();
        log.info("now2 {}",now2);
    }
}
Calendar的注意点如下:
- 需要用getInstance来拿实例
- 使用setTime与getTime,来触发与Date的相互转换
- 月份要+1,才是正确的值
2.3 Date的format与parse
package java_standard_test;

import org.junit.jupiter.api.Test;

import java.text.ParseException;
import java.text.SimpleDateFormat;
import java.util.Calendar;
import java.util.Date;

import static org.junit.jupiter.api.Assertions.assertEquals;

public class TestDateFormat {
    @Test
    public void testFormat() {
        //2021年6月30日 16:51:48 CST
        Date now = new Date(1625043108660L);

        //24小时制,格式化输出
        SimpleDateFormat ft = new SimpleDateFormat("yyyy-MM-dd HH:mm:ss");
        assertEquals(ft.format(now),"2021-06-30 16:51:48");

        //12小时制,格式化输出
        SimpleDateFormat ft2 = new SimpleDateFormat("yyyy-MM-dd hh:mm:ss");
        assertEquals(ft2.format(now),"2021-06-30 04:51:48");
    }

    @Test
    public void testParse(){
        //2021年6月30日 16:51:48 CST
        Date now = new Date(1625043108000L);

        //24小时制,读取
        SimpleDateFormat ft = new SimpleDateFormat("yyyy-MM-dd HH:mm:ss");
        try{
            Date now2 = ft.parse("2021-06-30 16:51:48");
            assertEquals(now,now2);
        }catch(ParseException e){
            throw new RuntimeException(e);
        }
    }
}
使用SimpleDateFormat来做Date与String的转换工作,注意小时要用HH,而不是hh
2.4 Duration
package java_standard_test;

import lombok.extern.slf4j.Slf4j;
import org.junit.jupiter.api.Test;

import java.time.Duration;
import java.util.Date;

@Slf4j
public class TestDuration {
    @Test
    public void go(){
        //2021年6月30日 16:51:48 CST
        Date begin = new Date(1625043108660L);

        //2021年6月30日 19:38:28 CST
        Date end = new Date(1625053108660L);

        Duration duration = Duration.between(begin.toInstant(),end.toInstant());
        //PT2H46M40S,代表2小时,36分钟,40秒。
        //getSeconds可以转换为秒级的说明
        log.info("duration {} {}秒",duration,duration.getSeconds());
    }

    @Test
    public void go2(){
        //从秒级转换为Duration
        Duration duration = Duration.ofSeconds(100);
        log.info("duration {}秒",duration.getSeconds());
    }
}
Duration是java 1.8以后的新类型,用between来创建,输出描述是特别的PT2H46M40S格式。
2.5 LocalDate
package java_standard_test;

import lombok.extern.slf4j.Slf4j;
import org.junit.jupiter.api.Test;

import java.time.Duration;
import java.time.LocalDate;
import java.time.Period;
import java.time.format.DateTimeFormatter;
import java.util.Date;

import static org.junit.jupiter.api.Assertions.assertEquals;

@Slf4j
public class TestLocalDate {
    @Test
    public void testLocalDateNew(){
        //获取今天日期
        LocalDate date = LocalDate.now();
    }


    @Test
    public void testLocalDateGet(){
        LocalDate date = LocalDate.of(2021,6,30);

        //没有month的坑
        assertEquals(date.getYear(),2021);
        assertEquals(date.getMonth().getValue(),6);
        assertEquals(date.getDayOfMonth(),30);
        assertEquals(date.getDayOfWeek().getValue(),3);
    }


    @Test
    public void testLocalDateSet(){
        LocalDate date = LocalDate.of(2021,6,30);

        //LocalDate都是Immutable的,可以在跨线程下使用,每次变化都创建新的Date
        LocalDate date2 = date.withYear(2022);
        assertEquals(date2.format(DateTimeFormatter.ofPattern("yyyy-MM-dd")),"2022-06-30");

        LocalDate date3 = date2.withMonth(7);
        LocalDate date4 = date3.withDayOfMonth(20);
        assertEquals(date4.format(DateTimeFormatter.ofPattern("yyyy-MM-dd")),"2022-07-20");
    }

    @Test
    public void testLocalDateFormatAndParse(){
        LocalDate date = LocalDate.of(2021,6,30);

        //format
        String formater = date.format(DateTimeFormatter.ofPattern("yyyy-MM-dd"));
        assertEquals(formater,"2021-06-30");

        //parse
        LocalDate date2 = LocalDate.parse("2022-07-28",DateTimeFormatter.ofPattern("yyyy-MM-dd"));
        assertEquals(date2.getYear(),2022);
        assertEquals(date2.getMonth().getValue(),7);
        assertEquals(date2.getDayOfMonth(),28);
    }

    @Test
    public void testLocalDateDuration(){
        LocalDate date = LocalDate.of(2021,6,30);
        LocalDate date2 = LocalDate.of(2021,7,30);


        //LocalDate不能用Duration,Duration是秒级的
        //Duration duration = Duration.between(date,date2);

        Period period = Period.between(date,date2);
        assertEquals(period.toString(),"P1M");
    }
}
LocalDate的注意点如下:
- 使用LocalDate.now()来获取当前日期
- 使用LocalDate.of()来自主创建特定日期
- 使用parse与format来做与String的转换
- Immutable实现,每个修改操作都会产生新的LocalDate实例,从而可以在多线程环境中安全使用。
- 日期的间距用Period,不能用Duration
- 获取用get,修改用with,with的功能很强大
2.6 LocalDateTime
package java_standard_test;

import lombok.extern.slf4j.Slf4j;
import org.junit.jupiter.api.Test;

import java.time.*;
import java.time.format.DateTimeFormatter;
import java.time.temporal.TemporalAdjusters;
import java.util.Date;

import static org.junit.jupiter.api.Assertions.assertEquals;

@Slf4j
public class TestLocalDateTime {
    @Test
    public void testLocalDateTimeNew(){
        //获取今天日期
        LocalDateTime date = LocalDateTime.now();


    }

    @Test
    public void testLocalDateTimeGet(){
        //用指定的日期创建LocalDate
        LocalDateTime date = LocalDateTime.of(2021,6,30,12,30,59);

        //没有month的坑
        assertEquals(date.getYear(),2021);
        assertEquals(date.getMonth().getValue(),6);
        assertEquals(date.getDayOfMonth(),30);
        assertEquals(date.getDayOfWeek().getValue(),3);
        assertEquals(date.getHour(),12);
        assertEquals(date.getMinute(),30);
        assertEquals(date.getSecond(),59);
    }

    @Test
    public void testLocalDateTimeSet(){
        LocalDateTime date = LocalDateTime.of(2021,6,30,18,30,59);

        //LocalDateTime都是Immutable的,可以在跨线程下使用,每次变化都创建新的Date
        LocalDateTime date2 = date.withYear(2022);
        assertEquals(date2.format(DateTimeFormatter.ofPattern("yyyy-MM-dd HH:mm:ss")),"2022-06-30 18:30:59");

        LocalDateTime date3 = date2.withMonth(7);
        LocalDateTime date4 = date3.withDayOfMonth(20);
        LocalDateTime date5 = date4.withHour(20);
        assertEquals(date5.format(DateTimeFormatter.ofPattern("yyyy-MM-dd HH:mm:ss")),"2022-07-20 20:30:59");
    }

    @Test
    public void testLocalDateTimeFormatAndParse(){
        LocalDateTime date = LocalDateTime.of(2021,6,30,18,30,59);

        //format
        String formater = date.format(DateTimeFormatter.ofPattern("yyyy-MM-dd HH:mm:ss"));
        assertEquals(formater,"2021-06-30 18:30:59");

        String formater2 = date.format(DateTimeFormatter.ISO_LOCAL_DATE_TIME);
        assertEquals(formater2,"2021-06-30T18:30:59");

        //parse
        LocalDateTime date2 = LocalDateTime.parse("2022-07-28 20:18:39",DateTimeFormatter.ofPattern("yyyy-MM-dd HH:mm:ss"));
        assertEquals(date2.getYear(),2022);
        assertEquals(date2.getMonth().getValue(),7);
        assertEquals(date2.getDayOfMonth(),28);
        assertEquals(date2.getHour(),20);
        assertEquals(date2.getMinute(),18);
        assertEquals(date2.getSecond(),39);
    }

    @Test
    public void testLocalDateDuration(){
        LocalDateTime date = LocalDateTime.of(2021,6,30,18,30,59);
        LocalDateTime date2 = LocalDateTime.of(2021,7,30,19,22,33);


        //LocalDateTime不能用Period,Period是天数级的
        //Period period = Period.between(date,date2);

        Duration duration = Duration.between(date,date2);
        assertEquals(duration.toString(),"PT720H51M34S");
    }

    @Test
    public void testSpecialWith(){
        LocalDateTime date = LocalDateTime.of(2021,6,2,18,30,59);

        //该月的最后一个星期一
        LocalDateTime date2 = date.with(TemporalAdjusters.lastInMonth(DayOfWeek.MONDAY));
        assertEquals(date2.format(DateTimeFormatter.ofPattern("yyyy-MM-dd HH:mm:ss")),"2021-06-28 18:30:59");

        //该月的最后一天
        LocalDateTime date3 = date.with(TemporalAdjusters.lastDayOfMonth());
        assertEquals(date3.format(DateTimeFormatter.ofPattern("yyyy-MM-dd HH:mm:ss")),"2021-06-30 18:30:59");
    }
}
LocalDateTime的注意点如下:
- 使用LocalDateTime.now()来获取当前日期
- 使用LocalDateTime.of()来自主创建特定日期
- 使用parse与format来做与String的转换,有默认的DateTimeFormatter可以选用
- Immutable实现,每个修改操作都会产生新的LocalDateTime实例,从而可以在多线程环境中安全使用。
- 时间的间距用Duration,不能用Period
- 获取用get,修改用with,with的功能很强大。可以看看date.with(TemporalAdjusters.lastInMonth(DayOfWeek.MONDAY)),date.with(TemporalAdjusters.lastDayOfMonth()),这个真的是666.
2.7 ZonedDateTime
@Test
public void testZoned(){
    LocalDateTime date = LocalDateTime.of(2021,6,2,18,30,59);

    //带时区信息的时间
    ZonedDateTime zonedDateTime = date.atZone(ZoneId.systemDefault());
    assertEquals(zonedDateTime.format(DateTimeFormatter.ISO_ZONED_DATE_TIME),"2021-06-02T18:30:59+08:00[Asia/Shanghai]");

    //切换到其他时区
    ZonedDateTime zonedDateTime2 = ZonedDateTime.ofInstant(zonedDateTime.toInstant(),ZoneId.of("Asia/Yerevan"));
    assertEquals(zonedDateTime2.format(DateTimeFormatter.ISO_ZONED_DATE_TIME),"2021-06-02T14:30:59+04:00[Asia/Yerevan]");
}
LocalDateTime与ZonedDateTime的互相转换
3 流计算
代码在这里
3.1 创建流
我一直觉得Java的流实现挺糟糕,完全没有C#的强大。不过有时候用流的确能少写点代码。
package java_standard_test;

import org.junit.jupiter.api.Test;
import org.springframework.beans.factory.annotation.Autowired;

import java.util.Arrays;
import java.util.List;
import java.util.stream.Collectors;
import java.util.stream.Stream;
import java.util.stream.StreamSupport;

import static org.junit.jupiter.api.Assertions.*;

public class TestStreamCreate {
    @Test
    public void testCollect(){
        List<Integer> lists = Arrays.asList(1,2,3);
        List<Integer> lists2 = lists.stream().map((a)->{
            return a+1;
        }).collect(Collectors.toList());
        assertIterableEquals(lists2,Arrays.asList(2,3,4));
    }

    @Autowired
    private UserRepository userRepository;

    @Test
    public void testIterable(){
        Iterable<Integer> iterables = Arrays.asList(1,2,3);

        //第二个参数代表不并行
        List<Integer> lists = StreamSupport.stream(iterables.spliterator(),false).map((a)->{
            return a+1;
        }).collect(Collectors.toList());
        assertIterableEquals(lists,Arrays.asList(2,3,4));
    }

    @Test
    public void testObjectArray(){
        Integer[] intArray = new Integer[]{1,2,3};

        //用Arrays.stream来转换为Stream
        List<Integer> lists = Arrays.stream(intArray).map((a)->{
            return a+1;
        }).collect(Collectors.toList());
        assertIterableEquals(lists,Arrays.asList(2,3,4));
    }

    @Test
    public void testObjectArray2(){
        Integer[] intArray = new Integer[]{1,2,3};

        //用Stream.of来转换为Stream
        List<Integer> lists = Stream.of(intArray).map((a)->{
            return a+1;
        }).collect(Collectors.toList());
        assertIterableEquals(lists,Arrays.asList(2,3,4));
    }

    @Test
    public void testPrimitiveArray(){
        int[] intArray = new int[]{1,2,3};

        //需要加入box转换,否则会报错
        List<Integer> lists = Arrays.stream(intArray).map((a)->{
            return a+1;
        }).boxed().collect(Collectors.toList());
        assertIterableEquals(lists,Arrays.asList(2,3,4));
    }

    //使用Stream.of,转换int[]的时候,会报错,会转换为Stream<int[]>,而不是正确的Stream<int>流
    /*
    @Test
    public void testPrimitiveArray(){
        int[] intArray = new int[]{1,2,3};

        List<Integer> lists = Stream.of(intArray).map((a)->{
            return a+1;
        }).boxed().collect(Collectors.toList());
        assertIterableEquals(lists,Arrays.asList(2,3,4));
    }
     */
}
要注意,可以用以下的方式创建流:
- List,直接用stream方法
- spliterator方法创建流
- Arrays.stream,对数组类型创建流,对于基础类型数组,输出的时候要注意用boxed来包装一下元素类型。
- Stream.of,对于基础类型数组,这种方法会失效。
将List与Iterable转换为流的方式,并用map,forEach,filter,sort等流操作符,最后用collect输出。
3.2 流操作
package java_standard_test;

import lombok.AllArgsConstructor;
import lombok.Data;
import lombok.NoArgsConstructor;
import lombok.extern.slf4j.Slf4j;
import org.junit.jupiter.api.Test;

import java.util.Arrays;
import java.util.List;
import java.util.Map;
import java.util.stream.Collectors;
import static org.junit.jupiter.api.Assertions.*;

@Slf4j
public class TestStreamOperate {

    @Data
    @AllArgsConstructor
    @NoArgsConstructor
    public static class User{
        private Long id;

        private String name;
    }

    @Test
    public void testMap(){
        List<User> userList = Arrays.asList(
                new User(1L,"fish"),
                new User(2L,"dog"),
                new User(3L,"sheep")
        );

        Map<Long,User> userMap = userList.stream().collect(Collectors.toMap(ref->ref.getId(), ref->ref));

        log.info("{}",userMap);
    }

    @Test
    public void testGroup(){
        List<User> userList = Arrays.asList(
                new User(1L,"fish"),
                new User(1L,"cat"),
                new User(2L,"dog"),
                new User(3L,"sheep")
        );

        Map<Long,List<User>> userMap = userList.stream().collect(Collectors.groupingBy(ref->ref.getId(),Collectors.toList()));

        log.info("{}",userMap);
    }
}
注意,可以用Collectors.toMap,或者Collectors.groupingBy来创建map映射,groupingBy的方法更为强大一点。
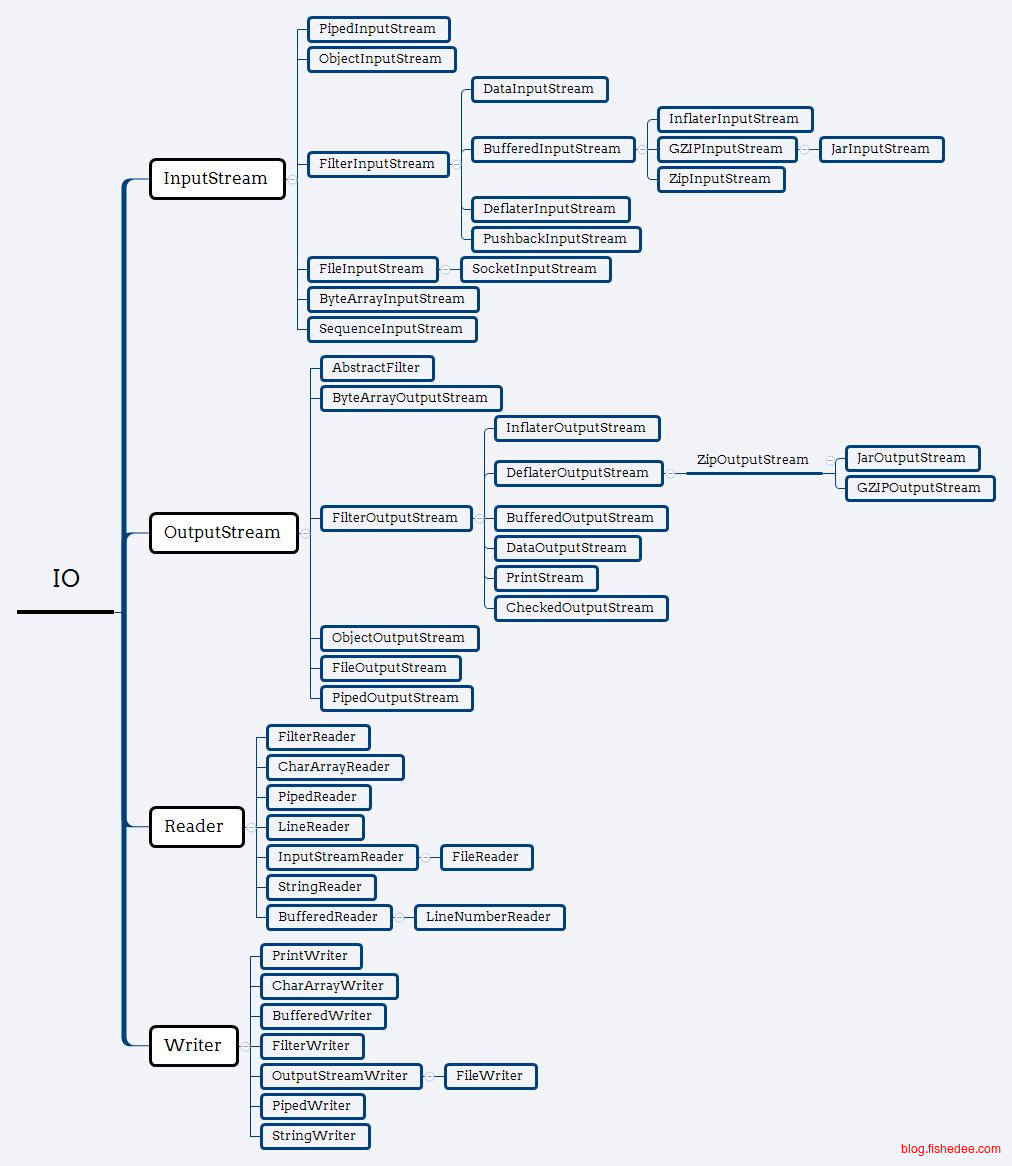
4 IO流
Java里面的IO流相当复杂,需要仔细对比每个类的职责。
代码在这里
4.1 字节流与缓存流
package java_test;

import org.springframework.stereotype.Component;

import java.io.*;

@Component
public class FileTest {

    public void go()throws Exception{
        FileInputStream inFile = null;
        FileOutputStream outFile = null;
        BufferedInputStream bufferedInputStream = null;
        BufferedOutputStream bufferedOutputStream = null;
        try{
            //FileInputStream是对文件的字节流
            inFile = new FileInputStream("a.jpeg");
            outFile = new FileOutputStream("b.jpeg");
            //bufferedInputStream是处理流
            bufferedInputStream = new BufferedInputStream(inFile);
            bufferedOutputStream = new BufferedOutputStream(outFile);
            byte[] buffer = new byte[1024];
            int length = 0;
            while( (length= bufferedInputStream.read(buffer))!=-1){
                bufferedOutputStream.write(buffer,0,length);
            }
        }finally {
            if( bufferedOutputStream != null){
                bufferedOutputStream.close();
            }
            if( bufferedInputStream != null){
                bufferedInputStream.close();
            }
            if( outFile != null){
                outFile.close();
            }
            if( inFile != null){
                inFile.close();
            }
        }
    }
}
InputStream与OutputStream就是以字节为对象的IO流,BufferedInputStream与BufferedOutputStream是一个装饰器对象,它能将字节流进行封装,高效地预读取数据到内存中,以提高读写效率。
同理地,其他的字节流还有:
- ByteArrayInputStream,从字节数组中读取
- ByteArrayOutputStream,写入到字节数组中
- PipedInputStream,从管道中读取
- PipedOutputStream,写入到管道中
4.2 字符流
package java_test;

import org.springframework.stereotype.Component;

import java.io.*;

@Component
public class FileTest2 {

    public void go()throws Exception{
        //FileReader是默认按系统的默认编码来读取的,Mac是UTF-8编码,在Windows是GBK编码,读取后的结果统一转换为UTF-8编码
        //这个设计显然并不好,在Windows系统中打开UTF-8编码的文件就会乱码,因为Windows系统默认的编码是GBK
        FileReader inFile = null;
        FileWriter outFile = null;
        BufferedReader bufferedReader = null;
        BufferedWriter bufferedWriter = null;
        try{
            //FileInputStream是对文件的字符流
            inFile = new FileReader("utf8.txt");
            outFile = new FileWriter("b.txt");
            //bufferedInputStream是处理字符流
            bufferedReader = new BufferedReader(inFile);
            bufferedWriter = new BufferedWriter(outFile);
            //这是与FileInputStream的区分,处理的是字符,不是字节,所有用char[],而不是byte[]
            char[] buffer = new char[1024];
            int length = 0;
            while( (length= bufferedReader.read(buffer))!=-1){
                bufferedWriter.write(buffer,0,length);
            }
        }finally {
            if( bufferedWriter != null){
                bufferedWriter.close();
            }
            if( bufferedReader != null){
                bufferedReader.close();
            }
            if( outFile != null){
                outFile.close();
            }
            if( inFile != null){
                inFile.close();
            }
        }
    }
}
Reader与Writer就是字符流,它的处理对象是Char,而不是byte,这就是他们与字节流的区别。同样地,带有缓冲区优化的IO流,就不能使用BufferedInputStream了,要用对应的BufferedReader。注意,FileReader是默认按系统的默认编码来读取的,Mac是UTF-8编码,在Windows是GBK编码,读取后的结果统一转换为UTF-8编码。这个设计显然并不好,在Windows系统中打开UTF-8编码的文件就会乱码,因为Windows系统默认的编码是GBK
同理地,其他的字符流还有:
- CharArrayReader,从字符数组中读取
- CharArrayWriter,写入到字符数组中
- StringReader,从字符串中读取
- StringWriter,写入到字符串中
- PipedReader,从管道中读取
- PipedWriter,写入到管道中
可以看到,CharArray与String是只有字符流,没有字节流的。同理,ByteArray是只有字节流,没有字符流的
4.3 字节流与字符流的转换
package java_test;

import org.springframework.stereotype.Component;

import java.io.*;

@Component
public class FileTest3 {

    public void go()throws Exception{
        //FileReader是默认按系统的默认编码来读取的,Mac是UTF-8编码,在Windows是GBK编码,读取后的结果统一转换为UTF-8编码
        //这个设计显然并不好,在Windows系统中打开UTF-8编码的文件就会乱码,因为Windows系统默认的编码是GBK
        FileInputStream inFile = null;
        FileOutputStream outFile = null;
        BufferedInputStream bufferedInputStream = null;
        BufferedOutputStream bufferedOutputStream = null;
        InputStreamReader reader = null;
        OutputStreamWriter writer = null;
        try{
            //FileInputStream是对文件的字节流
            inFile = new FileInputStream("utf8.txt");
            outFile = new FileOutputStream("gbk.txt");
            //bufferedInputStream是处理字节流
            bufferedInputStream = new BufferedInputStream(inFile);
            bufferedOutputStream = new BufferedOutputStream(outFile);
            //Stream转换为Reader,从字节流转换为字符流
            reader = new InputStreamReader(bufferedInputStream,"UTF-8");
            writer = new OutputStreamWriter(bufferedOutputStream,"GBK");
            //这是与FileInputStream的区分,处理的是字符,不是字节,所有用char[],而不是byte[]
            char[] buffer = new char[1024];
            int length = 0;
            while( (length= reader.read(buffer))!=-1){
                writer.write(buffer,0,length);
            }
        }finally {
            if( writer != null ){
                writer.close();
            }
            if( reader != null){
                reader.close();
            }
            if( bufferedOutputStream != null){
                bufferedOutputStream.close();
            }
            if( bufferedInputStream != null){
                bufferedInputStream.close();
            }
            if( outFile != null){
                outFile.close();
            }
            if( inFile != null){
                inFile.close();
            }
        }
    }
}
字符流与字节流转换的方式就是通过InputStreamReader与OutputStreamWriter,InpuStreamReader能将读取字节流,转换为读取字符流,OutputStreamWriter能写入字符流,转换为写入字节流。与纯粹的FileReader不同,InputStreamReader是能指定文件原来的编码,能显式地避免乱码问题的出现。
4.4 ByteArrayStream
package java_test;

import com.sun.xml.internal.messaging.saaj.util.ByteInputStream;
import com.sun.xml.internal.messaging.saaj.util.ByteOutputStream;
import org.springframework.beans.factory.annotation.Autowired;
import org.springframework.stereotype.Component;

import java.io.*;

@Component
public class ByteArrayStreamTest {

    public byte[] readToMemory()throws Exception{
        ByteArrayOutputStream byteStream = new ByteArrayOutputStream();
        FileInputStream inFile = null;
        BufferedInputStream bufferedInputStream = null;
        FileOutputStream outFile = null;
        try{
            inFile = new FileInputStream("a.jpeg");
            bufferedInputStream = new BufferedInputStream(inFile);
            byte[] buffer = new byte[1024];
            int length = 0;
            while( (length= bufferedInputStream.read(buffer))!=-1){
                byteStream.write(buffer,0,length);
            }
            return byteStream.toByteArray();
        }finally {
            if( byteStream!= null ){
                byteStream.close();
            }
            if( bufferedInputStream != null){
                bufferedInputStream.close();
            }
            if( inFile != null){
                inFile.close();
            }
        }
    }

    public void memoryToFile(byte[] memory)throws Exception{
        ByteArrayInputStream byteStream = new ByteArrayInputStream(memory);
        FileOutputStream outFile = null;
        BufferedOutputStream bufferedOutputStream = null;
        try{
            outFile = new FileOutputStream("b2.jpeg");
            bufferedOutputStream = new BufferedOutputStream(outFile);
            byte[] buffer = new byte[1024];
            int length = 0;
            while( (length= byteStream.read(buffer))!=-1){
                bufferedOutputStream.write(buffer,0,length);
            }
        }finally {
            if( byteStream != null ){
                byteStream.close();
            }
            if( bufferedOutputStream != null){
                bufferedOutputStream.close();
            }
            if( outFile != null){
                outFile.close();
            }
        }
    }

    public void go()throws Exception{
        byte[] memory = this.readToMemory();

        this.memoryToFile(memory);
    }
}
ByteArrayOutputStream与ByteArrayInputStream,是将内存看成是流的源和目的地的方法,这个工具经常用到。同理的是,StringReader与StringWriter
4.5 ByteBuffer
package java_test;

import com.oracle.tools.packager.IOUtils;
import org.springframework.stereotype.Component;

import java.io.*;
import java.nio.ByteBuffer;
import java.nio.channels.FileChannel;
import java.nio.file.StandardOpenOption;

@Component
public class ByteBufferTest {

    public void go()throws Exception {
        FileChannel readChannel = null;
        FileChannel writeChannel = null;
        try {
            readChannel = FileChannel.open(new File("a.jpeg").toPath());
            writeChannel = FileChannel.open(new File("b3.jpeg").toPath(), StandardOpenOption.WRITE , StandardOpenOption.CREATE);
            ByteBuffer byteBuffer = ByteBuffer.allocate(64);
            int length = 0;
            while ((length = readChannel.read(byteBuffer)) != -1) {
                //转换到写模式,从byteBuffer读取数据,写入到文件中
                byteBuffer.flip();
                writeChannel.write(byteBuffer);

                //清空缓冲区,未读未写
                byteBuffer.clear();
            }
        } finally {
            if (readChannel != null) {
                readChannel.close();
            }
            if (writeChannel != null) {
                writeChannel.close();
            }
        }
    }
}
ByteBuffer是nio的工具,用来代替简单的byte[1024]数组,它需要配合FileChannel或者SocketChannel这些工具来使用。注意,它不是StringBuffer的字节对应版本,它们是完全不同的两个概念。
4.6 关闭流
package java_test;

import org.springframework.stereotype.Component;

import java.io.*;

@Component
public class CloseFileTest {
    private void test1(){
        FileInputStream inFile = null;
        BufferedInputStream bufferedInputStream = null;
        ByteArrayOutputStream byteArrayOutputStream = new ByteArrayOutputStream();
        try{
            //FileInputStream是对文件的字节流
            inFile = new FileInputStream("a.jpeg");
            //bufferedInputStream是处理流
            bufferedInputStream = new BufferedInputStream(inFile);
            byte[] buffer = new byte[1024];
            int length = 0;
            while( (length= bufferedInputStream.read(buffer))!=-1){
                byteArrayOutputStream.write(buffer,0,length);
            }
            int allLength = byteArrayOutputStream.toByteArray().length;
            if( allLength != 256272 ){
                throw new RuntimeException("读取错误!");
            }
        }catch(FileNotFoundException e ){
            e.printStackTrace();
        }catch(IOException e){
            e.printStackTrace();
        }finally {
            try{
                if( bufferedInputStream != null){
                    bufferedInputStream.close();
                }
                if( inFile != null){
                    inFile.close();
                }
                if( byteArrayOutputStream != null ){
                    byteArrayOutputStream.close();
                }
            }catch(IOException e){
                e.printStackTrace();
            }
        }
    }

    private void test2(){
        FileInputStream inFile = null;
        BufferedInputStream bufferedInputStream = null;
        ByteArrayOutputStream byteArrayOutputStream = new ByteArrayOutputStream();
        try{
            //FileInputStream是对文件的字节流
            inFile = new FileInputStream("a.jpeg");
            //bufferedInputStream是处理流
            bufferedInputStream = new BufferedInputStream(inFile);
            byte[] buffer = new byte[1024];
            int length = 0;
            while( (length= bufferedInputStream.read(buffer))!=-1){
                byteArrayOutputStream.write(buffer,0,length);
            }
            if( byteArrayOutputStream.toByteArray().length != 256272){
                throw new RuntimeException("读取错误!");
            }
        }catch(FileNotFoundException e ){
            e.printStackTrace();
        }catch(IOException e){
            e.printStackTrace();
        }finally {
            try{
                //在装饰器模式上,外层流关闭,会触发内层流的关闭,不再需要手动关闭内层流
                if( bufferedInputStream != null){
                    bufferedInputStream.close();
                }
                if( byteArrayOutputStream != null ){
                    byteArrayOutputStream.close();
                }
            }catch(IOException e){
                e.printStackTrace();
            }
        }
    }

    private void test3(){
        try(
                BufferedInputStream inputStream = new BufferedInputStream(new FileInputStream("a.jpeg"));
                ByteArrayOutputStream outputStream = new ByteArrayOutputStream()
        ){
            byte[] buffer = new byte[1024];
            int length = 0;
            while( (length= inputStream.read(buffer))!=-1){
                outputStream.write(buffer,0,length);
            }
            if( outputStream.toByteArray().length != 256272){
                throw new RuntimeException("读取错误!");
            }
        }catch(FileNotFoundException e ){
            e.printStackTrace();
        }catch(IOException e){
            e.printStackTrace();
        }
    }

    public void go(){
        test1();
        test2();
        test3();
    }
}
如何正确关闭IO流,注意几点:
- 装饰器模式的IO流,只需要关闭最外面的流,底层和中间流都会自动关闭
- jdk7的try方式关闭流会省事一点
5 文件操作
看这里
5.1 文件
package java_test;

import lombok.extern.slf4j.Slf4j;
import org.springframework.stereotype.Component;

import java.io.*;

@Component
@Slf4j
public class FileTest {

    public void go()throws Exception{
        File a = new File("../file/data/a.jpeg");
        log.info("exists {}",a.exists());
        log.info("name {}",a.getName());
        log.info("path {}",a.getPath());
        log.info("absolutePath {}",a.getAbsolutePath());
        log.info("canonicalPath {}",a.getCanonicalPath());//去掉了...的符号
        log.info("isDirectory {}",a.isDirectory());
        log.info("isFile {}",a.isFile());

        File b = new File("data/cc.jpeg");
        if( b.exists() == false ){
            //创建文件
            b.createNewFile();

            //重命名
            b.renameTo(new File("data/c2.jpeg"));
        }
        //删除文件
        new File("data/c2.jpeg").delete();
    }
}
java的File工具还是相当简单的,也很直观,注意getCanonicalPath与getAbsolutePath的区别。
5.2 文件夹
package java_test;

import lombok.extern.slf4j.Slf4j;
import org.springframework.stereotype.Component;

import java.io.File;
import java.nio.file.Files;
import java.util.Arrays;
import java.util.stream.Collectors;

@Component
@Slf4j
public class DirectoryTest {

    public void go()throws Exception{
        File a = new File("../file");
        log.info("exists {}",a.exists());
        log.info("name {}",a.getName());
        log.info("path {}",a.getPath());
        log.info("absolutePath {}",a.getAbsolutePath());
        log.info("canonicalPath {}",a.getCanonicalPath());//去掉了...的符号
        log.info("isDirectory {}",a.isDirectory());
        log.info("isFile {}",a.isFile());

        File[] subFiles = a.listFiles();
        log.info("subFiles {}", Arrays.stream(subFiles).collect(Collectors.toList()));

        File c = new File("data2");
        if( c.exists() == false ){
            //创建文件夹
            c.mkdir();
            //重命名
            c.renameTo(new File("data3"));
        }
        //删除文件夹
        new File("data3").delete();
    }
}
文件夹的操作也很简单,我们最常用的方法是listFiles。
6 ScriptEngine
代码在这里
Java的ScriptEngine是在JVM上执行javascript代码的工具,性能虽然比不上V8,但也不差。常用在:
- 爬虫里面拉取js代码,然后放在ScriptEngine中执行
- ScriptEngine作为用户输入自定义逻辑的方法,安全可靠
- ScriptEngine作为Java的模板引擎。
遗憾的是,ScriptEngine在Jdk 15废弃了,因为跟不上最新的JS规范。
6.1 Java调用Javascript
package java_test;

import jdk.nashorn.api.scripting.ScriptObjectMirror;
import lombok.extern.slf4j.Slf4j;
import org.springframework.stereotype.Component;

import javax.script.Invocable;
import javax.script.ScriptEngine;
import javax.script.ScriptEngineManager;
import javax.script.ScriptException;

@Component
@Slf4j
public class EvalTest {
    public void testEvalExpression(){

        ScriptEngineManager scriptEngineManager = new ScriptEngineManager();
        ScriptEngine nashorn = scriptEngineManager.getEngineByName("nashorn");

        try {
            String script = "10+2";
            Object result = nashorn.eval(script);
            log.info("{} = {},{}",script,result,result.getClass().getTypeName());
        }catch(ScriptException e){
            System.out.println("执行脚本错误: "+ e.getMessage());
        }
    }

    public void testEvalObject(){
        ScriptEngineManager scriptEngineManager = new ScriptEngineManager();
        ScriptEngine nashorn = scriptEngineManager.getEngineByName("nashorn");

        try {
            String script = "var a = {\"name\":\"fish\",\"data\":[1,2,3]};JSON.stringify(a)";
            String result = (String)nashorn.eval(script);
            log.info("{} = {},{}",script,result,result.getClass().getTypeName());
        }catch(ScriptException e){
            System.out.println("执行脚本错误: "+ e.getMessage());
        }
    }

    public void testEvalFunction(){
        ScriptEngineManager scriptEngineManager = new ScriptEngineManager();
        ScriptEngine nashorn = scriptEngineManager.getEngineByName("nashorn");

        try {
            String script = "function run(){"+
                    "var a = {\"name\":\"fish\",\"data\":[1,2,3]};" +
                    "return JSON.stringify(a);"+
                    "}";
            ScriptObjectMirror invocable = (ScriptObjectMirror)nashorn.eval(script);
            Object result = invocable.call(null);
            log.info("{} = {},{}",script,result,result.getClass().getTypeName());
        }catch(ScriptException e){
            System.out.println("执行脚本错误: "+ e.getMessage());
        }
    }

    public void go(){
        testEvalExpression();
        testEvalObject();
        testEvalFunction();
    }
}
我们主要是使用eval方法来执行对应的脚本。注意点如下:
- 对于返回值为普通类型,eval返回String或者Integer等对应的类型
- 对于返回值为js的Object类型,eval返回ScriptObjectMirror类型
- 对于返回值为function类型,eval也是返回ScriptObjectMirror类型。
7 BigDecimal
代码在这里
7.1 基础操作
package java_standard_test;

import lombok.extern.slf4j.Slf4j;
import org.junit.jupiter.api.Test;
import static org.junit.jupiter.api.Assertions.*;
import java.math.BigDecimal;
import java.math.RoundingMode;

@Slf4j
public class TestBigDecimal {

    @Test
    public void testBaisc(){
        BigDecimal a = new BigDecimal("11");
        BigDecimal b = new BigDecimal("1.2");

        assertEquals(a.add(b),new BigDecimal("12.2"));
        assertEquals(a.subtract(b),new BigDecimal("9.8"));
        assertEquals(a.multiply(b),new BigDecimal("13.2"));

        //能够整除的时候才能使用直接的divide,否则会报出ArithmeticException异常
        assertThrows(ArithmeticException.class,()->{
            assertEquals(a.divide(b),new BigDecimal("12.31"));
        });

        //直接使用divide模式的时候,结果的scale(小数位数),与a的scale(小数位数)相同,也就是不确定的,我们需要尽量避免这种写法
        assertEquals(a.divide(b, BigDecimal.ROUND_HALF_UP),new BigDecimal("9"));

        //使用divide,指定scale(小数位数),明确的指定,我们尽量使用这种写法
        assertEquals(a.divide(b,4,BigDecimal.ROUND_HALF_UP),new BigDecimal("9.1667"));
    }

    @Test
    public void testEquals(){
        BigDecimal a = new BigDecimal("11");
        BigDecimal b = new BigDecimal("11.0");

        //直接使用equals比较的时候,会比较scale部分,所以结果为false。这种写法我们需要尽量避免
        assertFalse(a.equals(b));

        //使用compareTo,才能在避免scale不同的时候,只进行value部分的比较
        assertEquals(a.compareTo(b),0);
    }

    @Test
    public void testAbs(){
        assertEquals(new BigDecimal("11").abs(),new BigDecimal("11"));
        assertEquals(new BigDecimal("-11").abs(),new BigDecimal("11"));
    }

    @Test
    public void testFormat(){
        BigDecimal veryBigNumber = new BigDecimal("1.23e14");
        BigDecimal normal = new BigDecimal("11");
        BigDecimal backNumber = new BigDecimal("12.200");

        //普通的整数
        assertEquals(veryBigNumber.toString(),"1.23E+14");
        assertEquals(normal.toString(),"11");
        assertEquals(backNumber.toString(),"12.200");

        //plainString,避免科学计数法
        assertEquals(veryBigNumber.toPlainString(),"123000000000000");
        assertEquals(normal.toPlainString(),"11");
        assertEquals(backNumber.toPlainString(),"12.200");

        //stripTrailingZeros + plainString,先去掉尾部0,再加上避免科学计数法
        assertEquals(veryBigNumber.stripTrailingZeros().toPlainString(),"123000000000000");
        assertEquals(normal.stripTrailingZeros().toPlainString(),"11");
        assertEquals(backNumber.stripTrailingZeros().toPlainString(),"12.2");
    }

    @Test
    public void testRound(){
        BigDecimal a = new BigDecimal("2.12");
        BigDecimal a_2 = new BigDecimal("2.15");
        BigDecimal b = new BigDecimal("-2.12");
        BigDecimal b_2 = new BigDecimal("-2.15");

        //对于,正数,且不在中间线
        assertEquals(a.setScale(1,BigDecimal.ROUND_CEILING).toPlainString(),"2.2");
        assertEquals(a.setScale(1,BigDecimal.ROUND_FLOOR).toPlainString(),"2.1");
        assertEquals(a.setScale(1,BigDecimal.ROUND_DOWN).toPlainString(),"2.1");
        assertEquals(a.setScale(1,BigDecimal.ROUND_UP).toPlainString(),"2.2");
        assertEquals(a.setScale(1,BigDecimal.ROUND_HALF_UP).toPlainString(),"2.1");
        assertEquals(a.setScale(1,BigDecimal.ROUND_HALF_DOWN).toPlainString(),"2.1");

        //对于,正数,且在中间线
        assertEquals(a_2.setScale(1,BigDecimal.ROUND_CEILING).toPlainString(),"2.2");
        assertEquals(a_2.setScale(1,BigDecimal.ROUND_FLOOR).toPlainString(),"2.1");
        assertEquals(a_2.setScale(1,BigDecimal.ROUND_DOWN).toPlainString(),"2.1");
        assertEquals(a_2.setScale(1,BigDecimal.ROUND_UP).toPlainString(),"2.2");
        assertEquals(a_2.setScale(1,BigDecimal.ROUND_HALF_UP).toPlainString(),"2.2");
        assertEquals(a_2.setScale(1,BigDecimal.ROUND_HALF_DOWN).toPlainString(),"2.1");

        //对于,负数,且不在中间线
        assertEquals(b.setScale(1,BigDecimal.ROUND_CEILING).toPlainString(),"-2.1");
        assertEquals(b.setScale(1,BigDecimal.ROUND_FLOOR).toPlainString(),"-2.2");
        assertEquals(b.setScale(1,BigDecimal.ROUND_DOWN).toPlainString(),"-2.1");
        assertEquals(b.setScale(1,BigDecimal.ROUND_UP).toPlainString(),"-2.2");
        assertEquals(b.setScale(1,BigDecimal.ROUND_HALF_UP).toPlainString(),"-2.1");
        assertEquals(b.setScale(1,BigDecimal.ROUND_HALF_DOWN).toPlainString(),"-2.1");

        //对于,负数,且在中间线
        assertEquals(b_2.setScale(1,BigDecimal.ROUND_CEILING).toPlainString(),"-2.1");
        assertEquals(b_2.setScale(1,BigDecimal.ROUND_FLOOR).toPlainString(),"-2.2");
        assertEquals(b_2.setScale(1,BigDecimal.ROUND_DOWN).toPlainString(),"-2.1");
        assertEquals(b_2.setScale(1,BigDecimal.ROUND_UP).toPlainString(),"-2.2");
        assertEquals(b_2.setScale(1,BigDecimal.ROUND_HALF_UP).toPlainString(),"-2.2");
        assertEquals(b_2.setScale(1,BigDecimal.ROUND_HALF_DOWN).toPlainString(),"-2.1");

        //总结如下:
        //ROUND_CEILING和ROUND_FLOOR是考虑符号的进位,ROUND_CEILING总是偏大(同时考虑数和符号),ROUND_FLOOR总是偏小(同时考虑数和符号)。
        //ROUND_UP和ROUND_DOWN是不考虑符号的进位,ROUND_UP总是偏大(只考虑数,不考虑符号),ROUND_DOWN总是偏小(只考虑数,不考虑符号)。
        //ROUND_HALF_UP和ROUND_HALF_DOWN是不考虑符号的进位,ROUND_HALF_UP遇到5进位,ROUND_HALF_DOWN遇到5退位。
    }


    @Test
    public void testToInteger() {
        BigDecimal a = new BigDecimal("1.2");

        //在没有Round的情况下,直接转换为intValueExtract会报错
        assertThrows(ArithmeticException.class,()->{
            assertEquals(a.intValueExact(),1);
        });
        assertEquals(a.setScale(0,BigDecimal.ROUND_FLOOR).intValueExact(),1);

        //intValue就没有那么严谨了,没有round的时候也能转换到int,我们尽量避免这样做
        assertEquals(a.intValue(),1);
    }
}
BigDecimal的基础操作包括有:
- 加减乘除,注意除法运算最好带上scale。
- 比较,用compareTo,不要用equals
- 绝对值,abs,没啥好说的。
- 取整round,注意多种模式之间的区别
- 格式化,一般使用toPlainString,和stripTrailingZeros的组合
- 类型转换,注意全部用xxxExtact的API,以保证安全性
8 Optional
在Java开发中,我们一般返回值都不能返回Null,对于返回结果可能为null的类型,需要显式地用Optional包裹一下
代码在这里
8.1 基础
package java_standard_test;

import org.junit.jupiter.api.Test;

import java.util.NoSuchElementException;
import java.util.Optional;
import static org.junit.jupiter.api.Assertions.*;

public class TestOptional {

    @Test
    public void testEmpty(){
        Optional<Integer> result = Optional.empty();

        assertEquals(result.isPresent(),false);
        assertThrows(NoSuchElementException.class,()->{
            result.get();
        });
    }

    @Test
    public void testOf(){
        Optional<Integer> result = Optional.of(123);
        assertEquals(result.isPresent(),true);
        assertEquals(result.get(),123);
    }
}
Optional的写法还是比较简单,要点如下:
- 用Optional.empty和Optional.of来创建实例
- Optional.isPresent是检查是否为null的工具
- Optional.get只有在非null的时候才能执行,在null的时候会抛出异常
一般不需学习Optional的map,orElse,filter等这些操作符,因为它们给与了额外的设计复杂性,但是意义并不是很大。
9 拷贝中的Cloneable与Serializable
代码在这里
9.1 拷贝实现
package java_test;

import lombok.AllArgsConstructor;
import lombok.Data;
import lombok.NoArgsConstructor;
import lombok.SneakyThrows;

import java.io.Serializable;
import java.util.ArrayList;
import java.util.List;

@Data
@AllArgsConstructor
@NoArgsConstructor
//Serializable会递归调用每个字段的Serializable接口,如果某个字段没有实现Serializable,就会抛出异常
//这意味着People也必须实现Serializable接口才能正常运行,否则运行时会抛出异常
//Cloneable仅仅是一个浅拷贝的实现
public class Country implements Cloneable,Serializable {

    private Long id;

    private String name;

    private List<People> peopleList = new ArrayList<>();

    @Override
    @SneakyThrows
    public Country clone(){
        return (Country)super.clone();
    }
}
Cloneable的实现要麻烦一点,加入Cloneable的接口实现,并且将protected的clone转为public。Serializable最为简单,直接加入Serializable的接口就可以了。
package java_test;

import lombok.AllArgsConstructor;
import lombok.Data;
import lombok.NoArgsConstructor;

import java.io.Serializable;

@Data
@AllArgsConstructor
@NoArgsConstructor
public class People implements Serializable {
    private Long id;

    private String name;
}
People实体只有Serializable接口
9.2 测试
package java_test;

import com.fasterxml.jackson.databind.ObjectMapper;
import jdk.nashorn.api.scripting.ScriptObjectMirror;
import lombok.SneakyThrows;
import lombok.extern.slf4j.Slf4j;
import org.springframework.beans.factory.annotation.Autowired;
import org.springframework.stereotype.Component;

import javax.script.ScriptEngine;
import javax.script.ScriptEngineManager;
import javax.script.ScriptException;
import java.io.*;
import java.util.ArrayList;
import java.util.Arrays;
import java.util.List;
import java.util.function.Function;

@Component
@Slf4j
public class CloneTest {

    public Country createCountry(){
        Country country = new Country();
        country.setId(1001L);
        country.setName("fish");

        People people1 = new People();
        people1.setId(201L);
        people1.setName("p1");

        People people2 = new People();
        people2.setId(202L);
        people2.setName("p2");

        List<People> peopleList = new ArrayList<>();
        peopleList.add(people1);
        peopleList.add(people2);
        country.setPeopleList(peopleList);
        return country;
    }

    public void testClone(Function<Country,Country> handler){
        Country country = createCountry();
        log.info("{}",country);

        Country country2 = handler.apply(country);
        country2.setName("cat");
        country2.getPeopleList().get(0).setName("p3");

        People people3 = new People();
        people3.setId(203L);
        people3.setName("p3");
        country2.getPeopleList().add(people3);

        log.info("old {}",country);
        log.info("new {}",country2);
    }

    @Autowired
    private ObjectMapper objectMapper;

    @SneakyThrows
    public <T> T deepCloneByJackJson(T input){
        byte[] arrayBytes = objectMapper.writeValueAsBytes(input);
        return (T)objectMapper.readValue(arrayBytes,input.getClass());
    }

    @SneakyThrows
    public <T extends Serializable> T deepClone(T input){
        ByteArrayOutputStream baos = new ByteArrayOutputStream();
        ObjectOutputStream oos = new ObjectOutputStream(baos);
        oos.writeObject(input);
        ByteArrayInputStream bais = new ByteArrayInputStream(baos.toByteArray());
        ObjectInputStream iis = new ObjectInputStream(bais);
        return (T)iis.readObject();
    }

    public void go(){
        log.info("none clone");
        testClone(ref->ref);

        //Cloneable是浅拷贝实现
        log.info("shallow clone");
        testClone(ref->ref.clone());

        //Serializable是深拷贝实现
        log.info("deep clone");
        testClone(ref->deepClone(ref));

        //Jackson复制是深拷贝实现
        log.info("deep clone by jackjson");
        testClone(ref->deepCloneByJackJson(ref));
    }
}
测试代码也比较简单,没啥好说的,具体就是:
- Cloneable是浅拷贝
- Serializable是深拷贝,只是性能能差一点,而且要注意所有字段都需要实现Serializable。对于忽略的字段,我们需要用transient关键字(不是注解)
- Jackjson的深拷贝方式就经常用了,连注解都不用写。对于忽略的字段,我们用@JsonIgnore的方式
深拷贝与序列化不是同一个问题,深拷贝大多场景是内存中,不需要考虑数据的历史版本,也不需要考虑可读性。序列化则麻烦多了。
20 总结
简单,记录下来是为了方便查找而已
参考资料:
- 本文作者: fishedee
- 版权声明: 本博客所有文章均采用 CC BY-NC-SA 3.0 CN 许可协议,转载必须注明出处!