0 概述
Android的入门书籍了,没啥好说的。经过几年发展,Kotlin已经成为了Android的官方支持语言了。
本经验汇总,主要参考第一行Android代码(第3版),和疯狂Android讲义(Kotlin版)。总体来说,《第一行Android代码》讲解得更好一点,细致而且贴近新版开发(Android 10)。
1 安装与入门
1.1 IDE
到这里下载Android Studio,注意选择Intel芯片,还是Apple的ARM芯片。
注意买个梯子,因为很多SDK都需要从外面下载回来。
1.2 空项目
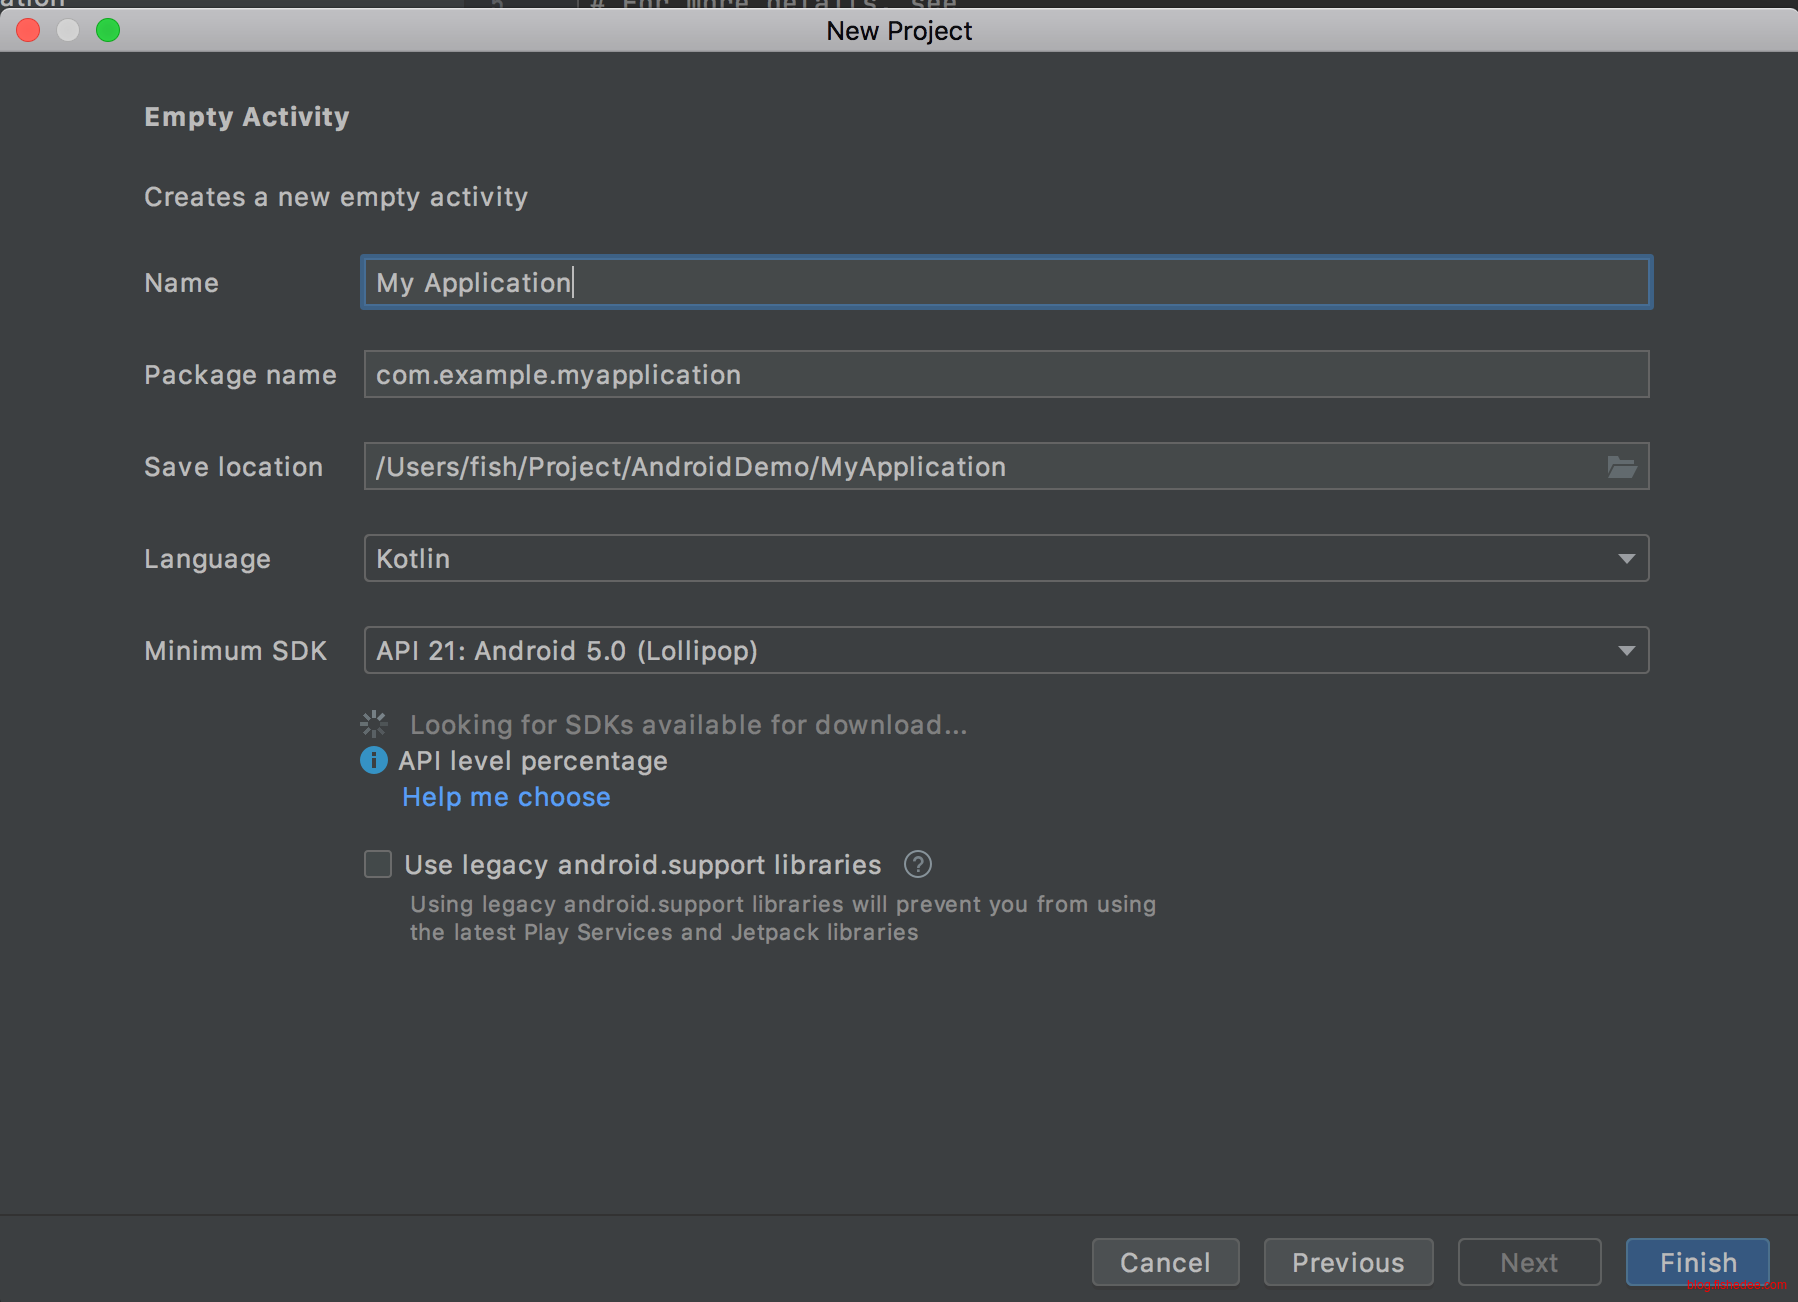
打开Android Studio,点击左上角的File和New就能创建新项目了,没啥好说的
1.3 目录结构
.
├── app
│   ├── build.gradle
│   ├── libs
│   ├── proguard-rules.pro
│   └── src
│       ├── androidTest
│       ├── main
│       └── test
├── build.gradle
├── gradle
│   └── wrapper
│       ├── gradle-wrapper.jar
│       └── gradle-wrapper.properties
├── gradle.properties
├── gradlew
├── gradlew.bat
├── local.properties
└── settings.gradle

8 directories, 10 files
默认生成的项目结构如上。
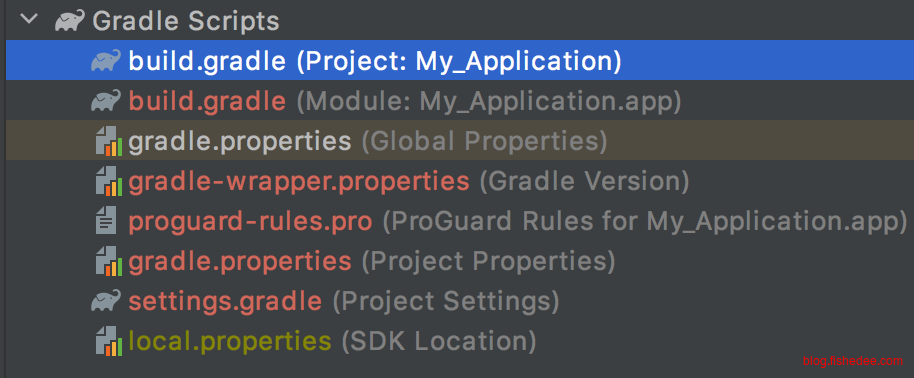
IDE提示各个文件的意义
1.3.1 local.properties
## This file is automatically generated by Android Studio.
# Do not modify this file -- YOUR CHANGES WILL BE ERASED!
#
# This file should *NOT* be checked into Version Control Systems,
# as it contains information specific to your local configuration.
#
# Location of the SDK. This is only used by Gradle.
# For customization when using a Version Control System, please read the
# header note.
sdk.dir=/Users/XXX/Library/Android/sdk
local.properties是SDK的位置,很少改动
1.3.2 build.gradle
// Top-level build file where you can add configuration options common to all sub-projects/modules.
buildscript {
    repositories {
        google()
        mavenCentral()
    }
    dependencies {
        classpath "com.android.tools.build:gradle:7.0.3"
        classpath "org.jetbrains.kotlin:kotlin-gradle-plugin:1.5.20"

        // NOTE: Do not place your application dependencies here; they belong
        // in the individual module build.gradle files
    }
}

task clean(type: Delete) {
    delete rootProject.buildDir
}build.gradle是项目级别的gradle脚本文件,相当于Maven里面的pom.xml
plugins {
    id 'com.android.application'
    id 'kotlin-android'
}

android {
    compileSdk 31

    defaultConfig {
        applicationId "com.example.myapplication"
        minSdk 21
        targetSdk 31
        versionCode 1
        versionName "1.0"

        testInstrumentationRunner "androidx.test.runner.AndroidJUnitRunner"
    }

    buildTypes {
        release {
            minifyEnabled false
            proguardFiles getDefaultProguardFile('proguard-android-optimize.txt'), 'proguard-rules.pro'
        }
    }
    compileOptions {
        sourceCompatibility JavaVersion.VERSION_1_8
        targetCompatibility JavaVersion.VERSION_1_8
    }
    kotlinOptions {
        jvmTarget = '1.8'
    }
}

dependencies {
    implementation 'androidx.core:core-ktx:1.3.2'
    implementation 'androidx.appcompat:appcompat:1.2.0'
    implementation 'com.google.android.material:material:1.3.0'
    implementation 'androidx.constraintlayout:constraintlayout:2.0.4'
    testImplementation 'junit:junit:4.+'
    androidTestImplementation 'androidx.test.ext:junit:1.1.2'
    androidTestImplementation 'androidx.test.espresso:espresso-core:3.3.0'
}在app/build.gradle,描述的是模块级别的gradle脚本文件。
1.3.3 gradle.properties
# Project-wide Gradle settings.
# IDE (e.g. Android Studio) users:
# Gradle settings configured through the IDE *will override*
# any settings specified in this file.
# For more details on how to configure your build environment visit
# http://www.gradle.org/docs/current/userguide/build_environment.html
# Specifies the JVM arguments used for the daemon process.
# The setting is particularly useful for tweaking memory settings.
org.gradle.jvmargs=-Xmx2048m -Dfile.encoding=UTF-8
# When configured, Gradle will run in incubating parallel mode.
# This option should only be used with decoupled projects. More details, visit
# http://www.gradle.org/docs/current/userguide/multi_project_builds.html#sec:decoupled_projects
# org.gradle.parallel=true
# AndroidX package structure to make it clearer which packages are bundled with the
# Android operating system, and which are packaged with your app"s APK
# https://developer.android.com/topic/libraries/support-library/androidx-rn
android.useAndroidX=true
# Automatically convert third-party libraries to use AndroidX
android.enableJetifier=true
# Kotlin code style for this project: "official" or "obsolete":
kotlin.code.style=official
描述的是gradle脚本文件的通用变量配置,这个变量会影响当前项目所有子模块的gradle脚本文件。
## For more details on how to configure your build environment visit
# http://www.gradle.org/docs/current/userguide/build_environment.html
#
# Specifies the JVM arguments used for the daemon process.
# The setting is particularly useful for tweaking memory settings.
# Default value: -Xmx1024m -XX:MaxPermSize=256m
# org.gradle.jvmargs=-Xmx2048m -XX:MaxPermSize=512m -XX:+HeapDumpOnOutOfMemoryError -Dfile.encoding=UTF-8
#
# When configured, Gradle will run in incubating parallel mode.
# This option should only be used with decoupled projects. More details, visit
# http://www.gradle.org/docs/current/userguide/multi_project_builds.html#sec:decoupled_projects
# org.gradle.parallel=true
#Tue Dec 07 16:14:18 CST 2021
systemProp.http.proxyHost=127.0.0.1
systemProp.https.proxyHost=127.0.0.1
systemProp.https.proxyPort=7890
systemProp.http.proxyPort=7890
对应的我们有gradle的全局变量配置,在/Users/xxxx/.gradle/gradle.properties文件中,一般用来配置代理。
1.3.4 settings.gradle
dependencyResolutionManagement {
    repositoriesMode.set(RepositoriesMode.FAIL_ON_PROJECT_REPOS)
    repositories {
        maven { url "https://frontjs-static.pgyer.com/dist/sdk/pgyersdk" }  //主力仓库
        maven { url "https://raw.githubusercontent.com/Pgyer/analytics/master" }  //备用仓库(主力仓库下载不下来使用)


        google()
        mavenCentral()
        jcenter() // Warning: this repository is going to shut down soon
    }
}
rootProject.name = "My Application"
include ':app'
settings.gradle是gradle的配置文件,主要描述的有使用哪些仓库,rootProject的名称是什么(rootProject),包含什么子模块(:include)。
settings.gradle也是配置依赖镜像的地方,相当于原来的allprojects下的repositories配置。
1.3.5 gradlew,gradlew.bat和gradle/wrapper
看这里
gradle是实际干活的可执行文件,但是不同的gradle配置使用不同gradle插件,需要不同版本的gradle。因此,这需要每个Android项目都需要一个不同版本的gradle,而不是像Maven一样全局一个Maven可执行文件。
为了抹平不同Android项目下对于gradle的调用,AndroidStudio自动生成graddle wrapper。gradlew和gradlew.bat是不同平台统一的gradle wrapper可执行文件。它会到gradle/wrapper中,根据配置文件自动下载不同版本的gradle来运行实际的命令。
#Tue Dec 07 16:13:40 CST 2021
distributionBase=GRADLE_USER_HOME
distributionUrl=https\://services.gradle.org/distributions/gradle-7.0.2-bin.zip
distributionPath=wrapper/dists
zipStorePath=wrapper/dists
zipStoreBase=GRADLE_USER_HOME
gradle/wrapper/gradle-wrapper.properties的配置文件,描述的是从哪里下载什么版本的gradle
JAVA_HOME="/Applications/Android Studio.app/Contents/jre/Contents/Home" ./gradlew命令行执行gradlew的方式,指定JRE版本为Android Studio的内置版本。
1.3.6 proguard-rules.pro
# Add project specific ProGuard rules here.
# You can control the set of applied configuration files using the
# proguardFiles setting in build.gradle.
#
# For more details, see
#   http://developer.android.com/guide/developing/tools/proguard.html

# If your project uses WebView with JS, uncomment the following
# and specify the fully qualified class name to the JavaScript interface
# class:
#-keepclassmembers class fqcn.of.javascript.interface.for.webview {
#   public *;
#}

# Uncomment this to preserve the line number information for
# debugging stack traces.
#-keepattributes SourceFile,LineNumberTable

# If you keep the line number information, uncomment this to
# hide the original source file name.
#-renamesourcefileattribute SourceFile
在app/proguard-rules.pro文件中,描述的是该模块如何混淆文件。
1.4 build.gradle脚本
1.4.1 典型配置
plugins {
    id 'com.android.application'
    id 'kotlin-android'
}

android {
    compileSdk 31

    defaultConfig {
        applicationId "com.example.myapplication"
        minSdk 21
        targetSdk 31
        versionCode 1
        versionName "1.0"

        testInstrumentationRunner "androidx.test.runner.AndroidJUnitRunner"
    }

    buildTypes {
        release {
            minifyEnabled false
            proguardFiles getDefaultProguardFile('proguard-android-optimize.txt'), 'proguard-rules.pro'
        }
    }
    compileOptions {
        sourceCompatibility JavaVersion.VERSION_1_8
        targetCompatibility JavaVersion.VERSION_1_8
    }
    kotlinOptions {
        jvmTarget = '1.8'
    }
}

dependencies {
    implementation 'androidx.core:core-ktx:1.3.2'
    implementation 'androidx.appcompat:appcompat:1.2.0'
    implementation 'com.google.android.material:material:1.3.0'
    implementation 'androidx.constraintlayout:constraintlayout:2.0.4'
    testImplementation 'junit:junit:4.+'
    androidTestImplementation 'androidx.test.ext:junit:1.1.2'
    androidTestImplementation 'androidx.test.espresso:espresso-core:3.3.0'
}
这是IDE生成的典型配置
1.4.2 sdkVersion配置
看这里
- compileSdkVersion,编译时用什么SDK版本来编译
- minSdkVersion,运行时,App仅支持什么SDK版本以上的系统。
- targetSdkVersion,运行时,App仅在targetSdkVersion版本以下完整测试,设备的操作系统需要根据targetSdkVersion进行兼容。
| targetSdkVersion | 情况 | 含义 |
|---|---|---|
| targetSdkVersion | <平台的API级别 | 由系统保证兼容性,举个栗子:targetSdkVersion==23(6.0),当前设备Android版本7.0,运行程序时用6.0那一套接口。 |
| targetSdkVersion | = 平台的API级别 | 不启用兼容性。 |
| targetSdkVersion | > 平台的API级别 | 由开发者自己保证兼容性,举个栗子:targetSdkVersion==23(6.0),当前设备Android版本是 5.0 ,运行程序 用的是5.0那套接口。设备根本到不了6.0 |
举个例子
在 Android 4.4 (API 19)以后,AlarmManager 的 set() 和 setRepeat() 这两个 API 的行为发生了变化。在 Android 4.4 以前,这两个 API 设置的都是精确的时间,系统能保证在 API 设置的时间点上唤醒 Alarm。因为省电原因 Android 4.4 系统实现了 AlarmManager 的对齐唤醒,这两个 API 设置唤醒的时间,系统都对待成不精确的时间,系统只能保证在你设置的时间点之后某个时间唤醒。虽然api的名字没有改变,但是功能结果已经发生改变,
我们设置targetSdkVersion为16,系统通过targetSdkVersion来保证Android的向前兼容性,在Android4.4 (API 19)之后的设备上,系统会判断你的targetSdkVersion是否小于19,如果小于的话,那就按照19之前的api方法,如果大于等于19,那么就按照之后的api方法来走,保证了程序运行的一致性。也就是向前兼容性。
系统会根据你的targetSdkVersion对同一个接口使用不同的执行方式,以保证兼容性。
1.5 单独的kotlin文件
1.5.1 build.gradle配置
plugins {
    id 'com.android.application'
    id 'kotlin-android'
}

android {
    compileSdk 30

    defaultConfig {
        applicationId "com.example.myapplication"
        minSdk 21
        targetSdk 30
        versionCode 1
        versionName "1.0"

        testInstrumentationRunner "androidx.test.runner.AndroidJUnitRunner"
    }

    buildTypes {
        release {
            minifyEnabled false
            proguardFiles getDefaultProguardFile('proguard-android-optimize.txt'), 'proguard-rules.pro'
        }
    }
    compileOptions {
        sourceCompatibility JavaVersion.VERSION_1_8
        targetCompatibility JavaVersion.VERSION_1_8
    }
    kotlinOptions {
        jvmTarget = '1.8'
    }
}

dependencies {

    implementation 'androidx.core:core-ktx:1.3.2'
    implementation 'androidx.appcompat:appcompat:1.2.0'
    implementation 'com.google.android.material:material:1.3.0'
    implementation 'androidx.constraintlayout:constraintlayout:2.0.4'
    testImplementation 'junit:junit:4.+'
    androidTestImplementation 'androidx.test.ext:junit:1.1.2'
    androidTestImplementation 'androidx.test.espresso:espresso-core:3.3.0'
}
注意先将compileSdk和targetSdk从31改到30,否则会报出:app:processDebugAndroidTestManifest‘ FAILED android:exported <activity>错误
看这里
1.5.2 单文件启动

新建一个Kotlin file
package com.example.myapplication

fun main(){
    println("uu");
}
输入以上代码
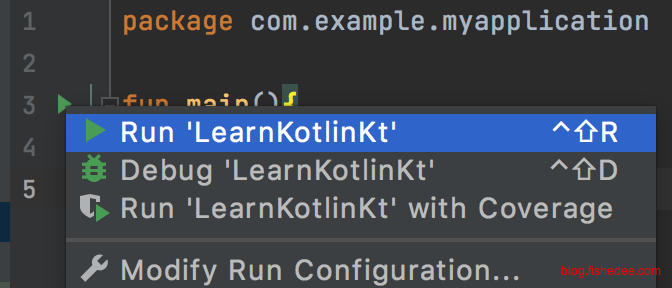
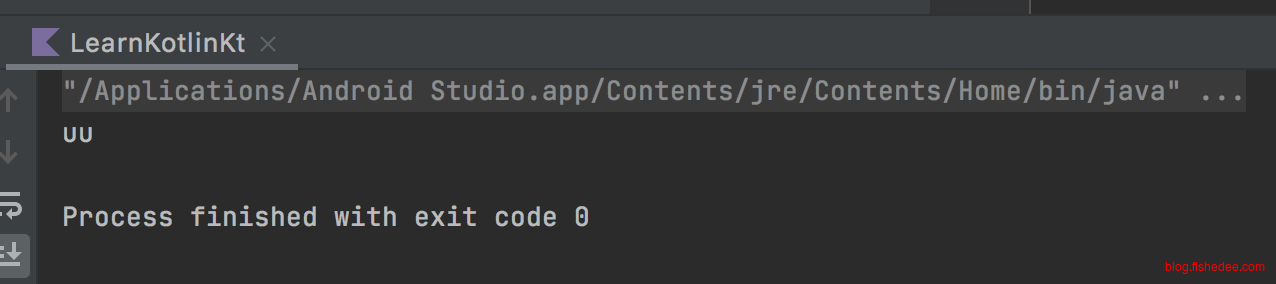
点击绿色小箭头就能启动了
1.6 仓库与镜像
仓库地址
// Top-level build file where you can add configuration options common to all sub-projects/modules.
buildscript {
    repositories {
        //版阿里云仓库
        maven {url 'https://maven.aliyun.com/repository/google'}
        maven {url 'https://maven.aliyun.com/repository/central'}
        maven {url 'https://maven.aliyun.com/repository/gradle-plugin'}

        google()
        mavenCentral()
    }
    dependencies {
        classpath "com.android.tools.build:gradle:7.0.3"
        classpath 'org.jetbrains.kotlin:kotlin-gradle-plugin:1.6.0'

        // NOTE: Do not place your application dependencies here; they belong
        // in the individual module build.gradle files
    }
}

task clean(type: Delete) {
    delete rootProject.buildDir
}使用阿里云镜像,官方地址在这里
1.7 Android Studio的Gralde任务
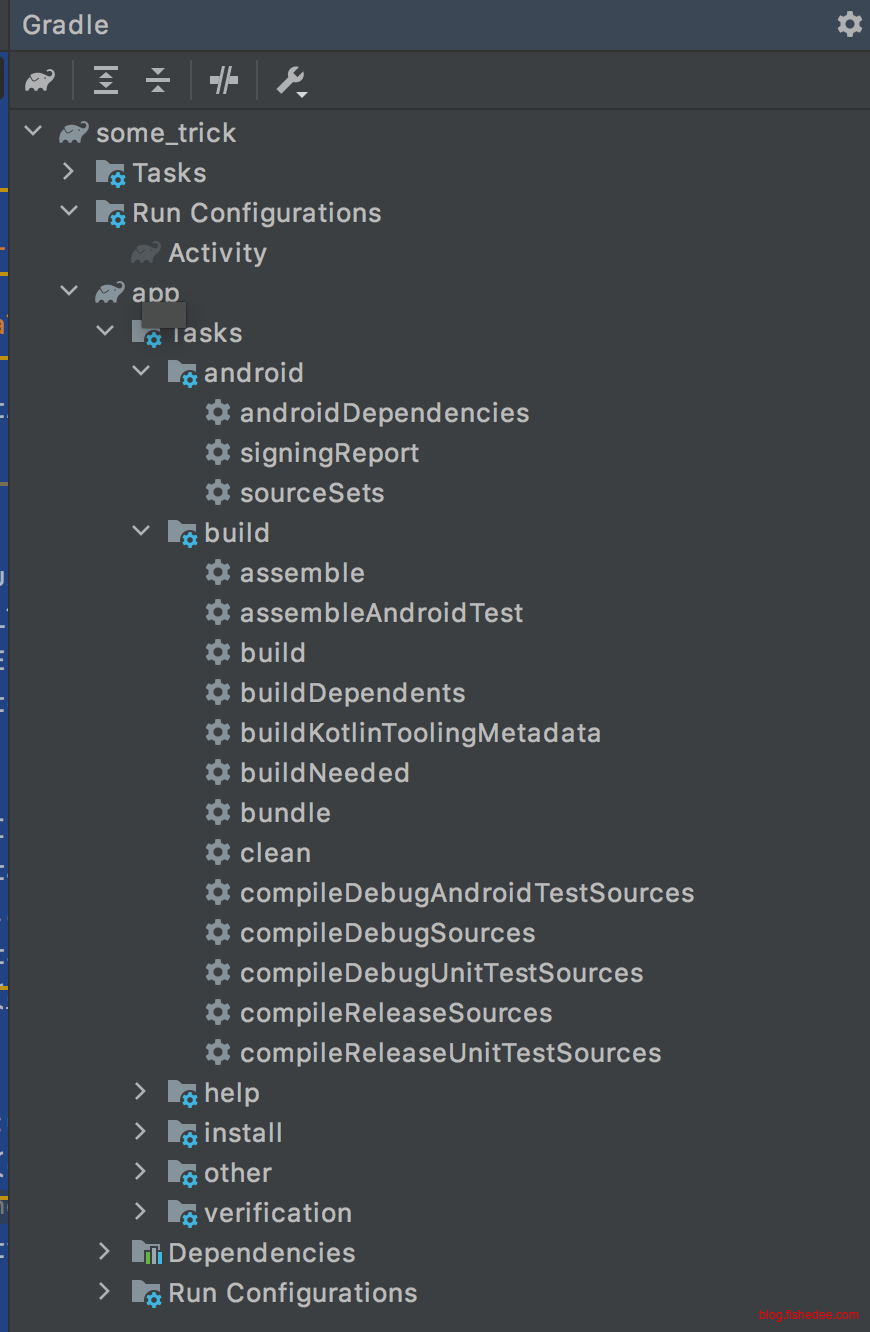
在Android Studio的View,Tool Window,Gradle中能显式以上的内容。在这里可以看到Gradle的依赖以及任务。双击对应的Task就能启动Gradle任务了。
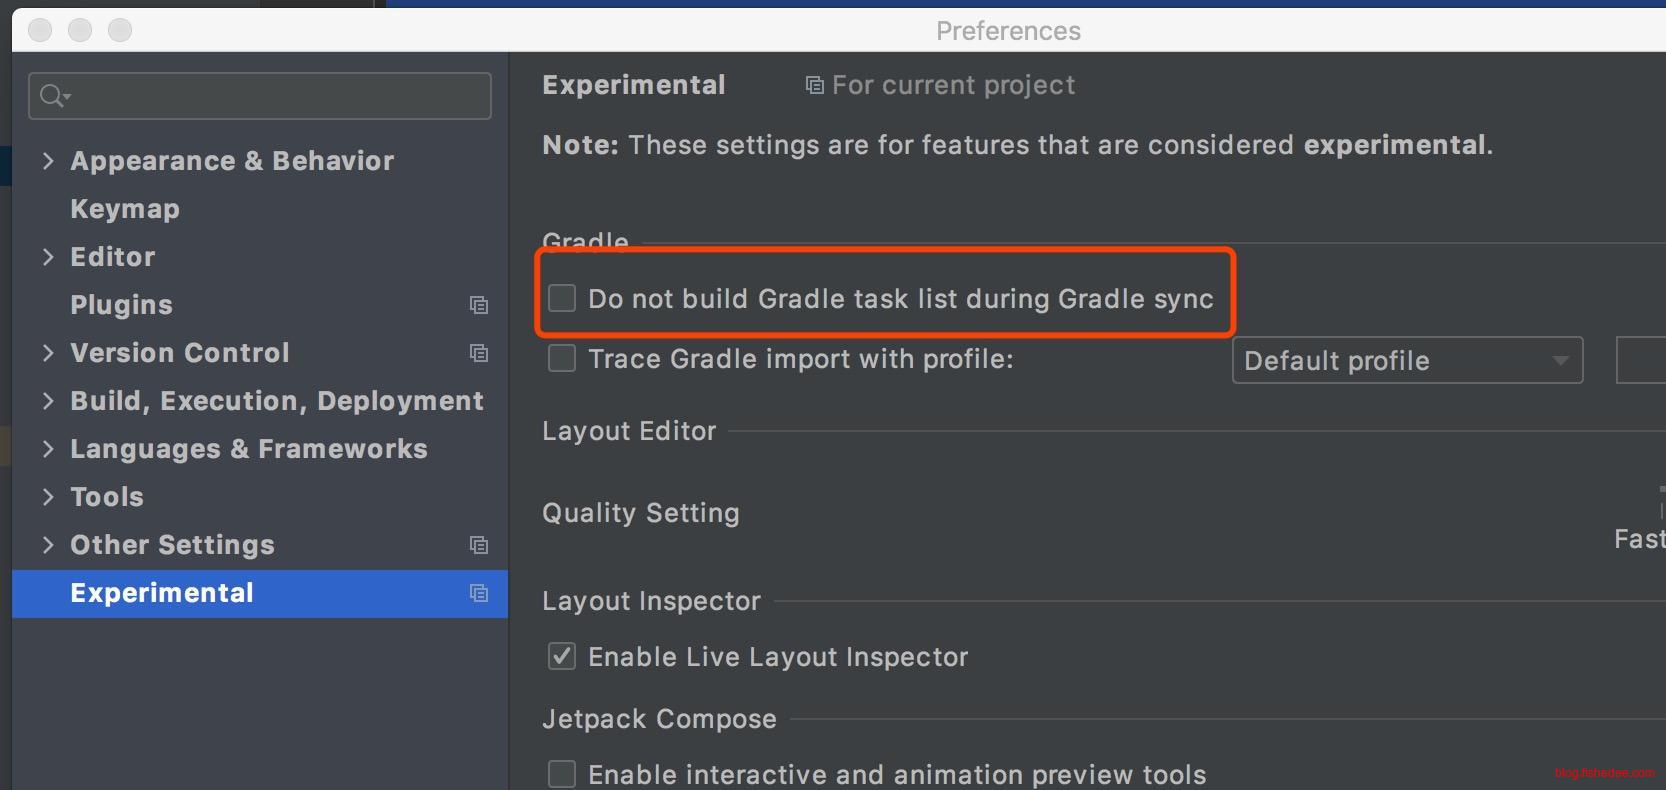
新版的Android Studio可能看不到Gradle的任务,需要先这样做。先在Android Studio中Setting中,将Do not build Gradle task list 的选项去掉就可以了。
2 Activity
Activity是安卓的基础模块了,相当于桌面中窗口的概念。
2.1 UI与菜单
代码在这里
2.1.1 定义layout
<?xml version="1.0" encoding="utf-8"?>
<LinearLayout xmlns:android="http://schemas.android.com/apk/res/android"
    xmlns:app="http://schemas.android.com/apk/res-auto"
    xmlns:tools="http://schemas.android.com/tools"
    android:orientation="vertical"
    android:layout_width="match_parent"
    android:layout_height="match_parent">

    <!--@+id/button1,是定义一个ID,而不是使用一个ID,该ID的名称为button1-->
    <Button
        android:id="@+id/button1"
        android:layout_width="match_parent"
        android:layout_height="wrap_content"
        android:text="点我"/>

    <Button
        android:id="@+id/button2"
        android:layout_width="match_parent"
        android:layout_height="wrap_content"
        android:text="点我2"/>

</LinearLayout>
首先,在res/layout/activity_main.xml定义以上的文件,那么Android Studio就会定义一个layout,id为activity_main
另外,由于Button中的id使用@+id的语法,所以,也会自动定义一个新的ID,名称为button1,和button2
2.1.2 定义menu
<menu xmlns:android="http://schemas.android.com/apk/res/android">
    <item
        android:id="@+id/add_item"
        android:title="Add"/>
    <item
        android:id="@+id/remove_item"
        android:title="Remove"/>
</menu>
在res/layout/menu中定义main.xml,描述了一个菜单资源。
2.1.3 AndroidManifest.xml
<?xml version="1.0" encoding="utf-8"?>
<manifest xmlns:android="http://schemas.android.com/apk/res/android"
    package="com.example.myapplication">

    <application
        android:allowBackup="true"
        android:icon="@mipmap/ic_launcher"
        android:label="@string/app_name"
        android:roundIcon="@mipmap/ic_launcher_round"
        android:supportsRtl="true"
        android:theme="@style/Theme.MyApplication">
        <!--android:label是标题栏的内容-->
        <activity
            android:name=".MainActivity"
            android:label="标题栏"
            android:exported="true">
            <intent-filter>
                <!--action为MAIN是指定入口的Activity-->
                <action android:name="android.intent.action.MAIN" />
                <category android:name="android.intent.category.LAUNCHER" />
            </intent-filter>
        </activity>
    </application>
</manifest>
定义Android的配置文件,每个Activity都需要先在这里注册。注意,入口的Activity的exported属性,和intent-filter属性都需要配置好,才能正常运行。activity的顶部标题栏为android:label来配置的。
2.1.4 Activity
package com.example.myapplication

import androidx.appcompat.app.AppCompatActivity
import android.os.Bundle
import android.view.Menu
import android.view.MenuItem
import android.widget.Button
import android.widget.Toast
import kotlinx.android.synthetic.main.activity_main.*

class MainActivity : AppCompatActivity() {
    override fun onCreate(savedInstanceState: Bundle?) {
        super.onCreate(savedInstanceState)
        setContentView(R.layout.activity_main)
        var button = findViewById<Button>(R.id.button1);
        button.setOnClickListener {
            Toast.makeText(this,"You clicked button1",Toast.LENGTH_SHORT).show();
        }
        //kotlin-android-extensions,使用这个插件自动生成出来的,不需要再用findViewById
        button2.setOnClickListener {
            Toast.makeText(this,"You clicked button2",Toast.LENGTH_SHORT).show();
        }
    }

    override fun onCreateOptionsMenu(menu: Menu?): Boolean {
        //将menu xml实例化到menu实体上
        menuInflater.inflate(R.menu.main,menu)
        return true
    }

    override fun onOptionsItemSelected(item: MenuItem): Boolean {
        //menu的项点击时的处理
        when(item.itemId){
            R.id.add_item->Toast.makeText(this,"You clicked add_item",Toast.LENGTH_SHORT).show()
            R.id.remove_item->Toast.makeText(this,"You clicked remove_item",Toast.LENGTH_SHORT).show()
        }
        return true
    }
}
最后我们写上MainActivity的代码就可以了,没啥好说的。一般情况下,我们需要先使用findViewById获取View的实例,再进行绑定事件操作,就像button1的处理。
2.1.5 kotlin-android-extensions
plugins {
    id 'com.android.application'
    id 'kotlin-android'
    id 'kotlin-android-extensions'
}

android {
    compileSdk 31

    defaultConfig {
        applicationId "com.example.myapplication"
        minSdk 21
        targetSdk 31
        versionCode 1
        versionName "1.0"

        testInstrumentationRunner "androidx.test.runner.AndroidJUnitRunner"
    }

    buildTypes {
        release {
            minifyEnabled false
            proguardFiles getDefaultProguardFile('proguard-android-optimize.txt'), 'proguard-rules.pro'
        }
    }
    compileOptions {
        sourceCompatibility JavaVersion.VERSION_1_8
        targetCompatibility JavaVersion.VERSION_1_8
    }
    kotlinOptions {
        jvmTarget = '1.8'
    }
}

dependencies {

    implementation 'androidx.core:core-ktx:1.3.2'
    implementation 'androidx.appcompat:appcompat:1.2.0'
    implementation 'com.google.android.material:material:1.3.0'
    implementation 'androidx.constraintlayout:constraintlayout:2.0.4'
    testImplementation 'junit:junit:4.+'
    androidTestImplementation 'androidx.test.ext:junit:1.1.2'
    androidTestImplementation 'androidx.test.espresso:espresso-core:3.3.0'
}
findViewById的问题在于,繁琐,而且每次需要类型转换,不安全。Kotlin中有省事的绑定方式,称为kotlin-android-extensions。首先在build.gradle中的plugin,添加上 ’kotlin-android-extensions’这一句。
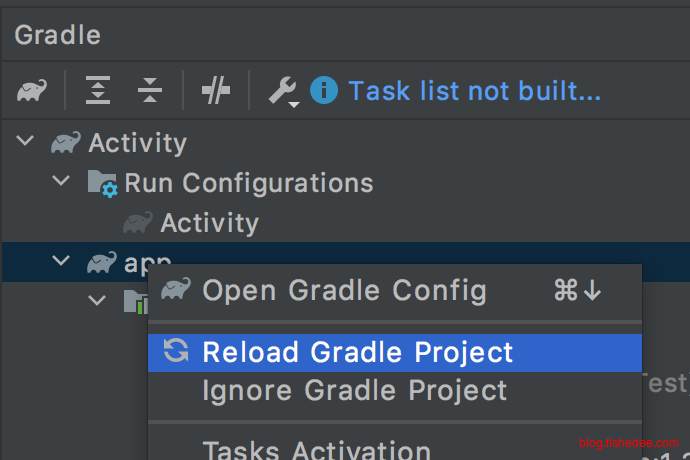
然后在View->Gradle窗口中,选择右键,点击Reload Gradle Project,将Gradle配置同步上就可以了
import kotlinx.android.synthetic.main.activity_main.*

//kotlin-android-extensions,使用这个插件自动生成出来的,不需要再用findViewById
button2.setOnClickListener {
    Toast.makeText(this,"You clicked button2",Toast.LENGTH_SHORT).show();
}
那么用button2的时候,直接使用button2就可以了,android studio会自动import对应的类,这个时候的button2是强类型,安全可靠的,而且也不再需要使用findViewById了,省事。
2.1.6 反编译kotlin
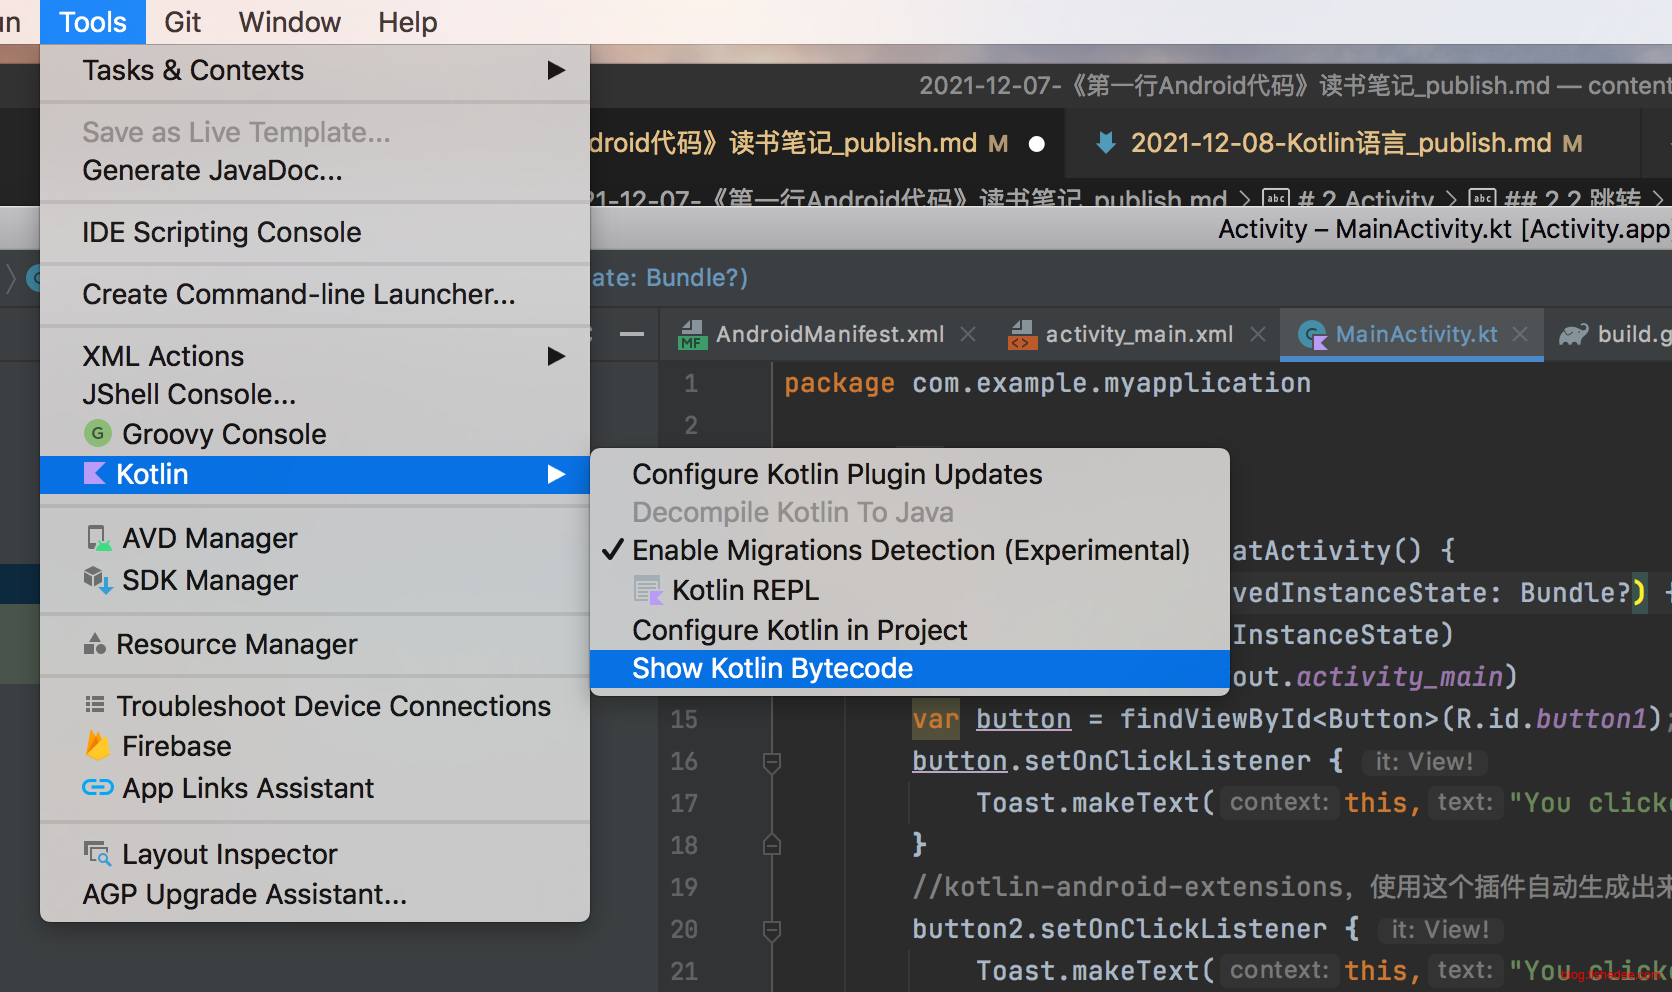
这个kotlin-android-extensions为啥这么屌,我们来看看原理是什么。首先,点开Activity的代码文件,然后选择Tools->Kotlin->Show Kotlin Bytecode。
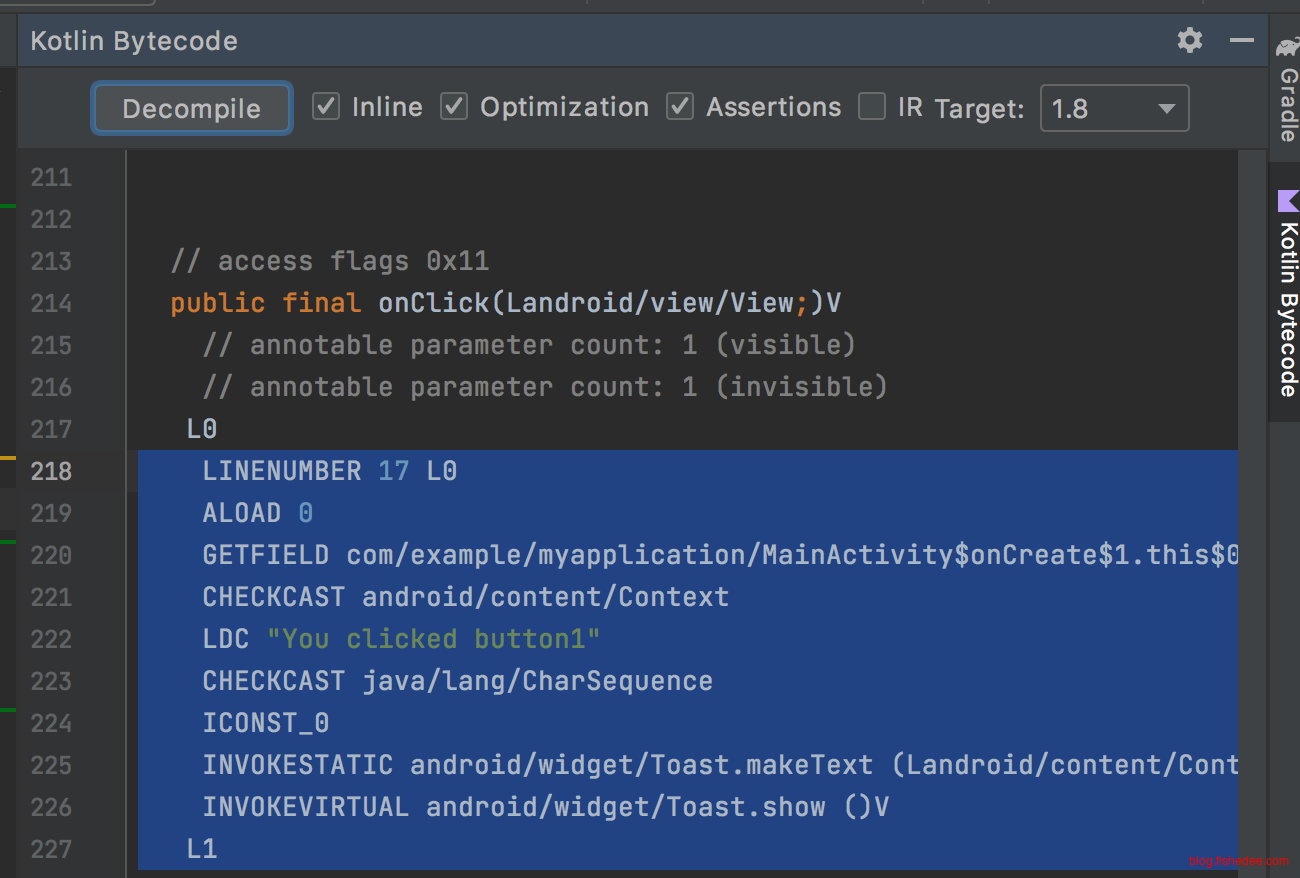
然后选择,左上角的Decompile按钮
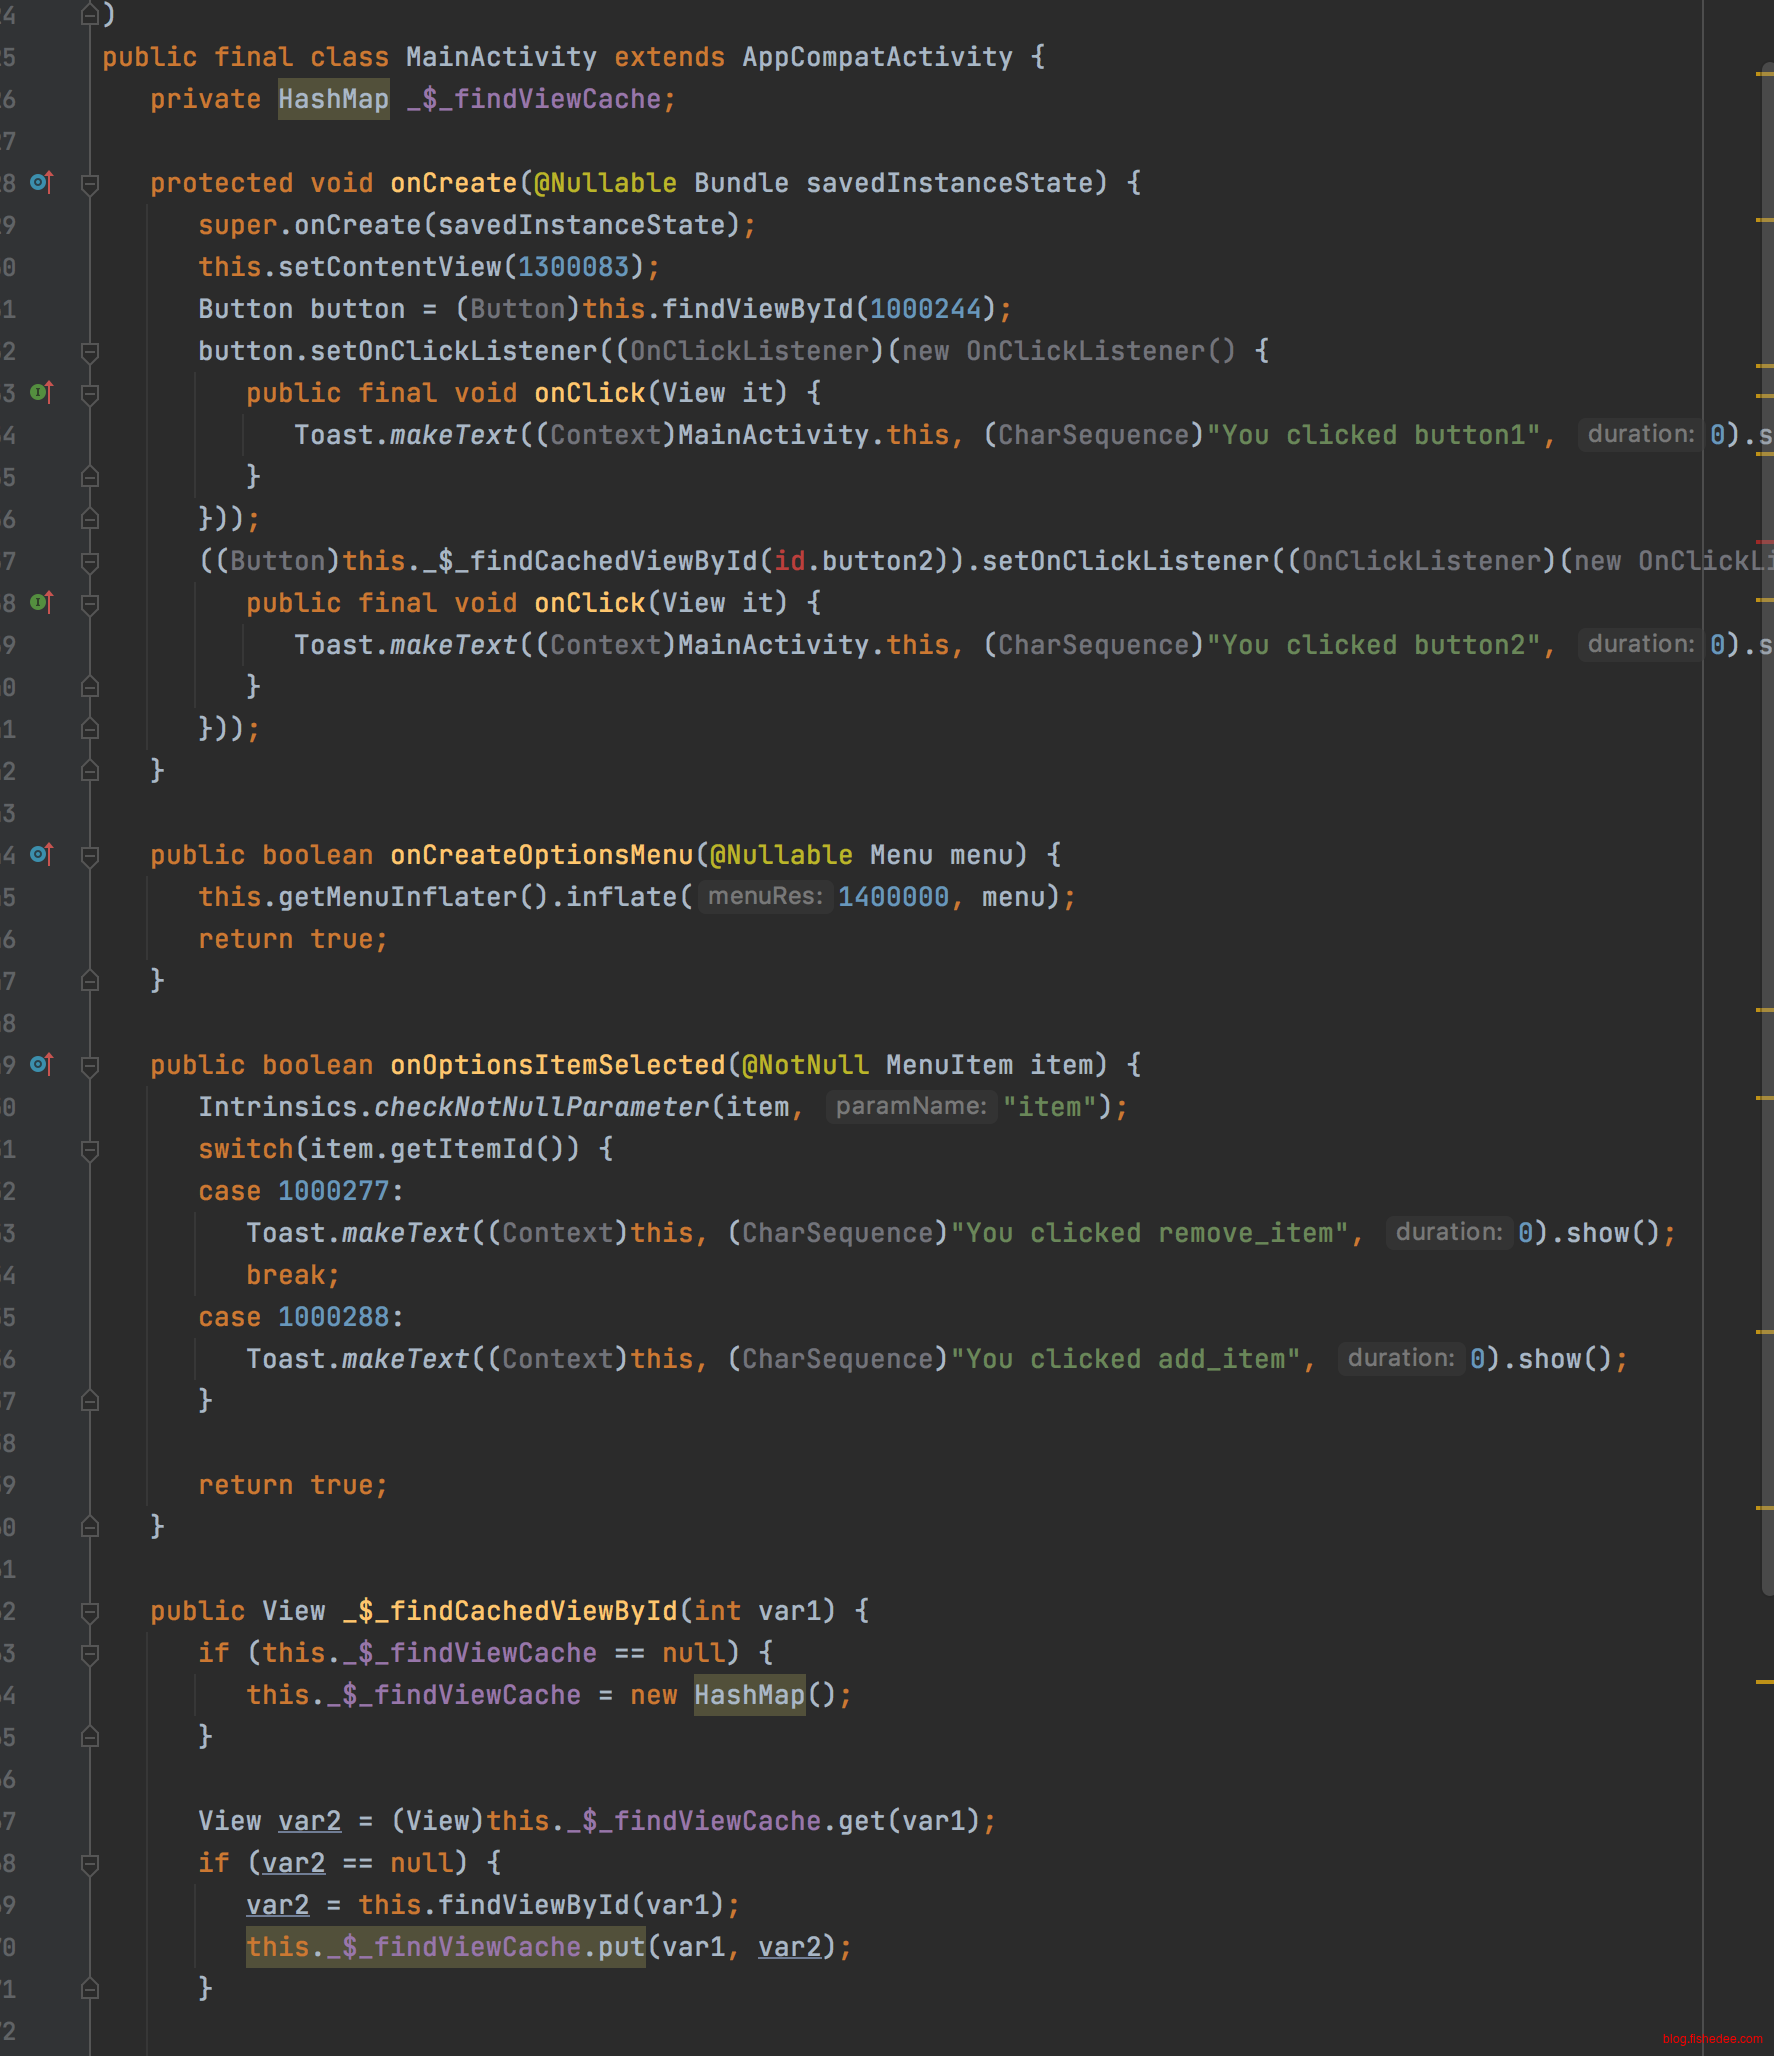
我们就能看到MainActivity的Java版本代码了。kotlin-android-extensions其实就是做了简单的事情,调用了本地的自动生成的_$_findCachedViewById方法而已,而且根据XML的配置,自动进行了类型转换。这件事其实没啥神奇的。
2.2 跳转
代码在这里
2.2.1 显式跳转
package com.example.myapplication.explicit

import android.content.Intent
import androidx.appcompat.app.AppCompatActivity
import android.os.Bundle
import com.example.myapplication.R
import kotlinx.android.synthetic.main.activity_main.*

class ExplicitFirstActivity : AppCompatActivity() {
    override fun onCreate(savedInstanceState: Bundle?) {
        super.onCreate(savedInstanceState)
        setContentView(R.layout.activity_explicit_first)
        button1.setOnClickListener {
            //通过直接指定Activity类名的方式来启动Intent
            var intent = Intent(this,ExplicitSecondActivity::class.java);
            startActivity(intent)
        }
    }
}
显式跳转也比较简单,直接传入指定的Activity的class就可以了。注意,转入的java的class,所以看清楚写法。
2.2.2 显式跳转,带数据和结果
package com.example.myapplication.explicit_result

import android.content.Intent
import androidx.appcompat.app.AppCompatActivity
import android.os.Bundle
import android.util.Log
import com.example.myapplication.R
import com.example.myapplication.explicit.ExplicitSecondActivity
import kotlinx.android.synthetic.main.activity_main.*

class ExplicitResultFirstActivity : AppCompatActivity() {
    val requestCode = 101;
    val logName = ExplicitResultFirstActivity::class.simpleName;
    override fun onCreate(savedInstanceState: Bundle?) {
        super.onCreate(savedInstanceState)
        setContentView(R.layout.activity_explicit_result_first)
        button1.setOnClickListener {
            //通过直接指定Activity类名的方式来启动Intent
            var intent = Intent(this, ExplicitResultSecondActivity::class.java);
            intent.putExtra("name","fish");
            startActivityForResult(intent,requestCode)
        }
    }

    override fun onActivityResult(requestCode: Int, resultCode: Int, data: Intent?) {
        super.onActivityResult(requestCode, resultCode, data)
        if( requestCode == this.requestCode ){
            Log.d(logName,"requestCode is ${requestCode} resultCode is ${resultCode}");
            if( resultCode == RESULT_OK){
                var returnedData = data?.getStringExtra("age");
                Log.d(logName,"result is ${returnedData}");
            }
        }
    }
}- 显式跳转带数据,就是在Intent创建以后,加入putExtra就可以了
- 显式跳转需要返回结果时候,需要用startActivityForResult,而不是startActivity,并且传入requestCode。最后,在拿到requestCode以后,在onActivityResult判断returnCode就可以了。
package com.example.myapplication.explicit_result

import android.content.Intent
import androidx.appcompat.app.AppCompatActivity
import android.os.Bundle
import android.util.Log
import com.example.myapplication.R
import kotlinx.android.synthetic.main.activity_explicit_result_second.*


class ExplicitResultSecondActivity : AppCompatActivity() {
    val logName = ExplicitResultSecondActivity::class.simpleName;


    override fun onCreate(savedInstanceState: Bundle?) {
        super.onCreate(savedInstanceState)
        setContentView(R.layout.activity_explicit_result_second)

        //取出当前的intent,获取参数值
        var inputData = intent.getStringExtra("name");
        Log.d(logName,"input ${inputData}")

        button1.setOnClickListener {
            var intent = Intent()
            //设置返回值
            intent.putExtra("age","789")

            //RESULT_OK的值为-1
            //默认按下返回键退出的时候,返回值为RESULT_CANCELED,值为0
            setResult(RESULT_OK,intent)

            //退出当前的Activity
            finish()
        }
    }
}
在被跳转的activity中,拿出当前的intent,就能拿到extra内容了。返回结果的时候,需要使用setResult再finish的方式结束。
2.2.3 隐式跳转
package com.example.myapplication.implicit

import android.content.Intent
import android.net.Uri
import androidx.appcompat.app.AppCompatActivity
import android.os.Bundle
import com.example.myapplication.R
import kotlinx.android.synthetic.main.activity_implicit_main.*

class ImplicitMainActivity : AppCompatActivity() {
    override fun onCreate(savedInstanceState: Bundle?) {
        super.onCreate(savedInstanceState)
        setContentView(R.layout.activity_implicit_main)
        button_web.setOnClickListener {
            //隐式intent的方式,先传入action
            var intent = Intent(Intent.ACTION_VIEW)
            //再填入category,category为default的时候可以不传入
            //intent.addCategory("android.intent.category.DEFAULT")

            //最后传入data,这个看不同的action再决定要不要传入
            intent.data = Uri.parse("https://www.baidu.com")

            //本地的WebActivity,与内置的浏览器都能响应这个Intent
            startActivity(intent)
        }

        button_tel.setOnClickListener {
            var intent = Intent(Intent.ACTION_DIAL)
            intent.data = Uri.parse("tel:10086")
            startActivity(intent)
        }

        button_category.setOnClickListener {
            var intent = Intent("com.fishedee.ACTION_START")
            intent.addCategory("com.fishedee.MY_CATEGORY")
            startActivity(intent)
        }
    }
}
隐式跳转,有两种用法:
- 隐式跳转其他app的activity,那么就在intent填入action,然后用setData,或者addCategory来扩展需要指定的具体内容。看ACTION_VIEW和ACTION_DIAL的用法。
- 隐式跳转自身app的其他activity。那么也是用intent先填入自定义的action,用addCategory填入自定义的category即可。
<activity
    android:name=".implicit.ImplicitCategoryActivity"
    android:exported="false">
    <intent-filter>
        <action android:name="com.fishedee.ACTION_START" />
        <!-- 注意即使有了自定义的MY_CATEGORY,也必须加上DEFAULT的category,否则启动不了 -->
        <category android:name="android.intent.category.DEFAULT" />
        <category android:name="com.fishedee.MY_CATEGORY" />
    </intent-filter>
</activity>
<activity
    android:name=".implicit.ImplicitWebActivity"
    android:exported="true">
    <intent-filter tools:ignore="AppLinkUrlError">
        <action android:name="android.intent.action.VIEW" />

        <category android:name="android.intent.category.DEFAULT" />

        <data android:scheme="https" />
    </intent-filter>
</activity>
对于能被其他app唤起的activity,需要将exported设置为true。注意,任何时候,对于能被隐式跳转的activity,都需要加上android.intent.category.DEFAULT的category。
2.2.4 最佳实践
2.2.4.1 维护activity栈
package com.example.myapplication.best

import android.app.Activity

//单例
object  ActivityCollector {
    private val activities = ArrayList<Activity>()

    fun add(activity:Activity){
        activities.add(activity)
    }

    fun remove(activity: Activity){
        activities.remove(activity)
    }

    fun finishAll(){
        for( activity in activities){
            if( !activity.isFinishing ){
                activity.finish()
            }
        }
        activities.clear()
    }
}
先建立一个activity栈
package com.example.myapplication.best

import android.os.Bundle
import android.util.Log
import androidx.appcompat.app.AppCompatActivity

//用来记录所有的Activity,方便记录Activity栈,以及一键退出程序
open class BestBaseActivity :AppCompatActivity(){
    override fun onCreate(savedInstanceState:Bundle?){
        super.onCreate(savedInstanceState)
        Log.d("base create",this::class.java.simpleName)

        ActivityCollector.add(this)
    }

    override fun onDestroy() {
        super.onDestroy()

        Log.d("base destroy",this::class.java.simpleName)


        ActivityCollector.remove(this)
    }
}
建立一个可以被其他Activity继承的基础Activity
package com.example.myapplication.best

import android.content.Context
import android.content.Intent
import androidx.appcompat.app.AppCompatActivity
import android.os.Bundle
import android.util.Log
import com.example.myapplication.R
import kotlinx.android.synthetic.main.activity_best.*

class BestActivity : BestBaseActivity() {
    override fun onCreate(savedInstanceState: Bundle?) {
        super.onCreate(savedInstanceState)
        setContentView(R.layout.activity_best)

        var name = intent.getStringExtra("name")
        Log.d("BestActivity","input name = ${name}")

        button1.setOnClickListener {
            BestActivity.actionStart(this,"mm")
        }
        button2.setOnClickListener {
            ActivityCollector.finishAll()
        }
    }
}
那么,当我们希望可以一键关闭所有Activity的时候,直接用ActivityCollector的finishAll就可以了。
2.2.4.2 强类型跳转activity
package com.example.myapplication.best

import android.content.Context
import android.content.Intent
import androidx.appcompat.app.AppCompatActivity
import android.os.Bundle
import android.util.Log
import com.example.myapplication.R
import kotlinx.android.synthetic.main.activity_best.*

class BestActivity : BestBaseActivity() {
    override fun onCreate(savedInstanceState: Bundle?) {
        super.onCreate(savedInstanceState)
        setContentView(R.layout.activity_best)

        var name = intent.getStringExtra("name")
        Log.d("BestActivity","input name = ${name}")

        button1.setOnClickListener {
            BestActivity.actionStart(this,"mm")
        }
        button2.setOnClickListener {
            ActivityCollector.finishAll()
        }
    }

    //伴生对象,相当于静态方法
    //使用伴生对象来启动其他的Activity
    companion object{
        fun actionStart(content:Context,name:String){
            var intent = Intent(content,BestActivity::class.java)
            intent.putExtra("name",name)
            content.startActivity(intent)
        }
    }
}
强类型跳转,用伴生对象的方法生成一个actionStart就可以了。这样的话,传入参数,与取出参数都在同一个代码文件里面,更为可靠安全。
2.3 生命周期
2.3.1 概述
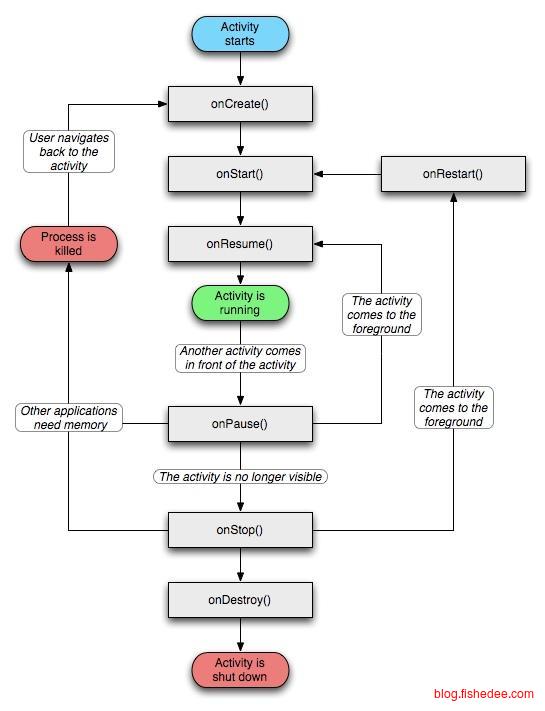
首先,放出大图,展示activity的生命周期,一般来说,activity只会停留在如下的几个状态:
- onCreate,当前activity在Activity栈中。对应的离开时间为onDestroy。
- onStart,当前activity在Activity栈中,且用户可见。对应的离开时间为onStop。
- onResume,当前activity在Activity栈中,且用户可见,且在栈顶。对应的离开时间为onPause。
2.3.2 切换到下一个普通的Activity
如果Activity的A跳转到Activity的B,会发生什么情况?
- A: onPause->onStop
- B: onCreate->onStart->onResume
返回的时候:
- B: onPause->onStop->onDestroy
- A: onRestart->onStart->onResume
2.3.3 切换到下一个Dialog的Activity
代码在这里
如果Activity的A跳转到Dialog主题Activity的B,会发生什么情况?
- A: onPause
- B: onCreate->onStart->onResume
注意,相比2.3.2,少了一个onStop触发。因为出现了一个Dialog的Activity的时候,底层的Activity A对用户来说依然是可见的,只是不在栈顶而已。
返回的时候:
- B: onPause->onStop->onDestroy
- A: onResume
2.3.4 旋转屏幕
如果用户正在看Activity的A,然后旋转屏幕,会发生什么情况?
如果该activity没有添加configChanges属性
- A: onPause->onStop->onDestroy->onCreate->onStart->onResume,完全就是一个重建activity的过程
如果该activity添加configChanges属性
<activity android:name=".Test"
 android:configChanges="orientation|keyboard">
</activity>
那么A的activity的生命周期没有触发,只会触发onConfigurationChanged属性
2.3.5 其他情况
- 最小化Activity,相当于从A跳转到B而已。没啥好说的
2.4 运行模式
<activity
    android:name=".MainActivity"
    android:label="标题栏"
    android:launchMode="standard">
</activity>
每个activity在Manifest可以设置launchMode,根据配置分别为:
- standard,每次激活Activity时都会创建Activity,并放入任务栈中。
- singleTop,如果在任务的栈顶正好存在该Activity的实例, 就重用该实例,否者就会创建新的实例并放入栈顶(即使栈中已经存在该Activity实例,只要不在栈顶,都会创建实例)。
- singleTask,如果在栈中已经有该Activity的实例,就重用该实例(会调用实例的onNewIntent())。重用时,会让该实例回到栈顶,因此在它上面的其他Activity将会被移除栈。如果栈中不存在该实例,将会创建新的实例放入栈中。
- singleInstanse,在一个新栈中创建该Activity实例,并让多个应用共享改栈中的该Activity实例。一旦改模式的Activity的实例存在于某个栈中,任何应用再激活改Activity时都会重用该栈中的实例,其效果相当于多个应用程序共享一个应用,不管谁激活该Activity都会进入同一个应用中。
3 UI
Android的UI还是比较简单的,虽然没有React那么顺手,但总体的性能较好,设计也合理
3.1 基础控件
代码在这里
3.1.1 TextView
<?xml version="1.0" encoding="utf-8"?>
<LinearLayout xmlns:android="http://schemas.android.com/apk/res/android"
    xmlns:app="http://schemas.android.com/apk/res-auto"
    xmlns:tools="http://schemas.android.com/tools"
    android:divider="@drawable/divider"
    android:showDividers="middle"
    android:padding="10dp"
    android:orientation="vertical"
    android:layout_width="match_parent"
    android:layout_height="match_parent">
    <TextView
        android:layout_height="wrap_content"
        android:layout_width="match_parent"
        android:background="@drawable/border"
        android:text="文字"/>
    <TextView
        android:layout_height="wrap_content"
        android:layout_width="match_parent"
        android:background="@drawable/border"
        android:gravity="center"
        android:text="文字,gravity:center"/>
    <TextView
        android:layout_height="40dp"
        android:layout_width="match_parent"
        android:background="@drawable/border"
        android:gravity="center_vertical|end"
        android:text="文字,gravity:center_vertical|end"/>
    <TextView
        android:layout_height="wrap_content"
        android:layout_width="match_parent"
        android:background="@drawable/border"
        android:textColor="#00FF00"
        android:text="文字,textColor"/>
    <TextView
        android:layout_height="wrap_content"
        android:layout_width="match_parent"
        android:background="@drawable/border"
        android:textSize="20sp"
        android:text="文字,textSize"/>
</LinearLayout>
TextView的几个属性:
- text,文字
- textColor,颜色
- textSize,大小,一般用sp作为单位,因为需要跟随用户在系统配置而变化
- gravity,文字在整个TextView里面的分布
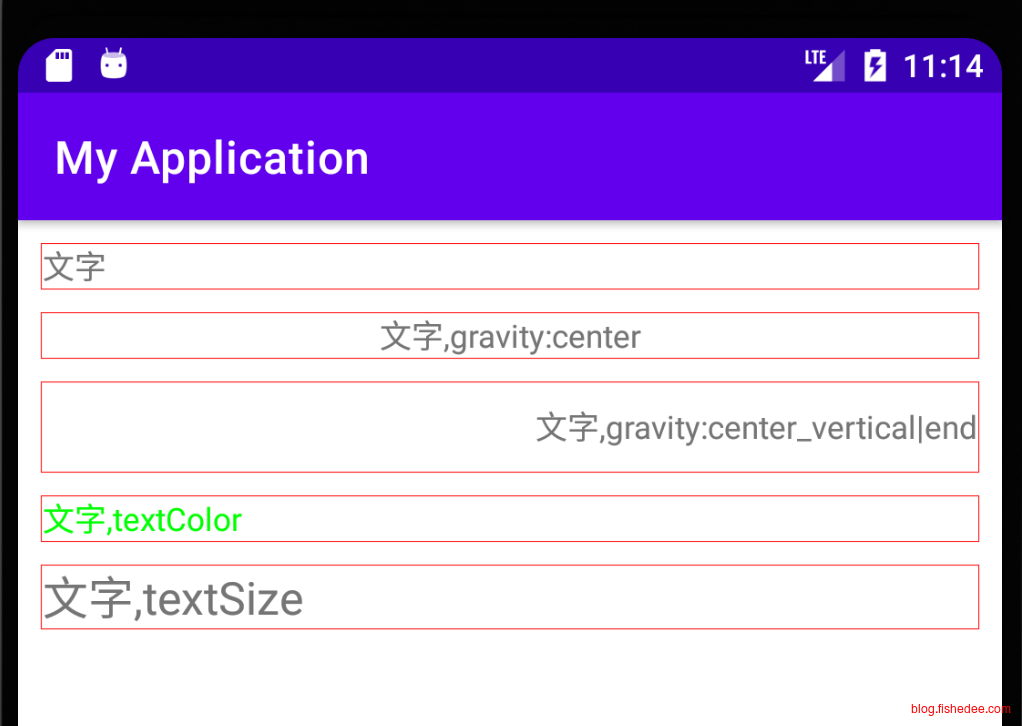
效果如上
3.1.2 Button
<?xml version="1.0" encoding="utf-8"?>
<LinearLayout xmlns:android="http://schemas.android.com/apk/res/android"
xmlns:app="http://schemas.android.com/apk/res-auto"
xmlns:tools="http://schemas.android.com/tools"
android:divider="@drawable/divider"
android:showDividers="middle"
android:padding="10dp"
android:orientation="vertical"
android:layout_width="match_parent"
android:layout_height="match_parent">
<!--默认全部text为大写,需要设置textAllCaps为false-->
<Button
android:id="@+id/button1"
android:layout_height="wrap_content"
android:layout_width="match_parent"
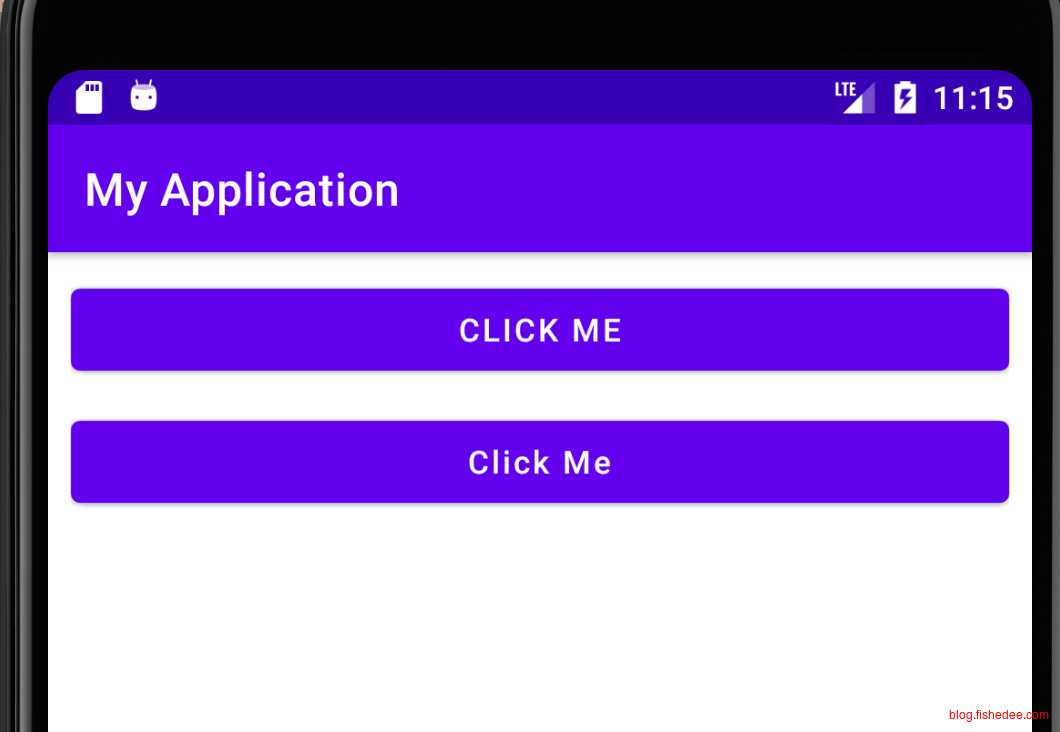
android:text="Click Me"/>
<Button
android:layout_height="wrap_content"
android:layout_width="match_parent"
android:textAllCaps="false"
android:text="Click Me"/>
</LinearLayout>Button的属性:
- textAllCaps,默认为全部大写
package com.example.myapplication

import androidx.appcompat.app.AppCompatActivity
import android.os.Bundle
import androidx.appcompat.app.AlertDialog
import kotlinx.android.synthetic.main.activity_button.*

class ButtonActivity : AppCompatActivity() {
    override fun onCreate(savedInstanceState: Bundle?) {
        super.onCreate(savedInstanceState)
        setContentView(R.layout.activity_button)
        button1.setOnClickListener {
            AlertDialog.Builder(this).apply {
                setTitle("This is dialog")
                setMessage("Something important")
                //不能点击灰白处关闭
                setCancelable(false)
                //闭包的两个参数
                setPositiveButton("确认"){dialog,which->}
                setNegativeButton("取消"){dialog,which->}
            }.show()
        }
    }
}
效果如上
3.1.3 EditText
3.1.3.1 基础输入
<?xml version="1.0" encoding="utf-8"?>
<LinearLayout xmlns:android="http://schemas.android.com/apk/res/android"
xmlns:app="http://schemas.android.com/apk/res-auto"
xmlns:tools="http://schemas.android.com/tools"
android:divider="@drawable/divider"
android:showDividers="middle"
android:padding="10dp"
android:orientation="vertical"
android:layout_width="match_parent"
android:layout_height="match_parent">
<EditText
android:id="@+id/textInput"
android:layout_height="wrap_content"
android:layout_width="match_parent"
android:background="@drawable/border"
android:text="文字"/>
<EditText
android:layout_height="wrap_content"
android:layout_width="match_parent"
android:background="@drawable/border"
android:hint="请输入文字"
android:text="文字,hint"/>
<EditText
android:layout_height="40dp"
android:layout_width="match_parent"
android:background="@drawable/border"
android:maxLines="2"
android:text="文字,maxLines=2"/>
<EditText
android:layout_height="40dp"
android:layout_width="match_parent"
android:background="@drawable/border"
android:singleLine="true"
android:text="文字,singleLine=true"/>
<EditText
android:layout_height="40dp"
android:layout_width="match_parent"
android:background="@drawable/border"
android:inputType="textPassword"
android:text="文字,inputType=textPassword"/>
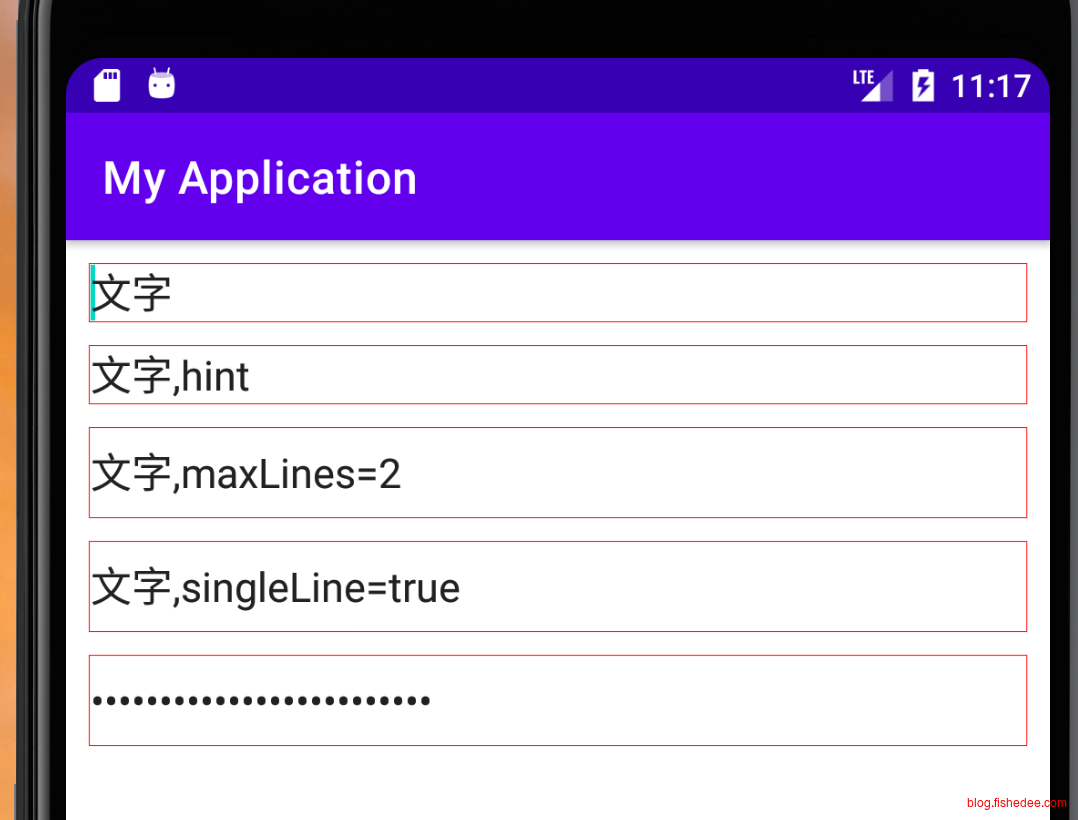
</LinearLayout>EditText的几个属性:
- text,文字
- hint,相当于Input里面的placeholder
- maxLines,高度最多多少行,超出行数以后会有滚动条
- inputType,输入的数据类型
- singleLine,singleLine字段已经不再推荐使用了。对于单行文本,官方推荐都填写maxLines=1和inputType的属性,这样能达到singleLine一样的效果。
package com.example.myapplication

import androidx.appcompat.app.AppCompatActivity
import android.os.Bundle
import android.util.Log
import androidx.core.widget.doOnTextChanged
import kotlinx.android.synthetic.main.activity_edit_text.*

class EditTextActivity : AppCompatActivity() {
    override fun onCreate(savedInstanceState: Bundle?) {
        super.onCreate(savedInstanceState)
        setContentView(R.layout.activity_edit_text)
        textInput.doOnTextChanged { text, start, before, count ->
            Log.d("editText text","${text} start:${start} before:${before} count:${count}")
        }
    }
}
注意EditText的doOnTextChanged回调
效果如上
3.1.3.2 软键盘确认输入
package com.example.myapplication

import android.annotation.SuppressLint
import android.app.Activity
import android.content.Context
import android.util.AttributeSet
import android.view.inputmethod.EditorInfo
import android.view.inputmethod.InputMethodManager
import android.widget.EditText
import android.widget.Toast
import androidx.appcompat.widget.AppCompatEditText

class MyEditText(ctx:Context,attrs:AttributeSet) :AppCompatEditText(ctx,attrs){

    init{
        this.setOnEditorActionListener { v, actionId, event ->
            if( actionId == EditorInfo.IME_ACTION_SEARCH){
                Toast.makeText(this.context,"键盘的搜索按键",Toast.LENGTH_SHORT).show()
                //需要手动关闭软键盘
                hiddenKeyboard()
                true
            }else{
                false
            }
        }
    }

    private fun showKeyboard(){
        this.requestFocus()
        val imm = this.context.getSystemService(Context.INPUT_METHOD_SERVICE) as InputMethodManager
        imm.showSoftInput(this,InputMethodManager.SHOW_IMPLICIT)
    }

    private fun hiddenKeyboard(){
        val activity = this.context as Activity
        val imm = this.context.getSystemService(Context.INPUT_METHOD_SERVICE) as InputMethodManager
        val currentFocus = activity.currentFocus
        if( imm.isActive && currentFocus != null ){
            val windowToken = currentFocus.windowToken
            if( windowToken != null ){
                imm.hideSoftInputFromWindow(windowToken,InputMethodManager.HIDE_NOT_ALWAYS)
            }
        }
    }
}
我们需要键盘确认的时候,回调给外部方,并自动收起软键盘
<com.example.myapplication.MyEditText
    android:layout_width="match_parent"
    android:layout_height="40dp"
    android:background="@drawable/border"
    android:imeOptions="actionSearch"
    android:inputType="text"
    android:maxLines="1"
    android:text="imeOptions,需要配置inputType,最好也配置maxLines才能生效"/>
布局文件
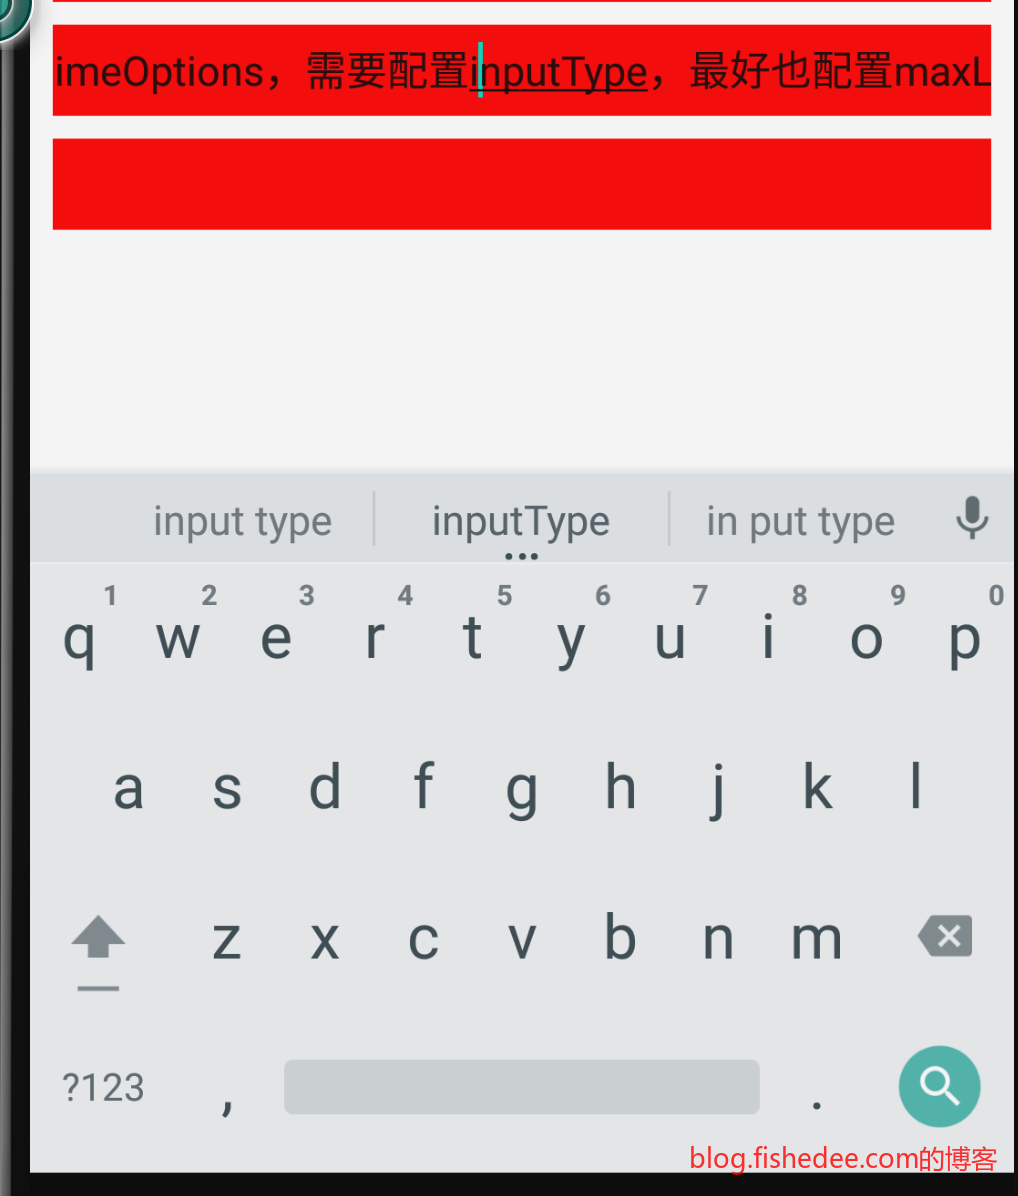
效果如上
3.1.3.3 扫码枪输入
package com.example.myapplication

import android.app.Activity
import android.content.Context
import android.text.Editable
import android.text.TextWatcher
import android.util.AttributeSet
import android.util.Log
import android.view.KeyEvent
import android.view.inputmethod.EditorInfo
import android.view.inputmethod.InputMethodManager
import android.widget.Toast
import androidx.appcompat.widget.AppCompatEditText

class BarCodeEditText(ctx:Context,attrs:AttributeSet) :AppCompatEditText(ctx,attrs){
    private var mBeginning = System.nanoTime()
    private var barCodeListener:((String)->Unit)? = null

    fun setOnBarCodeListener(listener:(String)->Unit){
        this.barCodeListener = listener
    }

    init{
        addTextChangedListener(object :TextWatcher{
            override fun afterTextChanged(s: Editable?) {
            }
            override fun beforeTextChanged(s: CharSequence?, start: Int, count: Int, after: Int) {
                if( (s == null || s.isEmpty()) && start == 0 ){
                    mBeginning = System.nanoTime()
                }
            }

            override fun onTextChanged(s: CharSequence?, start: Int, before: Int, count: Int) {
            }
        })
        setOnEditorActionListener { v, actionId, event ->
            if( actionId == EditorInfo.IME_ACTION_DONE || actionId == EditorInfo.IME_ACTION_SEARCH){
                val inputText = this.text.toString()
                barCodeListener?.invoke(inputText)
                setText("")
                hiddenKeyboard()
                true
            }else{
                false
            }

        }
    }

    override fun onKeyDown(keyCode: Int, event: KeyEvent?): Boolean {
        if( keyCode == KeyEvent.KEYCODE_ENTER){
            return true
        }
        return super.onKeyDown(keyCode, event)
    }

    override fun onKeyUp(keyCode: Int, event: KeyEvent?): Boolean {
        if( keyCode == KeyEvent.KEYCODE_ENTER ){
            val inputText = this.text.toString().trim()
            if( inputText.isNotBlank() ){
                barCodeListener?.invoke(inputText)
            }
            this.setText("")
            this.hiddenKeyboard()
            return true
        }
        return super.onKeyUp(keyCode, event)
    }

    private fun hiddenKeyboard(){
        val activity = this.context as Activity
        val imm = this.context.getSystemService(Context.INPUT_METHOD_SERVICE) as InputMethodManager
        val currentFocus = activity.currentFocus
        if( imm.isActive && currentFocus != null ){
            val windowToken = currentFocus.windowToken
            if( windowToken != null ){
                imm.hideSoftInputFromWindow(windowToken,InputMethodManager.HIDE_NOT_ALWAYS)
            }
        }
    }
}扫码枪接收到Enter字符,或者,接收到键盘的Done按钮的时候,触发二维码通知,并清除EditText的输入。注意,我们覆写onKeyDown和onKeyUp事件,是为了避免EditText在遇到Enter输入以后,会自动跳到下一个焦点。特别要注意的是,不要过分相信扫码枪的数据,扫码枪里面的数据可能会有换行字符,前后空格字符,甚至是一个空字符串,需要做好输入校正的操作。
<com.example.myapplication.BarCodeEditText
    android:layout_width="match_parent"
    android:layout_height="40dp"
    android:background="@drawable/border"
    android:imeOptions="actionSearch"
    android:inputType="text"
    android:maxLines="1"
    android:text=""/>
布局文件
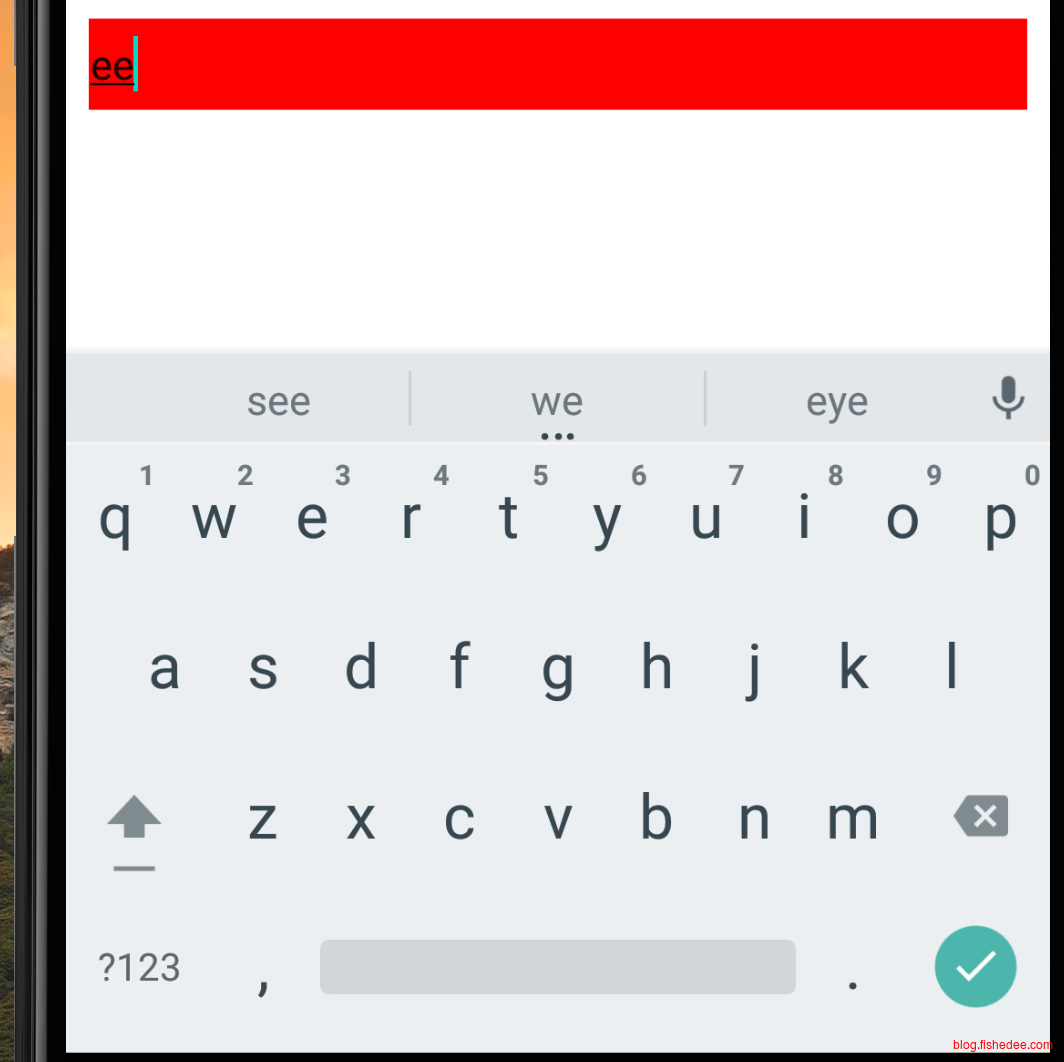
效果如上
3.1.3.4 避免进入页面打开软键盘
<activity
    android:name=".OrderDetailActivity"
    android:windowSoftInputMode="adjustUnspecified|adjustResize|stateHidden"
    android:exported="false" />
禁止页面跳转弹出输入法键盘设置
3.1.4 ImageView
3.1.4.1 src
<?xml version="1.0" encoding="utf-8"?>
<LinearLayout xmlns:android="http://schemas.android.com/apk/res/android"
    xmlns:app="http://schemas.android.com/apk/res-auto"
    xmlns:tools="http://schemas.android.com/tools"
    android:divider="@drawable/divider"
    android:showDividers="middle"
    android:padding="10dp"
    android:orientation="vertical"
    android:layout_width="match_parent"
    android:layout_height="match_parent">
    <ImageView
        android:layout_width="match_parent"
        android:layout_height="wrap_content"
        android:background="@drawable/border"
        android:src="@drawable/sample"/>
</LinearLayout>
ImageView的属性:
- src,数据来源,没啥好说的
效果如上
3.1.4.2 scaleType
<?xml version="1.0" encoding="utf-8"?>
<ScrollView xmlns:android="http://schemas.android.com/apk/res/android"
    xmlns:app="http://schemas.android.com/apk/res-auto"
    xmlns:tools="http://schemas.android.com/tools"
    android:layout_width="match_parent"
    android:layout_height="match_parent"
    tools:context=".ImageViewActivity2">
    <LinearLayout
        android:orientation="vertical"
        android:layout_width="match_parent"
        android:layout_height="wrap_content"
        android:padding="10dp">
        <ImageView
            android:layout_width="match_parent"
            android:layout_height="120dp"
            android:background="@drawable/border"
            android:scaleType="fitXY"
            android:src="@drawable/sample"/>
        <ImageView
            android:layout_width="match_parent"
            android:layout_height="120dp"
            android:background="@drawable/border"
            android:scaleType="fitStart"
            android:src="@drawable/sample"/>
        <ImageView
            android:layout_width="match_parent"
            android:layout_height="120dp"
            android:background="@drawable/border"
            android:scaleType="fitCenter"
            android:src="@drawable/sample"/>
        <ImageView
            android:layout_width="match_parent"
            android:layout_height="120dp"
            android:background="@drawable/border"
            android:scaleType="fitEnd"
            android:src="@drawable/sample"/>
        <ImageView
            android:layout_width="match_parent"
            android:layout_height="120dp"
            android:background="@drawable/border"
            android:scaleType="center"
            android:src="@drawable/sample"/>
        <ImageView
            android:layout_width="match_parent"
            android:layout_height="120dp"
            android:background="@drawable/border"
            android:scaleType="centerCrop"
            android:src="@drawable/sample"/>
        <ImageView
            android:layout_width="match_parent"
            android:layout_height="120dp"
            android:background="@drawable/border"
            android:scaleType="centerInside"
            android:src="@drawable/sample"/>
    </LinearLayout>
</ScrollView>
我们测试ImageView的各种scaleType
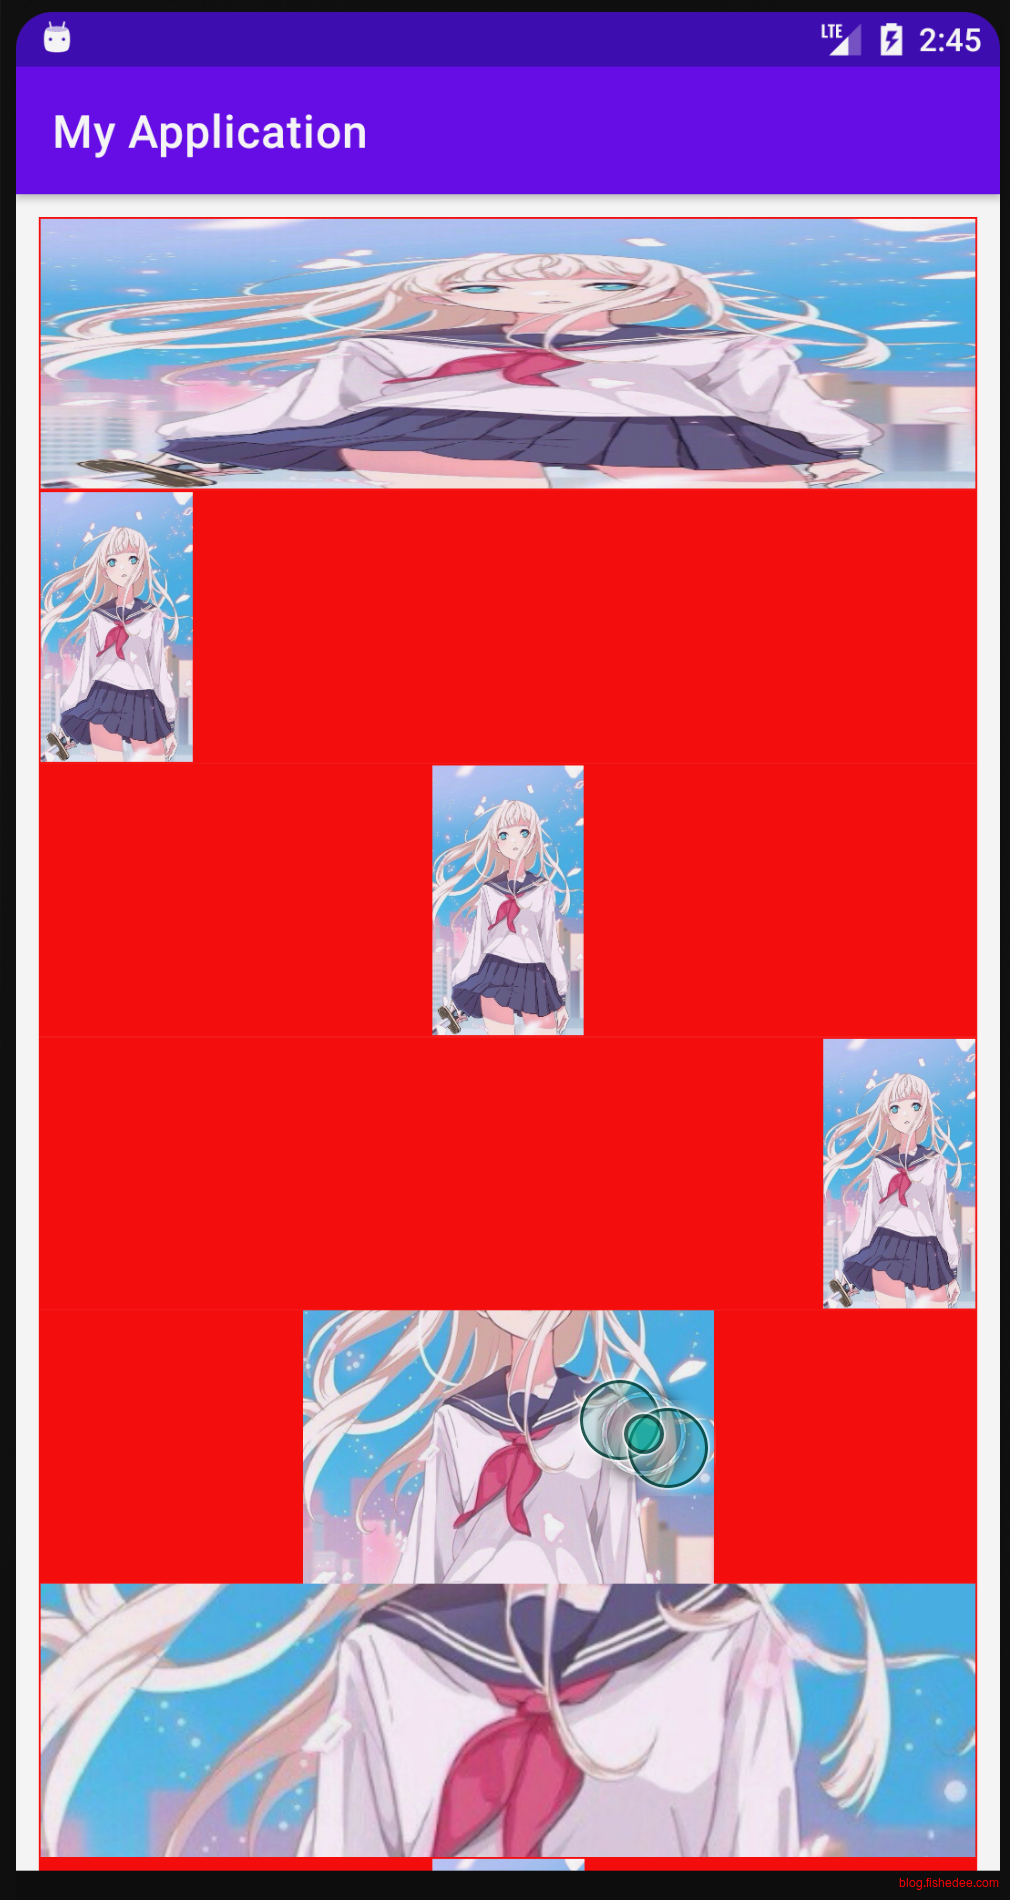
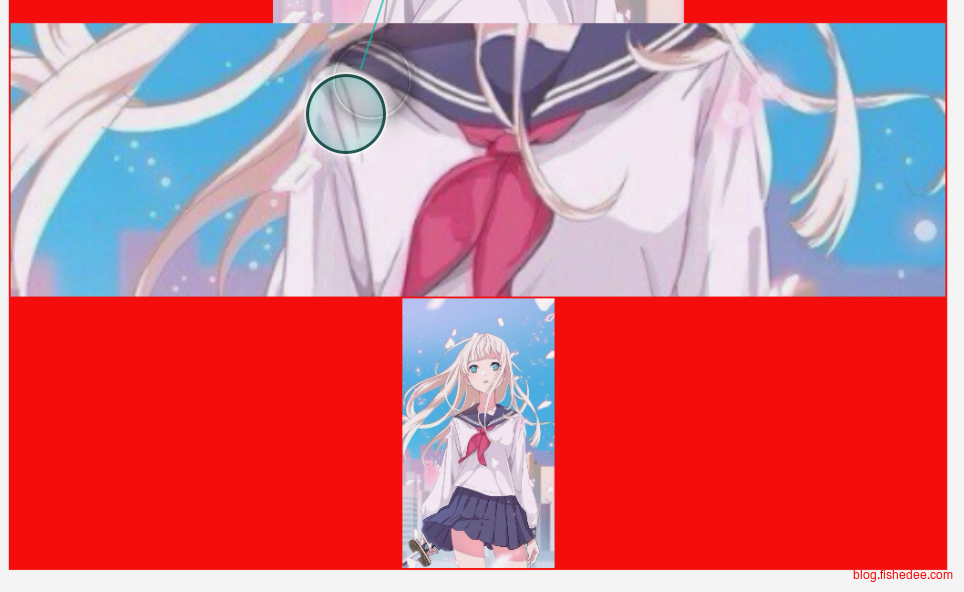
效果如上。
当ImageView的宽高比与Image的宽高比不一致的时候,怎么显示出来,这就是ScaleType要做的事情了。
- fitXY,强行缩放图片,使得图片宽高比与框一致,但是这样做会变形。特点是无余位,变形,不丢失信息。
- fitStart,fitCenter,fitEnd。图片最长边与框对齐。特点是可能余位,无变形,不丢失信息。
- centerCrop。图片最短边与框对齐。特点是无余位,无变形,总是丢失信息。
最后,有些情况下,图片很小,但是框很大,我们就不希望图片还缩放了。我们有:
- center。框较大时不缩放,框较小时裁剪图片中间信息。特点是可能余位,无变形,不丢失信息。
- centerInside。框较大时不缩放,框较小时等比例缩放图片。特点是可能余位,无变形,不丢失信息。
无余位,无变形,不丢失信息,三个特征只能选两个。默认情况,ImageView的ScaleType是fitCenter。
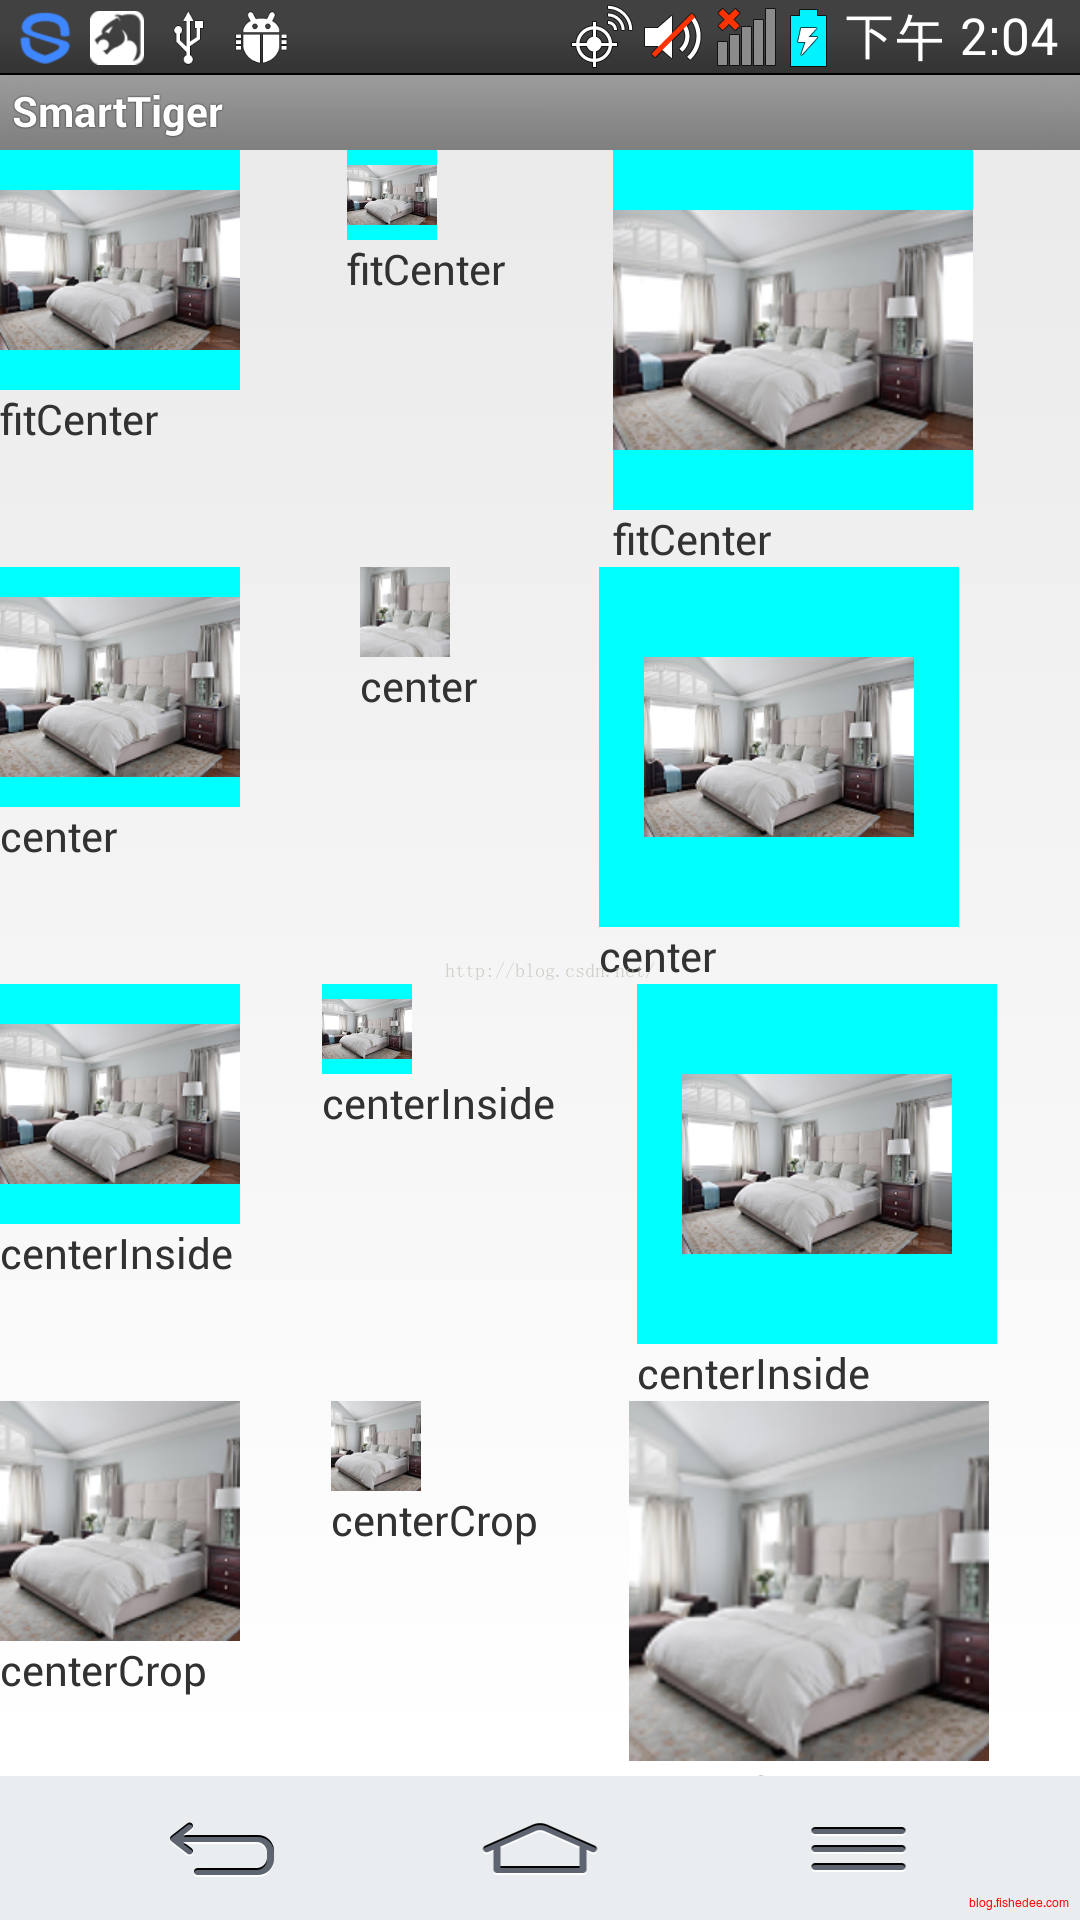
附上另外一种ScaleType方式
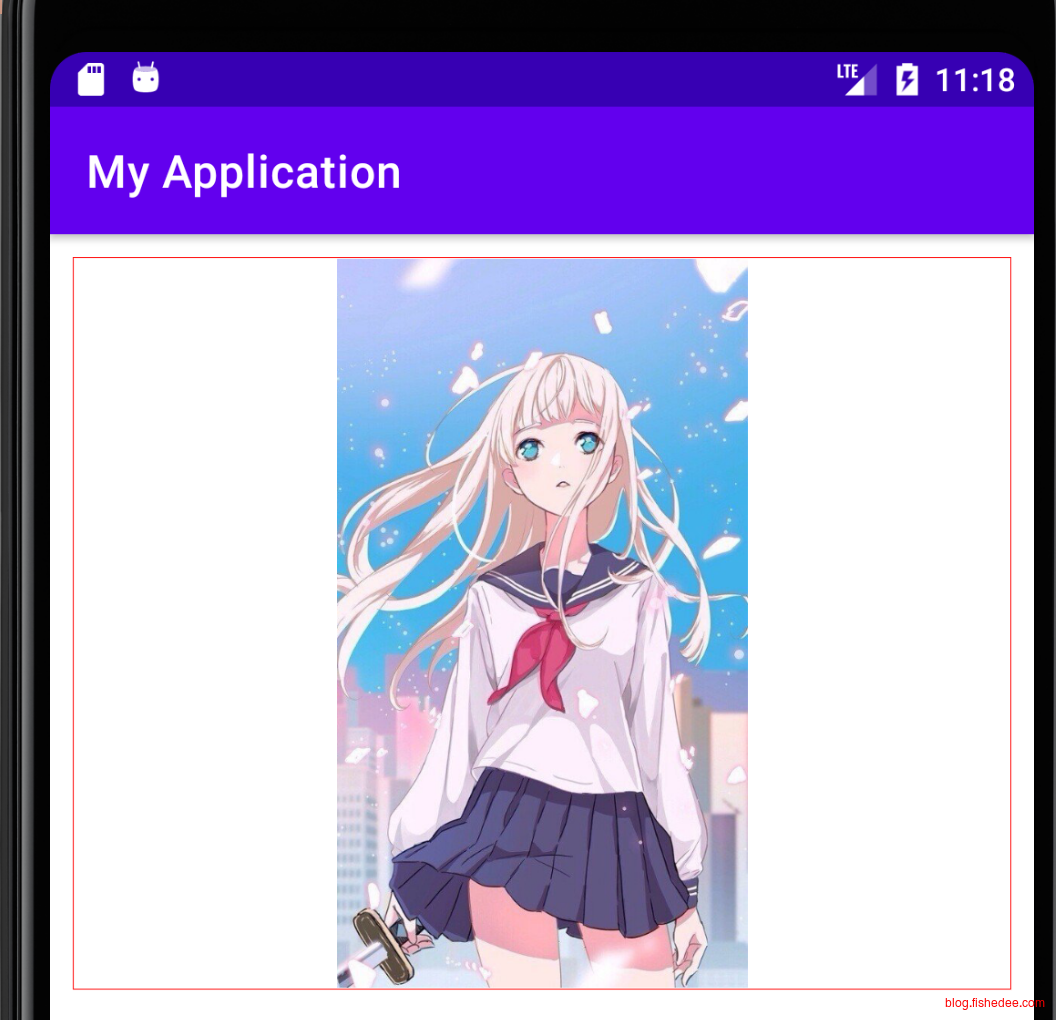
3.1.4.3 adjustViewBounds
当我们希望框的宽高比总是与图片一致的时候,就用这个属性。先用width或者height固定框的一边,然后用adjustViewBounds来让ImageView自动控制另外一边。
<?xml version="1.0" encoding="utf-8"?>
<ScrollView xmlns:android="http://schemas.android.com/apk/res/android"
    xmlns:app="http://schemas.android.com/apk/res-auto"
    xmlns:tools="http://schemas.android.com/tools"
    android:layout_width="match_parent"
    android:layout_height="match_parent">
    <LinearLayout
        android:divider="@drawable/divider"
        android:showDividers="middle"
        android:padding="10dp"
        android:orientation="vertical"
        android:layout_width="match_parent"
        android:layout_height="wrap_content">
        <ImageView
            android:layout_width="match_parent"
            android:layout_height="wrap_content"
            android:background="@drawable/border"
            android:src="@drawable/sample"/>
        <ImageView
            android:layout_width="match_parent"
            android:layout_height="wrap_content"
            android:background="@drawable/border"
            android:adjustViewBounds="true"
            android:src="@drawable/sample"/>
        <ImageView
            android:layout_width="match_parent"
            android:layout_height="wrap_content"
            android:background="@drawable/border"
            android:src="@drawable/flower"/>
        <ImageView
            android:layout_width="match_parent"
            android:layout_height="wrap_content"
            android:background="@drawable/border"
            android:adjustViewBounds="true"
            android:src="@drawable/flower"/>
    </LinearLayout>
</ScrollView>
布局如上
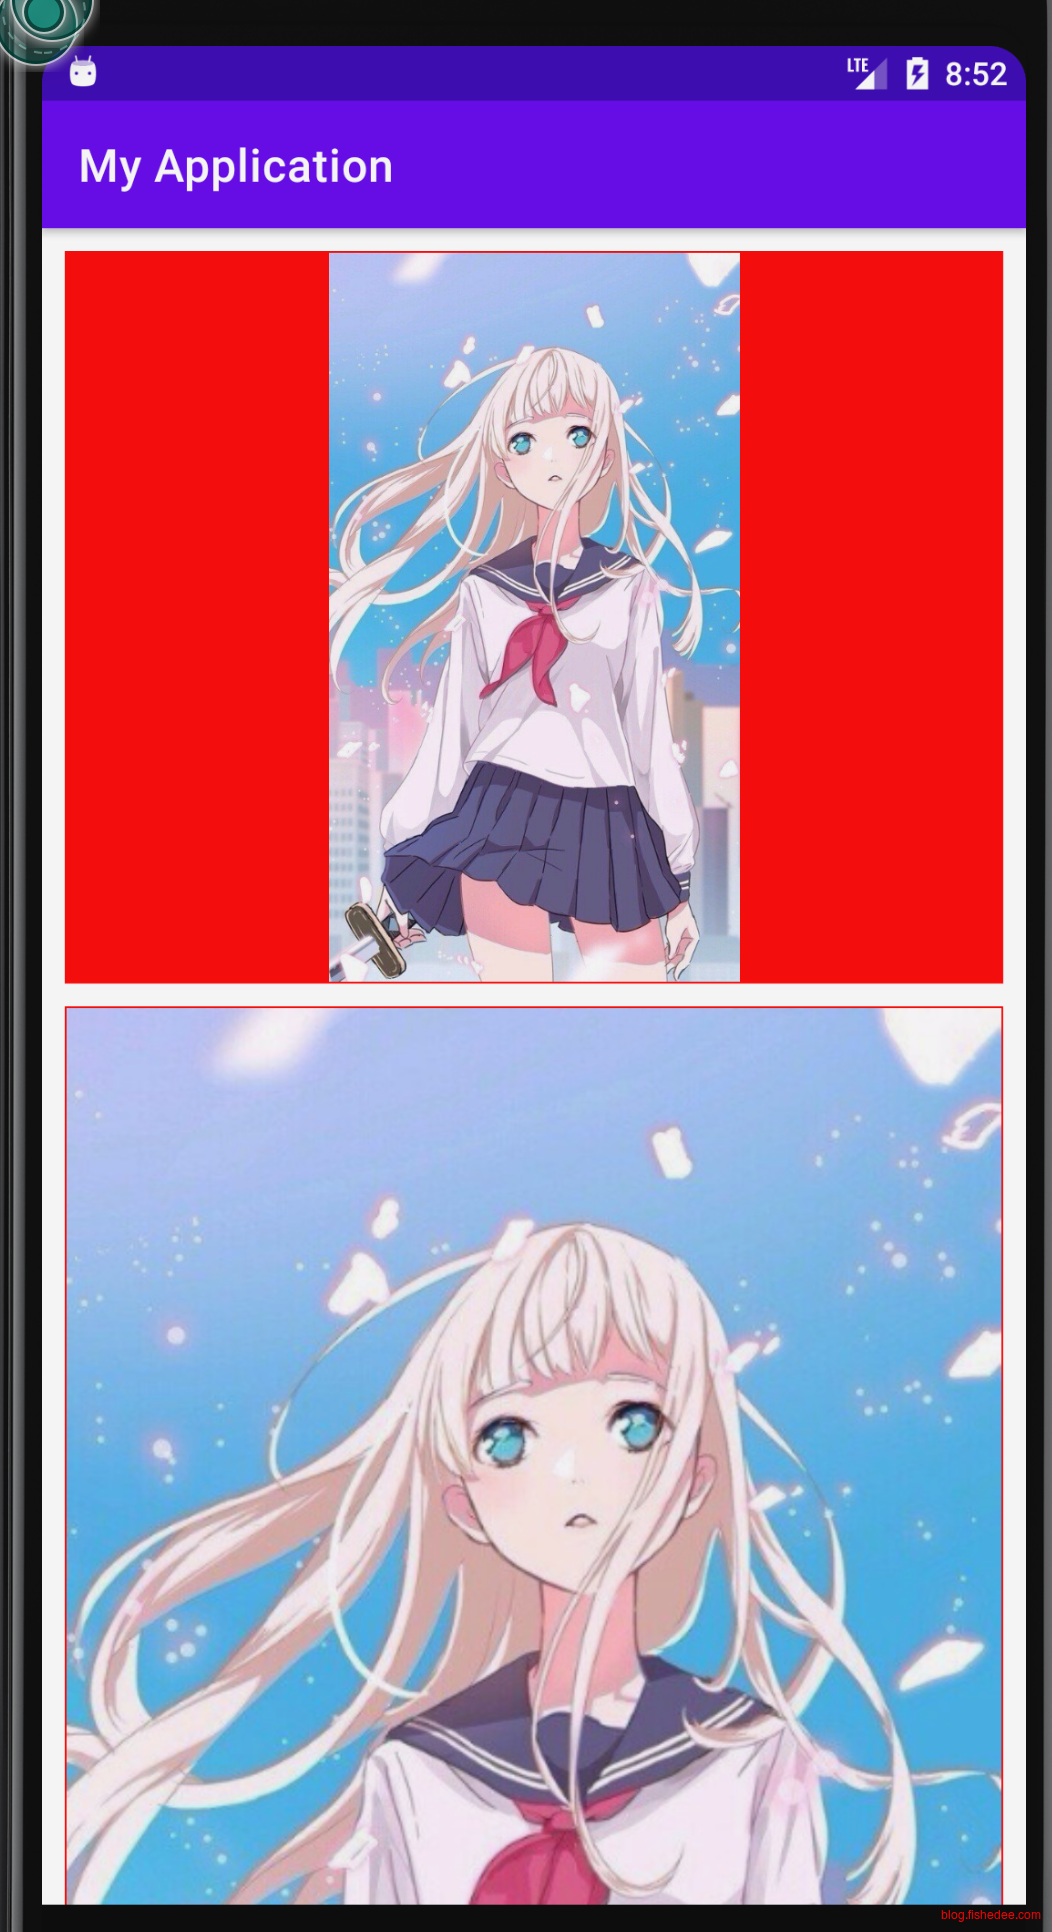
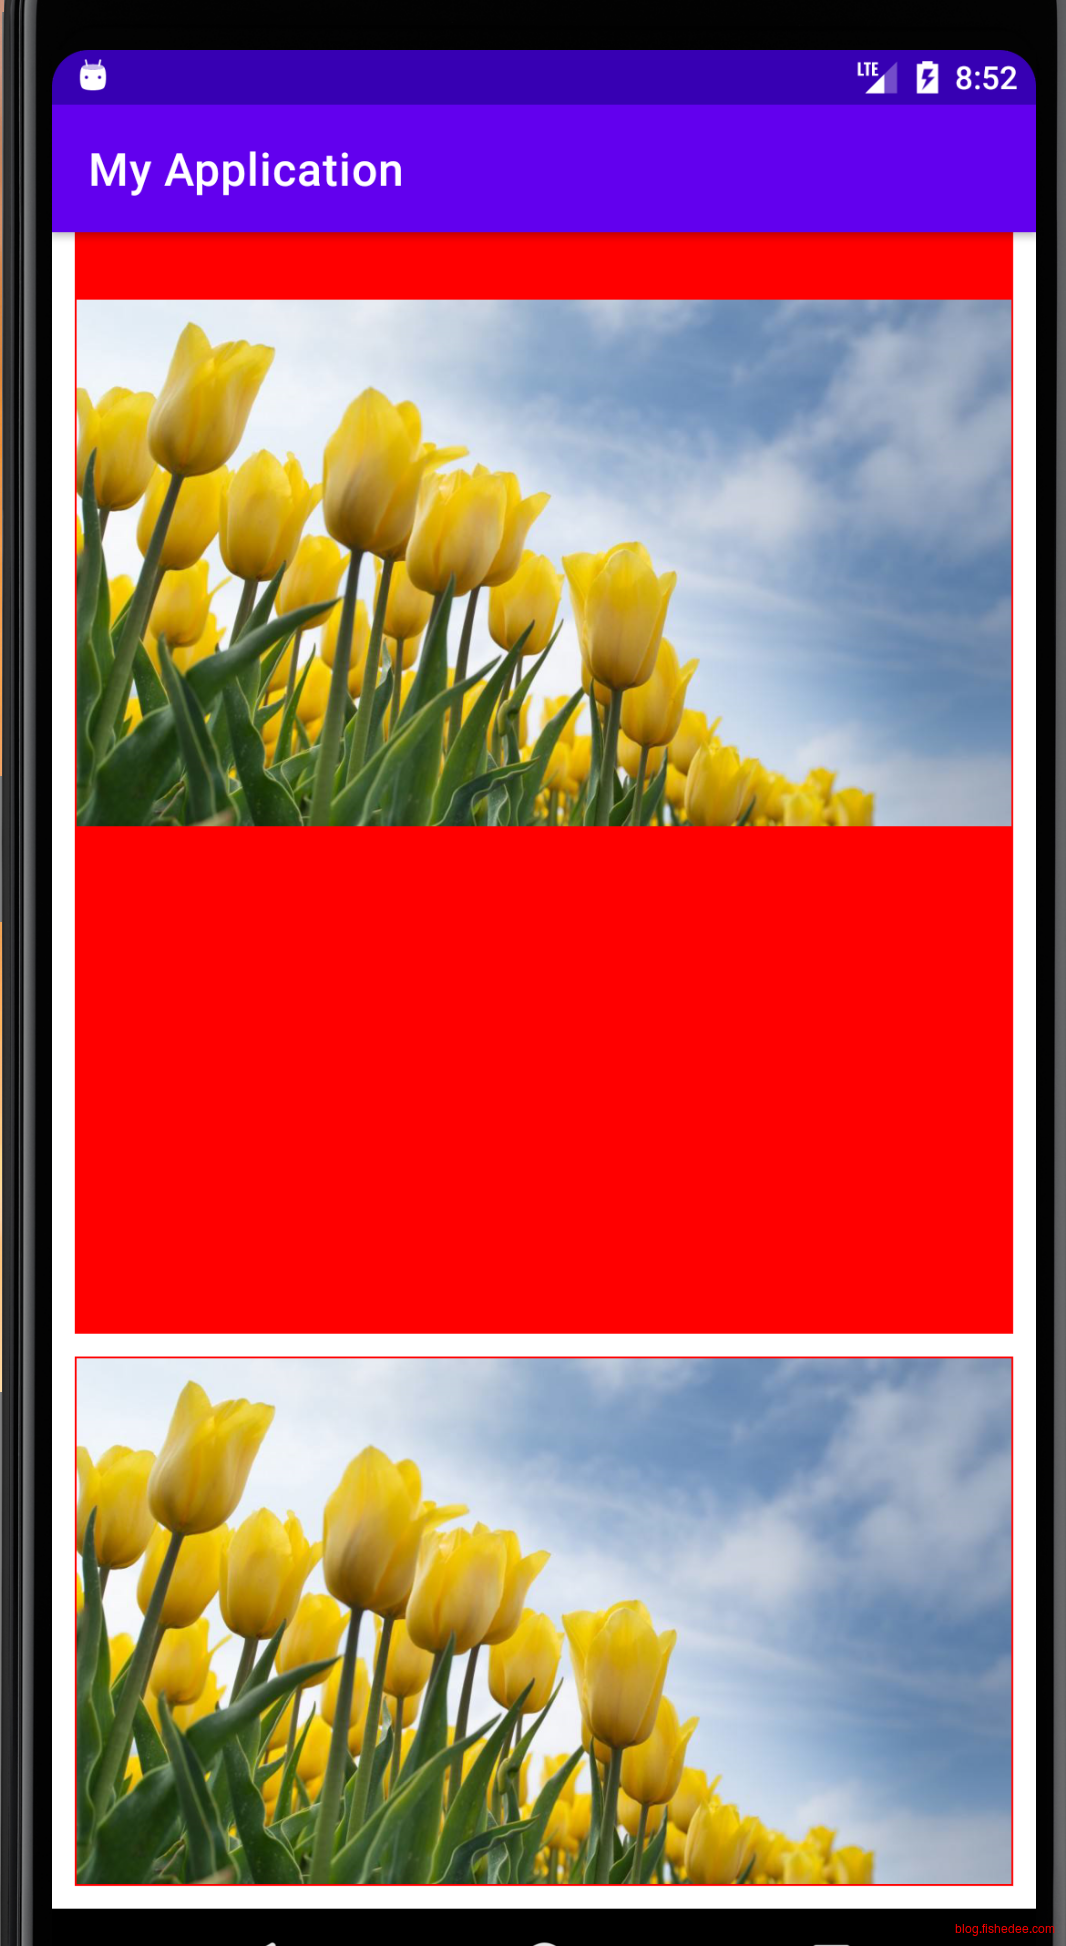
效果如上
3.1.5 ProgressBar
<?xml version="1.0" encoding="utf-8"?>
<LinearLayout xmlns:android="http://schemas.android.com/apk/res/android"
    xmlns:app="http://schemas.android.com/apk/res-auto"
    xmlns:tools="http://schemas.android.com/tools"
    android:divider="@drawable/divider"
    android:showDividers="middle"
    android:padding="10dp"
    android:orientation="vertical"
    android:layout_width="match_parent"
    android:layout_height="match_parent">
    <ProgressBar
        android:layout_height="wrap_content"
        android:layout_width="match_parent"
        android:background="@drawable/border"/>
    <!--visibility为gone,看不到,不会占位-->
    <ProgressBar
        android:layout_height="wrap_content"
        android:layout_width="match_parent"
        android:background="@drawable/border"
        style="?android:attr/progressBarStyleHorizontal"
        android:visibility="gone"/>
    <ProgressBar
        android:layout_height="wrap_content"
        android:layout_width="match_parent"
        android:background="@drawable/border"
        style="?android:attr/progressBarStyleHorizontal"
        android:max="100"
        android:progress="45"/>
    <!--visibility为invisible,看不到,且依然会占位-->
    <ProgressBar
        android:layout_height="wrap_content"
        android:layout_width="match_parent"
        android:background="@drawable/border"
        style="?android:attr/progressBarStyleHorizontal"
        android:visibility="invisible"/>
    <ProgressBar
        android:layout_height="wrap_content"
        android:layout_width="match_parent"
        android:background="@drawable/border"
        style="?android:attr/progressBarStyleHorizontal"
        android:max="100"
        android:progress="90"/>
</LinearLayout>
ProgressBar的几个属性:
- style,默认会圆形的,通过设置style,可以设置为横条进度,或者竖条进度
- max,最大的进度值
- progress,当前的进度值
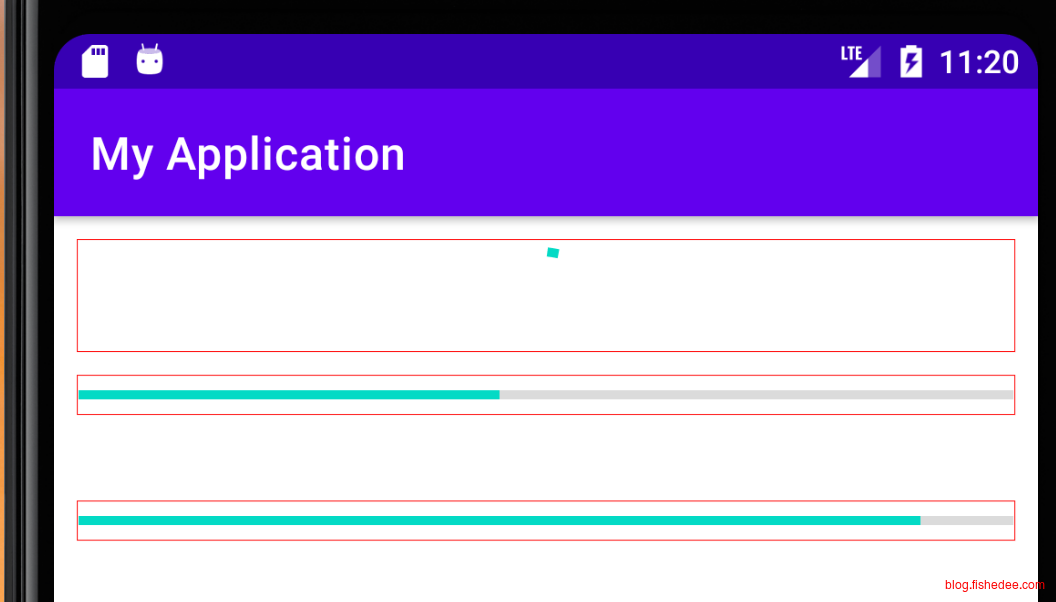
效果如上
3.1.6 通用属性
通用属性有:
- layout_width,宽度,有wrap_content,和match_parent两种,一般用dp作为单位。
- layout_height,高度,有wrap_content,和match_parent两种,一般用dp作为单位。
- margin,边框
- padding,填充
- background,设置圆角,边框,都通过这个来设置
- visibility,gone是真正的消失,invisible是隐藏但占据布局位置,visible是默认值
3.2 布局控件
代码在这里
3.2.1 LinearLayout
3.2.1.1 基础
<?xml version="1.0" encoding="utf-8"?>
<!--divider是相当于LinearLayout里面插入分割线-->
<LinearLayout xmlns:android="http://schemas.android.com/apk/res/android"
    xmlns:app="http://schemas.android.com/apk/res-auto"
    xmlns:tools="http://schemas.android.com/tools"
    android:orientation="vertical"
    android:padding="10dp"
    android:showDividers="middle"
    android:divider="@drawable/divider"
    android:layout_width="match_parent"
    android:layout_height="match_parent"
    tools:context=".LinearLayoutActivity">
    <!--orientation是相当于flex布局里面的flex-direction-->
    <LinearLayout
        android:background="@drawable/border"
        android:orientation="horizontal"
        android:layout_width="match_parent"
        android:layout_height="wrap_content">
        <Button
            android:layout_height="wrap_content"
            android:layout_width="wrap_content"
            android:text="按钮1"/>
        <Button
            android:layout_height="wrap_content"
            android:layout_width="wrap_content"
            android:text="按钮2"/>
        <Button
            android:layout_height="wrap_content"
            android:layout_width="wrap_content"
            android:text="按钮3"/>
    </LinearLayout>
    <!--layout-gravity是相当于flex布局里面的align-self,副轴方向上对齐-->
    <LinearLayout
        android:background="@drawable/border"
        android:orientation="horizontal"
        android:layout_width="match_parent"
        android:layout_height="100dp">
        <Button
            android:layout_height="wrap_content"
            android:layout_width="wrap_content"
            android:layout_gravity="top"
            android:text="按钮1"/>
        <Button
            android:layout_height="wrap_content"
            android:layout_width="wrap_content"
            android:layout_gravity="center"
            android:text="按钮2"/>
        <Button
            android:layout_height="wrap_content"
            android:layout_width="wrap_content"
            android:layout_gravity="bottom"
            android:text="按钮3"/>
    </LinearLayout>
    <!--layout-weight是相当于flex布局里面的flex-grow,按权重分配剩余空间-->
    <LinearLayout
        android:background="@drawable/border"
        android:orientation="horizontal"
        android:layout_width="match_parent"
        android:layout_height="wrap_content">
        <Button
            android:layout_height="wrap_content"
            android:layout_width="wrap_content"
            android:text="按钮1"/>
        <Button
            android:layout_height="wrap_content"
            android:layout_width="0dp"
            android:layout_weight="1"
            android:text="按钮2"/>
        <Button
            android:layout_height="wrap_content"
            android:layout_width="wrap_content"
            android:text="按钮3"/>
    </LinearLayout>
</LinearLayout>
布局如上
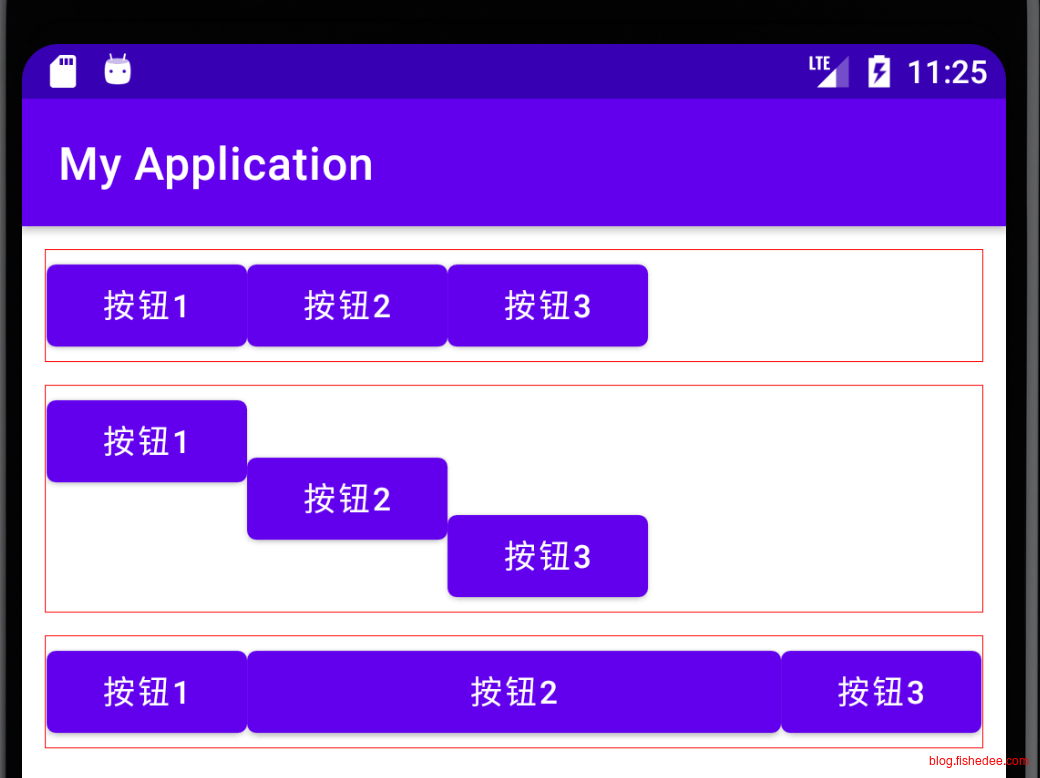
效果如上
基础使用包括orientation,layout_weight和layout_gravity
3.2.1.2 分割线
<?xml version="1.0" encoding="utf-8"?>
<ScrollView xmlns:android="http://schemas.android.com/apk/res/android"
    xmlns:app="http://schemas.android.com/apk/res-auto"
    xmlns:tools="http://schemas.android.com/tools"
    android:orientation="vertical"
    android:layout_width="match_parent"
    android:layout_height="match_parent"
    tools:context=".LinearLayoutActivity3">
    <LinearLayout
        android:layout_width="match_parent"
        android:layout_height="wrap_content"
        android:orientation="vertical">
        <!--使用Divider来做固定宽度的间隔-->
        <LinearLayout
            android:background="@drawable/border"
            android:divider="@drawable/divider2"
            android:showDividers="middle"
            android:gravity="center"
            android:orientation="horizontal"
            android:layout_width="match_parent"
            android:layout_height="wrap_content">
            <Button
                android:layout_height="wrap_content"
                android:layout_width="wrap_content"
                android:text="按钮1"/>
            <Button
                android:layout_height="wrap_content"
                android:layout_width="wrap_content"
                android:text="按钮2"/>
            <Button
                android:layout_height="wrap_content"
                android:layout_width="wrap_content"
                android:text="按钮3"/>
        </LinearLayout>
        <!--使用Divider来做固定宽度的间隔,beginning-->
        <LinearLayout
            android:background="@drawable/border"
            android:divider="@drawable/divider2"
            android:showDividers="beginning"
            android:orientation="horizontal"
            android:layout_width="match_parent"
            android:layout_height="wrap_content">
            <Button
                android:layout_height="wrap_content"
                android:layout_width="wrap_content"
                android:text="按钮1"/>
            <Button
                android:layout_height="wrap_content"
                android:layout_width="wrap_content"
                android:text="按钮2"/>
            <Button
                android:layout_height="wrap_content"
                android:layout_width="wrap_content"
                android:text="按钮3"/>
        </LinearLayout>
        <!--使用Divider来做固定宽度的间隔,beginning-->
        <LinearLayout
            android:background="@drawable/border"
            android:divider="@drawable/divider2"
            android:gravity="right"
            android:showDividers="end"
            android:orientation="horizontal"
            android:layout_width="match_parent"
            android:layout_height="wrap_content">
            <Button
                android:layout_height="wrap_content"
                android:layout_width="wrap_content"
                android:text="按钮1"/>
            <Button
                android:layout_height="wrap_content"
                android:layout_width="wrap_content"
                android:text="按钮2"/>
            <Button
                android:layout_height="wrap_content"
                android:layout_width="wrap_content"
                android:text="按钮3"/>
        </LinearLayout>
        <!--使用显式View来做均分间隔-->
        <LinearLayout
            android:background="@drawable/border"
            android:orientation="horizontal"
            android:layout_width="match_parent"
            android:layout_height="wrap_content">
            <View
                android:layout_width="0dp"
                android:background="@drawable/bg"
                android:layout_height="match_parent"
                android:layout_weight="1"/>
            <Button
                android:layout_height="wrap_content"
                android:layout_width="wrap_content"
                android:text="按钮1"/>
            <View
                android:layout_width="0dp"
                android:background="@drawable/bg"
                android:layout_height="match_parent"
                android:layout_weight="1"/>
            <Button
                android:layout_height="wrap_content"
                android:layout_width="wrap_content"
                android:text="按钮2"/>
            <View
                android:layout_width="0dp"
                android:background="@drawable/bg"
                android:layout_height="match_parent"
                android:layout_weight="1"/>
            <Button
                android:layout_height="wrap_content"
                android:layout_width="wrap_content"
                android:text="按钮3"/>
            <View
                android:layout_width="0dp"
                android:background="@drawable/bg"
                android:layout_height="match_parent"
                android:layout_weight="1"/>
        </LinearLayout>
    </LinearLayout>
</ScrollView>
分割线,用divider,注意只能使用固定宽度或高度的分割线
<?xml version="1.0" encoding="utf-8"?>
<shape xmlns:android = "http://schemas.android.com/apk/res/android"
    android:shape="rectangle">
    <size
        android:width = "10dp"
        android:height="10dp"/>
</shape>
divider的样式
<?xml version="1.0" encoding="utf-8"?>
<shape xmlns:android = "http://schemas.android.com/apk/res/android"
    android:shape="rectangle">
    <stroke
        android:width="2dp"
        android:color="@color/black"/>
</shape>
background的样式
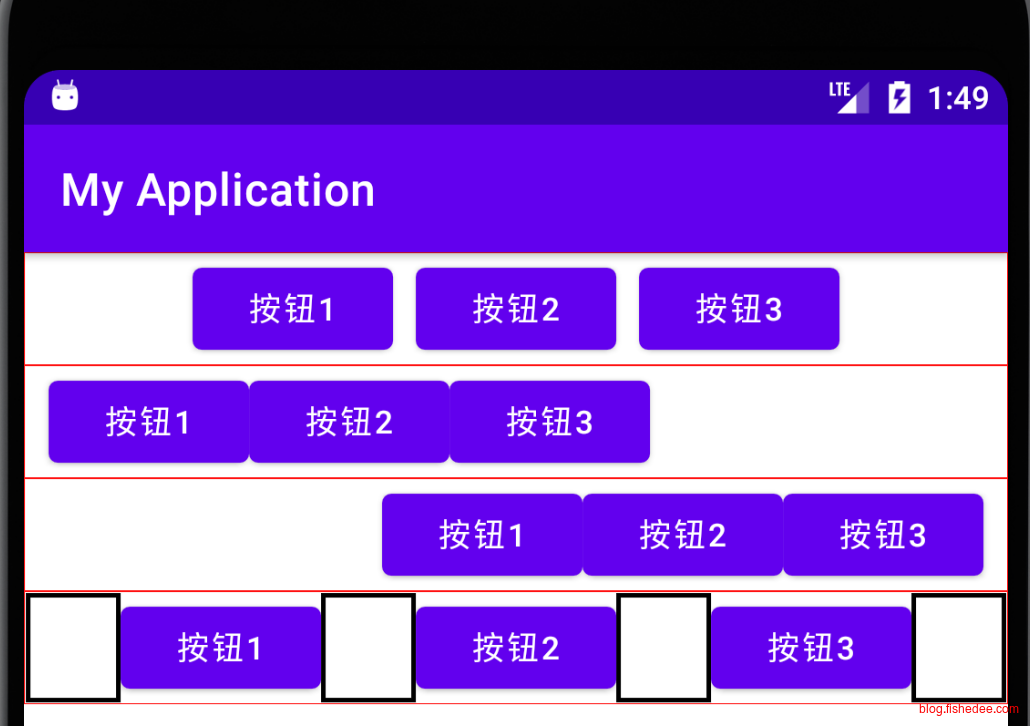
效果图如上
3.2.1.3 gravity
<?xml version="1.0" encoding="utf-8"?>
<ScrollView xmlns:android="http://schemas.android.com/apk/res/android"
    xmlns:app="http://schemas.android.com/apk/res-auto"
    xmlns:tools="http://schemas.android.com/tools"
    android:orientation="vertical"
    android:layout_width="match_parent"
    android:layout_height="match_parent"
    tools:context=".LinearLayoutActivity2">
    <LinearLayout
        android:layout_width="match_parent"
        android:layout_height="wrap_content"
        android:orientation="vertical">
        <LinearLayout
            android:background="@drawable/border"
            android:orientation="horizontal"
            android:layout_width="match_parent"
            android:layout_height="80dp"
            android:gravity="right|center_vertical">
            <Button
                android:layout_height="wrap_content"
                android:layout_width="wrap_content"
                android:text="按钮1"/>
            <Button
                android:layout_height="wrap_content"
                android:layout_width="wrap_content"
                android:text="按钮2"/>
            <Button
                android:layout_height="wrap_content"
                android:layout_width="wrap_content"
                android:text="按钮3"/>
        </LinearLayout>
        <LinearLayout
            android:background="@drawable/border"
            android:orientation="horizontal"
            android:layout_width="match_parent"
            android:layout_height="80dp"
            android:gravity="bottom|center_horizontal">
            <Button
                android:layout_height="wrap_content"
                android:layout_width="wrap_content"
                android:text="按钮1"/>
            <Button
                android:layout_height="wrap_content"
                android:layout_width="wrap_content"
                android:text="按钮2"/>
            <Button
                android:layout_height="wrap_content"
                android:layout_width="wrap_content"
                android:text="按钮3"/>
        </LinearLayout>
    </LinearLayout>
</ScrollView>
LinearLayout自身,还有一个gravity属性,它相当于flex布局里面的justify-content和align-content
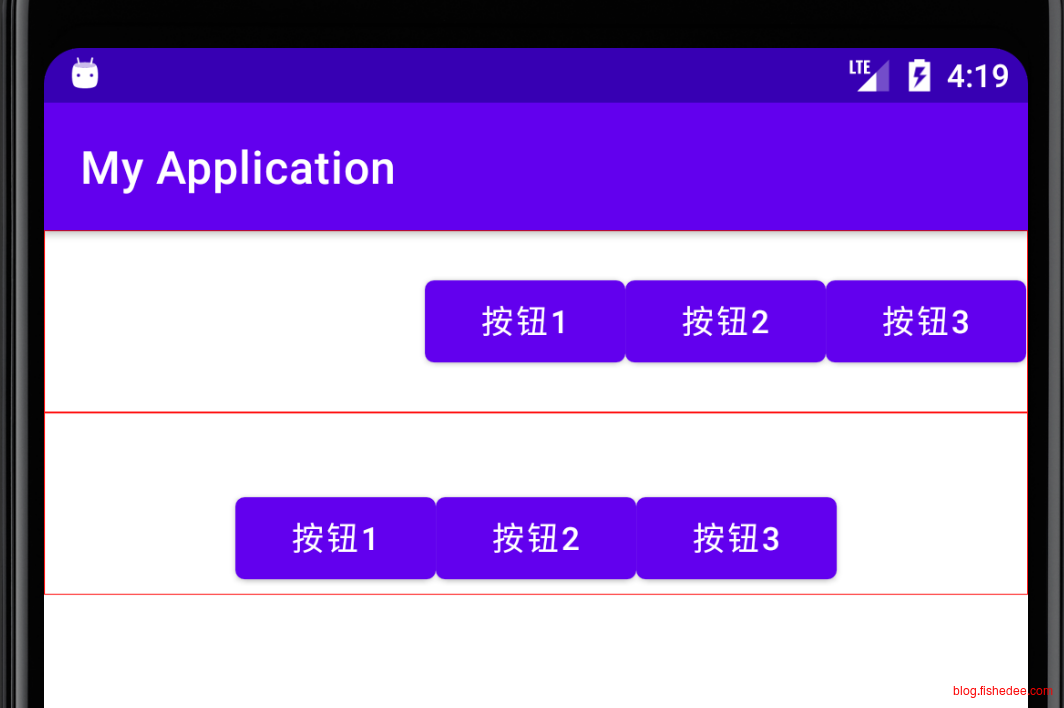
总的来说,LinearLayout跟Html里面的flex布局,很相似,包含几个属性为:
- 自身的orientation,相当于flex-direction
- 自身divider与showDividers,在子控件里面插入空隙,注意只能是固定的空隙
- 自身的gravity,相当于flex布局里面的justify-content和align-content,可以同时设置主轴和副轴的排列
- 子控件的layout_gravity,相当于align-self,注意它和gravity是不同的两个属性,注意只能设置副轴方向的排列。
- 子控件的layout_weight,相当于flex-grow
3.2.2 RelativeLayout
<?xml version="1.0" encoding="utf-8"?>
<LinearLayout xmlns:android="http://schemas.android.com/apk/res/android"
    xmlns:app="http://schemas.android.com/apk/res-auto"
    xmlns:tools="http://schemas.android.com/tools"
    android:orientation="vertical"
    android:divider="@drawable/divider"
    android:showDividers="middle"
    android:padding="10dp"
    android:layout_width="match_parent"
    android:layout_height="match_parent"
    tools:context=".RelativeLayoutActivity">
    <RelativeLayout
        android:background="@drawable/border"
        android:layout_width="match_parent"
        android:layout_height="0dp"
        android:layout_weight="1">
        <Button
            android:layout_height="wrap_content"
            android:layout_width="wrap_content"
            android:layout_centerHorizontal="true"
            android:layout_centerVertical="true"
            android:text="按钮1"/>
        <Button
            android:layout_height="wrap_content"
            android:layout_width="wrap_content"
            android:layout_alignParentLeft="true"
            android:layout_alignParentTop="true"
            android:text="按钮2"/>
        <Button
            android:layout_height="wrap_content"
            android:layout_width="wrap_content"
            android:layout_alignParentRight="true"
            android:layout_alignParentTop="true"
            android:text="按钮3"/>
        <Button
            android:layout_height="wrap_content"
            android:layout_width="wrap_content"
            android:layout_alignParentLeft="true"
            android:layout_alignParentBottom="true"
            android:text="按钮4"/>
        <Button
            android:layout_height="wrap_content"
            android:layout_width="wrap_content"
            android:layout_alignParentRight="true"
            android:layout_alignParentBottom="true"
            android:text="按钮5"/>
    </RelativeLayout>
    <RelativeLayout
        android:background="@drawable/border"
        android:layout_width="match_parent"
        android:layout_height="0dp"
        android:layout_weight="1">

        <Button
            android:id="@+id/centerButton"
            android:layout_width="wrap_content"
            android:layout_height="wrap_content"
            android:layout_centerInParent="true"
            android:text="按钮1" />
        <Button
            android:layout_height="wrap_content"
            android:layout_width="wrap_content"
            android:layout_above="@id/centerButton"
            android:layout_toLeftOf="@id/centerButton"
            android:text="按钮2"/>
        <Button
            android:layout_height="wrap_content"
            android:layout_width="wrap_content"
            android:layout_above="@id/centerButton"
            android:layout_toRightOf="@id/centerButton"
            android:text="按钮3"/>
        <Button
            android:layout_height="wrap_content"
            android:layout_width="wrap_content"
            android:layout_below="@id/centerButton"
            android:layout_toLeftOf="@id/centerButton"
            android:text="按钮4"/>
        <Button
            android:layout_height="wrap_content"
            android:layout_width="wrap_content"
            android:layout_below="@id/centerButton"
            android:layout_toRightOf="@id/centerButton"
            android:text="按钮5"/>
    </RelativeLayout>
</LinearLayout>
RelativeLayout就是相对父级,或者相对其他子控件来布局了,也比较简单,包含属性有:
- 相对父级,layout_centerHorizontal,layout_centerVertical,layout_alignParentLeft,layout_alignParentRight,layout_alignParentTop和layout_alignParentBottom
- 相对其他子级,layout_toLeftOf,layout_toRightOf,layout_above,layout_below
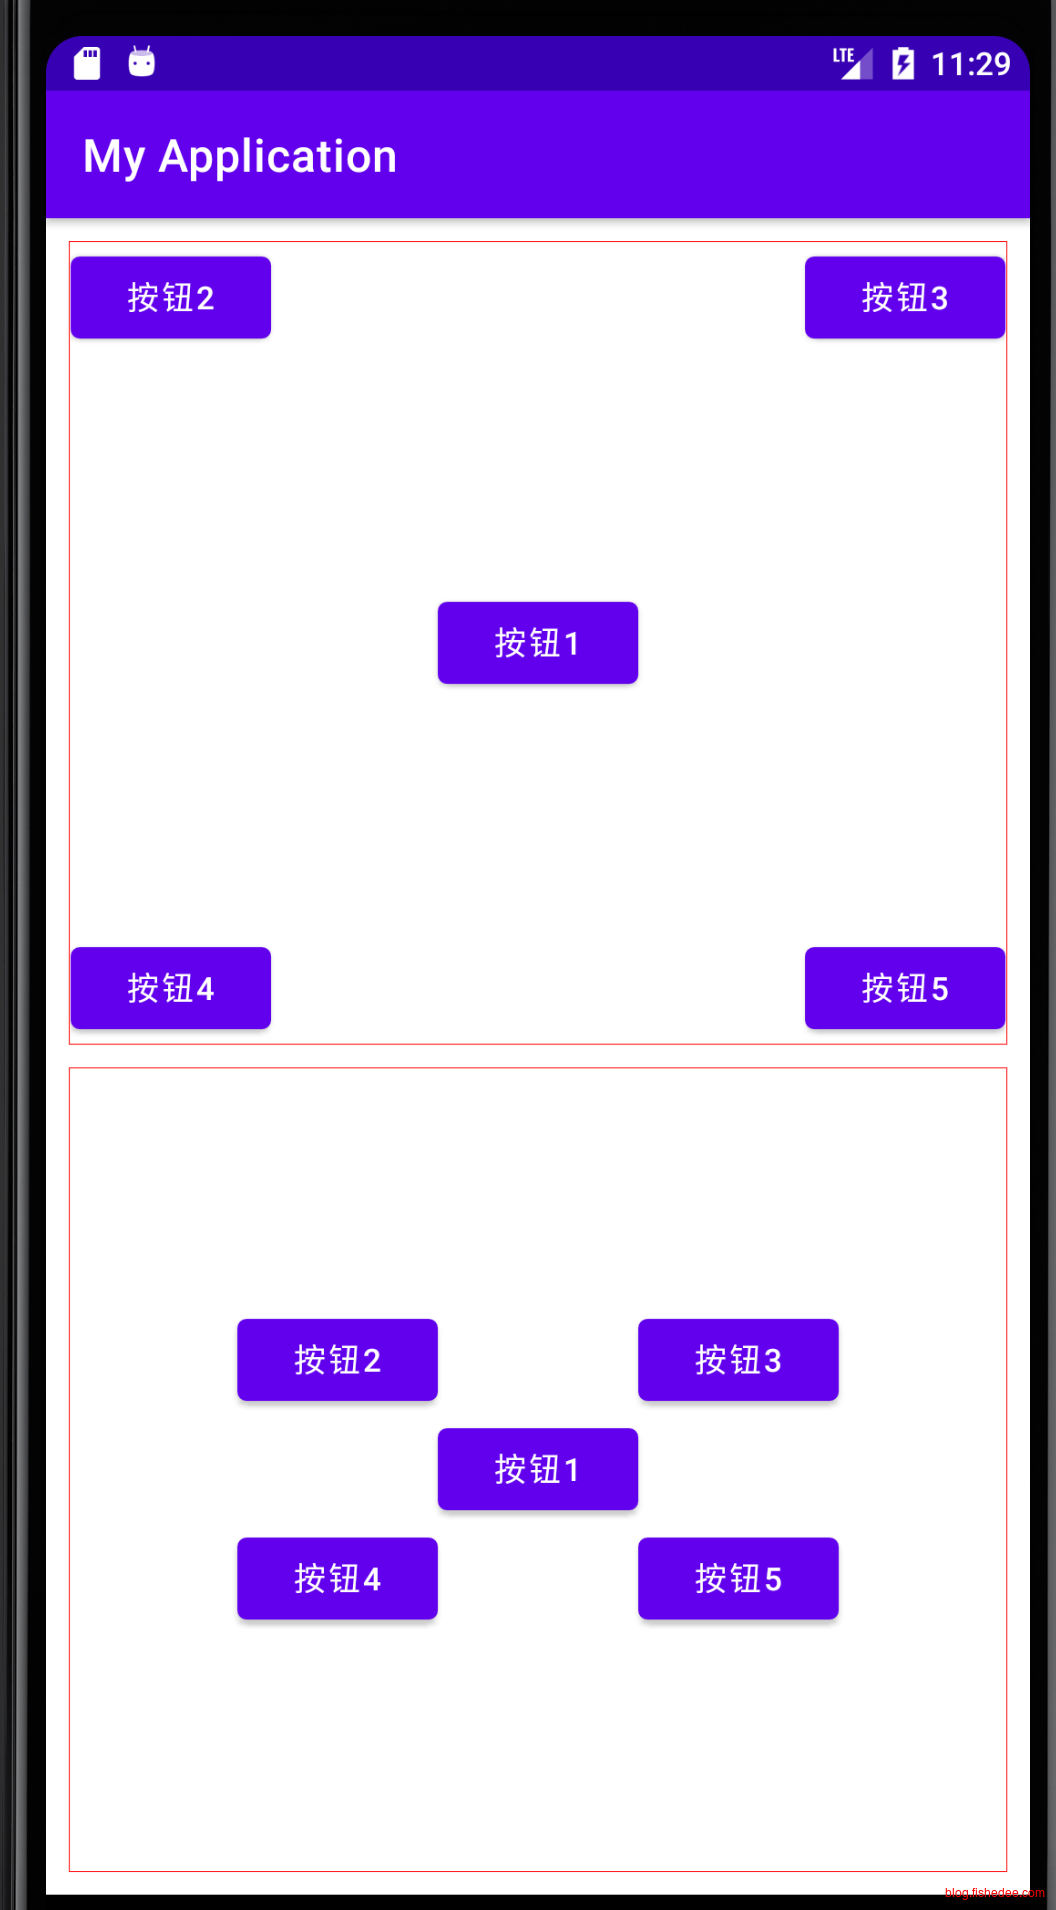
效果如上
3.2.3 FrameLayout
<?xml version="1.0" encoding="utf-8"?>
<LinearLayout xmlns:android="http://schemas.android.com/apk/res/android"
    xmlns:app="http://schemas.android.com/apk/res-auto"
    xmlns:tools="http://schemas.android.com/tools"
    android:orientation="vertical"
    android:divider="@drawable/divider"
    android:showDividers="middle"
    android:padding="10dp"
    android:layout_width="match_parent"
    android:layout_height="match_parent"
    tools:context=".RelativeLayoutActivity">
    <FrameLayout
        android:background="@drawable/border"
        android:layout_width="match_parent"
        android:layout_height="0dp"
        android:layout_weight="1">
        <Button
            android:layout_height="wrap_content"
            android:layout_width="wrap_content"
            android:text="按钮1"/>
        <Button
            android:layout_height="wrap_content"
            android:layout_width="wrap_content"
            android:layout_marginLeft="10dp"
            android:layout_marginTop="10dp"
            android:text="按钮2"/>
    </FrameLayout>
    <FrameLayout
        android:background="@drawable/border"
        android:layout_width="match_parent"
        android:layout_height="0dp"
        android:layout_weight="1">
        <Button
            android:layout_height="wrap_content"
            android:layout_width="wrap_content"
            android:layout_gravity="left"
            android:text="按钮1"/>
        <Button
            android:layout_height="wrap_content"
            android:layout_width="wrap_content"
            android:layout_gravity="right"
            android:layout_marginRight="10dp"
            android:layout_marginTop="10dp"
            android:text="按钮2"/>
    </FrameLayout>
</LinearLayout>
FrameLayout就是将多个控件重叠在一起摆放,这是作为简单的布局了,没啥好说的,几个属性:
- layout_gravity,相对父级的什么位置开始布局
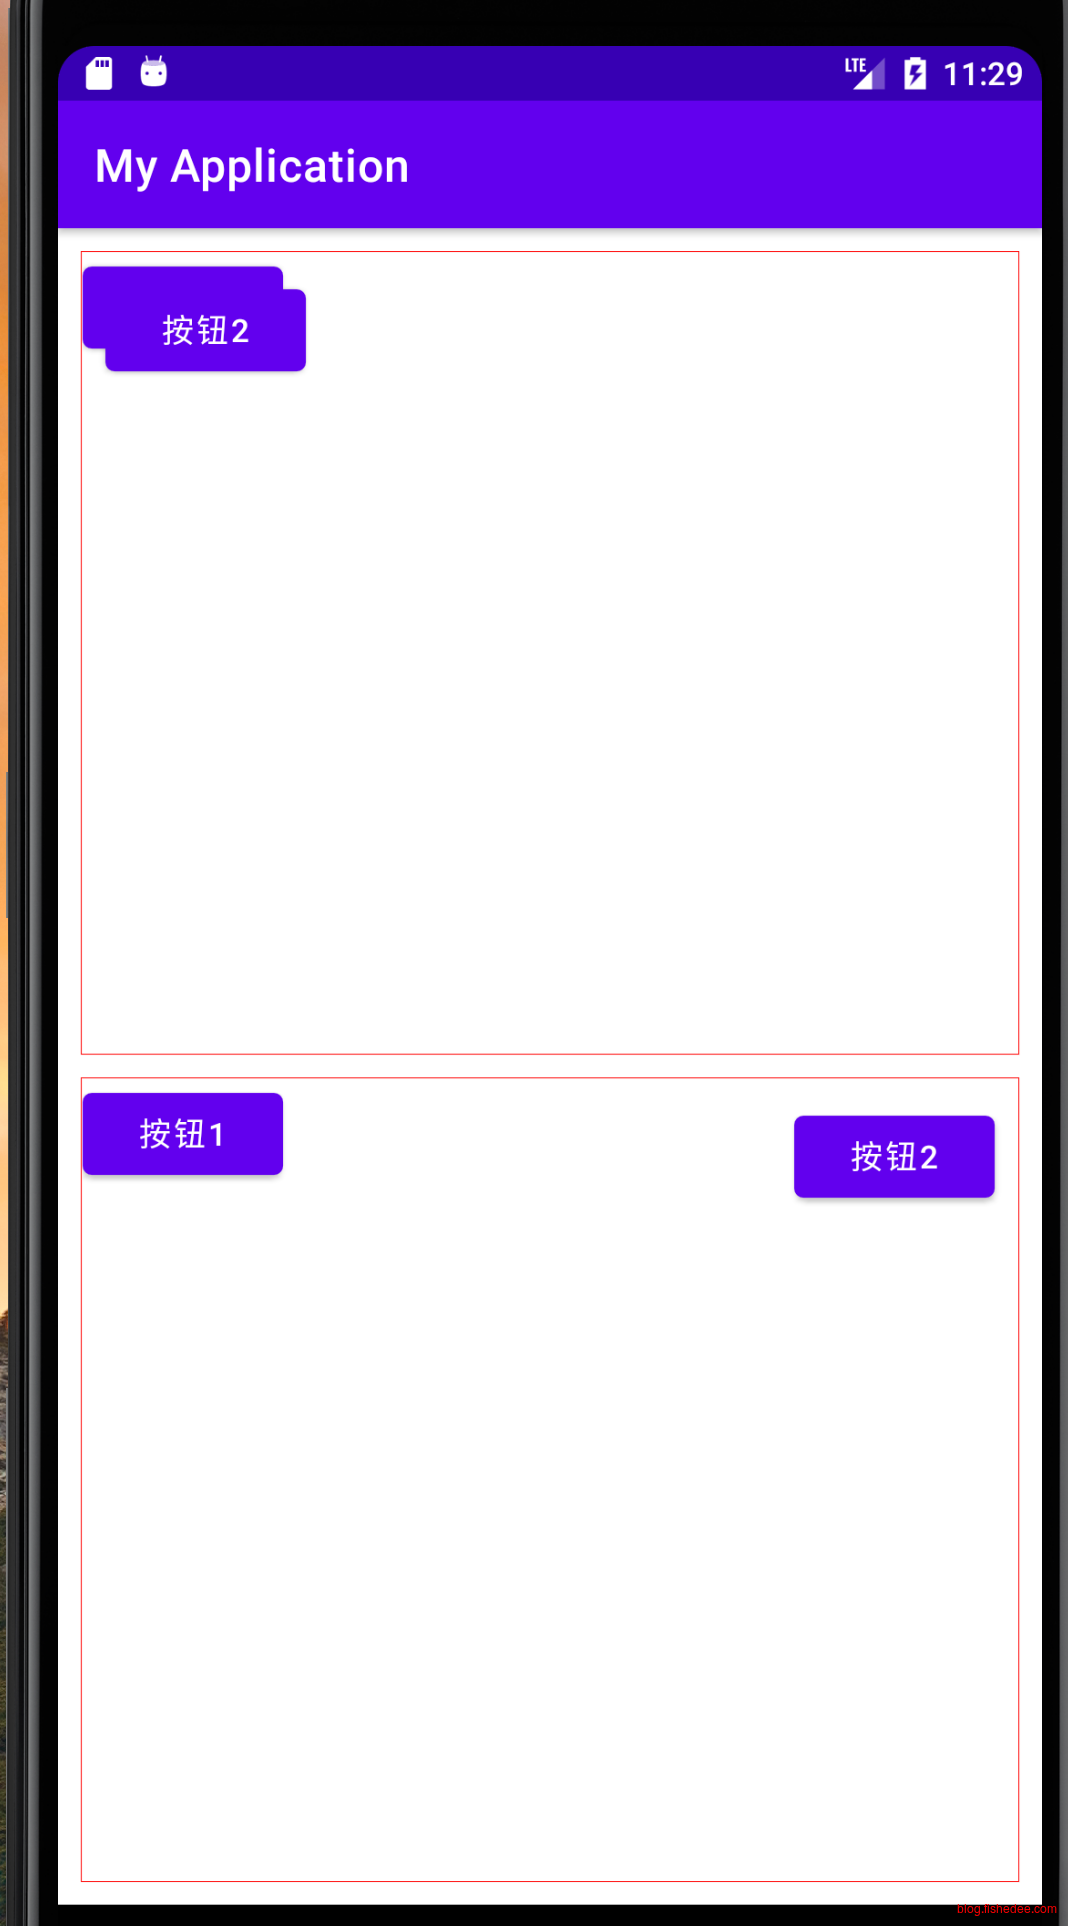
效果如上
3.2.4 ConstraintLayout
参考资料,在这里:
事先声明,ConstraintLayout不是万能药,它过度依赖于各个组件之间的相对定位,过度使用的时候,会导致牵一发而动全身的问题。对于,控件之间缺少关联依赖的布局,应该尽可能使用LinearLayout。对于,控件之间有明显的依赖关系的布局,才去使用强大的ConstraintLayout,它明显是代替RelativeLayout的。
3.2.4.1 基础
<?xml version="1.0" encoding="utf-8"?>
<LinearLayout xmlns:android="http://schemas.android.com/apk/res/android"
    xmlns:app="http://schemas.android.com/apk/res-auto"
    xmlns:tools="http://schemas.android.com/tools"
    android:orientation="vertical"
    android:layout_width="match_parent"
    android:layout_height="match_parent"
    tools:context=".ConstraintLayoutActivity">
    <androidx.constraintlayout.widget.ConstraintLayout
        android:layout_width="match_parent"
        android:layout_height="100dp"
        android:background="@drawable/border">
        <TextView
            android:id="@+id/textView1_1"
            android:layout_width="wrap_content"
            android:layout_height="30dp"
            app:layout_constraintLeft_toLeftOf="parent"
            app:layout_constraintTop_toTopOf="parent"
            android:layout_marginTop="10dp"
            android:layout_marginLeft="10dp"
            android:background="#ff0000"
            android:text="TextView1"/>
        <TextView
            android:id="@+id/textView1_2"
            android:layout_width="wrap_content"
            android:layout_height="wrap_content"
            app:layout_constraintLeft_toRightOf="@id/textView1_1"
            app:layout_constraintTop_toTopOf="@id/textView1_1"
            android:background="#00ff00"
            android:text="TextView2"/>
    </androidx.constraintlayout.widget.ConstraintLayout>

    <androidx.constraintlayout.widget.ConstraintLayout
        android:layout_width="match_parent"
        android:layout_height="100dp"
        android:background="@drawable/border">
        <TextView
            android:id="@+id/textView2_1"
            android:layout_width="wrap_content"
            android:layout_height="80dp"
            app:layout_constraintLeft_toLeftOf="parent"
            app:layout_constraintTop_toTopOf="parent"
            android:layout_marginTop="10dp"
            android:layout_marginLeft="10dp"
            android:background="#ff0000"
            android:text="TextView1"/>
        <TextView
            android:id="@+id/textView2_2"
            android:layout_marginLeft="10dp"
            android:layout_width="wrap_content"
            android:layout_height="30dp"
            app:layout_constraintLeft_toRightOf="@id/textView2_1"
            app:layout_constraintTop_toTopOf="@id/textView2_1"
            android:background="#00ff00"
            android:text="TextView2"/>
        <TextView
            android:id="@+id/textView2_3"
            android:layout_marginLeft="10dp"
            android:layout_width="wrap_content"
            android:layout_height="wrap_content"
            app:layout_constraintLeft_toRightOf="@id/textView2_1"
            app:layout_constraintBottom_toBottomOf="@id/textView2_1"
            android:background="#0000ff"
            android:text="TextView3"/>
    </androidx.constraintlayout.widget.ConstraintLayout>

    <androidx.constraintlayout.widget.ConstraintLayout
        android:layout_width="match_parent"
        android:layout_height="100dp"
        android:background="@drawable/border">
        <TextView
            android:id="@+id/textView3_1"
            android:layout_width="wrap_content"
            android:layout_height="wrap_content"
            app:layout_constraintLeft_toLeftOf="parent"
            app:layout_constraintRight_toRightOf="parent"
            app:layout_constraintTop_toTopOf="parent"
            android:background="#ff0000"
            android:text="TextView1"/>
        <TextView
            android:id="@+id/textView3_2"
            android:layout_width="wrap_content"
            android:layout_height="wrap_content"
            android:layout_marginTop="20dp"
            app:layout_constraintLeft_toLeftOf="parent"
            app:layout_constraintRight_toRightOf="parent"
            app:layout_constraintHorizontal_bias="0.8"
            app:layout_constraintTop_toTopOf="parent"
            android:background="#ff0000"
            android:text="TextView1_bias"/>
        <TextView
            android:id="@+id/textView3_3"
            android:layout_width="wrap_content"
            android:layout_height="wrap_content"
            app:layout_constraintTop_toTopOf="parent"
            app:layout_constraintBottom_toBottomOf="parent"
            app:layout_constraintLeft_toLeftOf="parent"
            android:background="#00ff00"
            android:text="TextView2"/>
        <TextView
            android:id="@+id/textView3_4"
            android:layout_width="wrap_content"
            android:layout_height="wrap_content"
            android:layout_marginLeft="80dp"
            app:layout_constraintVertical_bias="0.3"
            app:layout_constraintTop_toTopOf="parent"
            app:layout_constraintBottom_toBottomOf="parent"
            app:layout_constraintLeft_toLeftOf="parent"
            android:background="#00ff00"
            android:text="TextView2_bias"/>
    </androidx.constraintlayout.widget.ConstraintLayout>

    <androidx.constraintlayout.widget.ConstraintLayout
        android:layout_width="match_parent"
        android:layout_height="100dp"
        android:background="@drawable/border">
        <TextView
            android:id="@+id/textView4_1"
            android:layout_marginTop="10dp"
            android:layout_width="wrap_content"
            android:layout_height="wrap_content"
            app:layout_constraintLeft_toLeftOf="parent"
            app:layout_constraintRight_toRightOf="@+id/textView4_2"
            app:layout_constraintTop_toTopOf="parent"
            android:background="#ff0000"
            android:text="TextView1"/>
        <TextView
            android:id="@+id/textView4_2"
            android:layout_width="wrap_content"
            android:layout_height="wrap_content"
            android:layout_marginTop="10dp"
            app:layout_constraintTop_toTopOf="parent"
            app:layout_constraintLeft_toRightOf="@+id/textView4_1"
            app:layout_constraintRight_toRightOf="parent"
            android:background="#00ff00"
            android:text="TextView2"/>
    </androidx.constraintlayout.widget.ConstraintLayout>
    <androidx.constraintlayout.widget.ConstraintLayout
        android:layout_width="match_parent"
        android:layout_height="100dp"
        android:background="@drawable/border">
        <TextView
            android:id="@+id/textView5_1"
            android:layout_marginLeft="10dp"
            android:layout_marginRight="10dp"
            android:layout_width="0dp"
            android:layout_height="wrap_content"
            app:layout_constraintLeft_toLeftOf="parent"
            app:layout_constraintRight_toRightOf="parent"
            app:layout_constraintTop_toTopOf="parent"
            android:background="#ff0000"
            android:text="TextView1"/>
    </androidx.constraintlayout.widget.ConstraintLayout>
    <androidx.constraintlayout.widget.ConstraintLayout
        android:layout_width="match_parent"
        android:layout_height="100dp"
        android:background="@drawable/border">
        <TextView
            android:id="@+id/textView6_1"
            android:layout_marginTop="10dp"
            android:layout_marginBottom="10dp"
            android:layout_width="wrap_content"
            android:layout_height="0dp"
            app:layout_constraintLeft_toLeftOf="parent"
            app:layout_constraintTop_toTopOf="parent"
            app:layout_constraintBottom_toBottomOf="parent"
            android:background="#ff0000"
            android:text="TextView1"/>
    </androidx.constraintlayout.widget.ConstraintLayout>
</LinearLayout>
布局如上
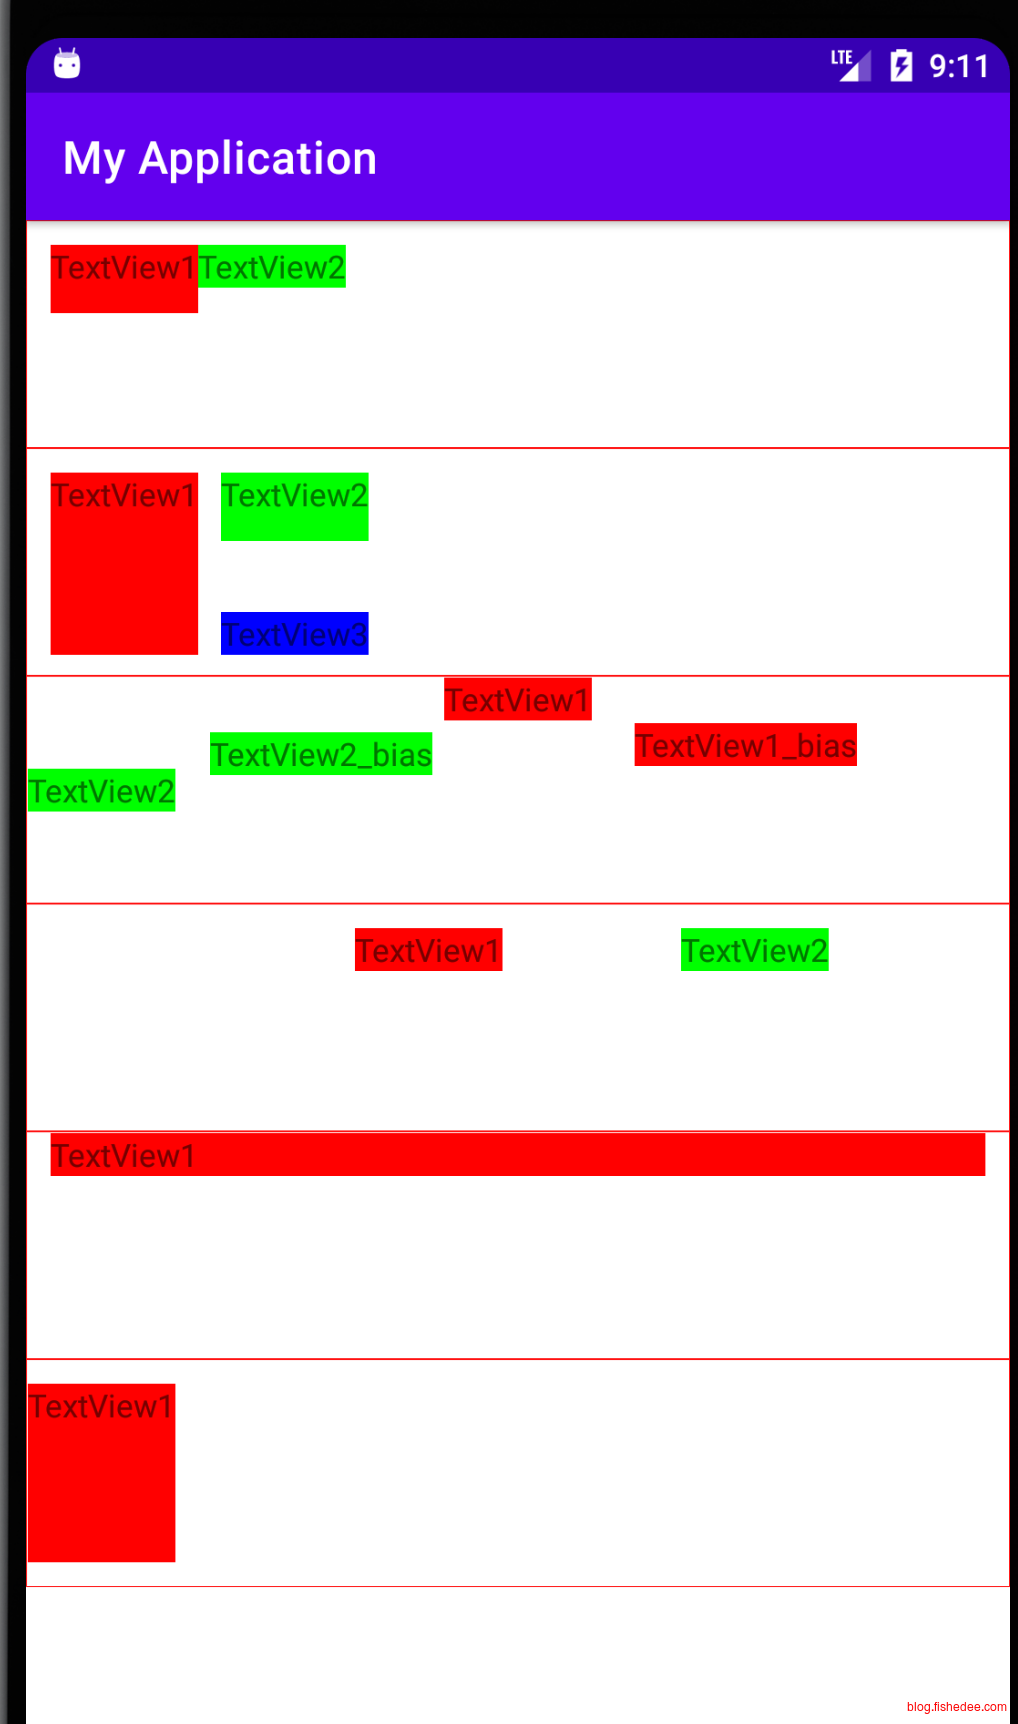
效果如上
ConstraintLayout既然是对RelativeLayout的扩展,那相对定位的能力必然是要更强大的。
- 相对定位,left_rightOfXXX,可以填写parent或者对应的id。注意,a_bOfxxx,就是自己的a,与别人的b对齐。凡是xxxOf的,就是别人的xxx。增强在于,定位可以是left,top,bottom,right,start,end和baseline。基础布局中,我们仅需要配置left,与top就可以了。
- 居中,将自身的width设置为wrap_content,并同时设置left_xxxOf,与right_xxxOf,就能实现水平居中。同理,将自身的height设置为wrap_content,并同时设置top_xxxOf,与bottom_xxxOf,就能实现垂直居中。另外,还提供了一个好用的layout_constraintHorizontal_bias与layout_constraintVertical_bias来配置居中的比例。
- 展开铺满,铺满在ConstraintLayout不再使用match_parent,而是将自身的width设置为0dp,并同时设置left_xxxOf,与right_xxxOf就可以了。
3.2.4.2 链
<?xml version="1.0" encoding="utf-8"?>
<LinearLayout xmlns:android="http://schemas.android.com/apk/res/android"
    xmlns:app="http://schemas.android.com/apk/res-auto"
    xmlns:tools="http://schemas.android.com/tools"
    android:orientation="vertical"
    android:layout_width="match_parent"
    android:layout_height="match_parent"
    tools:context=".ConstraintLayoutActivity2">

    <androidx.constraintlayout.widget.ConstraintLayout
        android:layout_width="match_parent"
        android:layout_height="100dp"
        android:background="@drawable/border">
        <TextView
            android:id="@+id/textView1_1"
            android:layout_width="wrap_content"
            android:layout_height="wrap_content"
            app:layout_constraintLeft_toLeftOf="parent"
            app:layout_constraintRight_toLeftOf="@id/textView1_2"
            app:layout_constraintTop_toTopOf="parent"
            android:background="#ff0000"
            app:layout_constraintHorizontal_chainStyle="spread"
            android:text="TextView1"/>
        <TextView
            android:id="@+id/textView1_2"
            android:layout_width="wrap_content"
            android:layout_height="wrap_content"
            app:layout_constraintLeft_toRightOf="@id/textView1_1"
            app:layout_constraintRight_toLeftOf="@id/textView1_3"
            app:layout_constraintTop_toTopOf="@id/textView1_1"
            android:background="#00ff00"
            android:text="TextView2"/>

        <TextView
            android:id="@+id/textView1_3"
            android:layout_width="wrap_content"
            android:layout_height="wrap_content"
            app:layout_constraintLeft_toRightOf="@id/textView1_2"
            app:layout_constraintRight_toRightOf="parent"
            app:layout_constraintTop_toTopOf="parent"
            android:background="#0000ff"
            android:text="TextView2"/>
    </androidx.constraintlayout.widget.ConstraintLayout>

    <androidx.constraintlayout.widget.ConstraintLayout
        android:layout_width="match_parent"
        android:layout_height="100dp"
        android:background="@drawable/border">
        <TextView
            android:id="@+id/textView2_1"
            android:layout_width="wrap_content"
            android:layout_height="wrap_content"
            app:layout_constraintLeft_toLeftOf="parent"
            app:layout_constraintRight_toLeftOf="@id/textView2_2"
            app:layout_constraintTop_toTopOf="parent"
            android:background="#ff0000"
            app:layout_constraintHorizontal_chainStyle="spread_inside"
            android:text="TextView1"/>
        <TextView
            android:id="@+id/textView2_2"
            android:layout_width="wrap_content"
            android:layout_height="wrap_content"
            app:layout_constraintLeft_toRightOf="@id/textView2_1"
            app:layout_constraintRight_toLeftOf="@id/textView2_3"
            app:layout_constraintTop_toTopOf="parent"
            android:background="#00ff00"
            android:text="TextView2"/>

        <TextView
            android:id="@+id/textView2_3"
            android:layout_width="wrap_content"
            android:layout_height="wrap_content"
            app:layout_constraintLeft_toRightOf="@id/textView2_2"
            app:layout_constraintRight_toRightOf="parent"
            app:layout_constraintTop_toTopOf="parent"
            android:background="#0000ff"
            android:text="TextView2"/>
    </androidx.constraintlayout.widget.ConstraintLayout>

    <androidx.constraintlayout.widget.ConstraintLayout
        android:layout_width="match_parent"
        android:layout_height="100dp"
        android:background="@drawable/border">
        <TextView
            android:id="@+id/textView3_1"
            android:layout_width="wrap_content"
            android:layout_height="wrap_content"
            app:layout_constraintLeft_toLeftOf="parent"
            app:layout_constraintRight_toLeftOf="@id/textView3_2"
            app:layout_constraintTop_toTopOf="parent"
            android:background="#ff0000"
            app:layout_constraintHorizontal_chainStyle="packed"
            android:text="TextView1"/>
        <TextView
            android:id="@+id/textView3_2"
            android:layout_width="wrap_content"
            android:layout_height="wrap_content"
            app:layout_constraintLeft_toRightOf="@id/textView3_1"
            app:layout_constraintRight_toLeftOf="@id/textView3_3"
            app:layout_constraintTop_toTopOf="parent"
            android:background="#00ff00"
            android:text="TextView2"/>

        <TextView
            android:id="@+id/textView3_3"
            android:layout_width="wrap_content"
            android:layout_height="wrap_content"
            app:layout_constraintLeft_toRightOf="@id/textView3_2"
            app:layout_constraintRight_toRightOf="parent"
            app:layout_constraintTop_toTopOf="parent"
            android:background="#0000ff"
            android:text="TextView2"/>
    </androidx.constraintlayout.widget.ConstraintLayout>


    <androidx.constraintlayout.widget.ConstraintLayout
        android:layout_width="match_parent"
        android:layout_height="100dp"
        android:background="@drawable/border">
        <TextView
            android:id="@+id/textView4_1"
            android:layout_width="0dp"
            android:layout_height="wrap_content"
            app:layout_constraintLeft_toLeftOf="parent"
            app:layout_constraintRight_toLeftOf="@id/textView4_2"
            app:layout_constraintTop_toTopOf="parent"
            android:background="#ff0000"
            app:layout_constraintHorizontal_weight="1"
            android:text="TextView1"/>
        <TextView
            android:id="@+id/textView4_2"
            android:layout_width="0dp"
            android:layout_height="wrap_content"
            app:layout_constraintLeft_toRightOf="@id/textView4_1"
            app:layout_constraintRight_toLeftOf="@id/textView4_3"
            app:layout_constraintTop_toTopOf="parent"
            android:background="#00ff00"
            app:layout_constraintHorizontal_weight="2"
            android:text="TextView2"/>

        <TextView
            android:id="@+id/textView4_3"
            android:layout_width="wrap_content"
            android:layout_height="wrap_content"
            app:layout_constraintLeft_toRightOf="@id/textView4_2"
            app:layout_constraintRight_toRightOf="parent"
            app:layout_constraintTop_toTopOf="parent"
            android:background="#0000ff"
            android:text="TextView2"/>
    </androidx.constraintlayout.widget.ConstraintLayout>
</LinearLayout>
布局代码
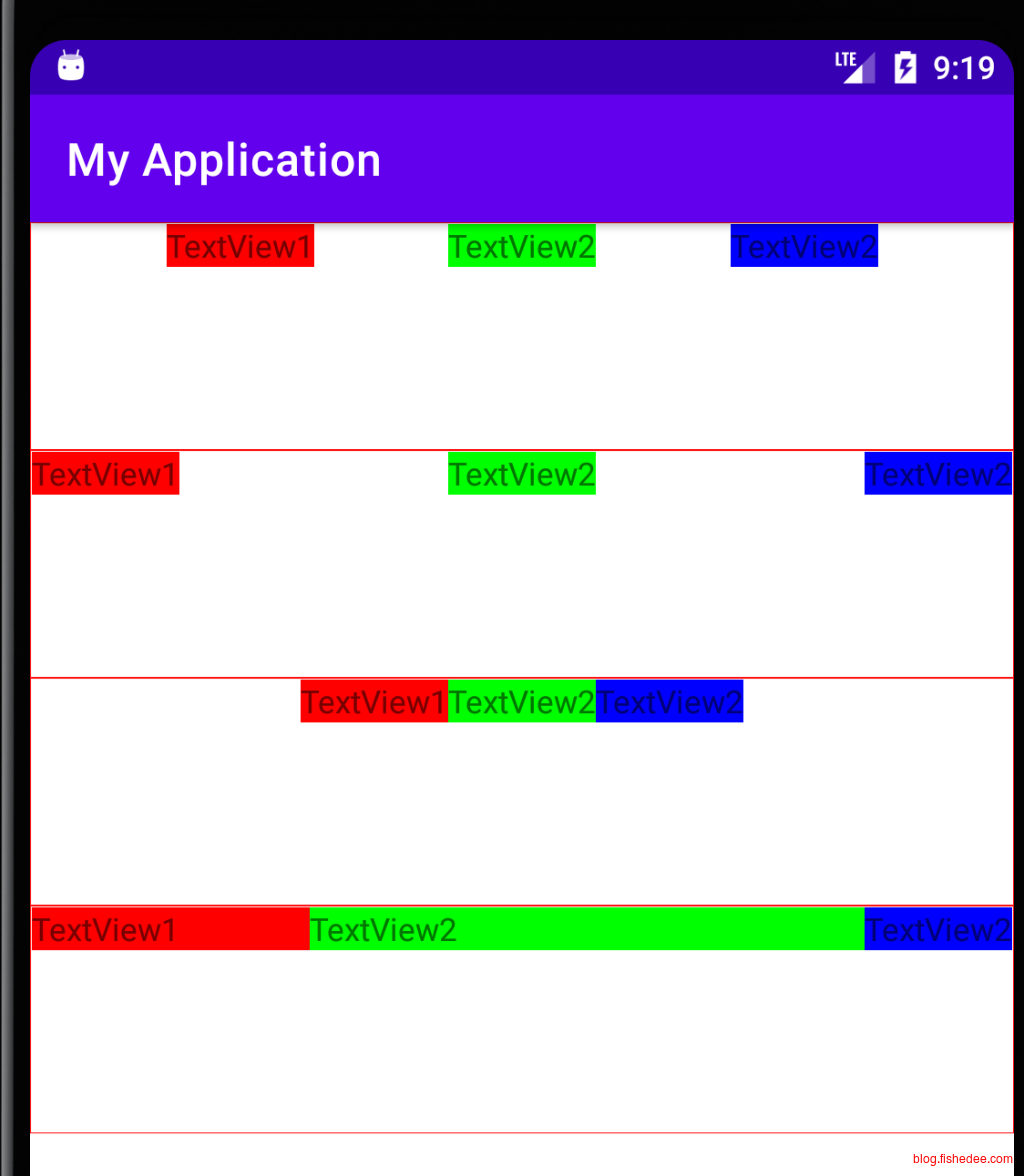
效果如上
将互相定位的一行,或者一列称为链,我们对链有额外的属性配置:
- layout_constraintHorizontal_chainStyle,相当于flex的justify-content中的,space-around,space-between和center。
- layout_constraintHorizontal_weight,相当于flex的flex-grow。
3.2.4.3 布局辅助对象
<?xml version="1.0" encoding="utf-8"?>
<LinearLayout xmlns:android="http://schemas.android.com/apk/res/android"
    xmlns:app="http://schemas.android.com/apk/res-auto"
    xmlns:tools="http://schemas.android.com/tools"
    android:orientation="vertical"
    android:layout_width="match_parent"
    android:layout_height="match_parent"
    tools:context=".ConstraintLayoutActivity2">

    <androidx.constraintlayout.widget.ConstraintLayout
        android:layout_width="match_parent"
        android:layout_height="100dp"
        android:background="@drawable/border">
        <TextView
            android:id="@+id/textView1_1"
            android:layout_width="wrap_content"
            android:layout_height="wrap_content"
            app:layout_constraintLeft_toLeftOf="parent"
            app:layout_constraintTop_toTopOf="parent"
            android:layout_marginTop="20dp"
            android:background="#ff0000"
            app:layout_constraintHorizontal_chainStyle="spread"
            android:text="TextView1ddddd"/>
        <TextView
            android:id="@+id/textView1_2"
            android:layout_width="wrap_content"
            android:layout_height="wrap_content"
            app:layout_constraintLeft_toLeftOf="parent"
            android:layout_marginTop="10dp"
            app:layout_constraintTop_toBottomOf="@id/textView1_1"
            android:background="#00ff00"
            android:text="TextView2"/>
        <androidx.constraintlayout.widget.Barrier
            android:id="@+id/barrier"
            android:layout_width="wrap_content"
            android:layout_height="wrap_content"
            app:barrierDirection="right"
            app:constraint_referenced_ids="textView1_1,textView1_2"/>

        <TextView
            android:id="@+id/textView1_3"
            android:layout_width="wrap_content"
            android:layout_height="wrap_content"
            android:layout_marginLeft="30dp"
            app:layout_constraintLeft_toRightOf="@id/barrier"
            app:layout_constraintTop_toTopOf="@id/textView1_1"
            android:background="#0000ff"
            android:text="TextView2"/>
    </androidx.constraintlayout.widget.ConstraintLayout>

    <androidx.constraintlayout.widget.ConstraintLayout
        android:layout_width="match_parent"
        android:layout_height="100dp"
        android:background="@drawable/border">
        <TextView
            android:id="@+id/textView2_1"
            android:layout_width="wrap_content"
            android:layout_height="wrap_content"
            app:layout_constraintLeft_toLeftOf="parent"
            app:layout_constraintTop_toTopOf="parent"
            android:layout_marginTop="20dp"
            android:background="#ff0000"
            app:layout_constraintHorizontal_chainStyle="spread"
            android:text="TextView1ddddd"/>
        <TextView
            android:id="@+id/textView2_2"
            android:layout_width="wrap_content"
            android:layout_height="wrap_content"
            app:layout_constraintTop_toTopOf="parent"
            android:layout_marginTop="10dp"
            android:layout_marginLeft="20dp"
            app:layout_constraintLeft_toRightOf="@id/textView2_1"
            android:background="#00ff00"
            android:text="TextView2"/>
        <androidx.constraintlayout.widget.Barrier
            android:id="@+id/barrier2"
            android:layout_width="wrap_content"
            android:layout_height="wrap_content"
            app:barrierDirection="bottom"
            app:constraint_referenced_ids="textView2_1,textView2_2"/>

        <TextView
            android:id="@+id/textView2_3"
            android:layout_width="wrap_content"
            android:layout_height="wrap_content"
            android:layout_marginTop="20dp"
            app:layout_constraintTop_toBottomOf="@id/barrier2"
            app:layout_constraintLeft_toLeftOf="parent"
            android:background="#0000ff"
            android:text="TextView2"/>
    </androidx.constraintlayout.widget.ConstraintLayout>

    <androidx.constraintlayout.widget.ConstraintLayout
        android:layout_width="match_parent"
        android:layout_height="100dp"
        android:background="@drawable/border">
        <androidx.constraintlayout.widget.Guideline
            android:id="@+id/guideline"
            android:layout_width="wrap_content"
            android:layout_height="wrap_content"
            android:orientation="vertical"
            app:layout_constraintGuide_percent="0.4"/>

        <TextView
            android:id="@+id/textView3_1"
            android:layout_width="wrap_content"
            android:layout_height="wrap_content"
            app:layout_constraintLeft_toLeftOf="@id/guideline"
            app:layout_constraintRight_toRightOf="@id/guideline"
            app:layout_constraintTop_toTopOf="parent"
            android:layout_marginTop="10dp"
            android:background="#0000ff"
            android:text="TextView2"/>
    </androidx.constraintlayout.widget.ConstraintLayout>


    <androidx.constraintlayout.widget.ConstraintLayout
        android:layout_width="match_parent"
        android:layout_height="100dp"
        android:background="@drawable/border">
        <androidx.constraintlayout.widget.Guideline
            android:id="@+id/guideline2"
            android:layout_width="wrap_content"
            android:layout_height="wrap_content"
            android:orientation="horizontal"
            app:layout_constraintGuide_percent="0.4"/>

        <TextView
            android:id="@+id/textView4_1"
            android:layout_width="wrap_content"
            android:layout_height="wrap_content"
            app:layout_constraintLeft_toLeftOf="parent"
            app:layout_constraintBottom_toBottomOf="@id/guideline2"
            app:layout_constraintTop_toTopOf="@id/guideline2"
            android:layout_marginTop="10dp"
            android:background="#0000ff"
            android:text="TextView2"/>
    </androidx.constraintlayout.widget.ConstraintLayout>
</LinearLayout>
布局代码如上
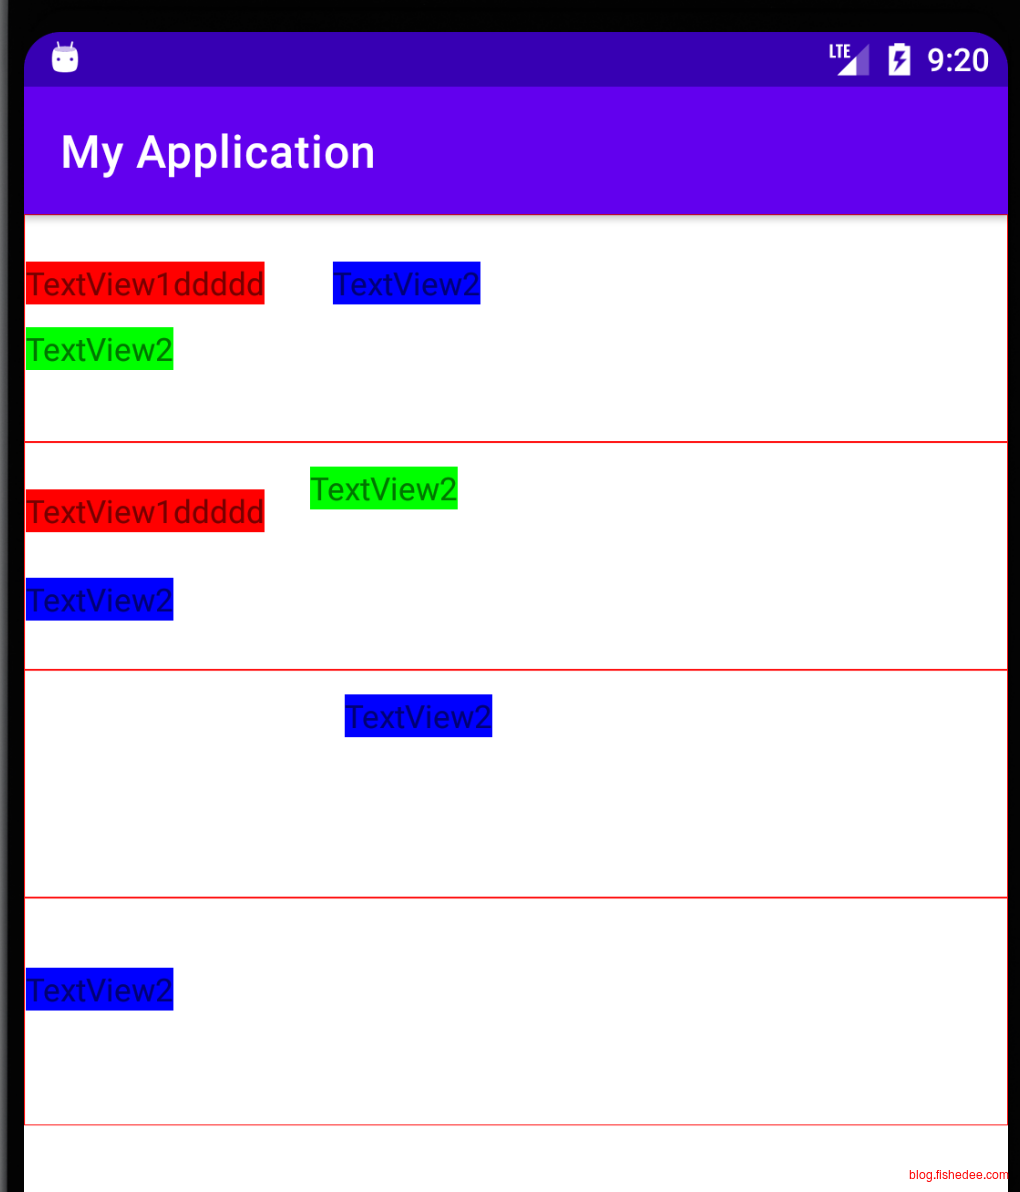
效果如上
辅助对象,是以显式的xml节点来辅助布局,同时实际UI中并不显示出来。包括有:
- Barrier,取多个组件的top,bottom,left,right其中一个的最值。其他组件可以依据Barrier来做相对定位。
- Guideline,取parent的百分比,或者绝对值做横线,或者竖线。其他组件可以依据Guideline来做相对定位。
3.2.4.4 动态对象容器
<?xml version="1.0" encoding="utf-8"?>
<LinearLayout xmlns:android="http://schemas.android.com/apk/res/android"
    xmlns:app="http://schemas.android.com/apk/res-auto"
    xmlns:tools="http://schemas.android.com/tools"
    android:orientation="vertical"
    android:layout_width="match_parent"
    android:layout_height="match_parent"
    tools:context=".ConstraintLayoutActivity2">

    <androidx.constraintlayout.widget.ConstraintLayout
        android:layout_width="match_parent"
        android:layout_height="100dp"
        android:background="@drawable/border">
        <TextView
            android:id="@+id/textView1_1"
            android:layout_width="wrap_content"
            android:layout_height="wrap_content"
            app:layout_constraintLeft_toLeftOf="parent"
            app:layout_constraintTop_toTopOf="parent"
            android:layout_marginTop="20dp"
            android:background="#ff0000"
            app:layout_constraintHorizontal_chainStyle="spread"
            android:text="TextView1ddddd"/>
        <TextView
            android:id="@+id/textView1_2"
            android:layout_width="wrap_content"
            android:layout_height="wrap_content"
            app:layout_constraintLeft_toLeftOf="parent"
            android:layout_marginTop="10dp"
            app:layout_constraintTop_toBottomOf="@id/textView1_1"
            android:background="#00ff00"
            android:text="TextView2"/>
        <androidx.constraintlayout.widget.Barrier
            android:id="@+id/barrier"
            android:layout_width="wrap_content"
            android:layout_height="wrap_content"
            app:barrierDirection="right"
            app:constraint_referenced_ids="textView1_1,textView1_2"/>

        <TextView
            android:id="@+id/textView1_3"
            android:layout_width="wrap_content"
            android:layout_height="wrap_content"
            android:layout_marginLeft="30dp"
            app:layout_constraintLeft_toRightOf="@id/barrier"
            app:layout_constraintTop_toTopOf="@id/textView1_1"
            android:background="#0000ff"
            android:text="TextView2"/>
        <androidx.constraintlayout.widget.Group
            android:layout_width="wrap_content"
            android:layout_height="wrap_content"
            android:visibility="invisible"
            app:constraint_referenced_ids="textView1_1,textView1_3"/>
    </androidx.constraintlayout.widget.ConstraintLayout>

    <androidx.constraintlayout.widget.ConstraintLayout
        android:layout_width="match_parent"
        android:layout_height="100dp"
        android:background="@drawable/border">
        <TextView
            android:id="@+id/textView2_1"
            android:layout_width="wrap_content"
            android:layout_height="wrap_content"
            app:layout_constraintLeft_toLeftOf="parent"
            app:layout_constraintTop_toTopOf="parent"
            android:layout_marginTop="20dp"
            android:background="#ff0000"
            app:layout_constraintHorizontal_chainStyle="spread"
            android:text="TextView1ddddd"/>
        <TextView
            android:id="@+id/textView2_2"
            android:layout_width="wrap_content"
            android:layout_height="wrap_content"
            app:layout_constraintTop_toTopOf="parent"
            android:layout_marginTop="10dp"
            android:layout_marginLeft="20dp"
            app:layout_constraintLeft_toRightOf="@id/textView2_1"
            android:background="#00ff00"
            android:text="TextView2"/>
        <androidx.constraintlayout.widget.Barrier
            android:id="@+id/barrier2"
            android:layout_width="wrap_content"
            android:layout_height="wrap_content"
            app:barrierDirection="bottom"
            app:constraint_referenced_ids="textView2_1,textView2_2"/>
        <androidx.constraintlayout.widget.Placeholder
            android:id="@+id/placeholder"
            android:layout_width="wrap_content"
            android:layout_height="wrap_content"
            android:layout_marginTop="20dp"
            app:layout_constraintTop_toBottomOf="@id/barrier2"
            app:layout_constraintLeft_toLeftOf="parent"
            app:content="@id/textView2_3"
            />
        <TextView
            android:id="@+id/textView2_3"
            android:layout_width="wrap_content"
            android:layout_height="wrap_content"
            android:background="#0000ff"
            android:text="TextView2"/>
    </androidx.constraintlayout.widget.ConstraintLayout>
</LinearLayout>
布局代码如上
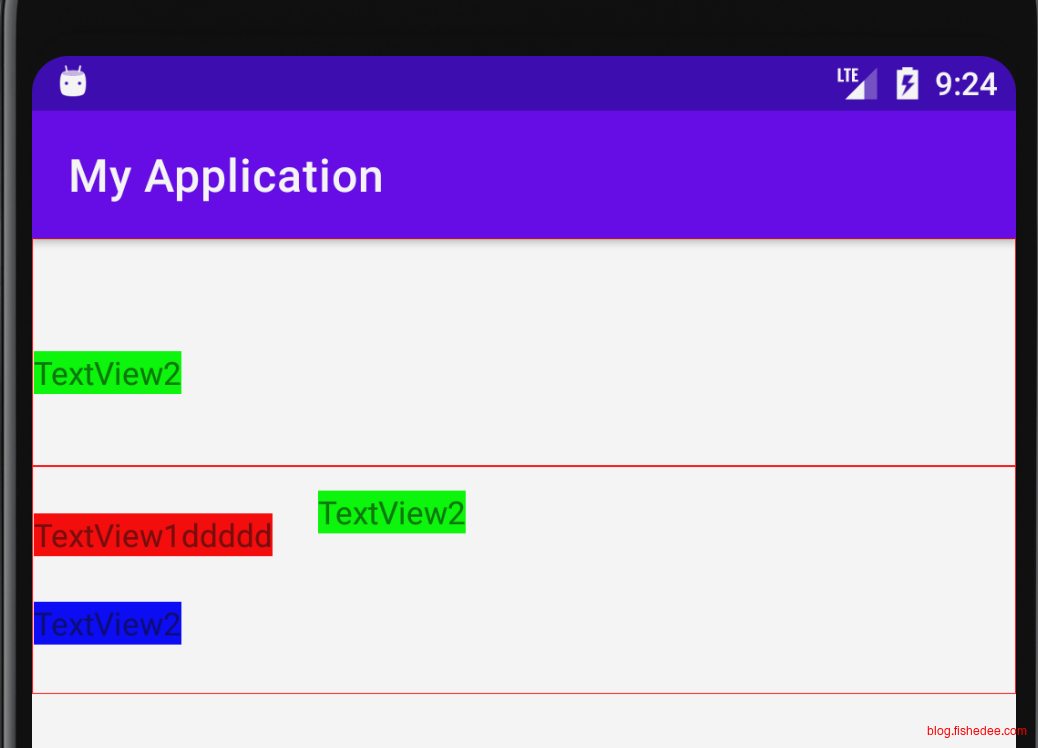
效果如上
动态对象容器,主要是为了方便布局时的动态对象插入或者删除,显隐而已。例如有:
- Group,对多个对象进行统一的显隐
- Placeholder,承担布局对象,让View只配置自身代码,不需要配置布局代码。
3.2.5 GridLayout
Android的GridLayout有点残废,不能设置分割线样式,布局设定有有点怪
<?xml version="1.0" encoding="utf-8"?>
<ScrollView xmlns:android="http://schemas.android.com/apk/res/android"
    xmlns:app="http://schemas.android.com/apk/res-auto"
    xmlns:tools="http://schemas.android.com/tools"
    android:layout_width="match_parent"
    android:layout_height="match_parent"
    tools:context=".GridLayoutActivity">
    <LinearLayout
        android:orientation="vertical"
        android:layout_width="match_parent"
        android:layout_height="wrap_content">
        <GridLayout
            android:layout_width="wrap_content"
            android:layout_height="wrap_content"
            android:padding="10dp"
            android:columnCount="2"
            android:rowCount="3">
            <TextView
                android:layout_column="0"
                android:background="@drawable/border"
                android:layout_width="wrap_content"
                android:layout_height="30dp"
                android:text="文字1"/>
            <TextView
                android:layout_column="1"
                android:background="@drawable/border"
                android:layout_width="wrap_content"
                android:layout_height="30dp"
                android:text="文字2"/>
            <TextView
                android:layout_column="0"
                android:layout_columnSpan="2"
                android:background="@drawable/border"
                android:layout_width="wrap_content"
                android:layout_height="30dp"
                android:text="文字3"/>
            <TextView
                android:layout_column="0"
                android:background="@drawable/border"
                android:layout_width="wrap_content"
                android:layout_height="30dp"
                android:text="文字444"/>
            <TextView
                android:layout_column="1"
                android:background="@drawable/border"
                android:layout_width="wrap_content"
                android:layout_height="30dp"
                android:text="文字5"/>
        </GridLayout>
        <GridLayout
            android:layout_width="match_parent"
            android:layout_height="wrap_content"
            android:padding="10dp"
            android:columnCount="2"
            android:rowCount="3">
            <TextView
                android:layout_column="0"
                android:background="@drawable/border"
                android:layout_columnWeight="1"
                android:layout_height="30dp"
                android:text="文字1"/>
            <TextView
                android:layout_column="1"
                android:background="@drawable/border"
                android:layout_columnWeight="1"
                android:layout_height="30dp"
                android:text="文字2"/>
            <TextView
                android:layout_column="0"
                android:layout_columnSpan="2"
                android:background="@drawable/border"
                android:layout_columnWeight="1"
                android:layout_height="30dp"
                android:text="文字3"/>
            <TextView
                android:layout_column="0"
                android:background="@drawable/border"
                android:layout_columnWeight="1"
                android:layout_height="30dp"
                android:text="文字4"/>
            <TextView
                android:layout_column="1"
                android:background="@drawable/border"
                android:layout_columnWeight="1"
                android:layout_height="30dp"
                android:text="文字5"/>
        </GridLayout>
        <GridLayout
            android:layout_width="match_parent"
            android:layout_height="wrap_content"
            android:padding="10dp"
            android:columnCount="2"
            android:rowCount="3">
            <TextView
                android:layout_column="0"
                android:background="@drawable/border"
                android:layout_columnWeight="1"
                android:layout_height="30dp"
                android:text="文字1"/>
            <TextView
                android:layout_column="1"
                android:background="@drawable/border"
                android:layout_columnWeight="1"
                android:layout_height="30dp"
                android:text="文字2"/>
            <TextView
                android:layout_column="0"
                android:layout_columnSpan="2"
                android:background="@drawable/border"
                android:layout_height="30dp"
                android:layout_gravity="right"
                android:text="文字3"/>
            <TextView
                android:layout_column="0"
                android:background="@drawable/border"
                android:layout_height="30dp"
                android:layout_columnWeight="1"
                android:text="文字4"/>
            <TextView
                android:layout_column="1"
                android:background="@drawable/border"
                android:layout_height="30dp"
                android:layout_columnWeight="1"
                android:text="文字5"/>
        </GridLayout>
    </LinearLayout>
</ScrollView>
布局如上
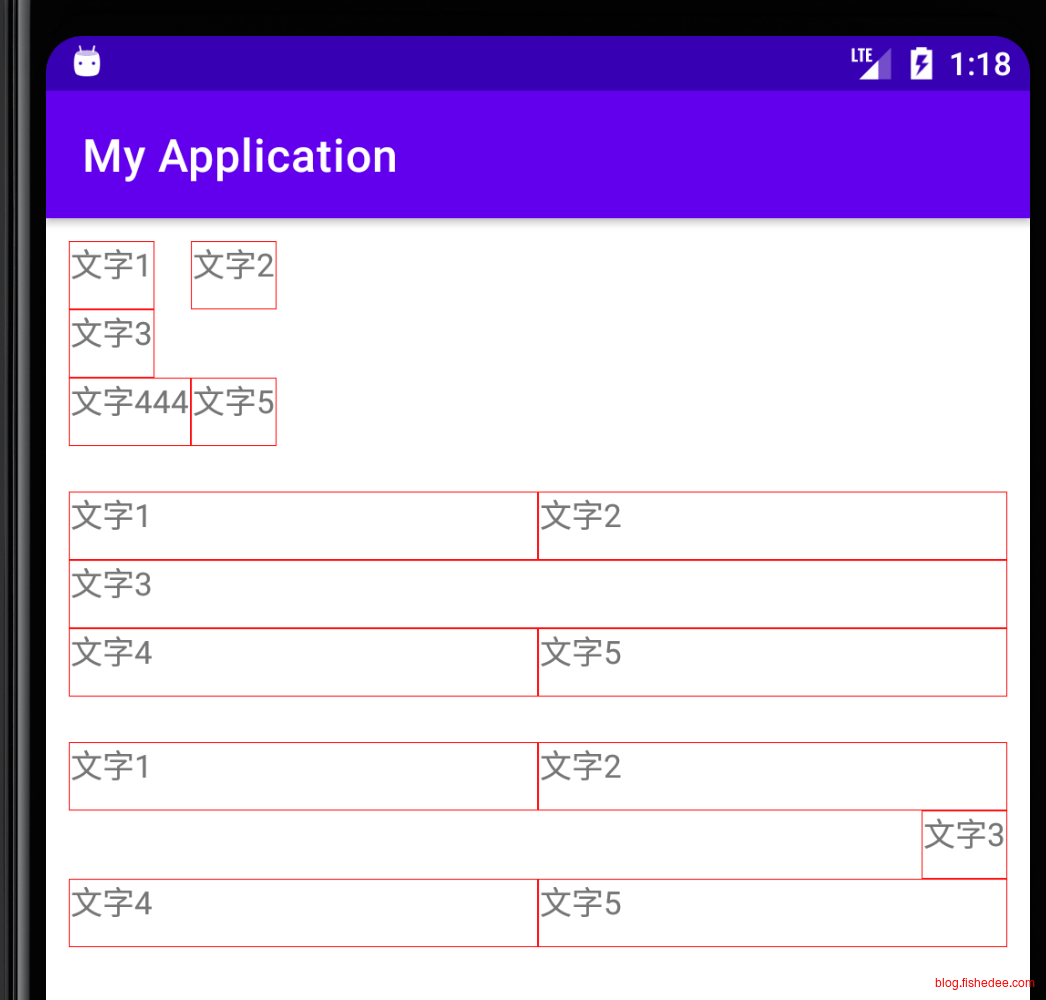
效果如上
要点如下:
- GridLayout的columnCount与rowCount设置行与列的总数量,layout_column,layout_columnSpan,layout_row,layout_rowSpan设置当前在哪一个单元格里面,行合并,和列合并是多少。
- 单元格使用match_parent是不可行的,会导致与GridLayout一样的宽度。要使用layout_columnWeight或者layout_rowWeight,按照比例来分割剩余空间。
- 相同列数的单元格,共享共同的宽度。不同列数的单元格,可以通过layout_gravity来设置自身的对齐方式。
3.3 自定义控件
代码在这里
3.3.1 嵌套xml子控件
<?xml version="1.0" encoding="utf-8"?>
<LinearLayout xmlns:android="http://schemas.android.com/apk/res/android"
    android:layout_width="match_parent"
    android:layout_height="wrap_content"
    android:background="#EEE">
    <Button
        android:layout_width="wrap_content"
        android:layout_height="wrap_content"
        android:layout_gravity="center"
        android:layout_margin="5dp"
        android:text="Back"
        android:textColor="#FFF"/>
    <TextView
        android:id="@id/title"
        android:layout_width="0dp"
        android:layout_height="wrap_content"
        android:layout_gravity="center"
        android:layout_weight="1"
        android:background="@drawable/border"
        android:gravity="center"
        android:text="Title Text"
        android:textColor="#F00"
        android:textSize="24sp"/>
    <Button
        android:layout_width="wrap_content"
        android:layout_height="wrap_content"
        android:layout_gravity="center"
        android:layout_margin="5dp"
        android:text="Edit"
        android:textColor="#FFF"/>
</LinearLayout>
首先定义一个子控件
<?xml version="1.0" encoding="utf-8"?>
<LinearLayout xmlns:android="http://schemas.android.com/apk/res/android"
    xmlns:app="http://schemas.android.com/apk/res-auto"
    xmlns:tools="http://schemas.android.com/tools"
    android:orientation="vertical"
    android:layout_width="match_parent"
    android:layout_height="match_parent">

    <include layout="@layout/my_title_layout"/>
</LinearLayout>
然后在另外一个控件中include它。这种定义子控件的方法比较简单,缺点就是子控件确实行为,只有UI,子控件没有封装业务逻辑。
3.3.2 嵌套kotlin子控件
<?xml version="1.0" encoding="utf-8"?>
<LinearLayout xmlns:android="http://schemas.android.com/apk/res/android"
    android:layout_width="match_parent"
    android:layout_height="wrap_content"
    android:background="#EEE">
    <Button
        android:layout_width="wrap_content"
        android:layout_height="wrap_content"
        android:layout_gravity="center"
        android:layout_margin="5dp"
        android:text="Back"
        android:textColor="#FFF"/>
    <TextView
        android:id="@id/title"
        android:layout_width="0dp"
        android:layout_height="wrap_content"
        android:layout_gravity="center"
        android:layout_weight="1"
        android:background="@drawable/border"
        android:gravity="center"
        android:text="Title Text"
        android:textColor="#F00"
        android:textSize="24sp"/>
    <Button
        android:layout_width="wrap_content"
        android:layout_height="wrap_content"
        android:layout_gravity="center"
        android:layout_margin="5dp"
        android:text="Edit"
        android:textColor="#FFF"/>
</LinearLayout>
定义一样的子控件Layout
package com.example.myapplication;

import android.content.Context;
import android.util.AttributeSet;
import android.view.LayoutInflater
import android.widget.LinearLayout
import kotlinx.android.synthetic.main.my_title_layout.view.*

//将xml与对应类绑定在一起,能将业务逻辑也封装在一起
class TitleLayout(context:Context,attrs:AttributeSet):LinearLayout(context,attrs) {
    init{
        LayoutInflater.from(context).inflate(R.layout.my_title_layout,this)
    }

    fun setTitle(input:String){
        title.setText(input);
    }
}
然后定义一个与父组件一样的Class,因为子控件的顶级控件为LinearLayout,所以这个也要继承LinearLayout。这个时候,我们可以封装业务逻辑了。
<?xml version="1.0" encoding="utf-8"?>
<LinearLayout xmlns:android="http://schemas.android.com/apk/res/android"
    xmlns:app="http://schemas.android.com/apk/res-auto"
    xmlns:tools="http://schemas.android.com/tools"
    android:orientation="vertical"
    android:layout_width="match_parent"
    android:layout_height="match_parent">

    <com.example.myapplication.TitleLayout
        android:id="@+id/myTitleLayout"
        android:layout_marginTop="10dp"
        android:layout_height="wrap_content"
        android:layout_width="match_parent"/>
</LinearLayout>
主控件中引用自定义titleLayout的方式
package com.example.myapplication

import android.content.Intent
import androidx.appcompat.app.AppCompatActivity
import android.os.Bundle
import android.util.Log
import kotlinx.android.synthetic.main.activity_main.*

class MainActivity : AppCompatActivity() {
    override fun onCreate(savedInstanceState: Bundle?) {
        super.onCreate(savedInstanceState)
        setContentView(R.layout.activity_main)

        //将默认的supportBar隐藏掉
        supportActionBar?.hide()

        myTitleLayout.setTitle("我是标题")
    }
}
主控件的代码中也能简单地引用titleLayout的业务逻辑。
3.4 列表控件
代码在这里
Android的列表控件都是虚拟列表的实现,所以性能都比较好,注意一下使用的套路就可以了。
3.4.1 ListView
<?xml version="1.0" encoding="utf-8"?>
<LinearLayout
    android:id="@+id/itemView"
    xmlns:android="http://schemas.android.com/apk/res/android"
    android:layout_width="match_parent"
    android:layout_height="60dp">
    <TextView
        android:id="@+id/text"
        android:layout_width="0dp"
        android:layout_weight="1"
        android:layout_height="wrap_content"
        android:layout_gravity="center_vertical"
        android:gravity="center" />

    <!--ListView下面的含有Button的时候,要将Button设置focusable为false,才能响应onItemClickListener-->
    <Button
        android:id="@+id/del"
        android:focusable="false"
        android:layout_width="wrap_content"
        android:layout_height="wrap_content"
        android:layout_gravity="center_vertical"
        android:layout_marginLeft="10dp" />
</LinearLayout>
先定义ListView的每一个Item的Layout
<?xml version="1.0" encoding="utf-8"?>
<LinearLayout xmlns:android="http://schemas.android.com/apk/res/android"
    xmlns:app="http://schemas.android.com/apk/res-auto"
    xmlns:tools="http://schemas.android.com/tools"
    android:orientation="vertical"
    android:layout_width="match_parent"
    android:layout_height="match_parent">
    <Button
        android:id="@+id/button_add"
        android:layout_width="match_parent"
        android:layout_height="wrap_content"
        android:text="添加一行"/>
    <Button
        android:id="@+id/button_add2"
        android:layout_width="match_parent"
        android:layout_height="wrap_content"
        android:text="添加一行,另外一种方法"/>
    <ListView
        android:id="@+id/listView"
        android:layout_width="match_parent"
        android:layout_height="match_parent"/>
</LinearLayout>
主控件引入ListView的方式
package com.example.myapplication

data class Todo(var title:String,var user:String) {
}
定义数据条目的Todo
package com.example.myapplication;

import android.app.Activity
import android.view.LayoutInflater
import android.view.View
import android.view.ViewGroup
import android.widget.ArrayAdapter
import android.widget.Button
import android.widget.TextView

//需要传递父级,Item的资源ID,和数据
class TodoAdapter(activity: Activity,val resourceId:Int,data:List<Todo>):ArrayAdapter<Todo>(activity,resourceId,data){

    inner class ViewHolder(val textView: TextView, val button:Button){}

    override fun getView(position: Int, convertView: View?, parent: ViewGroup): View {
        var view:View
        if( convertView == null ){
            //从context中生成Layout,Layout的资源ID为resourceId,Parent为parent,不绑定到root中
            view = LayoutInflater.from(context).inflate(resourceId,parent,false)

            //获取View,并缓存各自的数据对象
            val textView = view.findViewById<TextView>(R.id.text)
            val button = view.findViewById<Button>(R.id.del)
            view.tag = ViewHolder(textView, button)
        }else{
            //沿用现有的convertView
            view = convertView;
        }

        //填充数据
        var viewHolder = view.tag as ViewHolder
        val todo = getItem(position)
        if( todo != null ){
            viewHolder.button.setText("["+todo.user+"]添加")
            viewHolder.textView.setText(todo.title)
        }
        return view
    }
}
实现我们的ListView的Adapter,注意Adapter持有Content,Layout,和data三部分。
package com.example.myapplication

import androidx.appcompat.app.AppCompatActivity
import android.os.Bundle
import android.util.Log
import android.widget.Toast
import kotlinx.android.synthetic.main.activity_list_view_acitvity.*

class ListViewAcitvity : AppCompatActivity() {
    private val todoList = ArrayList<Todo>()

    override fun onCreate(savedInstanceState: Bundle?) {
        super.onCreate(savedInstanceState)
        setContentView(R.layout.activity_list_view_acitvity)

        initTodoList()
        //只需要实现一个Adapter就可以了
        val adapter = TodoAdapter(this,R.layout.todo_item,todoList)
        listView.adapter = adapter
        //ListView下面的含有Button的时候,要将Button设置focusable为false,才能响应onItemClickListener
        //看这里https://blog.csdn.net/yissan/article/details/50448950
        listView.setOnItemClickListener { _, _, position, _ ->
            Log.d("listView","click "+position)
            var todo = todoList[position]
            Toast.makeText(this,todo.title,Toast.LENGTH_SHORT).show()
        }

        button_add.setOnClickListener {
            val id = todoList.size+1;

            //修改todoList
            todoList.add(Todo("job_"+id,"fish_"+id))

            //需要手动通知Adapter发生了变化,否则不更新
            adapter.notifyDataSetChanged()
        }

        button_add2.setOnClickListener {
            val id = todoList.size+1;

            //使用Adapter来更新数据
            adapter.add(Todo("job_"+id,"fish_"+id))
        }
    }


    private fun initTodoList(){
        for( i in 0..1000){
            todoList.add(Todo("job_"+i,"fish_"+i))
        }
    }
}
要点:
- 有了adapter和item的layout以后,我们就能配置ListView了,配置的方法也很简单,创建Adapter,传入ListView就可以了
- ListView的itemClick,有专用listener
- 数据变化的方式有两种,要么直接通过Adapter修改,要么修改List,然后通知Adapter数据变化了
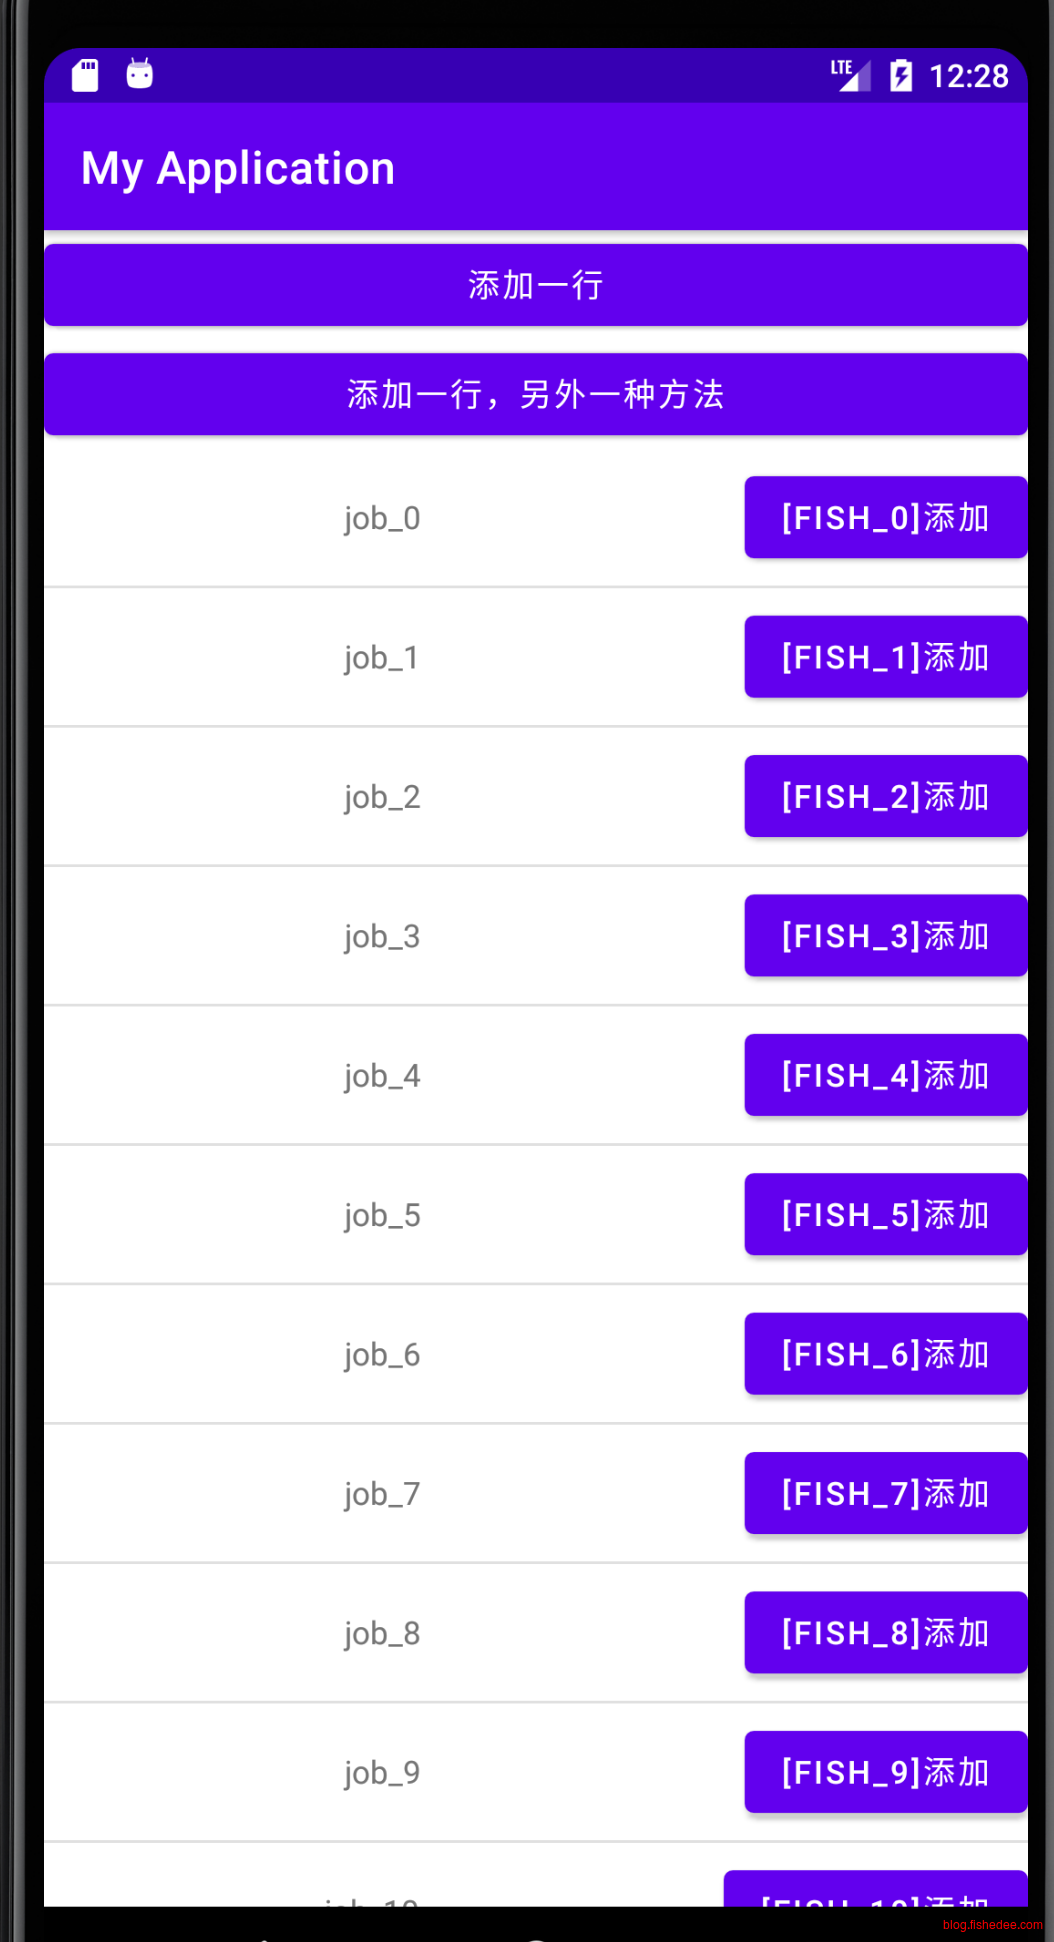
效果如上
3.4.2 RecyclerView
<?xml version="1.0" encoding="utf-8"?>
<LinearLayout
    android:id="@+id/itemView"
    xmlns:android="http://schemas.android.com/apk/res/android"
    android:layout_width="match_parent"
    android:layout_height="60dp">
    <TextView
        android:id="@+id/text"
        android:layout_width="0dp"
        android:layout_weight="1"
        android:layout_height="wrap_content"
        android:layout_gravity="center_vertical"
        android:gravity="center" />

    <!--ListView下面的含有Button的时候,要将Button设置focusable为false,才能响应onItemClickListener-->
    <Button
        android:id="@+id/del"
        android:focusable="false"
        android:layout_width="wrap_content"
        android:layout_height="wrap_content"
        android:layout_gravity="center_vertical"
        android:layout_marginLeft="10dp" />
</LinearLayout>
todo item 的Layout和刚才一样
<?xml version="1.0" encoding="utf-8"?>
<LinearLayout xmlns:android="http://schemas.android.com/apk/res/android"
    xmlns:app="http://schemas.android.com/apk/res-auto"
    xmlns:tools="http://schemas.android.com/tools"
    android:orientation="vertical"
    android:layout_width="match_parent"
    android:layout_height="match_parent">
    <Button
        android:id="@+id/button_add"
        android:layout_width="match_parent"
        android:layout_height="wrap_content"
        android:text="添加一行"/>
    <Button
        android:id="@+id/button_add2"
        android:layout_width="match_parent"
        android:layout_height="wrap_content"
        android:text="添加一行,性能更好的方法"/>
    <androidx.recyclerview.widget.RecyclerView
        android:id="@+id/recyclerView"
        android:layout_width="match_parent"
        android:layout_height="match_parent"/>
</LinearLayout>
主控件的布局,这次换成了RecyclerView
package com.example.myapplication

import android.view.LayoutInflater
import android.view.View
import android.view.ViewGroup
import android.widget.Button
import android.widget.LinearLayout
import android.widget.TextView
import android.widget.Toast
import androidx.recyclerview.widget.RecyclerView

//仅仅需要传递ViewHolder,连data都不需要传递,这大幅增加了data的灵活性
class TodoAdapter2(val todoList:List<Todo>):RecyclerView.Adapter<TodoAdapter2.ViewHolder>() {

    inner class ViewHolder(view: View):RecyclerView.ViewHolder(view){
        var itemView:LinearLayout = view.findViewById(R.id.itemView)
        val title:TextView = view.findViewById(R.id.text)
        var del:Button = view.findViewById(R.id.del)
    }

    override fun onCreateViewHolder(parent: ViewGroup, viewType: Int): ViewHolder {
        val view = LayoutInflater.from(parent.context).inflate(R.layout.todo_item,parent,false)
        var viewHolder =  ViewHolder(view)
        //RecyclerView默认没有边框线,需要手动添加
        viewHolder.itemView.setBackgroundResource(R.drawable.border)
        //使用View点击的方式
        viewHolder.itemView.setOnClickListener {
            //取得当前ViewHolder的位置
            var position = viewHolder.adapterPosition
            var todo = todoList[position]
            Toast.makeText(parent.context,todo.title, Toast.LENGTH_SHORT).show()
        }
        return viewHolder
    }

    override fun onBindViewHolder(holder: ViewHolder, position: Int) {
        var todo = todoList[position]
        holder.title.setText(todo.title)
        holder.del.setText("["+todo.user+"]添加")
    }

    //返回Item数量
    override fun getItemCount() = todoList.size
}
然后我们实现RecyclerView的Adapter,这次的Adapter设计更为合理,只需要传入ViewHolder就可以了。data与Activity都不再需要传入,更为灵活。
注意,ViewHolder上有itemView,adapterPosition这些重要的方法。
package com.example.myapplication

import androidx.appcompat.app.AppCompatActivity
import android.os.Bundle
import android.util.Log
import android.widget.Toast
import androidx.recyclerview.widget.LinearLayoutManager
import kotlinx.android.synthetic.main.activity_list_view_acitvity.*
import kotlinx.android.synthetic.main.activity_list_view_acitvity.button_add
import kotlinx.android.synthetic.main.activity_list_view_acitvity.button_add2
import kotlinx.android.synthetic.main.activity_recycle_view.*

class RecycleViewActivity : AppCompatActivity() {
    private val todoList = ArrayList<Todo>()

    override fun onCreate(savedInstanceState: Bundle?) {
        super.onCreate(savedInstanceState)
        setContentView(R.layout.activity_recycle_view)

        initTodoList()
        //只需要实现一个Adapter就可以了
        val adapter = TodoAdapter2(todoList)
        val layoutManager = LinearLayoutManager(this)
        //要多传入一个排序属性
        recyclerView.layoutManager = layoutManager
        recyclerView.adapter = adapter

        //recyclerView不再有onItemClick的

        button_add.setOnClickListener {
            val id = todoList.size+1;

            //修改todoList
            todoList.add(Todo("job_"+id,"fish_"+id))

            //需要手动通知Adapter发生了变化,否则不更新
            adapter.notifyDataSetChanged()
        }

        button_add2.setOnClickListener {
            val id = todoList.size+1;

            //修改todoList
            todoList.add(Todo("job_"+id,"fish_"+id))
            //因为Adapter里面不再存储数据本身,所以没有add操作
            //adapter.add(Todo("job_"+id,"fish_"+id))
            //比notifyDataSetChanged更有效率的更新通知方式
            adapter.notifyItemInserted(todoList.size-1)
        }
    }


    private fun initTodoList(){
        for( i in 0..1000){
            todoList.add(Todo("job_"+i,"fish_"+i))
        }
    }
}
要点如下:
- RecyclerView的配置不仅需要Adapter,还需要一个LayoutManager。因为RecyclerView同时支持List,Grid和瀑布等多种布局方式
- RecyclerView的itemClickListener交给了ViewHolder来做了
- 数据更改时,不再调用Adapter,而是手动更改数据,然后以多种方式通知Adapter数据变更了。
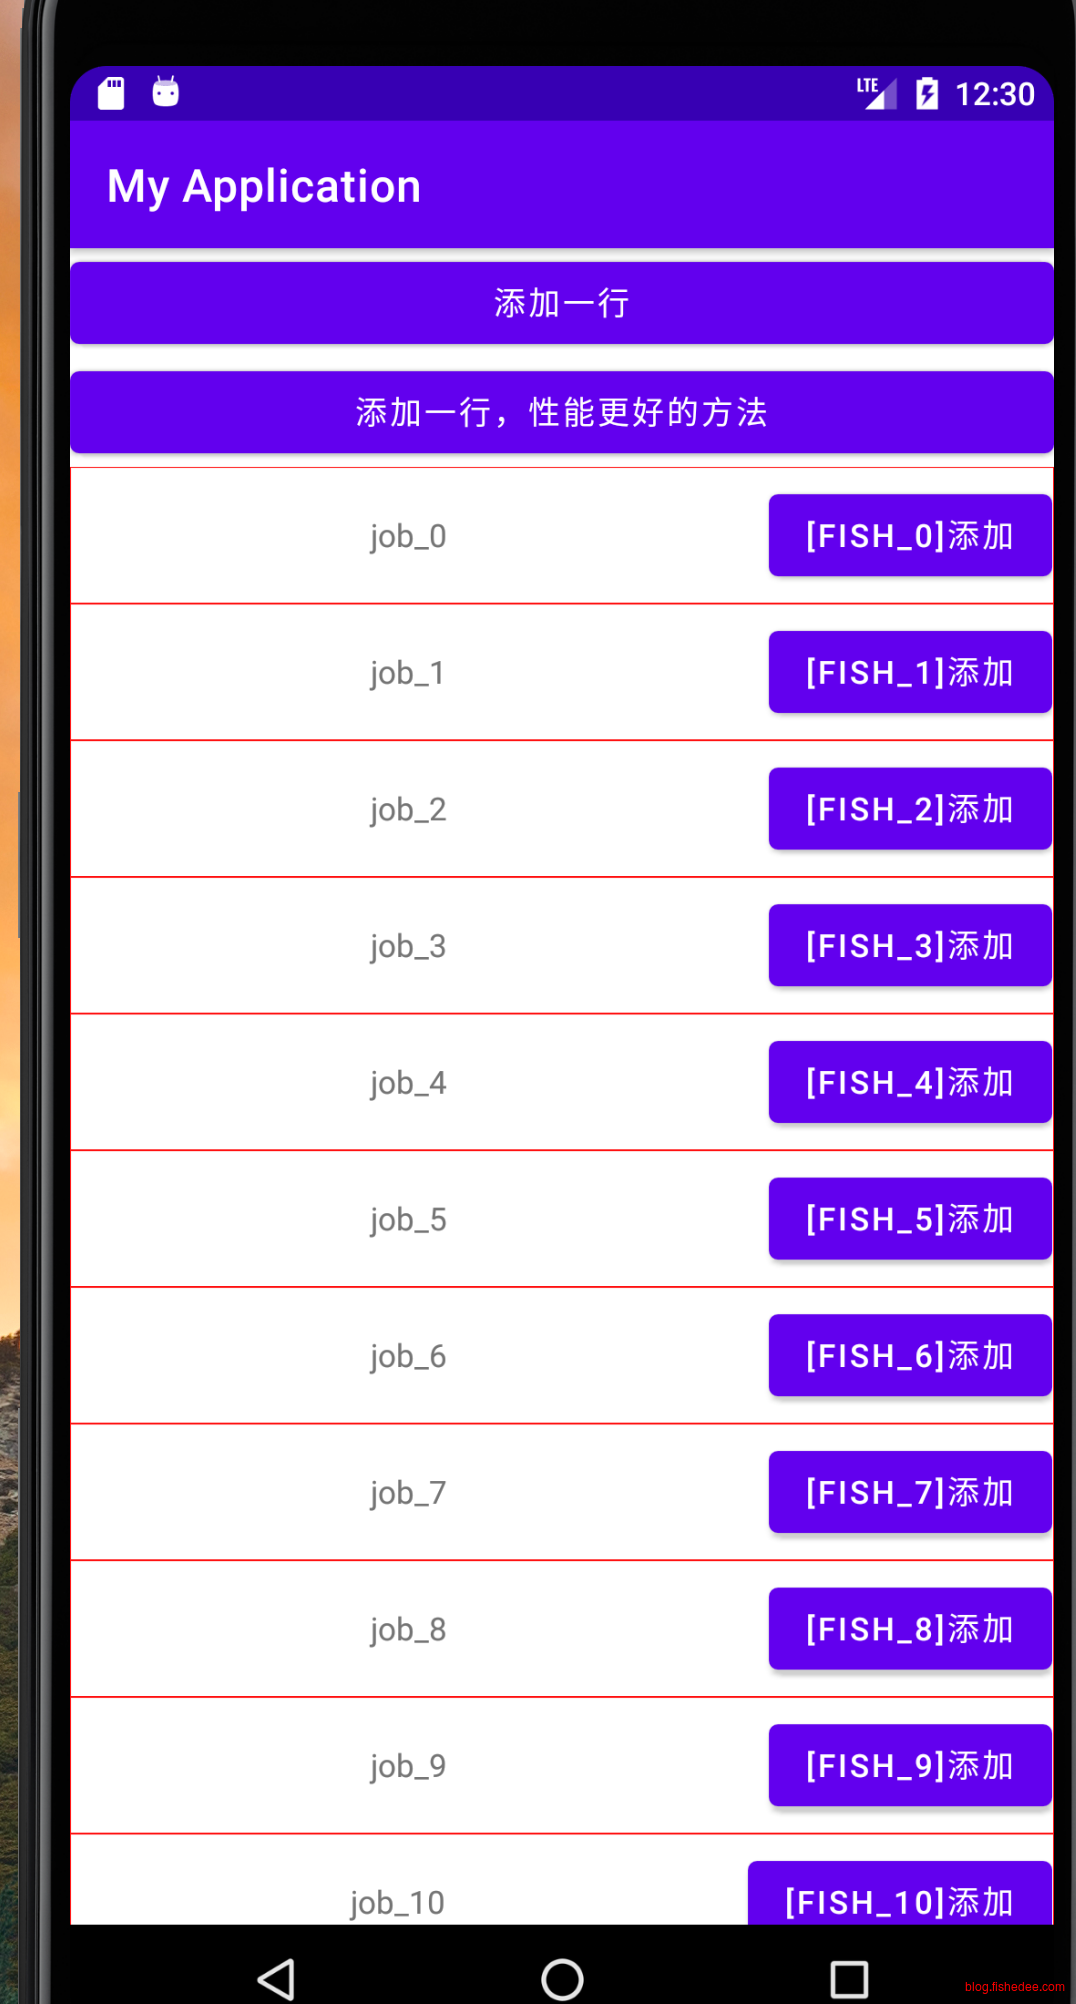
效果如上
3.4.2 RecyclerView的多个ViewType
package com.example.myapplication

import android.view.LayoutInflater
import android.view.View
import android.view.ViewGroup
import android.widget.*
import androidx.recyclerview.widget.RecyclerView

//仅仅需要传递ViewHolder,连data都不需要传递,这大幅增加了data的灵活性
class TodoAdapter3(val todoList:List<Todo>):RecyclerView.Adapter<RecyclerView.ViewHolder>() {

    inner class NormalViewHolder(view: View):RecyclerView.ViewHolder(view){
        val title:TextView = view.findViewById(R.id.text)
        var del:Button = view.findViewById(R.id.del)
    }

    inner class EditViewHolder(view: View):RecyclerView.ViewHolder(view){
        val title:TextView = view.findViewById(R.id.text)
        var del:TextView = view.findViewById(R.id.del)
    }

    val NormalMsgType = 1;
    var EditMsgType = 2;

    override fun getItemViewType(position: Int): Int {
        val todo = todoList[position]
        if( todo.title.contains("1")){
            return NormalMsgType;
        }else{
            return EditMsgType;
        }
    }

    override fun onCreateViewHolder(parent: ViewGroup, viewType: Int): RecyclerView.ViewHolder {
        var viewHolder:RecyclerView.ViewHolder;
        if( viewType == NormalMsgType ){
            val view = LayoutInflater.from(parent.context).inflate(R.layout.todo_item,parent,false)
            viewHolder = NormalViewHolder(view)
        }else{
            val view = LayoutInflater.from(parent.context).inflate(R.layout.todo_item2,parent,false)
            viewHolder = EditViewHolder(view)
        }
        //RecyclerView默认没有边框线,需要手动添加
        viewHolder.itemView.setBackgroundResource(R.drawable.border)
        //使用View点击的方式
        viewHolder.itemView.setOnClickListener {
            //取得当前ViewHolder的位置
            var position = viewHolder.adapterPosition
            var todo = todoList[position]
            Toast.makeText(parent.context,todo.title, Toast.LENGTH_SHORT).show()
        }
        return viewHolder
    }

    override fun onBindViewHolder(holder: RecyclerView.ViewHolder, position: Int) {
        var todo = todoList[position]
        when(holder){
            is NormalViewHolder->{
                holder.title.setText(todo.title)
                holder.del.setText("["+todo.user+"]添加")
            }
            is EditViewHolder->{
                holder.title.setText(todo.title)
                holder.del.setText("["+todo.user+"]添加")
            }
        }
    }

    //返回Item数量
    override fun getItemCount() = todoList.size
}
RecyclerView自身还支持多种ViewType,不再需要用一个FrameLayout来处理多个View的情况,难度也不高。
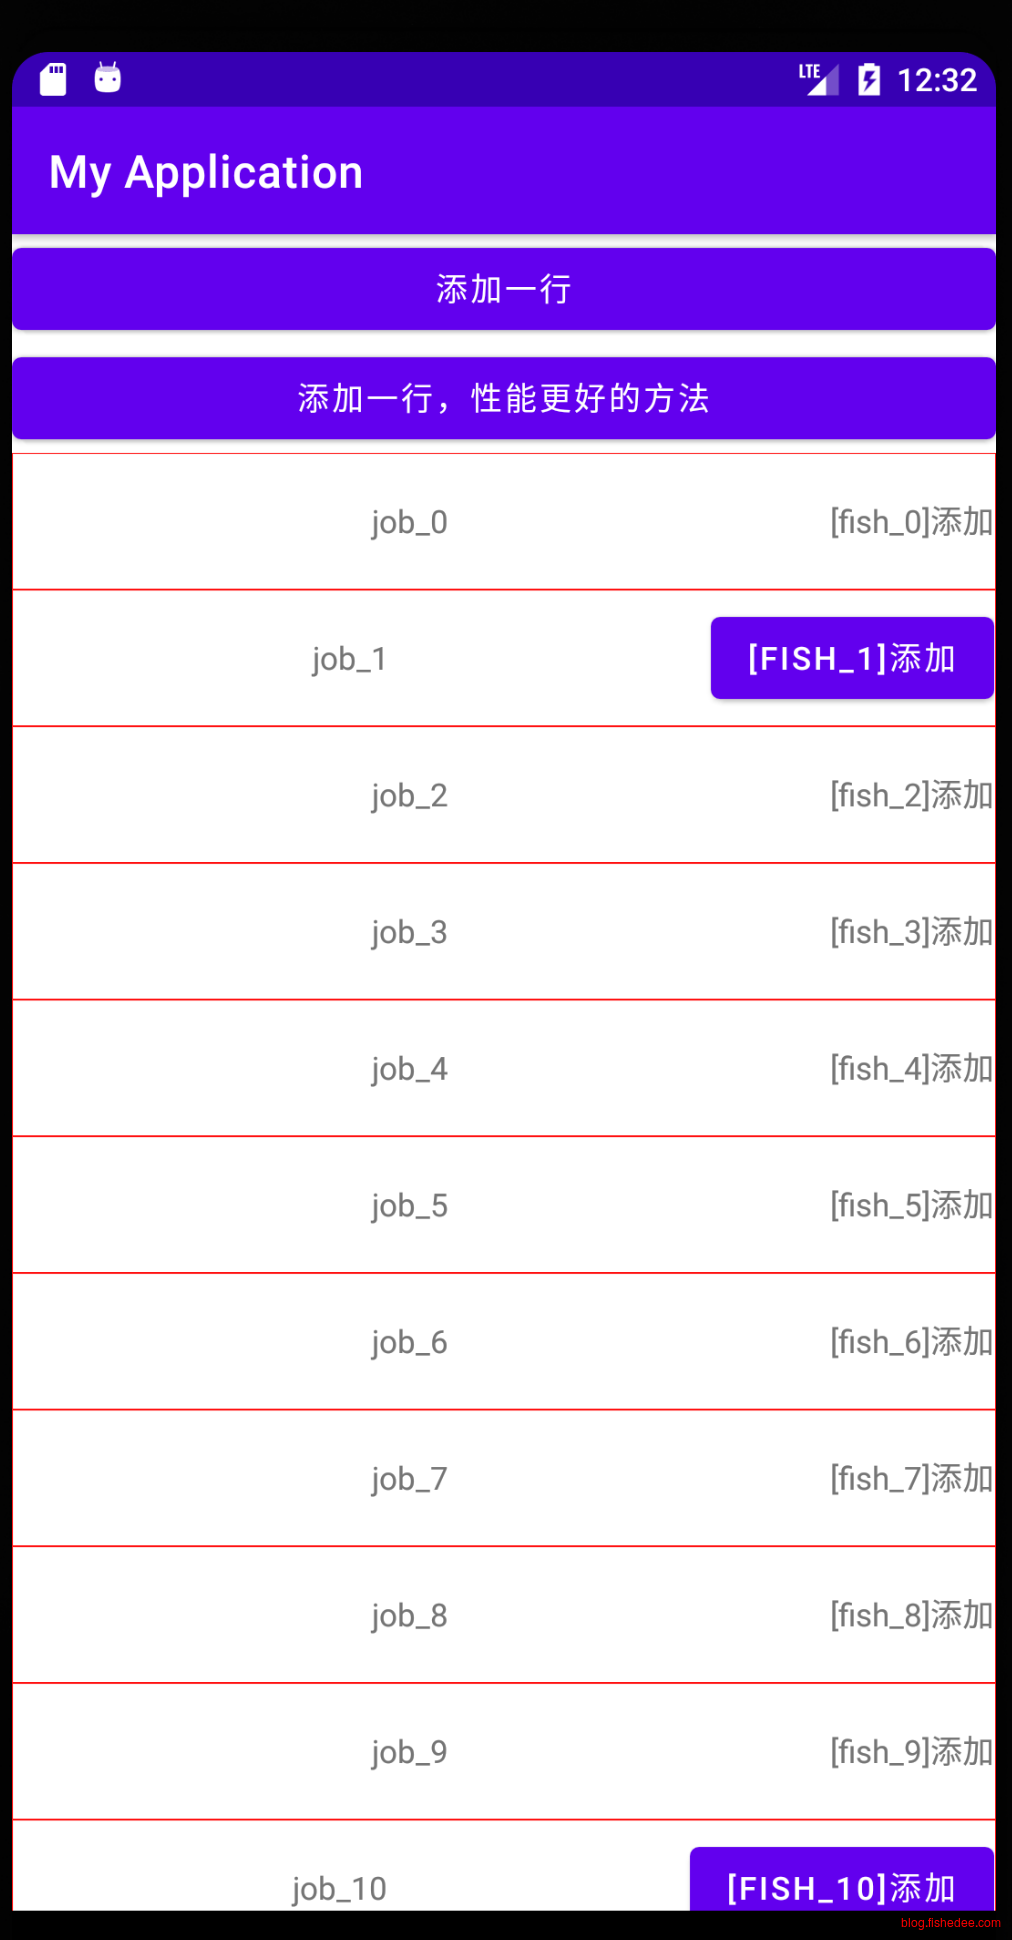
效果如上
3.5 RecyclerView高级用法
参考资料:
代码在这里
3.5.1 添加Header与Footer
<?xml version="1.0" encoding="utf-8"?>
<LinearLayout xmlns:android="http://schemas.android.com/apk/res/android"
    xmlns:app="http://schemas.android.com/apk/res-auto"
    android:orientation="vertical"
    xmlns:tools="http://schemas.android.com/tools"
    android:layout_width="match_parent"
    android:layout_height="match_parent"
    tools:context=".RecyclerViewActivityWithHeader">
    <androidx.recyclerview.widget.RecyclerView
        android:id="@+id/recycler_view"
        android:layout_width="match_parent"
        android:layout_height="match_parent"/>
</LinearLayout>
主页面布局
<?xml version="1.0" encoding="utf-8"?>
<LinearLayout xmlns:android="http://schemas.android.com/apk/res/android"
    android:orientation="horizontal"
    android:layout_width="match_parent"
    android:layout_height="100dp">
    <TextView
        android:id="@+id/item"
        android:layout_width="match_parent"
        android:layout_height="match_parent"
        android:gravity="center"
        android:textSize="20sp"
        android:text="我是Header"
        android:background="@color/grey"/>
</LinearLayout>
头部布局
<?xml version="1.0" encoding="utf-8"?>
<LinearLayout xmlns:android="http://schemas.android.com/apk/res/android"
    android:orientation="horizontal"
    android:layout_width="match_parent"
    android:layout_height="50dp"
    android:layout_margin="16dp">
    <TextView
        android:id="@+id/item"
        android:layout_width="match_parent"
        android:layout_height="match_parent"
        android:textSize="20sp"
        android:gravity="center"
        android:background="@color/grey"/>
</LinearLayout>
条目布局,注意有layout_margin
<?xml version="1.0" encoding="utf-8"?>
<LinearLayout xmlns:android="http://schemas.android.com/apk/res/android"
    android:orientation="horizontal"
    android:layout_width="match_parent"
    android:layout_height="100dp">
    <TextView
        android:id="@+id/item"
        android:layout_width="match_parent"
        android:layout_height="match_parent"
        android:textSize="20sp"
        android:text="我是Footer"
        android:gravity="center"
        android:background="@color/grey"/>
</LinearLayout>
底部布局
package com.example.myapplication

import androidx.recyclerview.widget.RecyclerView
import android.widget.TextView
import android.view.LayoutInflater
import android.view.View
import android.view.ViewGroup


class DataAdapterWithHeader(private var mDatas:List<String>) : RecyclerView.Adapter<RecyclerView.ViewHolder>() {
    val TYPE_HEADER = 0 //说明是带有Header的

    val TYPE_FOOTER = 1 //说明是带有Footer的

    val TYPE_NORMAL = 2 //说明是不带有header和footer的

    //HeaderView, FooterView
    private var mHeaderView: View? = null
    private var mFooterView: View? = null

    //HeaderView和FooterView的get和set函数
    fun getHeaderView(): View? {
        return mHeaderView
    }

    fun setHeaderView(headerView: View?) {
        mHeaderView = headerView
        notifyItemInserted(0)
    }

    fun getFooterView(): View? {
        return mFooterView
    }

    fun setFooterView(footerView: View?) {
        mFooterView = footerView
        notifyItemInserted(getItemCount() - 1)
    }

    /** 重写这个方法,很重要,是加入Header和Footer的关键,我们通过判断item的类型,从而绑定不同的view    * */
    override fun getItemViewType(position: Int): Int {
        if ( mHeaderView != null && position == 0) {
            //第一个item应该加载Header
            return TYPE_HEADER
        }
        if( mFooterView != null && position == getItemCount() - 1){
            return TYPE_FOOTER
        }
        return TYPE_NORMAL
    }

    //创建View,如果是HeaderView或者是FooterView,直接在Holder中返回
    override  fun onCreateViewHolder(parent: ViewGroup, viewType: Int): RecyclerView.ViewHolder {
        if (mHeaderView != null && viewType == TYPE_HEADER) {
            return ListHolder(mHeaderView!!)
        }
        if (mFooterView != null && viewType == TYPE_FOOTER) {
            return ListHolder(mFooterView!!)
        }
        val layout: View =
            LayoutInflater.from(parent.context).inflate(R.layout.cyclerview_item, parent, false)
        return ListHolder(layout)
    }

    //绑定View,这里是根据返回的这个position的类型,从而进行绑定的,   HeaderView和FooterView, 就不同绑定了
    override fun onBindViewHolder(holder: RecyclerView.ViewHolder, position: Int) {
        if (getItemViewType(position) == TYPE_NORMAL) {
            if (holder is ListHolder) {
                var realPosition = position
                if( mHeaderView != null ){
                    //这里加载数据的时候要注意,是从position-1开始,因为position==0已经被header占用了
                    realPosition = realPosition -1
                }
                holder.tv?.text = mDatas[realPosition]
            }
            return
        } else{
            return
        }
    }

    //在这里面加载ListView中的每个item的布局
    inner class ListHolder(itemView: View) : RecyclerView.ViewHolder(itemView) {
        var tv: TextView? = null

        init {
            //如果是headerview或者是footerview,直接返回
            if (itemView === mHeaderView) {

            }else if( itemView == mFooterView ){

            }else{
                tv = itemView.findViewById(R.id.item)
            }
        }
    }

    //返回View中Item的个数,这个时候,总的个数应该是ListView中Item的个数加上HeaderView和FooterView
    override fun getItemCount(): Int {
        return if (mHeaderView == null && mFooterView == null) {
            mDatas.size
        } else if (mHeaderView == null && mFooterView != null) {
            mDatas.size + 1
        } else if (mHeaderView != null && mFooterView == null) {
            mDatas.size + 1
        } else {
            mDatas.size + 2
        }
    }
}
Header与Footer的实现关键在于Adapter,对index进行判断,返回不同的View。
package com.example.myapplication

import androidx.appcompat.app.AppCompatActivity
import android.os.Bundle
import androidx.recyclerview.widget.LinearLayoutManager
import kotlinx.android.synthetic.main.activity_recycler_view_with_header.*
import android.view.LayoutInflater

class RecyclerViewActivityWithHeader : AppCompatActivity() {
    val data:List<String>

    init{
        val listData = ArrayList<String>()
        for( i in 0..100){
            listData.add(i.toString()+"_txt")
        }
        this.data = listData
    }

    override fun onCreate(savedInstanceState: Bundle?) {
        super.onCreate(savedInstanceState)
        setContentView(R.layout.activity_recycler_view_with_header)

        val linearLayoutManager = LinearLayoutManager(this)
        val adapter = DataAdapterWithHeader(this.data)
        recycler_view.layoutManager = linearLayoutManager
        recycler_view.adapter = adapter

        //设置Header与Footer
        val header = LayoutInflater.from(this).inflate(R.layout.cyclerview_header, recycler_view, false)
        adapter.setHeaderView(header)
        val footer = LayoutInflater.from(this).inflate(R.layout.cyclerview_footer, recycler_view, false)
        adapter.setFooterView(footer)
    }
}
入口文件
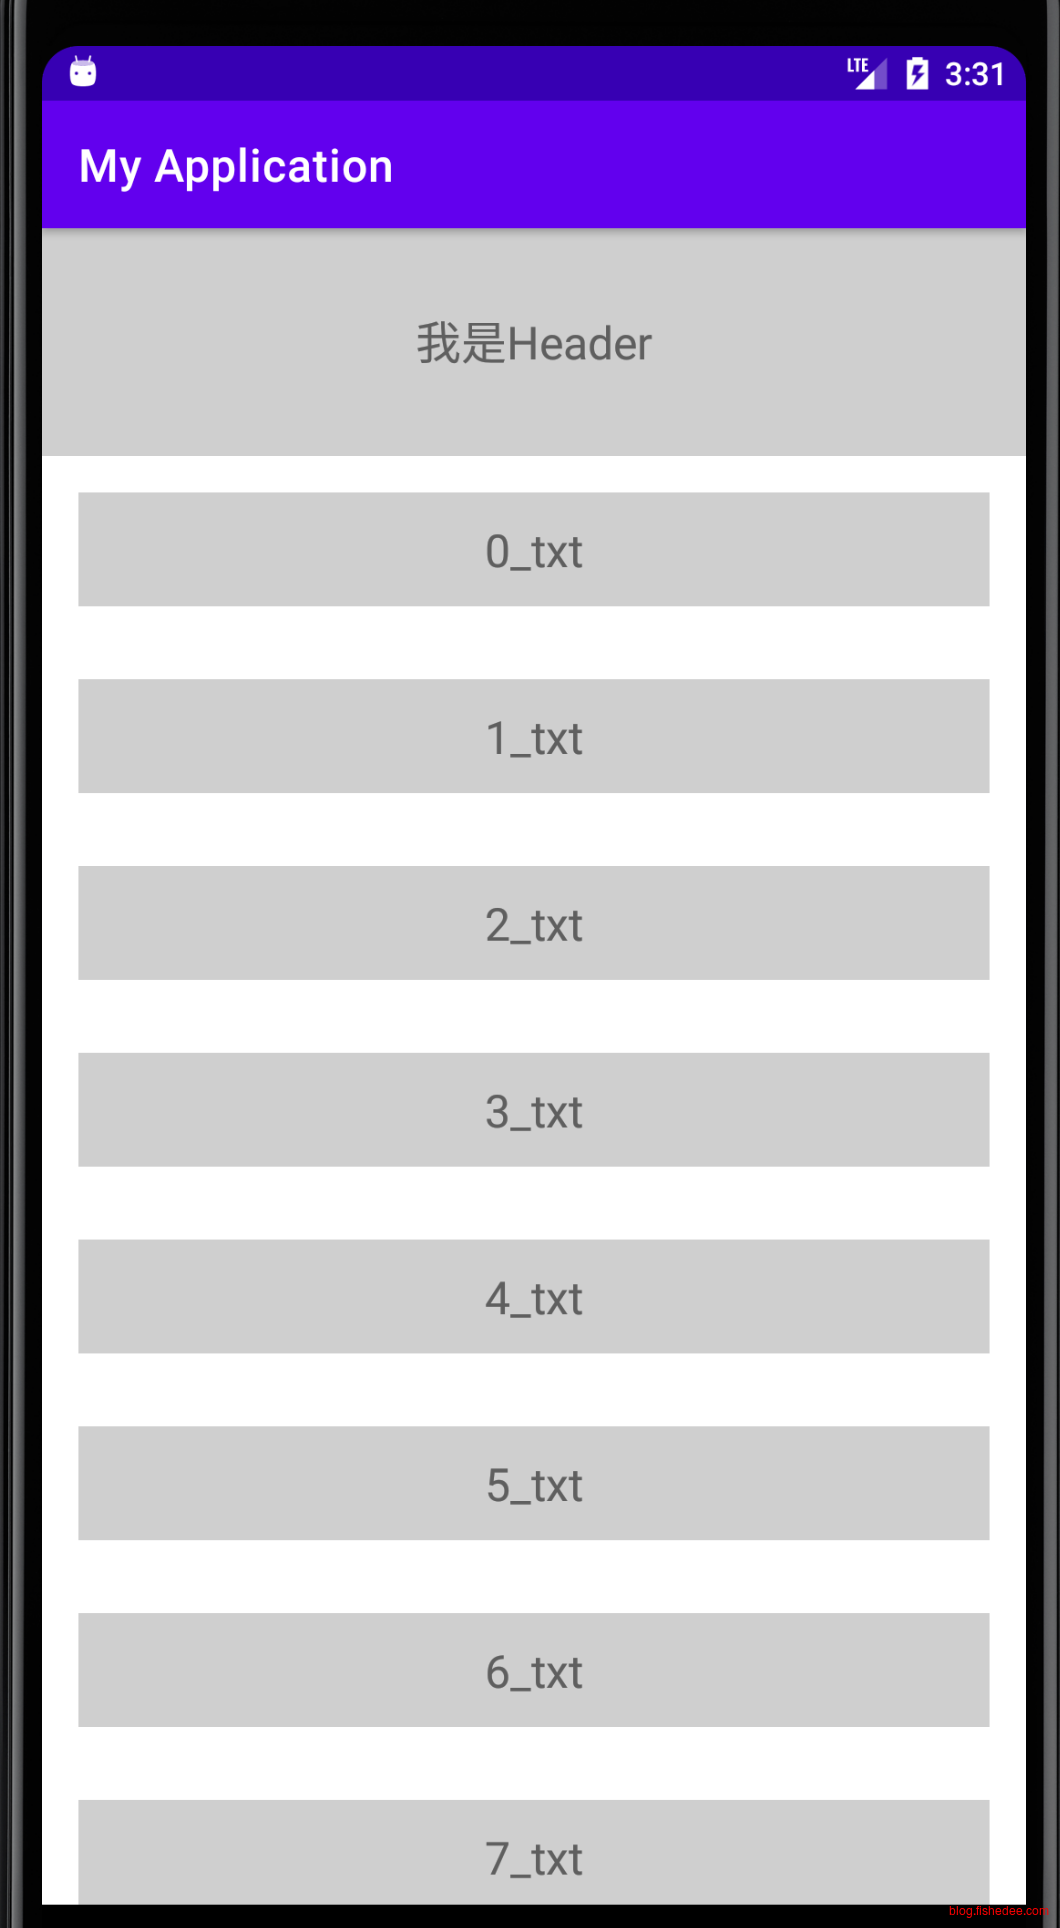
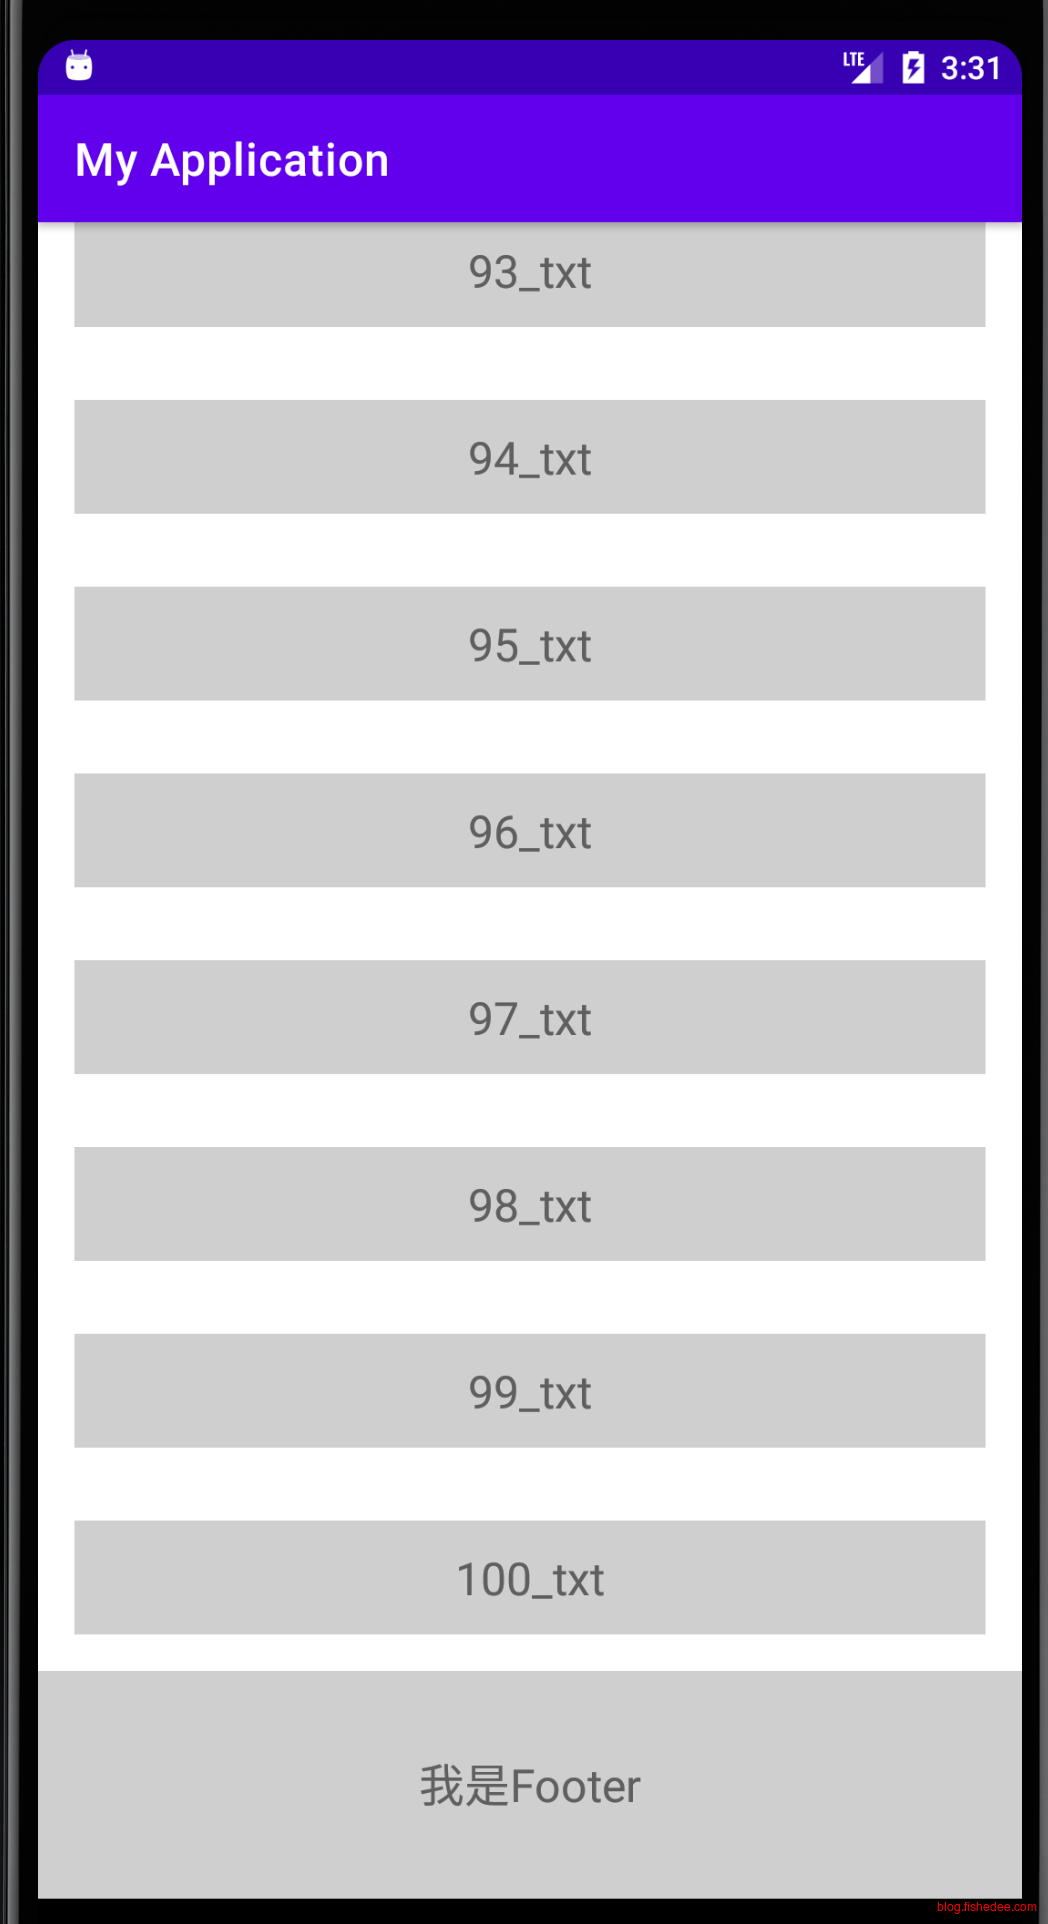
效果如上
3.5.2 加入分割线
<?xml version="1.0" encoding="utf-8"?>
<shape xmlns:android="http://schemas.android.com/apk/res/android"
    android:shape="rectangle">
    <solid android:color="#FF0000"/>
    <size android:height="1dp"/>
</shape>
加入border文件
package com.example.myapplication
import android.R
import android.content.Context
import android.content.res.TypedArray
import android.graphics.Canvas
import android.graphics.Rect
import android.graphics.drawable.Drawable
import android.util.Log
import android.view.View
import androidx.recyclerview.widget.RecyclerView

import androidx.recyclerview.widget.LinearLayoutManager
import androidx.recyclerview.widget.RecyclerView.ItemDecoration

/** * Created by wnw on 16-5-22.  */
class LinearRecycleViewDecoration(private val mContext: Context, orientation: Int,drawableResource:Int) :
    ItemDecoration() {

    private val mDivider: Drawable

    private var mOrientation = 0

    init {
        mDivider = mContext.resources.getDrawable(drawableResource)
        setOrientation(orientation)
    }


    //设置屏幕的方向
    private fun setOrientation(orientation: Int) {
        require(!(orientation != HORIZONTAL_LIST && orientation != VERTICAL_LIST)) { "invalid orientation" }
        mOrientation = orientation
        Log.d("Decorator","height = ${mDivider.intrinsicHeight} and width = ${mDivider.intrinsicWidth}")
    }

    override fun onDraw(c: Canvas, parent: RecyclerView, state: RecyclerView.State) {
        if (mOrientation == HORIZONTAL_LIST) {
            drawVerticalLine(c, parent, state)
        } else {
            drawHorizontalLine(c, parent, state)
        }
    }

    //画横线, 这里的parent其实是显示在屏幕显示的这部分
    private fun drawHorizontalLine(c: Canvas?, parent: RecyclerView, state: RecyclerView.State?) {
        val left = parent.paddingLeft
        val right = parent.width - parent.paddingRight
        val childCount = parent.childCount
        for (i in 0 until childCount) {
            val child = parent.getChildAt(i)

            //获得child的布局信息
            val params = child.layoutParams as RecyclerView.LayoutParams
            val top = child.bottom + params.bottomMargin
            val bottom = top + mDivider.intrinsicHeight
            mDivider.setBounds(left, top, right, bottom)
            mDivider.draw(c!!)
            Log.d("Decorator", "drawHorizontalLine ${left}   ${right} ${top} ${bottom} ${i}");
        }
    }

    //画竖线
    private fun drawVerticalLine(c: Canvas?, parent: RecyclerView, state: RecyclerView.State?) {
        val top = parent.paddingTop
        val bottom = parent.height - parent.paddingBottom
        val childCount = parent.childCount
        for (i in 0 until childCount) {
            val child = parent.getChildAt(i)

            //获得child的布局信息
            val params = child.layoutParams as RecyclerView.LayoutParams
            val left = child.right + params.rightMargin
            val right = left + mDivider.intrinsicWidth
            mDivider.setBounds(left, top, right, bottom)
            mDivider.draw(c!!)
            Log.d("Decorator", "drawVerticalLine ${left}   ${right} ${top} ${bottom} ${i}");
        }
    }

    //由于Divider也有长宽高,每一个Item需要向下或者向右偏移
    override fun getItemOffsets(
        outRect: Rect,
        view: View,
        parent: RecyclerView,
        state: RecyclerView.State
    ) {
        if (mOrientation == HORIZONTAL_LIST) {
            //画横线,就是往下偏移一个分割线的高度
            outRect[0, 0, 0] = mDivider.intrinsicHeight
        } else {
            //画竖线,就是往右偏移一个分割线的宽度
            outRect[0, 0, mDivider.intrinsicWidth] = 0
        }
    }

    companion object {
        const val HORIZONTAL_LIST = LinearLayoutManager.HORIZONTAL
        const val VERTICAL_LIST = LinearLayoutManager.VERTICAL
    }
}
加入ItemDecoration
package com.example.myapplication

import androidx.appcompat.app.AppCompatActivity
import android.os.Bundle
import androidx.recyclerview.widget.LinearLayoutManager
import kotlinx.android.synthetic.main.activity_recycler_view_with_divider.*

class RecyclerViewActivityWithDivider : AppCompatActivity() {
    val data:List<String>

    init{
        val listData = ArrayList<String>()
        for( i in 0..100){
            listData.add(i.toString()+"_txt")
        }
        this.data = listData
    }

    override fun onCreate(savedInstanceState: Bundle?) {
        super.onCreate(savedInstanceState)
        setContentView(R.layout.activity_recycler_view_with_divider)


        val linearLayoutManager = LinearLayoutManager(this)
        val adapter = DataAdapterWithHeader(this.data)
        val itemDecoration = LinearRecycleViewDecoration(this,LinearRecycleViewDecoration.VERTICAL_LIST,R.drawable.border)
        recycler_view.layoutManager = linearLayoutManager
        recycler_view.adapter = adapter
        recycler_view.addItemDecoration(itemDecoration)
    }
}
分割线通过addItemDecoration来实现,没啥好说的。ListView只需要用一个divider样式就可以了
4 Fragment
代码在这里
4.1 自定义View的动态替换
package com.example.myapplication.view

import android.content.Context
import android.util.AttributeSet
import android.view.LayoutInflater
import android.widget.Button
import android.widget.LinearLayout
import com.example.myapplication.R

class LeftView(context:Context,attrs:AttributeSet):LinearLayout(context,attrs) {
     private lateinit var buttonView:Button

    init{
        val view = LayoutInflater.from(context).inflate(R.layout.fragment_left,this)
        buttonView = view.findViewById(R.id.changeButton)
    }

    fun setButtonText(input:String){
        buttonView.setText(input);
    }
}
定义一个LeftView
package com.example.myapplication.view

import android.content.Context
import android.util.AttributeSet
import android.view.LayoutInflater
import android.widget.Button
import android.widget.LinearLayout
import com.example.myapplication.R

class RightView(context:Context):LinearLayout(context) {

    init{
        LayoutInflater.from(context).inflate(R.layout.fragment_right,this)
    }

}
定义一个RightView,注意没有AttributeSet参数,因为这个View是手动实例的,不是通过xml实例出来的。
package com.example.myapplication.view

import android.content.Context
import android.util.AttributeSet
import android.view.LayoutInflater
import android.widget.Button
import android.widget.LinearLayout
import com.example.myapplication.R

class AnotherRightView(context:Context):LinearLayout(context) {

    init{
        LayoutInflater.from(context).inflate(R.layout.fragment_another_right,this)
    }

}
定义另外一个AnotherRightView。
<?xml version="1.0" encoding="utf-8"?>
<LinearLayout xmlns:android="http://schemas.android.com/apk/res/android"
    xmlns:app="http://schemas.android.com/apk/res-auto"
    xmlns:tools="http://schemas.android.com/tools"
    android:orientation="vertical"
    android:layout_width="match_parent"
    android:layout_height="match_parent"
    tools:context=".fragment.FragmentActivity">
    <com.example.myapplication.view.LeftView
        android:id="@+id/leftView"
        android:layout_height="0dp"
        android:layout_weight="1"
        android:layout_width="match_parent"/>
    <FrameLayout
        android:background="@drawable/border"
        android:id="@+id/rightLayout"
        android:layout_height="0dp"
        android:layout_width="match_parent"
        android:layout_weight="1">
    </FrameLayout>
</LinearLayout>
主页面的布局,使用Framelayout来做动态页面替换的容器,这可是一个基础套路了。
package com.example.myapplication.view

import androidx.appcompat.app.AppCompatActivity
import android.os.Bundle
import android.view.View
import com.example.myapplication.R
import com.example.myapplication.fragment.AnotherRightFragment
import com.example.myapplication.fragment.LeftFragment
import com.example.myapplication.fragment.RightFragment
import kotlinx.android.synthetic.main.activity_user_view.*
import kotlinx.android.synthetic.main.fragment_left.*

class UserViewActivity : AppCompatActivity() {
    override fun onCreate(savedInstanceState: Bundle?) {
        super.onCreate(savedInstanceState)
        setContentView(R.layout.activity_user_view)

        changeButton.setOnClickListener {
            replaceTop(AnotherRightView(this))
            leftView.setButtonText("按钮改变了")
        }

        replaceTop(RightView(this))
    }

    private fun replaceTop(view:View){
        rightLayout.removeAllViews()
        rightLayout.addView(view)
    }
}
主页面的逻辑,也比较简单,就是点击按钮以后,动态替换View。
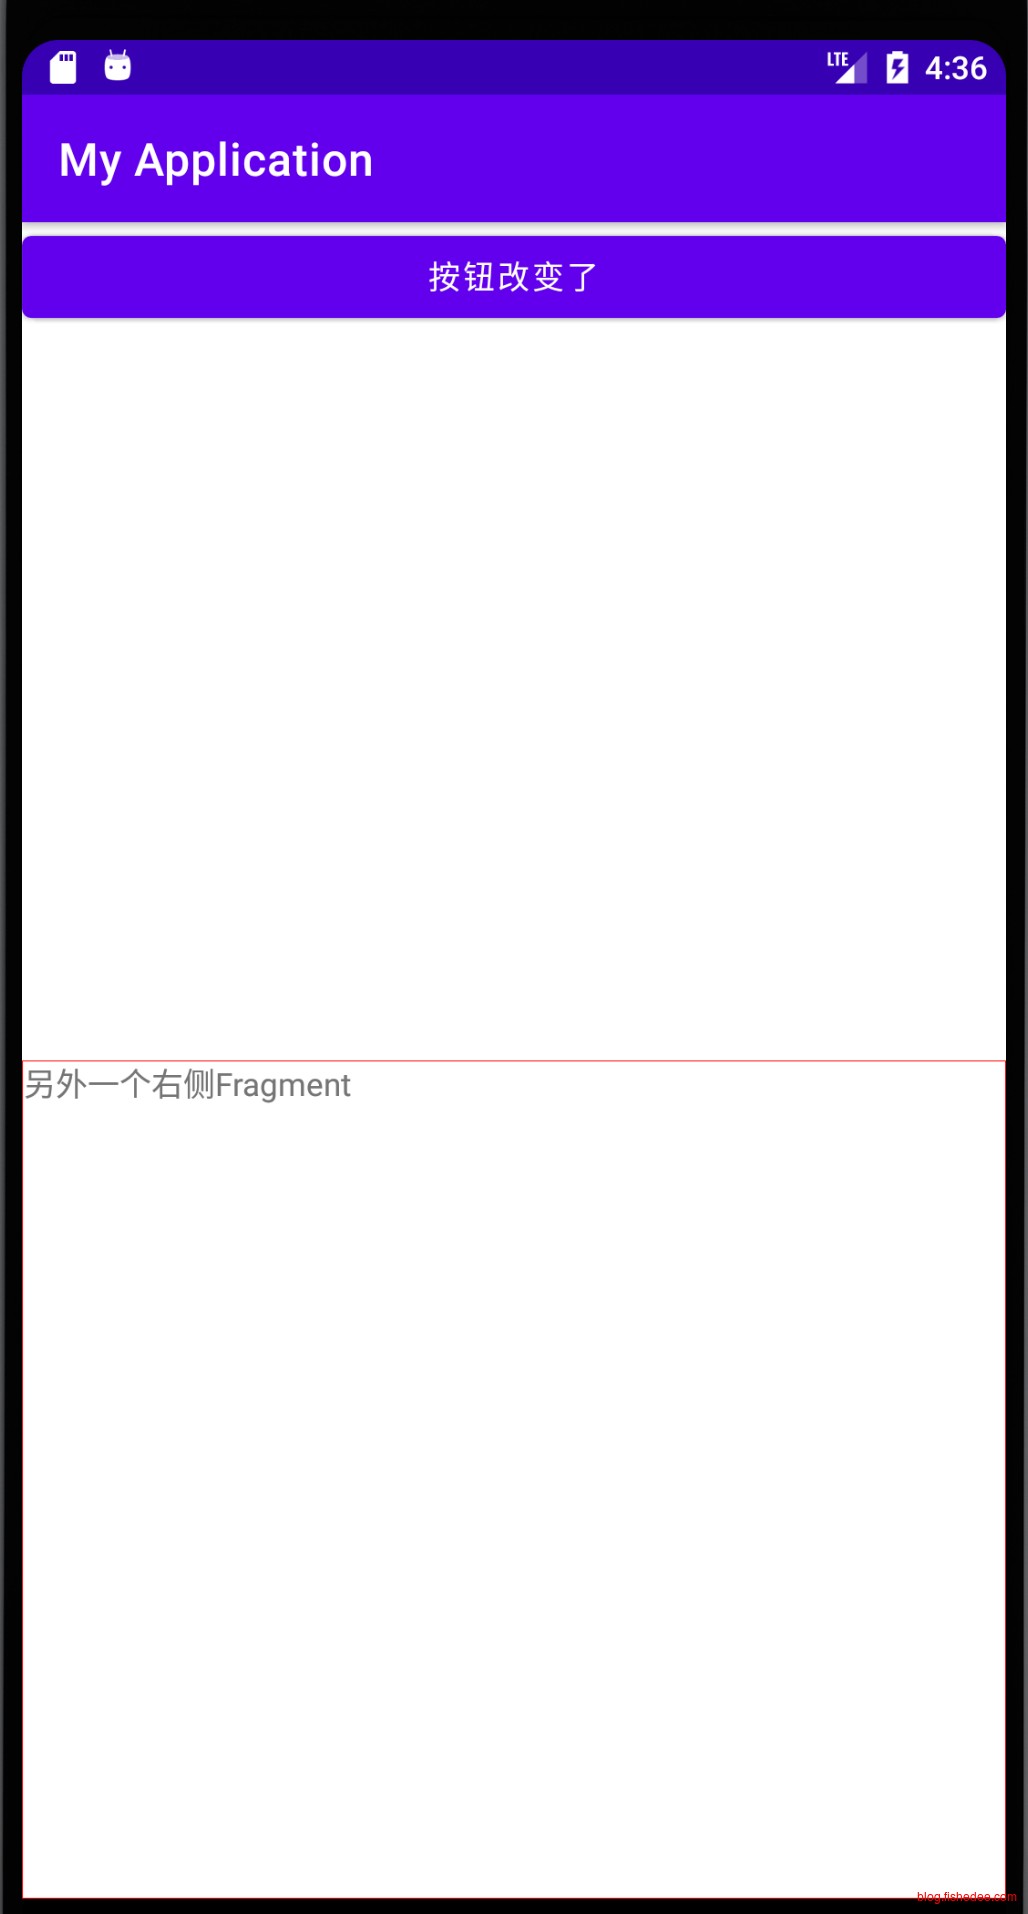
效果如上。
使用自定义View的动态替换,有两个问题:
- 下方的View没有Activity栈,替换了View以后,如果按下Back键,会退出整个Activity,而不是返回上一个View。
- 自定义View无法知道Activity的生命周期。
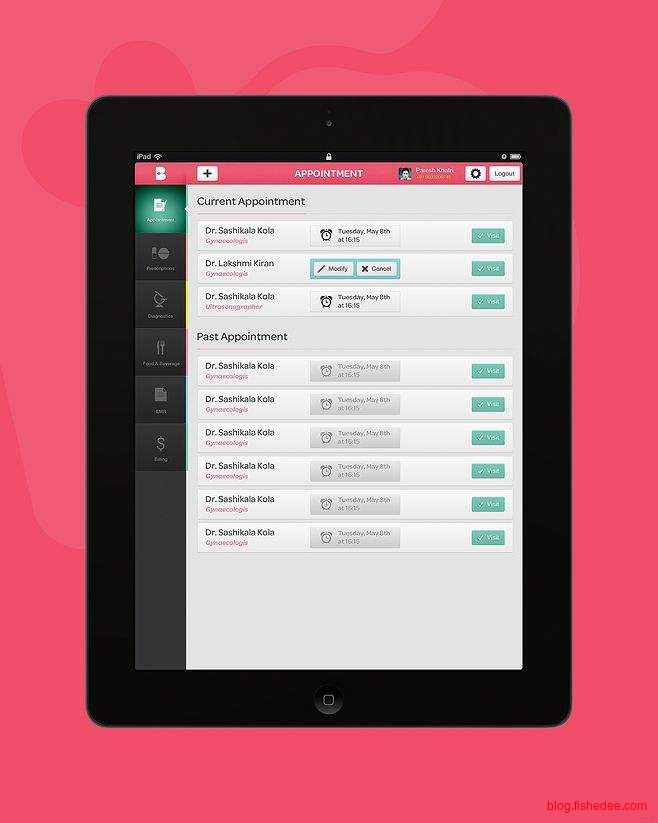
类似这种的平板UI中,左侧菜单栏是保持不变的,但是右侧的视图是有自己的栈
4.2 Fragment的动态替换
为了解决以上的问题,Android提出了Fragment的概念。注意,我们要使用androidX里面的Fragment,不要使用系统自带的Fragment,否则会有比较多兼容性问题。
package com.example.myapplication.fragment

import android.os.Bundle
import androidx.fragment.app.Fragment
import android.view.LayoutInflater
import android.view.View
import android.view.ViewGroup
import android.widget.Button
import com.example.myapplication.R


class LeftFragment : Fragment() {
    lateinit var changeButton:Button;

    override fun onCreateView(
        inflater: LayoutInflater, container: ViewGroup?,
        savedInstanceState: Bundle?
    ): View? {
        // Inflate the layout for this fragment
        val view = inflater.inflate(R.layout.fragment_left, container, false)
        this.changeButton = view.findViewById<Button>(R.id.changeButton)
        return view
    }

    fun setButtonText(text:String){
        changeButton.setText(text)
    }

}
先定义一个LeftFragment,封装有自己的业务逻辑
package com.example.myapplication.fragment

import android.os.Bundle
import androidx.fragment.app.Fragment
import android.view.LayoutInflater
import android.view.View
import android.view.ViewGroup
import com.example.myapplication.R

class RightFragment : Fragment() {
    override fun onCreateView(
        inflater: LayoutInflater, container: ViewGroup?,
        savedInstanceState: Bundle?
    ): View? {
        // Inflate the layout for this fragment
        return inflater.inflate(R.layout.fragment_right, container, false)
    }
}
定义一个RightFragment
package com.example.myapplication.fragment

import android.os.Bundle
import androidx.fragment.app.Fragment
import android.view.LayoutInflater
import android.view.View
import android.view.ViewGroup
import com.example.myapplication.R

class AnotherRightFragment : Fragment() {
    override fun onCreateView(
        inflater: LayoutInflater, container: ViewGroup?,
        savedInstanceState: Bundle?
    ): View? {
        // Inflate the layout for this fragment
        return inflater.inflate(R.layout.fragment_another_right, container, false)
    }
}
定义一个AnotherRightFragment
<?xml version="1.0" encoding="utf-8"?>
<LinearLayout xmlns:android="http://schemas.android.com/apk/res/android"
    xmlns:app="http://schemas.android.com/apk/res-auto"
    xmlns:tools="http://schemas.android.com/tools"
    android:orientation="vertical"
    android:layout_width="match_parent"
    android:layout_height="match_parent"
    tools:context=".fragment.FragmentActivity">
    <!--Fragment必须加上ID,否则会报错-->
    <fragment
        android:id="@+id/leftFragment"
        android:layout_height="0dp"
        android:layout_width="match_parent"
        android:layout_weight="1"
        android:name="com.example.myapplication.fragment.LeftFragment"/>
    <FrameLayout
        android:background="@drawable/border"
        android:id="@+id/rightLayout"
        android:layout_height="0dp"
        android:layout_width="match_parent"
        android:layout_weight="1">
    </FrameLayout>
</LinearLayout>
这是主页面的布局,注意,所有在XML中定义的fragment都需要一个id,否则启动会报错。
package com.example.myapplication.fragment

import androidx.appcompat.app.AppCompatActivity
import android.os.Bundle
import android.util.Log
import androidx.fragment.app.Fragment
import com.example.myapplication.R
import kotlinx.android.synthetic.main.fragment_left.*

class FragmentActivity : AppCompatActivity() {
    override fun onCreate(savedInstanceState: Bundle?) {
        super.onCreate(savedInstanceState)
        setContentView(R.layout.activity_fragment)

        changeButton.setOnClickListener {
            replaceFragment(AnotherRightFragment())
            //获取当前的Fragment
            var leftFragment = supportFragmentManager.findFragmentById(R.id.leftFragment) as LeftFragment
            leftFragment.setButtonText("按钮改了!")
        }

        replaceFragment(RightFragment())
    }
    private fun replaceFragment(fragment:Fragment){
        var fragmentManager = supportFragmentManager
        val transaction = fragmentManager.beginTransaction()
        //supportFragmentManager.fragments.size表示当前页面有多少个Fragments,而不是栈里面有多少个Fragment
        //前后都是1,commit以后才会改变
        Log.d("fragment before",supportFragmentManager.fragments.size.toString())
        transaction.replace(R.id.rightLayout,fragment)
        Log.d("fragment after",supportFragmentManager.fragments.size.toString())
        if( supportFragmentManager.fragments.size > 1){
            transaction.addToBackStack(null)
        }
        transaction.commit()
    }
}
这是主页面代码,注意获取,和设置Fragment的相关代码。
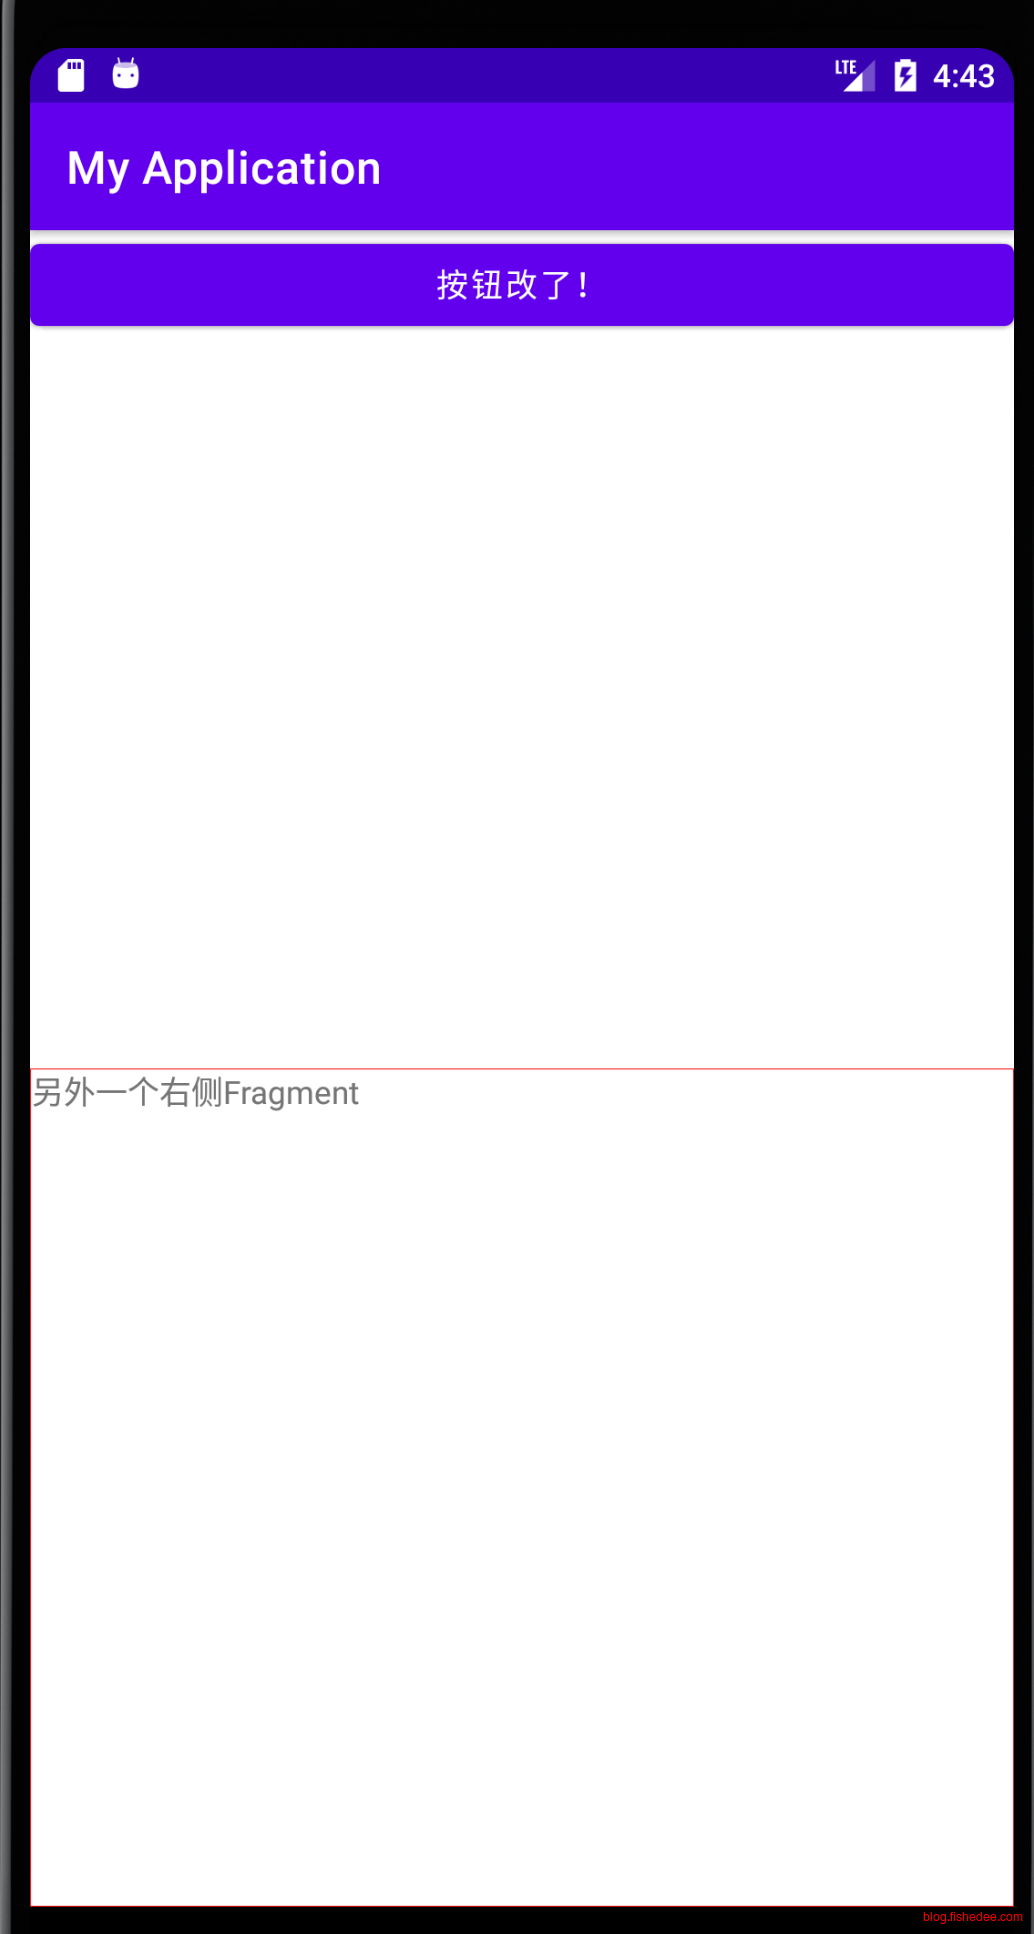
效果如上,这个时候按下Back键,能自动展示上一次的Fragment了。
4.3 Fragment的生命周期
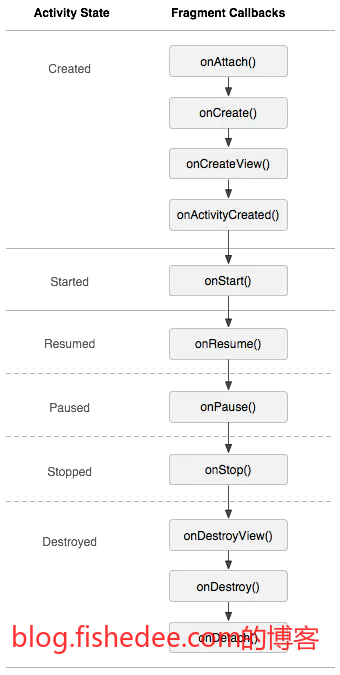
Fragment的生命周期与Activity很相似了。
- onCreate是在栈
- onStart是在栈,且可见
- onResume是在栈,且可见,且在栈顶
要注意的是,创建Layout的位置一般在onCreateView,而不是在onCreate。
具体看这里
5 Boardcast
Boardcast相当于后端中的事件接收器,Android中支持静态注册,和动态注册两种。暂时没用到,我就不写笔记了
Boardcast的主要作用为:
- 接收来自系统的广播,wifi连上和掉线了,蜂窝网络连上和掉线了,tick的事件等等
- 接收其他App的通知,这称为隐式广播,这种方式现在被Android禁用得比较多了
- 接收本App的Activity或者服务的通知,这个做法比较少了,直接绑定当前进程的通知开销更少,实时性更高。
6 持久化
代码在这里
6.1 文件
<?xml version="1.0" encoding="utf-8"?>
<LinearLayout xmlns:android="http://schemas.android.com/apk/res/android"
    xmlns:app="http://schemas.android.com/apk/res-auto"
    xmlns:tools="http://schemas.android.com/tools"
    android:orientation="vertical"
    android:layout_width="match_parent"
    android:layout_height="match_parent"
    tools:context=".FileActivity">
    <EditText
        android:id="@+id/editText"
        android:layout_width="match_parent"
        android:layout_height="wrap_content"
        android:hint="请输入"/>
</LinearLayout>
布局文件
package com.example.myapplication

import androidx.appcompat.app.AppCompatActivity
import android.os.Bundle
import android.util.Log
import android.widget.Toast
import kotlinx.android.synthetic.main.activity_file.*
import java.io.*
import java.lang.StringBuilder

class FileActivity : AppCompatActivity() {
    override fun onCreate(savedInstanceState: Bundle?) {
        super.onCreate(savedInstanceState)
        setContentView(R.layout.activity_file)
        val inputText = load()
        if( inputText.isNotEmpty() ){
            editText.setText(inputText)
            editText.setSelection(inputText.length)
            Toast.makeText(this,"Restoring succeded",Toast.LENGTH_SHORT).show()
        }
    }

    override  fun onDestroy(){
        super.onDestroy()
        val inputText = editText.text.toString()
        save(inputText)
    }

    private fun save(content:String){
        try{
            //MODE_PRIVATE是清空重新写入,MODE_APPEND是尾部添加
                //这种方式读写文件,不允许有路径
            val output = openFileOutput("data.txt", MODE_PRIVATE)
            val writer = BufferedWriter(OutputStreamWriter(output))
            writer.use{
                it.write(content)
            }
        }catch(e:IOException){
            e.printStackTrace()
        }
    }

    private fun load():String{
        var content = StringBuilder()
        try{
            //这种方式读写文件,不允许有路径
            val input = openFileInput("data.txt")
            val reader = BufferedReader(InputStreamReader(input))
            reader.use {
                reader.forEachLine {
                    content.append(it+"\n")
                }
            }
        }catch(e:IOException){
            e.printStackTrace()
        }
        return content.toString()
    }
}
使用Activity自带的openFileInput和openFileOutput,作为读写文件的工具,注意不能附带任何的路径分割符。文件固定存放在/data/data/package.name/files目录中。
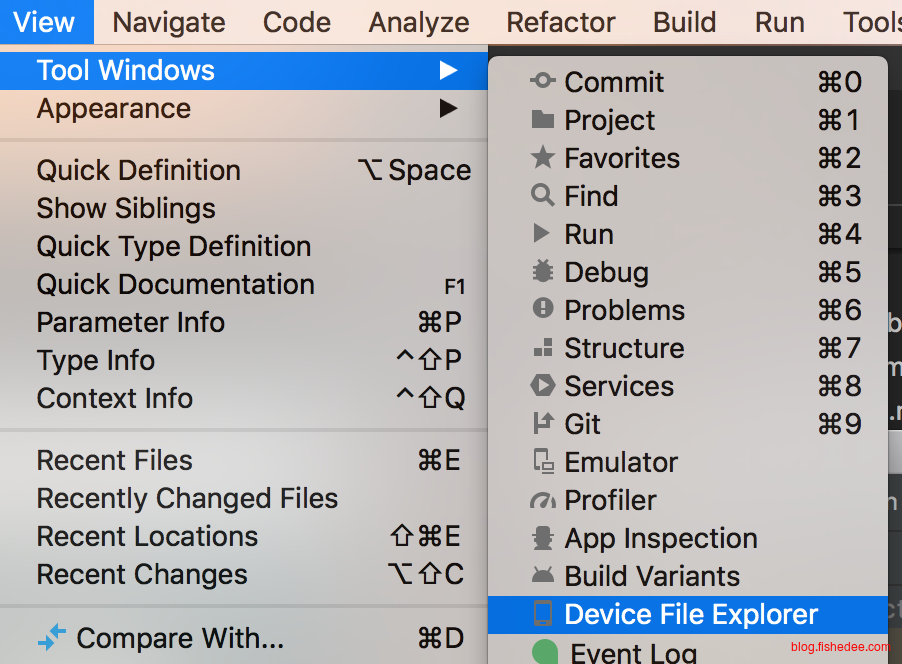
在Android Studio的View->Tools->Device File Explorer,或者右下角的Device File Explorer可以看到文件管理器,在那里我们能看到模拟器里面的文件。
6.2 SQLLite
6.2.1 SQLHelper
package com.example.myapplication

import android.content.Context
import android.database.sqlite.SQLiteDatabase
import android.database.sqlite.SQLiteOpenHelper

class MySqlDatabaseHelper(val context:Context,name:String,version:Int) :SQLiteOpenHelper(context,name,null,version){

    private val createBook ="create table Book( "+
            " id integer primary key autoincrement,"+
            " author text,"+
            "name text," +
            "category_id integer )"

    private val createCategory ="create table Category( "+
            " id integer primary key autoincrement,"+
            " category_name text,"+
            " category_code integer) "

    override fun onCreate(db: SQLiteDatabase) {
        db.execSQL(createBook)
        db.execSQL(createCategory)
    }

    override fun onUpgrade(db: SQLiteDatabase, oldVersion: Int, newVersion: Int) {
        if( oldVersion <= 1 ){
            db.execSQL(createBook)
        }
        if( oldVersion <= 2 ){
            db.execSQL(createCategory)
        }
    }
}
先创建MySqlDatabaseHelper,主要是负责Sql版本的Schema。另外,Schema需要支持不同版本的渐进更新。
6.2.2 CURD
package com.example.myapplication

import android.annotation.SuppressLint
import android.database.Cursor
import androidx.appcompat.app.AppCompatActivity
import android.os.Bundle
import android.util.Log
import kotlinx.android.synthetic.main.activity_sqlite.*
import java.lang.Exception

class SQLiteActivity : AppCompatActivity() {
    override fun onCreate(savedInstanceState: Bundle?) {
        super.onCreate(savedInstanceState)
        setContentView(R.layout.activity_sqlite)

        val dbHeper = MySqlDatabaseHelper(this,"BookStore.db",2)

        add.setOnClickListener {
            val db = dbHeper.writableDatabase
            //开始事务
            db.beginTransaction()
            try{
                db.execSQL("insert into Book(author,name,category_id)values(\"fish\",\"book1\",1001)")
                //提交事务
                db.setTransactionSuccessful()
            }catch(e:Exception){
                e.printStackTrace()
            }finally {
                //结束事务
                db.endTransaction()
            }
        }

        del.setOnClickListener {
            val db = dbHeper.writableDatabase
            db.execSQL("delete from Book where author = \"fish\"")
        }

        mod.setOnClickListener {
            val db = dbHeper.writableDatabase
            db.execSQL("update Book set author = \"fish2\" where author = \"fish\"")
        }

        query.setOnClickListener {
            val db = dbHeper.readableDatabase
            val cursor = db.rawQuery("select id,author,name,category_id from Book where category_id = ?",arrayOf("1001"))
            if( cursor.moveToFirst()){
                do{
                    @SuppressLint("RANGE")
                    val id = cursor.getInt(cursor.getColumnIndex("id"))
                    @SuppressLint("RANGE")
                    val author = cursor.getString(cursor.getColumnIndex("author"))
                    @SuppressLint("RANGE")
                    val name = cursor.getString(cursor.getColumnIndex("name"))
                    @SuppressLint("RANGE")
                    val category_id = cursor.getInt(cursor.getColumnIndex("category_id"))
                    Log.d("Book","id ${id},author ${author},name ${name},category_id ${category_id}")
                }while(cursor.moveToNext())
            }
            cursor.close()
        }
    }
}
有了SqlHelper以后,我们需要传入Context,database的存储文件名,和当前的版本号。
- 新增,修改,删除,都用execSQL
- 查询用rawQuery
都挺简单的,没啥好说
/data/data/xxxx/databasesdatabase存储在以上的路径上
6.2.3 远程查看database
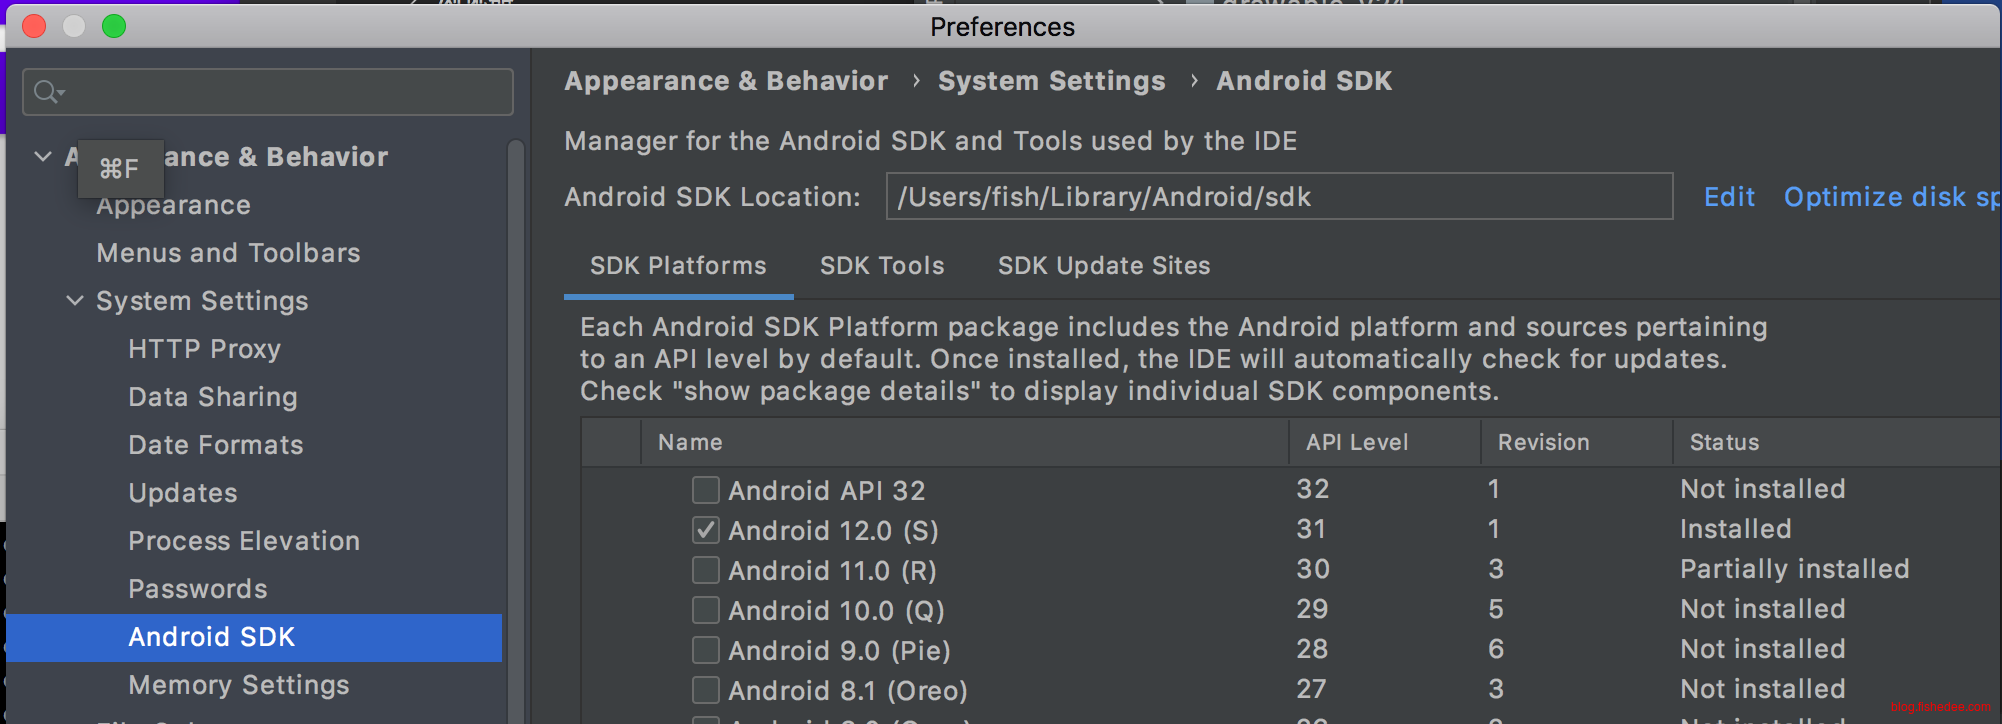
首先打开Android Studio,查看当前的Android SDK的位置
export ANDROID_HOME=/Users/xx/Library/Android/sdk:/Users/xx/Library/Android/sdk/platform-tools
export PATH=$PATH:$ANDROID_HOME
然后将Android SDK的位置,包括根目录和platform-tools都加入到PATH变量中
adb shell
cd /data/data/com.example.myapplication/databases
打开SQLite数据库所在的位置
sqlite3 xxx.db
使用sqlite3打开对应的db文件,就能远程查询db数据了
6.2.4 经验
orderDao.modOrder(order)
orderItemDao.delByOrderId(id)
orderItemDao.addAll(items)
在Android中,数据走到一半被后台强行kill掉是很正常的,所以要特别注意将多个操作放入事务中进行。否则就会出现数据不一致的情况。例如,在上面的例子中,如果进程在del以后被kill掉的,那么这个订单的item数据就会全部丢失了。所以,要把一个聚合根的数据以事务的方式写入数据库,保证不会出现不一致的情况。
另外,在SqlLite的数据库中,事务是文件级别的,如果一个操作在走写事务,那么其他操作就走不了读操作。这种方式并发度比较低,但是可靠性也容易做,也不容易出现死锁问题。
7 ContentProvider
共享数据,相当于Android提供一个通用的协议,让本App的数据可以暴露给其他App读写。协议上对SQLite的支持相当友好,所以一般App数据也用SQLite来实现的。暂时没用到,我也是不写笔记了。
ContentProvider主要作用有:
- 读取系统App的数据,短信,通讯录,通话记录,日程,联系人,当前定位,麦克风,电话状态,传感器,外置存储等信息。
- 提供自身App数据给其他App使用,应用也比较少。
8 多媒体
代码在这里
8.1 通知
8.1.1 普通通知
package com.example.myapplication

import android.app.Notification
import android.app.NotificationChannel
import android.app.NotificationManager
import android.app.PendingIntent
import android.content.Context
import android.content.Intent
import android.graphics.BitmapFactory
import android.os.Build
import androidx.appcompat.app.AppCompatActivity
import android.os.Bundle
import android.util.Log
import android.view.View
import androidx.core.app.NotificationCompat
import kotlinx.android.synthetic.main.activity_notify.*

class NotifyActivity : AppCompatActivity(),View.OnClickListener{
    override fun onCreate(savedInstanceState: Bundle?) {
        super.onCreate(savedInstanceState)
        setContentView(R.layout.activity_notify)
        this.createChannel()
        normalNotify.setOnClickListener(this)
        largeTextNotify.setOnClickListener(this)
        largeImageNotify.setOnClickListener(this)
        startService.setOnClickListener {
            val intent = Intent(this,MyService::class.java)
            startService(intent)
        }
        stopService.setOnClickListener {
            var intent = Intent(this,MyService::class.java)
            stopService(intent)
        }
    }

    private lateinit var manager:NotificationManager;

    private fun createChannel(){
        this.manager = getSystemService(Context.NOTIFICATION_SERVICE) as NotificationManager
        if( Build.VERSION.SDK_INT >= Build.VERSION_CODES.O ){
            val channel = NotificationChannel("normal","Normal",NotificationManager.IMPORTANCE_DEFAULT)
            this.manager.createNotificationChannel(channel)
        }
    }

    override fun onClick(v: View?) {
        if( v == normalNotify){
            var intent = Intent(this,MainActivity::class.java)
            var pi = PendingIntent.getActivity(this,0,intent,0)
            //注意传入渠道名
            val notification = NotificationCompat.Builder(this,"normal")
                .setContentTitle("This is Content Title")
                .setContentText("This is Content text")
                .setSmallIcon(R.drawable.small)
                .setLargeIcon(BitmapFactory.decodeResource(resources,R.drawable.large))
                .setContentIntent(pi)//点击后的打开
                .setAutoCancel(true)//点击后自动删除通知
                .build()
            //notify的id用来区分重复的通知
            this.manager.notify(1,notification)
        }else if( v == largeTextNotify){
            var intent = Intent(this,MainActivity::class.java)
            var pi = PendingIntent.getActivity(this,0,intent,0)
            //注意传入渠道名
            val notification = NotificationCompat.Builder(this,"normal")
                .setContentTitle("This is Content Title")
                .setStyle(NotificationCompat.BigTextStyle().bigText("Learn how to to build notifications, send and sync data, and use voice actions.Get the official Android IDE and developer tools to build apps for Android"))
                .setSmallIcon(R.drawable.small)
                .setLargeIcon(BitmapFactory.decodeResource(resources,R.drawable.large))
                .setContentIntent(pi)//点击后的打开
                .setAutoCancel(true)//点击后自动删除通知
                .build()
            //notify的id用来区分重复的通知
            this.manager.notify(2,notification)
        }else if( v == largeImageNotify){
            var intent = Intent(this,MainActivity::class.java)
            var pi = PendingIntent.getActivity(this,0,intent,0)
            //注意传入渠道名
            val notification = NotificationCompat.Builder(this,"normal")
                .setContentTitle("This is Content Title")
                .setStyle(NotificationCompat.BigPictureStyle().bigPicture(BitmapFactory.decodeResource(resources,R.drawable.large)))
                .setSmallIcon(R.drawable.small)
                .setLargeIcon(BitmapFactory.decodeResource(resources,R.drawable.large))
                .setContentIntent(pi)//点击后的打开
                .setAutoCancel(true)//点击后自动删除通知
                .build()
            //notify的id用来区分重复的通知
            this.manager.notify(3,notification)
        }
    }
}
Android的通知现在需要先注册Channel,然后发送的时候指定Channel来发送,另外就是每个通知都需要一个ID,用来去重。建立通知有几种方法:
- 使用NotificationCompat.build,来设置setContentTitle和setContentText
- 使用NotificationCompat.build,来设置setContentTitle和BigTextStyle的setStyle
- 使用NotificationCompat.build,来设置setContentTitle和BigPictureStyle的setStyle
8.1.2 前台服务通知
package com.example.myapplication

import android.app.NotificationChannel
import android.app.NotificationManager
import android.app.PendingIntent
import android.app.Service
import android.content.Context
import android.content.Intent
import android.graphics.BitmapFactory
import android.os.Build
import android.os.IBinder
import android.util.Log
import androidx.core.app.NotificationCompat

class MyService : Service() {

    private fun createChannel():NotificationManager{
        val manager = getSystemService(Context.NOTIFICATION_SERVICE) as NotificationManager
        if( Build.VERSION.SDK_INT >= Build.VERSION_CODES.O ){
            val channel = NotificationChannel("my_service","前台Service通知", NotificationManager.IMPORTANCE_DEFAULT)
            manager.createNotificationChannel(channel)
        }
        return manager
    }

    override fun onBind(intent: Intent?): IBinder? {
        TODO("Not yet implemented")
    }

    override fun onCreate() {
        super.onCreate()
        Log.d("MyService","onCreate")
        var intent = Intent(this,MainActivity::class.java)
        var pi = PendingIntent.getActivity(this,0,intent,0)
        //注意传入渠道名
        val notification = NotificationCompat.Builder(this,"my_service")
            .setContentTitle("This is Content Title")
            .setContentText("This is Content text")
            .setSmallIcon(R.drawable.small)
            .setLargeIcon(BitmapFactory.decodeResource(resources,R.drawable.large))
            .setContentIntent(pi)//点击后的打开
            .build()
        //启动前台通知
        //前台通知的特点是,与服务绑定在一起,通知在的时候,服务就在,通知不在的时候,服务就不在。
        //前台服务无法简单地划走,用户需要明确指定关闭该服务的时候,才能关闭它
        startForeground(1,notification)
    }
}
前台服务通知,就是将服务与一个通知绑定在一起,显式地告诉用户有这样的一个后台服务在运行。当用户需要删除后台服务的时候,仅仅需要关掉通知就可以了。
<?xml version="1.0" encoding="utf-8"?>
<manifest xmlns:android="http://schemas.android.com/apk/res/android"
    xmlns:tools="http://schemas.android.com/tools"
    package="com.example.myapplication">
    <uses-permission android:name="android.permission.FOREGROUND_SERVICE"/>
    <application
        android:allowBackup="true"
        android:icon="@mipmap/ic_launcher"
        android:label="@string/app_name"
        android:roundIcon="@mipmap/ic_launcher_round"
        android:supportsRtl="true"
        android:theme="@style/Theme.MyApplication">
        <service
            android:name=".MyService"
            android:enabled="true"
            android:exported="true"></service>
        <activity
            android:name=".NotifyActivity"
            android:exported="false" />
    </application>

</manifest>
注意配置的时候,要打开FOREGROUND_SERVICE的权限,以及注册MyService的服务
startService.setOnClickListener {
    val intent = Intent(this,MyService::class.java)
    startService(intent)
}
stopService.setOnClickListener {
    var intent = Intent(this,MyService::class.java)
    stopService(intent)
}
启动和停止服务的方式
8.2 拍照
FileProvider看这里,从Android 7.0开始版本,不同App之间传递数据,不允许继续使用file://的方法了,因为这样做有安全隐患。安全的办法是,不同App之间使用content://的方法来传递数据。为什么使用content://来传递uri就安全了呢?
<?xml version="1.0" encoding="utf-8"?>
<manifest xmlns:android="http://schemas.android.com/apk/res/android"
    xmlns:tools="http://schemas.android.com/tools"
    package="com.example.myapplication">
    <application
        android:allowBackup="true"
        android:icon="@mipmap/ic_launcher"
        android:label="@string/app_name"
        android:roundIcon="@mipmap/ic_launcher_round"
        android:supportsRtl="true"
        android:theme="@style/Theme.MyApplication">
        <provider
            android:name="androidx.core.content.FileProvider"
            android:authorities="com.fishedee.fileProvider"
            android:exported="false"
            android:grantUriPermissions="true">
            <meta-data
                android:name="android.support.FILE_PROVIDER_PATHS"
                android:resource="@xml/file_paths"/>
        </provider>
    </application>

</manifest>
因为有FileProvider,每个App启动的时候,都先注册一个FileProvider,并填写自己专属的authorities。然后每个要往外传递的文件,都需要先用FileProvider的getUriForFile转换一下为随机的文件名。然后对方的App要读写这个uri的时候,就需要反向访问你这个App的FileProvider(ContentProvider机制)来实现,对方无法知道这个文件实际上对应硬盘上的哪个文件(对方只有一个随机的文件名,没有真实的文件名)。同时,对方也无法访问你没有授权过的文件(因为只有用FileProvider的getUriForFile转换过的文件,才能被其他App访问)
最后,有了FileProvider转换过的文件名,都需要用ContentResolver来反向读取它。
<?xml version="1.0" encoding="utf-8"?>
<LinearLayout xmlns:android="http://schemas.android.com/apk/res/android"
    xmlns:app="http://schemas.android.com/apk/res-auto"
    android:orientation="vertical"
    xmlns:tools="http://schemas.android.com/tools"
    android:layout_width="match_parent"
    android:layout_height="match_parent"
    tools:context=".CameraActivity">
    <Button
        android:id="@+id/takePhoto"
        android:layout_width="match_parent"
        android:layout_height="wrap_content"
        android:text="拍照"/>
    <ImageView
        android:id="@+id/imageView"
        android:layout_width="match_parent"
        android:layout_height="0dp"
        android:layout_weight="1"
        android:layout_gravity="center_vertical"/>
</LinearLayout>
布局文件
package com.example.myapplication

import android.content.Intent
import android.graphics.Bitmap
import android.graphics.BitmapFactory
import android.net.Uri
import android.os.Build
import androidx.appcompat.app.AppCompatActivity
import android.os.Bundle
import android.provider.MediaStore
import androidx.core.content.FileProvider
import kotlinx.android.synthetic.main.activity_camera.*
import java.io.File

class CameraActivity : AppCompatActivity() {

    private lateinit var imageUri:Uri;

    override fun onCreate(savedInstanceState: Bundle?) {
        super.onCreate(savedInstanceState)
        setContentView(R.layout.activity_camera)
        takePhoto.setOnClickListener {
            getNewFileUri()
            val intent = Intent("android.media.action.IMAGE_CAPTURE")
            intent.putExtra(MediaStore.EXTRA_OUTPUT,imageUri)
            startActivityForResult(intent,100)
        }
    }

    override fun onActivityResult(requestCode: Int, resultCode: Int, data: Intent?) {
        super.onActivityResult(requestCode, resultCode, data)
        when( requestCode){
            100->{
                if( resultCode == RESULT_OK){
                    val bitmap = BitmapFactory.decodeStream(contentResolver.openInputStream(imageUri))
                    imageView.setImageBitmap(bitmap)
                }
            }
        }
    }

    private fun getNewFileUri(){
        val outputImage = File(externalCacheDir,"output_image.jpg")
        if( outputImage.exists() ){
            outputImage.delete()
        }
        outputImage.createNewFile()
        if( Build.VERSION.SDK_INT >= Build.VERSION_CODES.N ){
            imageUri = FileProvider.getUriForFile(this,"com.fishedee.fileProvider",outputImage)
        }else{
            imageUri = Uri.fromFile(outputImage)
        }
    }
}
代码,其实并不困难,就是FileProvider比较麻烦。
8.3 相册
<?xml version="1.0" encoding="utf-8"?>
<LinearLayout xmlns:android="http://schemas.android.com/apk/res/android"
    xmlns:app="http://schemas.android.com/apk/res-auto"
    android:orientation="vertical"
    xmlns:tools="http://schemas.android.com/tools"
    android:layout_width="match_parent"
    android:layout_height="match_parent">
    <Button
        android:id="@+id/selectAlbum"
        android:layout_width="match_parent"
        android:layout_height="wrap_content"
        android:text="相册选择"/>
    <Button
        android:id="@+id/selectAlbum2"
        android:layout_width="match_parent"
        android:layout_height="wrap_content"
        android:text="相册选择2"/>
    <ImageView
        android:id="@+id/imageView"
        android:layout_width="match_parent"
        android:layout_height="0dp"
        android:layout_weight="1"
        android:layout_gravity="center_vertical"/>
</LinearLayout>
布局文件,也不困难
package com.example.myapplication

import android.content.Intent
import android.graphics.Bitmap
import android.graphics.BitmapFactory
import android.net.Uri
import androidx.appcompat.app.AppCompatActivity
import android.os.Bundle
import kotlinx.android.synthetic.main.activity_album.*
import kotlinx.android.synthetic.main.activity_album.imageView
import kotlinx.android.synthetic.main.activity_camera.*
import java.io.FileDescriptor

class AlbumActivity : AppCompatActivity() {
    override fun onCreate(savedInstanceState: Bundle?) {
        super.onCreate(savedInstanceState)
        setContentView(R.layout.activity_album)
        selectAlbum.setOnClickListener {
            var intent = Intent(Intent.ACTION_OPEN_DOCUMENT)
            intent.addCategory(Intent.CATEGORY_OPENABLE)
            intent.type="image/*"
            startActivityForResult(intent,100)
        }
        selectAlbum2.setOnClickListener {
            var intent = Intent(Intent.ACTION_OPEN_DOCUMENT)
            intent.addCategory(Intent.CATEGORY_OPENABLE)
            intent.type="image/*"
            startActivityForResult(intent,101)
        }
    }

    private fun getUriBitmap(uri: Uri):Bitmap?{
        val fd = contentResolver.openFileDescriptor(uri,"r")
        //使用openFileDescriptor的话要记得放在use里面关闭
        fd.use {
            if( fd != null ){
                return android.graphics.BitmapFactory.decodeFileDescriptor(fd.fileDescriptor)
            }else{
                return null
            }
        }
    }

    private fun getUriBitmap2(uri:Uri):Bitmap{
        val bitmap = BitmapFactory.decodeStream(contentResolver.openInputStream(uri))
        return bitmap
    }

    override fun onActivityResult(requestCode: Int, resultCode: Int, data: Intent?) {
        super.onActivityResult(requestCode, resultCode, data)
        if( requestCode == 100 ){
            if( resultCode == RESULT_OK && data != null ){
                data.data?.let { uri->
                    val bitmap = this.getUriBitmap(uri)
                    imageView.setImageBitmap(bitmap)
                }
            }
        }else if( requestCode == 101 ){
            if( resultCode == RESULT_OK && data != null ){
                data.data?.let { uri->
                    val bitmap = this.getUriBitmap2(uri)
                    imageView.setImageBitmap(bitmap)
                }
            }
        }
    }
}
相册选择读取文件的方式,也不困难。注意获取到了Uri以后,可以用contentResolver来获取FileDescriptor(注意要关闭文件),也可以直接openInputStream。
9 Service
后台服务,暂时没有用到,就不说了。
为什么不直接创建线程来做Service。因为Android的App是没有统一入口的,有时候是A页面进入,有时候是B页面进入,你无法确定该在哪里创建线程。另外,创建线程还需要考虑线程的重复性,你总不能在A页面和B页面的onCreate创建不同的线程(同一个任务),这样会导致线程太多了。
服务就是解决这个问题的,一个Service,无论start多少次,只有一个实例。然后,我们在Activity的onCreate的时候start这个服务,就能保证服务持久运作了。
10 网络
代码在这里
<?xml version="1.0" encoding="utf-8"?>
<manifest xmlns:android="http://schemas.android.com/apk/res/android"
    xmlns:tools="http://schemas.android.com/tools"
    package="com.example.myapplication">

    <uses-permission android:name="android.permission.INTERNET" />

    <application
        android:allowBackup="true"
        android:icon="@mipmap/ic_launcher"
        android:label="@string/app_name"
        android:networkSecurityConfig="@xml/network_config"
        android:roundIcon="@mipmap/ic_launcher_round"
        android:supportsRtl="true"
        android:theme="@style/Theme.MyApplication">
        <activity
            android:name=".OkHttpActivity"
            android:exported="false" />
        <activity
            android:name=".RetrofitActivity"
            android:exported="false" />
        <activity
            android:name=".GsonActivity"
            android:exported="false" />
        <activity
            android:name=".WebviewActivity"
            android:exported="false" />
        <activity
            android:name=".MainActivity"
            android:exported="true"
            android:label="标题栏">
            <intent-filter>

                <!-- action为MAIN是指定入口的Activity -->
                <action android:name="android.intent.action.MAIN" />

                <category android:name="android.intent.category.LAUNCHER" />
            </intent-filter>
        </activity>
    </application>

</manifest>
网络部分,先配置好INTERNET权限,另外还要配置application的networkSecurityConfig
<?xml version="1.0" encoding="utf-8"?>
<network-security-config>
    <base-config cleartextTrafficPermitted="true">
        <trust-anchors>
            <certificates src="system"/>
            <certificates src="user"/>
        </trust-anchors>
    </base-config>
</network-security-config>
networkSecurityConfig的作用是允许http而不是https通信。而且允许使用system和user的根证书。
本文额外需要用到的服务器代码在这里
注意,当模拟器中的端口无法联通的时候,尝试使用adb reverse来做端口转发。
10.1 WebView
<?xml version="1.0" encoding="utf-8"?>
<LinearLayout xmlns:android="http://schemas.android.com/apk/res/android"
    xmlns:app="http://schemas.android.com/apk/res-auto"
    android:orientation="vertical"
    xmlns:tools="http://schemas.android.com/tools"
    android:layout_width="match_parent"
    android:layout_height="match_parent"
    tools:context=".WebviewActivity">
    <LinearLayout
        android:orientation="horizontal"
        android:layout_width="match_parent"
        android:layout_height="wrap_content">
        <EditText
            android:id="@+id/urlInput"
            android:layout_width="0dp"
            android:layout_height="wrap_content"
            android:layout_weight="1"/>
        <Button
            android:id="@+id/go"
            android:layout_width="wrap_content"
            android:layout_height="wrap_content"
            android:text="查询"/>
    </LinearLayout>
    <WebView
        android:id="@+id/webView"
        android:layout_width="match_parent"
        android:layout_height="0dp"
        android:layout_weight="1"/>
</LinearLayout>
布局文件
package com.example.myapplication

import androidx.appcompat.app.AppCompatActivity
import android.os.Bundle
import android.webkit.WebViewClient
import kotlinx.android.synthetic.main.activity_webview.*

class WebviewActivity : AppCompatActivity() {
    override fun onCreate(savedInstanceState: Bundle?) {
        super.onCreate(savedInstanceState)
        setContentView(R.layout.activity_webview)
        webView.settings.javaScriptEnabled = true
        webView.webViewClient = WebViewClient()
        webView.loadUrl("https://www.baidu.com")
        go.setOnClickListener {
            val url = urlInput.text.toString()
            if( url.isNotEmpty() ){
                webView.loadUrl(url)
            }
        }
    }
}
也比较简单的,使用WebView前要配置好settings和WebViewClient
10.2 Gson
implementation 'com.google.code.gson:gson:2.8.9'加入gson依赖
package com.example.myapplication
import androidx.appcompat.app.AppCompatActivity
import android.os.Bundle
import android.util.Log
import com.google.gson.Gson
import com.google.gson.GsonBuilder
import com.google.gson.JsonObject
import com.google.gson.reflect.TypeToken
import java.lang.Exception
import kotlin.properties.Delegates
data class Person(val name:String,val age:Int)
class GsonActivity : AppCompatActivity() {
val gson:Gson
init{
val gsonBuilder = GsonBuilder()
.serializeNulls()
.disableHtmlEscaping()
.setDateFormat("yyyy-MM-dd HH:mm:ss")//对时间的序列化格式处理
gson = gsonBuilder.create()
}
override fun onCreate(savedInstanceState: Bundle?) {
super.onCreate(savedInstanceState)
setContentView(R.layout.activity_gson)
testGson()
}
data class MyDataRaw(val code:Int,val data:JsonObject)
private fun testRawJson(){
val data = "{\"code\":123,\"data\":{\"name\":\"fish\",\"age\":123}}"
val typeOf = object: TypeToken<MyDataRaw>(){}.type
val dataRaw = gson.fromJson<MyDataRaw>(data,typeOf)
Log.d("rawJson",dataRaw.toString())
/*
输出结果:
MyDataRaw(code=123, data={"name":"fish","age":123})
*/
val typeOf2 = object :TypeToken<Person>(){}.type
val person = gson.fromJson<Person>(dataRaw.data,typeOf2)
Log.d("rawJson2",person.toString())
/*
输出结果:
Person(name=fish, age=123)
*/
}
data class MyDataNull(val name:String,val age:Int,val address:String)
private fun testNullData(){
val data = "{\"name\":\"fish2\",\"age\":567,\"address\":null}"
val typeOf = object :TypeToken<MyDataNull>(){}.type
val dataNull = gson.fromJson<MyDataNull>(data,typeOf)
Log.d("nullJson",dataNull.toString())
/*
输出结果如下:
MyDataNull(name=fish2, age=567, address=null)
*/
}
data class MyDataNull2(val name:String="fish",val age:Int=123,val address:String="mmk")
private fun testNullData2(){
val data = """
{"age":123}
"""
val typeOf = object :TypeToken<MyDataNull2>(){}.type
val dataNull = gson.fromJson<MyDataNull2>(data,typeOf)
Log.d("nullJson2",dataNull.toString())
/*
输出结果如下:
MyDataNull(name=fish2, age=567, address=null)
*/
}
data class MyDataNull3(val name:String,val age:Int,val address:String)
private fun testNullData3(){
val data = """
{"age":123,"address":"dd"}
"""
val gson = GsonBuilder()
.registerTypeAdapterFactory(KotlinAdapterFactory())
.serializeNulls()
.disableHtmlEscaping()
.setDateFormat("yyyy-MM-dd HH:mm:ss")
.create()
val typeOf = object :TypeToken<MyDataNull3>(){}.type
try{
val dataNull = gson.fromJson<MyDataNull3>(data,typeOf)
Log.d("nullJson3",dataNull.toString())
}catch(e:Exception){
e.printStackTrace()
}
/*
输出结果如下:
com.google.gson.JsonParseException: Field: 'name' in Class 'com.example.myapplication.GsonActivity$MyDataNull3' is marked nonnull but found null value
2021-12-31 13:09:25.337 27841-27841/com.example.myapplication W/System.err: at com.example.myapplication.KotlinAdapter.nullCheck(KotlinAdapter.kt:53)
2021-12-31 13:09:25.338 27841-27841/com.example.myapplication W/System.err: at com.example.myapplication.KotlinAdapter.read(KotlinAdapter.kt:41)
*/
}
private fun testGsonDeseiralize(){
val data = "[{\"name\":\"Tom\",\"age\":20},{\"name\":\"Jack\",\"age\":25},{\"name\":\"Lily\",\"age\":22}]"
val typeOf = object: TypeToken<List<Person>>(){}.type
val personList = gson.fromJson<List<Person>>(data,typeOf)
Log.d("personList","list "+personList.toString())
/*
输出结果:
list [Person(name=Tom, age=20), Person(name=Jack, age=25), Person(name=Lily, age=22)]
*/
}
private fun testGsonSerialize(){
val list = mutableListOf<Person>()
list.add( Person("fish",123))
list.add( Person("cat",456))
list.add( Person("dog",789))
val jsonStr = gson.toJson(list)
Log.d("personList","json "+jsonStr)
/*
输出结果:
json [{"age":123,"name":"fish"},{"age":456,"name":"cat"},{"age":789,"name":"dog"}]
*/
}
private fun testGson(){
testGsonDeseiralize()
testGsonSerialize()
testRawJson()
testNullData()
testNullData2()
testNullData3()
}
}gson的序列化和反序列化,套路和JackJson一样的了,反序列化的时候都需要传入一个匿名对象。要点如下:
- gsonBuilder的配置,注意时间字段的配置
- TypeToken作为泛型的反序列化工具
- JsonObject和JsonArray作为RawJson的工具
- gson对Kotlin的非空类型标注是没有理会的,即使这个类型的非空的,依然将null数据设置进去
implementation "org.jetbrains.kotlin:kotlin-reflect:1.6.10"加入反射库
package com.example.myapplication
import com.google.gson.Gson
import com.google.gson.JsonParseException
import com.google.gson.TypeAdapter
import com.google.gson.TypeAdapterFactory
import com.google.gson.reflect.TypeToken
import com.google.gson.stream.JsonReader
import com.google.gson.stream.JsonWriter
import kotlin.reflect.KClass
import kotlin.reflect.full.declaredMemberProperties
import kotlin.reflect.jvm.isAccessible
class KotlinAdapterFactory : TypeAdapterFactory {
private fun Class<*>.isKotlinClass(): Boolean {
return this.declaredAnnotations.any {
// 只关心 kt 类型
it.annotationClass.qualifiedName == "kotlin.Metadata"
}
}
override fun <T : Any> create(gson: Gson, type: TypeToken<T>): TypeAdapter<T>? {
return if (type.rawType.isKotlinClass()) {
val kClass = (type.rawType as Class<*>).kotlin
val delegateAdapter = gson.getDelegateAdapter(this, type)
KotlinAdapter<T>(delegateAdapter, kClass as KClass<T>)
} else {
null
}
}
}
class KotlinAdapter<T : Any>(
private val delegateAdapter: TypeAdapter<T>,
private val kClass: KClass<T>
) : TypeAdapter<T>() {
override fun read(input: JsonReader?): T? {
return delegateAdapter.read(input)?.apply {
nullCheck(this)
}
}
override fun write(out: JsonWriter?, value: T) {
delegateAdapter.write(out, value)
}
private fun nullCheck(value: T) {
kClass.declaredMemberProperties.forEach { prop ->
prop.isAccessible = true
if (!prop.returnType.isMarkedNullable && prop(value) == null)
throw JsonParseException(
"Field: '${prop.name}' in Class '${kClass.java.name}' is marked nonnull but found null value"
)
}
}
}实现KotlinAdapterFactory。具体原理看这里。
gson对Kotlin的Null检查的方法有两种:
- 对data class的每个字段都加入默认值,注意是每个字段,否则依然会出问题。
- 额外加入kotlin反射库,大概增加2MB大小,在运行时读取kotlin的反射信息,动态检查是否满足Null约束
10.3 OkHttp
implementation 'com.squareup.okhttp3:okhttp:4.9.3'
implementation 'org.jetbrains.kotlinx:kotlinx-coroutines-core:1.5.2'
implementation 'org.jetbrains.kotlinx:kotlinx-coroutines-android:1.5.2'
加入OkHttp依赖,以及Kotlin协程依赖
<?xml version="1.0" encoding="utf-8"?>
<LinearLayout xmlns:android="http://schemas.android.com/apk/res/android"
    xmlns:app="http://schemas.android.com/apk/res-auto"
    xmlns:tools="http://schemas.android.com/tools"
    android:orientation="vertical"
    android:layout_width="match_parent"
    android:layout_height="match_parent"
    tools:context=".OkHttpActivity">
    <Button
        android:id="@+id/testGo"
        android:layout_width="match_parent"
        android:layout_height="wrap_content"
        android:text="go接口"/>
    <Button
        android:id="@+id/testGet"
        android:layout_width="match_parent"
        android:layout_height="wrap_content"
        android:text="get带query接口"/>
    <Button
        android:id="@+id/testPost"
        android:layout_width="match_parent"
        android:layout_height="wrap_content"
        android:text="post带body接口"/>
    <TextView
        android:id="@+id/showText"
        android:layout_width="match_parent"
        android:layout_height="0dp"
        android:layout_weight="1"/>
</LinearLayout>
布局文件
package com.example.myapplication.okhttp

import android.util.Log
import com.example.myapplication.Person
import com.example.myapplication.service.Country
import com.example.myapplication.service.Result
import com.google.gson.Gson
import com.google.gson.GsonBuilder
import com.google.gson.reflect.TypeToken
import okhttp3.*
import okhttp3.MediaType.Companion.toMediaType
import okhttp3.RequestBody.Companion.toRequestBody
import retrofit2.Response
import retrofit2.http.Header
import retrofit2.http.Query
import java.io.IOException
import java.lang.RuntimeException
import kotlin.coroutines.resume
import kotlin.coroutines.resumeWithException
import kotlin.coroutines.suspendCoroutine

object OkHttpService {
    val client = OkHttpClient()

    val gson: Gson

    init{
        val gsonBuilder = GsonBuilder()
        gsonBuilder.serializeNulls()
        gsonBuilder.disableHtmlEscaping()
        gson = gsonBuilder.create()
    }

    //注意,这里需要用inline+reified
    inline suspend fun <reified T> Call.await():T{
        val typeOf = object: TypeToken<T>(){}.type
        return suspendCoroutine { continuation ->
            enqueue(object: Callback {
                override fun onResponse(call: Call, response: okhttp3.Response) {
                    val bodyStr = response.body?.string()
                    if( bodyStr != null ){
                        Log.d("OkHttp",bodyStr)
                        val body = gson.fromJson<T>(bodyStr,typeOf)
                        continuation.resume(body)
                    }else{
                        continuation.resumeWithException(RuntimeException("response body is null"))
                    }
                }

                override fun onFailure(call: Call, e: IOException) {
                    continuation.resumeWithException(e)
                }
            })
        }
    }

    fun get1():Call{
        val request = Request.Builder()
            .url("http://192.168.1.68:8585/hello/get1")
            .get()
            .build()
        return client.newCall(request)
    }

    suspend  fun get2(user:String, myHeader: String):Result<String?>{
        var url = HttpUrl.Builder()
            .scheme("http")
            .host("192.168.1.68")
            .port(8585)
                //不能合并多个segments,不能这样写/hello/get2
            .addPathSegment("hello")
            .addPathSegment("get2")
            .addQueryParameter("user", user)
            .build();

        Log.d("OkHttp","get2 url ${url}")


        val request = Request.Builder()
            .url(url)
            .get()
            .addHeader("my",myHeader)
            .build()

        return client.newCall(request).await()
    }

    suspend  fun post1(country: Country, myHeader: String):Result<String?>{
        var url = HttpUrl.Builder()
            .scheme("http")
            .host("192.168.1.68")
            .port(8585)
            .addPathSegment("hello")
            .addPathSegment("post1")
            .build();

        val body = gson.toJson(country)

        val requestBody = body.toRequestBody("application/json; charset=utf-8".toMediaType())

        val request = Request.Builder()
            .url(url)
            .post(requestBody)
            .addHeader("my",myHeader)
            .build()

        return client.newCall(request).await()
    }
}
OkHttpService,发送HTTP请求的话,有点麻烦呀,这样就好。这里我们加入一个await扩展方法,方便协程使用,而且enqueue的返回值会自动切换到调用的线程上。
- Query参数用HttpUrl.Builder来创建
- Header参数用Request.Builder来创建
- Body参数,用String的扩展方法toRequestBody,或者用FormBody.Builder来创建,然后传入到body参数里面就可以了
package com.example.myapplication

import androidx.appcompat.app.AppCompatActivity
import android.os.Bundle
import com.example.myapplication.okhttp.OkHttpService
import com.example.myapplication.service.Country
import com.example.myapplication.service.Result
import com.example.myapplication.service.RetrofitService
import com.google.gson.Gson
import com.google.gson.GsonBuilder
import kotlinx.android.synthetic.main.activity_ok_http.*
import kotlinx.coroutines.Dispatchers
import kotlinx.coroutines.GlobalScope
import kotlinx.coroutines.launch
import kotlinx.coroutines.withContext
import okhttp3.Call
import okhttp3.Callback
import okhttp3.Response
import java.io.IOException
import java.lang.Exception

class OkHttpActivity : AppCompatActivity() {
    val gson: Gson

    init{
        val gsonBuilder = GsonBuilder()
        gsonBuilder.serializeNulls()
        gsonBuilder.disableHtmlEscaping()
        gson = gsonBuilder.create()
    }

    override fun onCreate(savedInstanceState: Bundle?) {
        super.onCreate(savedInstanceState)
        setContentView(R.layout.activity_ok_http)

        testGo.setOnClickListener {
            //OkHttp不会自动跳转到UI线程
            OkHttpService.get1().enqueue(object: Callback {
                override fun onResponse(
                    call: Call,
                    response: Response
                ) {
                    val data= response.body?.string()
                    runOnUiThread {
                        showText.text =data
                    }
                }

                override fun onFailure(call: Call, e: IOException) {
                    runOnUiThread {
                        showText.text = "failure! " + e.message
                    }
                }
            })
        }

        //协程写法
        testGet.setOnClickListener {
            GlobalScope.launch(Dispatchers.Main) {
                try{
                    val data = OkHttpService.get2("dog","mk")
                    showText.text = gson.toJson(data)
                }catch(e: Exception){
                    showText.text = "failure! "+ e.message
                }
            }
        }

        //协程写法
        testPost.setOnClickListener {
            GlobalScope.launch(Dispatchers.Main) {
                try{
                    val country = Country("China", listOf(
                        Country.Person("sheep",123),
                        Country.Person("rat",456)))
                    val data = OkHttpService.post1(country,"m2")
                    showText.text = gson.toJson(data)
                }catch(e: Exception){
                    showText.text = "failure! "+ e.message
                }
            }
        }
    }
}
这是调用OkHttp的写法,明显协程要简单省事得多。注意,为了简单起见,这里用了GlobalScope,而不是正确的CoroutineScope。
10.4 Retrofit
implementation 'com.squareup.retrofit2:retrofit:2.9.0'
implementation 'com.squareup.retrofit2:converter-gson:2.9.0'
implementation 'org.jetbrains.kotlinx:kotlinx-coroutines-core:1.5.2'
implementation 'org.jetbrains.kotlinx:kotlinx-coroutines-android:1.5.2'
加入retrofit和协程依赖。retrofit是OkHttp的进一步封装,使用了类似MyBatis那种将接口自动转换为实现的套路。
<?xml version="1.0" encoding="utf-8"?>
<LinearLayout xmlns:android="http://schemas.android.com/apk/res/android"
    xmlns:app="http://schemas.android.com/apk/res-auto"
    xmlns:tools="http://schemas.android.com/tools"
    android:orientation="vertical"
    android:layout_width="match_parent"
    android:layout_height="match_parent"
    tools:context=".RetrofitActivity">
    <Button
        android:id="@+id/testGo"
        android:layout_width="match_parent"
        android:layout_height="wrap_content"
        android:text="go接口"/>
    <Button
        android:id="@+id/testGet"
        android:layout_width="match_parent"
        android:layout_height="wrap_content"
        android:text="get带query接口"/>
    <Button
        android:id="@+id/testPost"
        android:layout_width="match_parent"
        android:layout_height="wrap_content"
        android:text="post带body接口"/>
    <TextView
        android:id="@+id/showText"
        android:layout_width="match_parent"
        android:layout_height="0dp"
        android:layout_weight="1"/>
</LinearLayout>
先定义一个布局文件
package com.example.myapplication.service

import retrofit2.Call
import retrofit2.http.*

data class Country(val name:String,val persons:List<Person>){
    data class Person(val name:String,val age:Int)
}
interface AppService {
    @GET("/hello/get1")
    fun get1():Call<Result<String?>>

    @GET("/hello/get2")
    fun get2(@Query("user")user:String,@Header("my") myHeader: String):Call<Result<String?>>

    @POST("/hello/post1")
    fun post1(@Body data:Country, @Header("my") myHeader: String):Call<Result<String?>>
}
先定义一个接口,简单明了
package com.example.myapplication.service;

import retrofit2.Call
import retrofit2.Callback
import retrofit2.Response
import retrofit2.Retrofit;
import retrofit2.converter.gson.GsonConverterFactory
import java.lang.RuntimeException
import kotlin.coroutines.resume
import kotlin.coroutines.resumeWithException
import kotlin.coroutines.suspendCoroutine

object RetrofitService {
    val retrofit = Retrofit.Builder()
        .baseUrl("http://192.168.1.68:8585/")
        .addConverterFactory(GsonConverterFactory.create())
        .build()

    val appService = retrofit.create(AppService::class.java)

    suspend fun <T> Call<T>.await():T{
        return suspendCoroutine { continuation ->
            enqueue(object:Callback<T>{
                override fun onResponse(call: Call<T>, response: Response<T>) {
                    val body = response.body()
                    if( body != null ){
                        continuation.resume(body)
                    }else{
                        continuation.resumeWithException(RuntimeException("response body is null"))
                    }
                }

                override fun onFailure(call: Call<T>, t: Throwable) {
                    continuation.resumeWithException(t)
                }
            })
        }
    }
}
然后定义一个RetrofitService
package com.example.myapplication

import androidx.appcompat.app.AppCompatActivity
import android.os.Bundle
import com.example.myapplication.service.Country
import com.example.myapplication.service.Result
import com.example.myapplication.service.RetrofitService
import com.google.gson.Gson
import com.google.gson.GsonBuilder
import kotlinx.android.synthetic.main.activity_retrofit.*
import kotlinx.coroutines.Dispatchers
import kotlinx.coroutines.GlobalScope
import kotlinx.coroutines.launch
import retrofit2.Call
import retrofit2.Callback
import retrofit2.Response
import retrofit2.await
import java.lang.Exception

class RetrofitActivity : AppCompatActivity() {
    val gson:Gson
    init{
        val gsonBuilder = GsonBuilder()
        gsonBuilder.serializeNulls()
        gsonBuilder.disableHtmlEscaping()
        gson = gsonBuilder.create()
    }

    override fun onCreate(savedInstanceState: Bundle?) {
        super.onCreate(savedInstanceState)
        setContentView(R.layout.activity_retrofit)
        testGo.setOnClickListener {
            RetrofitService.appService.get1().enqueue(object:Callback<Result<String?>>{
                override fun onResponse(
                    call: Call<Result<String?>>,
                    response: Response<Result<String?>>
                ) {
                    val data= response.body()
                    showText.text = gson.toJson(data)
                }

                override fun onFailure(call: Call<Result<String?>>, t: Throwable) {
                    showText.text ="failure! "+t.message
                }
            })
        }

        //协程写法
        testGet.setOnClickListener {
            GlobalScope.launch(Dispatchers.Main) {
                try{
                    val data = RetrofitService.appService.get2("fish","mm").await()
                    showText.text = gson.toJson(data)
                }catch(e:Exception){
                    showText.text = "failure! "+ e.message
                }
            }
        }

        //协程写法
        testPost.setOnClickListener {
            GlobalScope.launch(Dispatchers.Main) {
                try{
                    val country = Country("China", listOf(Country.Person("fish",123),Country.Person("cat",456)))
                    val data = RetrofitService.appService.post1(country,"m2").await()
                    showText.text = gson.toJson(data)
                }catch(e:Exception){
                    showText.text = "failure! "+ e.message
                }
            }
        }

    }
}
最后,直接调用就可以了,确实比OkHttp更加省事简单。缺点就是可控性要差一点,例如需要Retrofit的所有接口新增一个Header参数,或者自定义Query参数的格式转换等等。
10.5 OkHttpUtil
package com.balefcloud.scancode.network

import com.balefcloud.scancode.service.LoginService
import com.balefcloud.scancode.util.MyGson
import com.google.gson.JsonElement
import com.google.gson.reflect.TypeToken
import okhttp3.*
import okhttp3.MediaType.Companion.toMediaType
import okhttp3.RequestBody.Companion.toRequestBody
import java.io.IOException
import java.lang.RuntimeException
import java.util.concurrent.TimeUnit
import kotlin.coroutines.resume
import kotlin.coroutines.resumeWithException
import kotlin.coroutines.suspendCoroutine

object OkHttpUtil {
    data class BusinessException(val code:Int,val msg:String):RuntimeException(msg)

    data class NetworkException(val msg:String,val msgCause:Throwable?):RuntimeException(msgCause)

    data class LogoutException(val code:Int,val msg:String):RuntimeException(msg)

    data class ResponseFormat(val code:Int,val msg:String,val data:JsonElement)

    data class HeaderAndBody(val cookie: Map<String,String>,val body:String)

    //注意,这里需要用inline+reified
    suspend fun Call.await():HeaderAndBody{
        return suspendCoroutine { continuation ->
            enqueue(object: Callback {
                private fun extractCookie(cookieValue:String,cookieMap:HashMap<String,String>){
                    val cookieInfo = cookieValue.split(";")
                    for( cookieSingleInfo in cookieInfo ){
                        val cookieNameAndValueInfo = cookieSingleInfo.split("=")
                        if( cookieNameAndValueInfo.size != 2 ){
                            continue
                        }
                        val name = cookieNameAndValueInfo[0].trim()
                        val value = cookieNameAndValueInfo[1].trim()
                        if( name.isNotBlank() ){
                            cookieMap[name] = value
                        }
                    }
                }
                private fun extractHeader(response:Response):Map<String,String>{
                    val headers = response.headers
                    val cookieMap = HashMap<String,String>()
                    for( (key,value) in headers ){
                        if( key == "Set-Cookie"){
                            extractCookie(value,cookieMap)
                        }
                    }
                    return cookieMap
                }
                override fun onResponse(call: Call, response: Response) {
                    if(response.code != 200 ){
                        continuation.resumeWithException(NetworkException("网络返回码不是200,是${response.code}",null))
                    }else{
                        val cookie = this.extractHeader(response)
                        val bodyStr = response.body?.string()
                        if( bodyStr != null ){
                            continuation.resume(HeaderAndBody(cookie,bodyStr))
                        }else{
                            continuation.resumeWithException(NetworkException("返回的body为空",null))
                        }
                    }

                }

                override fun onFailure(call: Call, e: IOException) {
                    continuation.resumeWithException(NetworkException("网络错误",e))
                }
            })
        }
    }

    fun buildHttpClient():OkHttpClient{
        return OkHttpClient.Builder()
            .connectTimeout(5, TimeUnit.SECONDS)
            .readTimeout(5,TimeUnit.SECONDS)
            .writeTimeout(5,TimeUnit.SECONDS)
            .build()
    }

    fun buildUrl(path:String,data:String):HttpUrl{
        val pathSegments = path.split("/")

        var urlBuilder = HttpUrl.Builder()
            .scheme("https")
            .host("furniture.fishedee.com")
        for( single in pathSegments ){
            urlBuilder = urlBuilder.addPathSegment(single)
        }
        if( data.isNotBlank() ){
            urlBuilder = urlBuilder.addQueryParameter("data",data)
        }
        return urlBuilder.build()
    }

    suspend fun buildHeader(builder:Request.Builder):Request.Builder{
        val sessionId = LoginService.getSession()
        val rememberMeToken = LoginService.getRememberMeToken()
        val xsrfInfo = LoginService.getXsrfToken()
        return builder
            .addHeader("X-XSRF-TOKEN",xsrfInfo)
            .addHeader("Cookie","JSESSIONID=${sessionId}; XSRF-TOKEN=${xsrfInfo}; remember-me=${rememberMeToken}")
    }

    suspend fun writeCookie(cookieMap:Map<String,String>){
        val session = cookieMap["JSESSIONID"]
        val rememberMe = cookieMap["remember-me"]
        val xsrfToken = cookieMap["XSRF-TOKEN"]
        if( session != null ){
            LoginService.setSession(session)
        }
        if( rememberMe != null ){
            LoginService.setRememberMeToken(rememberMe)
        }
        if( xsrfToken != null ){
            LoginService.setXsrfToken(xsrfToken)
        }
    }

    fun extractBody(body:String):JsonElement{
        val typeOf = object: TypeToken<ResponseFormat>(){}.type
        val body = MyGson.gson.fromJson<ResponseFormat>(body,typeOf)
        if( body.code != 0 ){
            if( body.code == 20001 ){
                throw LogoutException(body.code,body.msg)
            }else{
                throw BusinessException(body.code,body.msg)
            }
        }
        return body.data
    }

    suspend inline fun<reified T,reified U> get(path:String,data:T):U{
        val requestData = MyGson.gson.toJson(data)
        val url = buildUrl(path,requestData)
        val request = Request.Builder()
            .url(url)
            .get()
        buildHeader(request)
        val response = buildHttpClient().newCall(request.build()).await()
        this.writeCookie(response.cookie)
        val realBody = this.extractBody(response.body)
        val typeOf = object: TypeToken<U>(){}.type
        return MyGson.gson.fromJson<U>(realBody,typeOf)
    }

    suspend inline fun<reified T,reified U> post(path:String,data:T):U{
        val requestData = MyGson.gson.toJson(data)
        val requestBody = requestData.toRequestBody("application/json; charset=utf-8".toMediaType())
        val url = buildUrl(path,"")
        val request = Request.Builder()
            .url(url)
            .post(requestBody)
        buildHeader(request)
        val response = buildHttpClient().newCall(request.build()).await()
        this.writeCookie(response.cookie)
        val realBody = this.extractBody(response.body)
        val typeOf = object: TypeToken<U>(){}.type
        return MyGson.gson.fromJson<U>(realBody,typeOf)
    }

    suspend inline fun<reified U> postForm(path:String,data:Map<String,String>):U{
        val formBodyBuilder = FormBody.Builder()
        for( (key,value) in data ){
            formBodyBuilder.add(key,value)
        }
        val url = buildUrl(path,"")
        val request = Request.Builder()
            .url(url)
            .post(formBodyBuilder.build())
        buildHeader(request)
        val response = buildHttpClient().newCall(request.build()).await()
        this.writeCookie(response.cookie)
        val realBody = this.extractBody(response.body)
        val typeOf = object: TypeToken<U>(){}.type
        return MyGson.gson.fromJson<U>(realBody,typeOf)
    }
}
包装了一个OkHttp的工具,没啥好说的,都挺简单的
11 Material Design
没有用到,暂时不做笔记
12 Jetpack
12.1 ViewModel
代码在这里
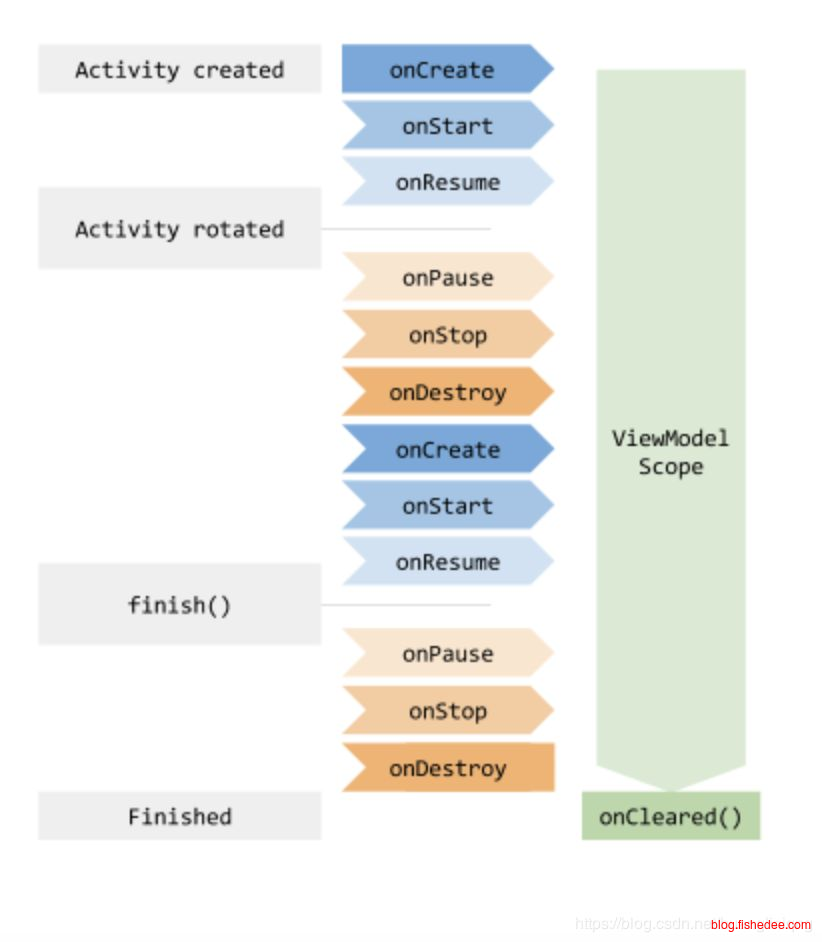
ViewModel很好地解决,业务逻辑应该放哪里的问题。ViewModel的生命周期更长,更容易被掌握
12.1.1 依赖
implementation 'androidx.lifecycle:lifecycle-runtime-ktx:2.4.0'
implementation 'androidx.lifecycle:lifecycle-viewmodel-ktx:2.4.0'
implementation 'androidx.activity:activity-ktx:1.4.0'

implementation 'org.jetbrains.kotlinx:kotlinx-coroutines-core:1.5.2'
implementation 'org.jetbrains.kotlinx:kotlinx-coroutines-android:1.5.2'
加入ViewModel和协程依赖
12.1.2 无参数ViewModel
<?xml version="1.0" encoding="utf-8"?>
<LinearLayout xmlns:android="http://schemas.android.com/apk/res/android"
    xmlns:app="http://schemas.android.com/apk/res-auto"
    android:orientation="vertical"
    xmlns:tools="http://schemas.android.com/tools"
    android:layout_width="match_parent"
    android:layout_height="match_parent"
    tools:context=".ViewModelActivity1">
    <TextView
        android:id="@+id/showText"
        android:layout_width="match_parent"
        android:layout_height="wrap_content"
        android:gravity="center"/>
    <Button
        android:id="@+id/plusOne"
        android:layout_width="match_parent"
        android:layout_height="wrap_content"
        android:text="加1"/>
</LinearLayout>
页面布局
package com.example.myapplication

import androidx.lifecycle.ViewModel

class MyViewModel1 :ViewModel(){
    var counter = 0

    override fun onCleared() {
        super.onCleared()

        //ViewModel唯一的生命周期,清除
        counter = 0
    }
}
创建一个ViewModel
package com.example.myapplication

import androidx.appcompat.app.AppCompatActivity
import android.os.Bundle
import androidx.lifecycle.ViewModelProvider
import kotlinx.android.synthetic.main.activity_main.*
import kotlinx.android.synthetic.main.activity_view_model1.*

class ViewModelActivity1 : AppCompatActivity() {
    lateinit var viewModel: MyViewModel1

    override fun onCreate(savedInstanceState: Bundle?) {
        super.onCreate(savedInstanceState)
        setContentView(R.layout.activity_view_model1)

        //创建无参数的ViewModel
        viewModel = ViewModelProvider(this, ViewModelProvider.NewInstanceFactory()).get(MyViewModel1::class.java)

        plusOne.setOnClickListener {
            viewModel.counter++
            showText.text = viewModel.counter.toString()
        }

        showText.text = viewModel.counter.toString()
    }
}
使用ViewModelProvider直接获取这个ViewModel,对这个ViewModel里面的value进行读写操作
12.1.3 有参数ViewModel
<?xml version="1.0" encoding="utf-8"?>
<LinearLayout xmlns:android="http://schemas.android.com/apk/res/android"
    xmlns:app="http://schemas.android.com/apk/res-auto"
    android:orientation="vertical"
    xmlns:tools="http://schemas.android.com/tools"
    android:layout_width="match_parent"
    android:layout_height="match_parent"
    tools:context=".ViewModelActivity2">
    <TextView
        android:id="@+id/showText"
        android:layout_width="match_parent"
        android:layout_height="wrap_content"
        android:gravity="center"/>
    <Button
        android:id="@+id/plusOne"
        android:layout_width="match_parent"
        android:layout_height="wrap_content"
        android:text="加1"/>
</LinearLayout>
布局文件
package com.example.myapplication

import androidx.lifecycle.ViewModel
import androidx.lifecycle.ViewModelProvider


class MyViewModel2(initCounter:Int) : ViewModel(){
    private var counter = initCounter

    override fun onCleared() {
        super.onCleared()

        //ViewModel唯一的生命周期,清除
        counter = 0
    }

    fun inc(){
        this.counter++
    }

    fun get():Int{
        return this.counter
    }

    class Factory(private val initCounter:Int):ViewModelProvider.Factory{
        override fun <T : ViewModel> create(modelClass: Class<T>): T {
            return MyViewModel2(initCounter) as T
        }
    }
}
创建一个带有初始参数的ViewModel,需要附带一个Factory
package com.example.myapplication

import androidx.appcompat.app.AppCompatActivity
import android.os.Bundle
import androidx.lifecycle.ViewModelProvider
import kotlinx.android.synthetic.main.activity_main.*
import kotlinx.android.synthetic.main.activity_view_model1.*
import kotlinx.android.synthetic.main.activity_view_model2.*
import kotlinx.android.synthetic.main.activity_view_model2.plusOne
import kotlinx.android.synthetic.main.activity_view_model2.showText

class ViewModelActivity2 : AppCompatActivity() {
    private lateinit var viewModel:MyViewModel2

    override fun onCreate(savedInstanceState: Bundle?) {
        super.onCreate(savedInstanceState)
        setContentView(R.layout.activity_view_model2)


        //创建含参数的ViewModel
        viewModel = ViewModelProvider(this, MyViewModel2.Factory(100)).get(MyViewModel2::class.java)

        plusOne.setOnClickListener {
            viewModel.inc()
            showText.text = viewModel.get().toString()
        }

        showText.text = viewModel.get().toString()
    }
}
ViewModelProvider的第二个参数需要传入我们的Factory,其他不变
12.1.4 协程的ViewModel
<?xml version="1.0" encoding="utf-8"?>
<LinearLayout xmlns:android="http://schemas.android.com/apk/res/android"
    xmlns:app="http://schemas.android.com/apk/res-auto"
    android:orientation="vertical"
    xmlns:tools="http://schemas.android.com/tools"
    android:layout_width="match_parent"
    android:layout_height="match_parent"
    tools:context=".ViewModelActivity3">
    <TextView
        android:id="@+id/showText"
        android:layout_width="match_parent"
        android:layout_height="wrap_content"
        android:gravity="center"/>
    <Button
        android:id="@+id/plusOne"
        android:layout_width="match_parent"
        android:layout_height="wrap_content"
        android:text="加1"/>
    <Button
        android:id="@+id/cancel"
        android:layout_width="match_parent"
        android:layout_height="wrap_content"
        android:text="取消"/>
</LinearLayout>
布局文件
package com.example.myapplication

import android.util.Log
import androidx.lifecycle.ViewModel
import androidx.lifecycle.viewModelScope
import kotlinx.coroutines.*

class MyTimeout{
    fun wait(timeout:Long,callback:(target:Int)->Unit):Thread{
        val thread = Thread{
            try{
                Thread.sleep(timeout)
                callback(100)
            }catch(e:InterruptedException){
                Log.d("ViewModel","catch thread interrupt")
            }
        }
        thread.start()
        return thread
    }
}

suspend fun suspendCoroutine_1():Int{
    //注意改为了suspendCancellableCoroutine,而不是suspendCoroutine
    return suspendCancellableCoroutine{ continuation->
        val thread = MyTimeout().wait(5000) { result ->
            continuation.resume(result){
                //resume的时候发现协程取消了
                //do nothing
            }
        }
        //关键是这一句,invokeOnCancellation的意义是,当收到协程cancel的时候,得到额外的通知
        //这样可以快速停止普通作用域的操作,例如及时停止线程池中对网络请求的发送(OkHttp),释放回调避免对View的内存占用(AutoDispose),
        continuation.invokeOnCancellation {
            //通知线程interrupt
            Log.d("ViewModel","cancel!!!")
            thread.interrupt()
        }

    }
}


class MyViewModel3 :ViewModel(){
    var counter = 0
    var job:Job? = null

    suspend fun inc(){
        this.job?.cancel()
        this.job = viewModelScope.launch {
            suspendCoroutine_1()
            counter++
        }
        this.job?.join()
    }

    fun cancel(){
        //一旦取消,ViewModelScope不再响应任何launch
        //viewModelScope.cancel()

        this.job?.cancel()
    }

    fun get():Int{
        return this.counter
    }
}
ViewModel自带了一个viewModelScope的协程作用域,这个作用域在ViewModel的onClear生命周期会自动被cancel。
package com.example.myapplication

import androidx.appcompat.app.AppCompatActivity
import android.os.Bundle
import android.util.Log
import androidx.lifecycle.ViewModelProvider
import kotlinx.android.synthetic.main.activity_view_model2.*
import kotlinx.android.synthetic.main.activity_view_model2.plusOne
import kotlinx.android.synthetic.main.activity_view_model2.showText
import kotlinx.android.synthetic.main.activity_view_model3.*
import kotlinx.coroutines.MainScope
import kotlinx.coroutines.cancel
import kotlinx.coroutines.launch

class ViewModelActivity3 : AppCompatActivity() {

    val mainScope = MainScope()

    lateinit var viewModel: MyViewModel3

    override fun onDestroy() {
        super.onDestroy()
        //退出的时候,记得cancel当前的scope
        mainScope.cancel()
    }

    override fun onCreate(savedInstanceState: Bundle?) {
        super.onCreate(savedInstanceState)
        setContentView(R.layout.activity_view_model3)


        //创建无参数的ViewModel
        viewModel = ViewModelProvider(this, ViewModelProvider.NewInstanceFactory()).get(MyViewModel3::class.java)

        plusOne.setOnClickListener {
            mainScope.launch {
                Log.d("ViewModel","pre inc")
                viewModel.inc()
                Log.d("ViewModel","post inc ${viewModel.get()}")
                showText.text = viewModel.get().toString()
            }
        }
        cancel.setOnClickListener {
            mainScope.launch {
                viewModel.cancel()
            }
        }

        showText.text = viewModel.get().toString()
    }
}
但是,一般情况下,我们更建议用Activity的MainScope,这个MainScope是由kotlinx-coroutines-android库提供的,注意,这里在Activity的onDestroy的时候需要手动cancel。
12.1.5 官方推荐做法
<?xml version="1.0" encoding="utf-8"?>
<LinearLayout xmlns:android="http://schemas.android.com/apk/res/android"
    xmlns:app="http://schemas.android.com/apk/res-auto"
    android:orientation="vertical"
    xmlns:tools="http://schemas.android.com/tools"
    android:layout_width="match_parent"
    android:layout_height="match_parent"
    tools:context=".new_recommend.ViewModelActivity4">

    <TextView
        android:id="@+id/showText"
        android:layout_width="match_parent"
        android:layout_height="wrap_content"
        android:gravity="center"/>
    <Button
        android:id="@+id/plusOne"
        android:layout_width="match_parent"
        android:layout_height="wrap_content"
        android:text="加1"/>
    <Button
        android:id="@+id/minusOne"
        android:layout_width="match_parent"
        android:layout_height="wrap_content"
        android:text="减1"/>

</LinearLayout>
布局文件
package com.example.myapplication.new_recommend

import androidx.lifecycle.ViewModel
import androidx.lifecycle.viewModelScope
import kotlinx.coroutines.delay
import kotlinx.coroutines.flow.MutableStateFlow
import kotlinx.coroutines.flow.StateFlow
import kotlinx.coroutines.launch
import kotlinx.coroutines.channels.Channel
import kotlinx.coroutines.flow.buffer
import kotlinx.coroutines.flow.receiveAsFlow

class MyViewModel4 :ViewModel(){
    //ui状态
    private val _counter = MutableStateFlow<Int>(0)

    val counter:StateFlow<Int> =_counter

    //副作用
    private val _effect:Channel<String> = Channel()

    val effect = _effect.receiveAsFlow().buffer()

    fun inc(){
        viewModelScope.launch {
            delay(100)
            _counter.value++
        }
    }

    fun minus(){
        viewModelScope.launch {
            delay(100)
            _counter.value--
            _effect.send("减去1了")
        }
    }

    fun setInitValue(data:Int){
        _counter.value = data
    }
}
使用stateFlow来传送UI状态,使用Channel传送副作用。而且,ViewModel的所有方法都尽可能不是suspend的,由ViewModel来启动协程。
注意,receiveAsFlow有一个buffer参数,避免发送端的堵塞。
package com.example.myapplication.new_recommend

import androidx.appcompat.app.AppCompatActivity
import android.os.Bundle
import android.util.Log
import android.widget.Toast
import androidx.activity.viewModels
import androidx.lifecycle.Lifecycle
import androidx.lifecycle.lifecycleScope
import androidx.lifecycle.repeatOnLifecycle
import androidx.lifecycle.whenStarted
import com.example.myapplication.R
import kotlinx.android.synthetic.main.activity_view_model4.*
import kotlinx.coroutines.delay
import kotlinx.coroutines.flow.collect
import kotlinx.coroutines.launch

class ViewModelActivity4 : AppCompatActivity() {

    //嵌入一个viewModel
    private val viewModel: MyViewModel4 by viewModels()

    init {
        lifecycleScope.launch {
            //当counter变化的时候,通知showText变化
            //为什么要用repeatOnLifecycle
            //因为我们希望UI在不可见的时候,不要进行更新,提高性能以及避免崩溃
            //repeatOnLifecycle(Lifecycle.State.STARTED)的意思:
            //每次Activity进入Started的时候就会执行,Activity退出Started的时候就会自动cancel
            //可重启生命周期感知型协程,注意这个函数是阻塞的,不会返回回来
            repeatOnLifecycle(Lifecycle.State.STARTED) {
                Log.d("ViewModel4", "init collect")
                viewModel.counter.collect { v ->
                    Log.d("ViewModel4", "have data ${v}")
                    showText.text = v.toString()
                }
            }
        }

        lifecycleScope.launch {
            whenStarted{
                viewModel.effect.collect {
                    Toast.makeText(this@ViewModelActivity4,it,Toast.LENGTH_SHORT).show()
                }
            }
        }
        lifecycleScope.launch {
            //whenStarted,是进入Started状态的时候执行闭包代码,当退出Started的时候会自动挂起(不是取消)
            //当页面重新进入Started状态,恢复运行
            //挂起生命周期感知型协程
            whenStarted {
                delay(100)
                Log.d("ViewModel4","init started")
                viewModel.setInitValue(101)
            }
        }
    }

    override fun onCreate(savedInstanceState: Bundle?) {
        super.onCreate(savedInstanceState)
        setContentView(R.layout.activity_view_model4)

        plusOne.setOnClickListener {
            viewModel.inc()
        }

        minusOne.setOnClickListener {
            viewModel.minus()
        }
    }
}
要点如下:
- 使用viewModels的委托来创建无参数的ViewModel
- 使用lifecycleScope的launch来启动Activity的协程
- repeatOnLifecycle是可重启生命周期感知型协程,辅助实现uiState的collect。因为uiState是可重复执行的状态,我们可以丢掉中间状态,只更新最新状态。
- whenStarted是挂起生命周期感知型协程,辅助实现副作用event的collect。因为effectEvent是用户需要感知到的副作用事件,而且不能被丢弃,当Activity不可见的时候只能暂停,而不是取消。大部分情况下应该使用whenStarted,repeatOnLifecycle只是一种优化实现而已。
12.1.6 经验推荐做法
package com.example.myapplication.new_recommend2;

import androidx.lifecycle.ViewModel
import androidx.lifecycle.viewModelScope
import kotlinx.coroutines.channels.Channel
import kotlinx.coroutines.delay
import kotlinx.coroutines.flow.MutableStateFlow
import kotlinx.coroutines.flow.StateFlow
import kotlinx.coroutines.flow.buffer
import kotlinx.coroutines.flow.receiveAsFlow
import kotlinx.coroutines.launch

public class MyViewModel5 :ViewModel(){

    //ui状态
    private val _counterState = MutableStateFlow<Int>(0)

    val counterState: StateFlow<Int> =_counterState

    //副作用
    private val _effect: Channel<Int> = Channel()

    val effect = _effect.receiveAsFlow().buffer()

    //本地数据
    private var counter = 0;

    //发送修改数据
    suspend fun inc(){
        this.counter++;
        this._effect.send(this.counter);
        this._counterState.value = this.counter;
    }
}
我们定义一个ViewModel
<?xml version="1.0" encoding="utf-8"?>
<LinearLayout xmlns:android="http://schemas.android.com/apk/res/android"
    xmlns:app="http://schemas.android.com/apk/res-auto"
    xmlns:tools="http://schemas.android.com/tools"
    android:layout_width="match_parent"
    android:layout_height="match_parent"
    android:orientation="vertical"
    tools:context=".new_recommend2.ViewModelActivity5">


    <TextView
        android:id="@+id/five_show_text"
        android:layout_width="match_parent"
        android:layout_height="wrap_content"
        android:gravity="center"/>

    <TextView
        android:id="@+id/five_show_text2"
        android:layout_width="match_parent"
        android:layout_height="wrap_content"
        android:gravity="center"/>

    <Button
        android:id="@+id/five_auto_add"
        android:textAllCaps="false"
        android:layout_width="match_parent"
        android:layout_height="wrap_content"
        android:text="launchWhenStarted的方式启动自动递增"/>

    <Button
        android:id="@+id/five_auto_add2"
        android:textAllCaps="false"
        android:layout_width="match_parent"
        android:layout_height="wrap_content"
        android:text="launch的方式启动自动递增"/>
    <Button
        android:id="@+id/five_next_page"
        android:textAllCaps="false"
        android:layout_width="match_parent"
        android:layout_height="wrap_content"
        android:text="启动一个Activity"/>
</LinearLayout>
我们定义一个布局文件
package com.example.myapplication.new_recommend2

import android.content.Intent
import androidx.appcompat.app.AppCompatActivity
import android.os.Bundle
import android.util.Log
import androidx.activity.viewModels
import androidx.lifecycle.Lifecycle
import androidx.lifecycle.lifecycleScope
import androidx.lifecycle.repeatOnLifecycle
import com.example.myapplication.R
import kotlinx.android.synthetic.main.activity_view_model4.*
import kotlinx.android.synthetic.main.activity_view_model5.*
import kotlinx.coroutines.delay
import kotlinx.coroutines.flow.buffer
import kotlinx.coroutines.flow.collect
import kotlinx.coroutines.launch

class ViewModelActivity5 : AppCompatActivity() {

    val TAG = ViewModelActivity5::class.java.name

    //嵌入一个viewModel
    private val viewModel: MyViewModel5 by viewModels()

    init{
        lifecycleScope.launch {
            repeatOnLifecycle(Lifecycle.State.STARTED) {
                Log.i(TAG,"repeatOnLifecycle begin collect")
                viewModel.counterState.collect {
                    Log.i(TAG,"repeatOnLifecycle collect ${it}")
                    five_show_text2.text = it.toString();
                }
            }
        }

        //这里必须使用launchWhenCreated,使用launchWhenStarted会产生effect的堵塞问题
        lifecycleScope.launchWhenCreated {
            Log.i(TAG,"launchWhenCreated begin collect")
            viewModel.effect.collect {
                Log.i(TAG,"launchWhenCreated collect ${it}")
                five_show_text.text = it.toString();
            }
        }
    }

    override fun onCreate(savedInstanceState: Bundle?) {
        super.onCreate(savedInstanceState)
        setContentView(R.layout.activity_view_model5)

        five_auto_add.setOnClickListener {
            //使用launchWhenStarted会在跳转页面以后自动暂停,这可能造成数据设置延迟
            lifecycleScope.launchWhenStarted {
                for( i in 0..100){
                    delay(100);
                    Log.i(TAG,"inc $i")
                    viewModel.inc();
                }
            }
        }

        five_auto_add2.setOnClickListener {
            //使用launch不会自动暂停,只会在Activity退出的时候取消协程
            lifecycleScope.launch {
                for( i in 0..100){
                    delay(100);
                    Log.i(TAG,"inc2 $i")
                    viewModel.inc();
                }
            }
        }

        five_next_page.setOnClickListener {
            val intent = Intent(this,EmptyActivity5::class.java)
            startActivity(intent)
        }
    }
}
经过测试,我们得到以下结论:
- 不能使用launchWhenStarted来收集副作用,这样会导致ViewModel的effect执行send操作的时候会堵塞,即使是加了buffer操作也会堵塞。我们必须只能使用launchWhenCreated来创建collect协程。
- 不能在类似setOnClickListener中使用launchWhenStarted,因为这样会导致ViewModel的操作暂停下来,这样会加大ViewModel数据处于中间状态的概率,如果ViewModel当前在执行无事务的Db操作,会加大Db处于中间状态的概率。
- repeatOnLifecycle当切换页面的时候,会取消当前的collect协程,恢复页面的时候重启collect的协程,一般用在状态同步。launchWhenStarted当切换页面的时候,会暂停当前的collect协程,恢复页面的时候恢复原来的collect的协程,一般用在副作用同步。
所以我们有以下的经验:
- 任何地方均不要用launchWhenStarted,除非极少数的情况下,UI操作指定必须要在Started状态才能执行,例如是Framgment的transaction操作。
- collect协程中,状态收集用repeatOnLifecycle,副作用收集用launchWhenCreated。如果分不清哪些是状态,哪些是副作用,那就全部用副作用,准没错。
- 初始化协程中,放在Activity的onCreate的末尾,并且使用launch启动协程
- 事件回调使用协程中,使用launch启动协程
12.1.7 MVVM框架
- 对于纯粹的TextView,Button的展示组件,我们使用StateFlow作为状态同步工具。
- 对于EditText的输入组件,我们用doTextChanged,实时将text同步到ViewModel。同时ViewModel使用Channel作为副作用同步工具。
- 对于RecylcerView或者ListView的列表组件,我们用Channel作为副作用同步工具,不仅同步Adapter的数据,而且同步adapter的notify,以及同步view的scrollTo的操作。
MVVM架构的关键点在于:
fun(View层手动触发ViewModel的方法) -> store(ViewModel的数据) -> Channel(通知View层变化的副作用)- ViewModel通知View层。Channel.recevieAsFlow是最通用的,从ViewModel同步数据到View层的工具。StateFlow仅仅是一个优化实现而已,没有副作用,也可以忽略中间状态的同步工具。而SharedFlow的缺点在于,当没有receiver的时候,send的数据会直接丢失,而不是缓存起来。
- 我们使用doTextChanged等工具,让ViewModel总是保持着View的最新状态。这样使得ViewModel的实现总是内聚的,它只需要读自身的数据就能执行全部的业务逻辑。
- 单一的store,每个ViewModel总是用一个Data类来存放所有状态。
12.2 Lifecycle
代码在这里
Lifecycle就是让普通的对象,也能倾听Activity或者Fragment的生命周期
implementation 'androidx.lifecycle:lifecycle-runtime:2.4.0'
implementation 'androidx.lifecycle:lifecycle-runtime-ktx:2.4.0'
implementation 'org.jetbrains.kotlinx:kotlinx-coroutines-core:1.5.2'
implementation 'org.jetbrains.kotlinx:kotlinx-coroutines-android:1.5.2'
加入依赖
package com.example.myapplication

import android.util.Log
import androidx.lifecycle.DefaultLifecycleObserver
import androidx.lifecycle.LifecycleOwner

class MyObserver :DefaultLifecycleObserver{
    override fun onCreate(owner: LifecycleOwner) {
        super.onCreate(owner)
        Log.d("MyObserver","onCreate")
    }

    override fun onResume(owner: LifecycleOwner) {
        super.onResume(owner)
        Log.d("MyObserver","onResume")
    }

    override fun onPause(owner: LifecycleOwner) {
        super.onPause(owner)
        Log.d("MyObserver","onPause")
    }

    override fun onDestroy(owner: LifecycleOwner) {
        super.onDestroy(owner)
        Log.d("MyObserver","onDestroy")
    }
}
创建一个普通的Observer,继承于DefaultLifecycleObserver。对于我们感兴趣的生命周期用override就可以了。
package com.example.myapplication

import androidx.appcompat.app.AppCompatActivity
import android.os.Bundle

class ObserverActivity : AppCompatActivity() {
    override fun onCreate(savedInstanceState: Bundle?) {
        super.onCreate(savedInstanceState)
        setContentView(R.layout.activity_observer)
        lifecycle.addObserver(MyObserver())
    }
}
然后用Activity的lifecycle来倾听就可以了。
12.3 LiveData
代码在这里
implementation 'androidx.lifecycle:lifecycle-livedata:2.4.0'
implementation 'androidx.lifecycle:lifecycle-livedata-ktx:2.4.0'
implementation 'org.jetbrains.kotlinx:kotlinx-coroutines-core:1.5.2'
implementation 'org.jetbrains.kotlinx:kotlinx-coroutines-android:1.5.2'
加入LiveData的依赖
package com.example.myapplication

import androidx.lifecycle.LiveData
import androidx.lifecycle.MutableLiveData
import androidx.lifecycle.ViewModel

class CounterViewModel :ViewModel(){
    val counter:LiveData<Int>
        get() = _counter

    private val _counter = MutableLiveData<Int>()

    fun plusOne(){
        val data = this._counter.value?:0
        this._counter.value = data+1
    }

    fun initData(){
        this._counter.value = 0
    }
}
LiveData是不可变的接口,MutableLiveData是可变的实现,我们让MutableLiveData是私有的,同时用LiveData为公开权限,以保证外部的类无法修改数据。
package com.example.myapplication

import androidx.appcompat.app.AppCompatActivity
import android.os.Bundle
import androidx.lifecycle.ViewModelProvider
import kotlinx.android.synthetic.main.activity_counter.*

class CounterActivity : AppCompatActivity() {
    lateinit var viewModel: CounterViewModel

    override fun onCreate(savedInstanceState: Bundle?) {
        super.onCreate(savedInstanceState)
        setContentView(R.layout.activity_counter)

        this.viewModel = ViewModelProvider(this,ViewModelProvider.NewInstanceFactory()).get(CounterViewModel::class.java)

        this.viewModel.counter.observe(this){counter->
            showText.text = counter.toString()
        }

        this.viewModel.initData()

        inc.setOnClickListener {
            this.viewModel.plusOne()
        }
    }
}
由于LiveData一般用在ViewModel,所以我们这里也有ViewModelProvider创建ViewModel。然后用LiveData的observe来倾听数据变化,然后触发视图更新。
12.4 Room
代码在这里
12.4.1 依赖
implementation 'androidx.room:room-runtime:2.4.0'
implementation 'androidx.room:room-ktx:2.4.0'
kapt 'androidx.room:room-compiler:2.4.0'
加入room的依赖
id 'kotlin-kapt'同时在plugins里面加入kotlin-kapt
12.4.2 Entity
package com.example.myapplication.db

import androidx.room.Entity
import androidx.room.PrimaryKey

@Entity
data class User(val name:String,val age:Int) {
    @PrimaryKey(autoGenerate = true)
    var id:Long = 0
}
描述一个User表
package com.example.myapplication.db

import androidx.room.Entity
import androidx.room.PrimaryKey

@Entity
class Category(val name:String) {
    @PrimaryKey(autoGenerate = true)
    var id:Long = 0
}
描述一个Category表
12.4.3 Dao
package com.example.myapplication.db

import androidx.room.*
import androidx.sqlite.db.SimpleSQLiteQuery
import androidx.sqlite.db.SupportSQLiteQuery

@Dao
interface UserDao {
    @Insert
    fun insert(user: User): Long

    @Update
    fun update(user: User)

    @Query("delete from User where id = :id")
    fun delete(id: Long)

    @Query("select * from user")
    fun getAll(): List<User>

    @Query("select * from user where name like :nameLike")
    fun getAllByName(nameLike: String): List<User>

    @RawQuery
    fun rawQuery(name:SupportSQLiteQuery): List<User>

    fun getAllByNameRaw(name:String):List<User>{
        val query = "select * from user where name like ?"
        val sqlQuery = SimpleSQLiteQuery(query,arrayOf("%${name}%"))
        return this.rawQuery(sqlQuery)
    }
}
描述一个UserDao,注意可以用@RawQuery的写法,这里其实跟SpringBoot-data-jpa的套路很相似
package com.example.myapplication.db

import androidx.room.Dao
import androidx.room.Insert
import androidx.room.Query

@Dao
interface CategoryDao {
    @Insert
    fun insert(category: Category): Long


    @Query("select * from category")
    fun getAll(): List<Category>
}
简单的CategoryDao
12.4.4 Database
package com.example.myapplication.db

import android.content.Context
import androidx.room.Database
import androidx.room.Room
import androidx.room.RoomDatabase
import androidx.room.migration.Migration
import androidx.sqlite.db.SupportSQLiteDatabase

@Database(version = 2, entities = [User::class,Category::class])
abstract  class AppDatabase:RoomDatabase() {
    abstract fun userDao(): UserDao

    abstract fun categoryDao():CategoryDao

    companion object{
        private val MIGRATION_1_2 = object :Migration(1,2){
            override fun migrate(database: SupportSQLiteDatabase) {
                database.execSQL("create table Category("+
                        "id integer primary key autoincrement not null,"+
                        "name text not null"+
                        ")");
            }
        }
        private var instance: AppDatabase? = null

        @Synchronized
        fun getDatabase(context: Context): AppDatabase {
            instance?.let {
                return it
            }
            return Room.databaseBuilder(context.applicationContext, AppDatabase::class.java,
            "app_database")
                    //默认不允许在主线程操作
                //.allowMainThreadQueries()
                    //schema不对齐的时候,直接删除
                //.fallbackToDestructiveMigration()
                .addMigrations(MIGRATION_1_2)
                .build().apply {
                instance = this
            }
        }
    }
}
创建一个AppDatabase,是一个抽象类,需要继承于RoomDatabase。然后建立一个伴随对象,获取它的单例。要点如下:
- Database设置当前的版本号,以及所用到的各种实体
- 将Dao设计为抽象接口
- DatabaseBuilder,加入迁移脚本,以及对应的选项。注意要用applicatonContext,不能用Activity的Context。
12.4.5 UI
package com.example.myapplication

import androidx.appcompat.app.AppCompatActivity
import android.os.Bundle
import androidx.appcompat.app.AlertDialog
import com.example.myapplication.db.AppDatabase
import com.example.myapplication.db.Category
import com.example.myapplication.db.User
import com.google.gson.Gson
import com.google.gson.GsonBuilder
import kotlinx.android.synthetic.main.activity_room.*
import kotlinx.coroutines.*

class RoomActivity : AppCompatActivity() {
    val mainScope = MainScope()
    lateinit var database:AppDatabase

    val gson: Gson

    init{
        val gsonBuilder = GsonBuilder()
        gsonBuilder.serializeNulls()
        gsonBuilder.disableHtmlEscaping()
        gson = gsonBuilder.create()
    }

    override fun onDestroy() {
        super.onDestroy()
        mainScope.cancel()
    }

    fun showDialog(text:String){
        AlertDialog.Builder(this).apply {
            setTitle("提示")
            setMessage(text)
            //不能点击灰白处关闭
            setCancelable(false)
            //闭包的两个参数
            setPositiveButton("确认"){dialog,which->}
            setNegativeButton("取消"){dialog,which->}
        }.show()
    }
    override fun onCreate(savedInstanceState: Bundle?) {
        super.onCreate(savedInstanceState)
        setContentView(R.layout.activity_room)

        database = AppDatabase.getDatabase(this.applicationContext)

        insert.setOnClickListener {
            mainScope.launch {
                withContext(Dispatchers.IO){
                    database.userDao().insert(User("fish",123))
                }
            }
        }

        delete.setOnClickListener {
            mainScope.launch {
                val delIdText = delId.text.toString()
                if( delIdText.isBlank() ){
                    showDialog("请输入ID")
                    return@launch
                }
                withContext(Dispatchers.IO) {
                    //走事务模式
                    database.runInTransaction {
                        database.userDao().delete(delIdText.toLong())
                    }
                }
            }
        }

        update.setOnClickListener {
            mainScope.launch {
                val modIdText = modId.text.toString()
                if( modIdText.isBlank() ){
                    showDialog("请输入ID")
                    return@launch
                }
                val user = User("fish2",789)
                user.id = modIdText.toLong()
                withContext(Dispatchers.IO) {
                    database.userDao().update(user)
                }
            }
        }

        getAll.setOnClickListener {
            mainScope.launch {
                val userList = withContext(Dispatchers.IO) {
                    database.userDao().getAll()
                }
                showAll.text = gson.toJson(userList)
            }
        }

        getRaw.setOnClickListener {
            mainScope.launch {
                val userList = withContext(Dispatchers.IO) {
                    database.userDao().getAllByNameRaw("2")
                }
                showAll.text = gson.toJson(userList)
            }
        }

        addCategory.setOnClickListener {
            mainScope.launch {
                withContext(Dispatchers.IO){
                    database.categoryDao().insert(Category("mk"))
                }
            }
        }

        getAllCategory.setOnClickListener {
            mainScope.launch {
                val categoryList = withContext(Dispatchers.IO){
                    database.categoryDao().getAll();
                }
                showAll.text = gson.toJson(categoryList)
            }
        }
    }
}
要点如下:
- AppDatabase.getDatabase来获取Room的单例
- mainScope来做协程池,同时withContext来切换线程进行db操作。这保证了Db操作不会堵塞UI线程。
- runInTransaction用来做事务操作
12.4.6 协程版本
package com.example.myapplication.db2


import androidx.room.*
import androidx.sqlite.db.SimpleSQLiteQuery
import androidx.sqlite.db.SupportSQLiteQuery
import com.example.myapplication.MyApplication
import kotlinx.coroutines.Dispatchers
import kotlinx.coroutines.withContext

@Dao
interface UserDao2 {
    @Insert
    suspend fun insert(user: User2): Long

    @Insert
    fun insertInner(user: User2): Long

    @Update
    suspend fun update(user: User2)

    @Query("delete from User2 where id = :id")
    suspend fun delete(id: Long)

    @Query("delete from User2 where id = :id")
    fun deleteInner(id: Long)

    @Query("select * from user2")
    suspend fun getAll(): List<User2>

    @RawQuery
    suspend fun rawQuery(name:SupportSQLiteQuery): List<User2>

    suspend fun getAllByNameRaw(name:String):List<User2>{
        val query = "select * from user2 where name like ?"
        val sqlQuery = SimpleSQLiteQuery(query,arrayOf("%${name}%"))
        return this.rawQuery(sqlQuery)
    }

    suspend fun deleteAndInsert(id:Long,user:User2){
        withContext(Dispatchers.IO){
            AppDatabase2.getDatabase().runInTransaction {
                deleteInner(id)
                insertInner(user)
            }
        }
    }
}
Room原生支持协程版本,只需要将方法改为suspend就可以了。另外要注意,使用事务的话,先用withContext切换线程,然后用runInTransaction来执行非suspend版本的方法。
12.5 ViewBinding
代码在这里
buildFeatures {
    viewBinding = true
}
ViewBinding是代替,kotlin-android-extension的实现,避免kat需要对每个layout的id都是唯一的问题。
<?xml version="1.0" encoding="utf-8"?>
<LinearLayout xmlns:android="http://schemas.android.com/apk/res/android"
    android:orientation="horizontal"
    android:layout_width="match_parent"
    android:layout_height="wrap_content"
    android:background="@drawable/border"
    android:padding="5dp">
    <EditText
        android:id="@+id/input"
        android:layout_width="0dp"
        android:layout_weight="1"
        android:layout_height="wrap_content"
        android:textSize="16sp"
        android:hint="请输入"/>
    <Button
        android:id="@+id/click_button"
        android:layout_width="wrap_content"
        android:layout_height="wrap_content"
        android:text="修改"/>
</LinearLayout>
布局文件,widget_my_edit.xml文件
package com.example.myapplication

import android.content.Context
import android.util.AttributeSet
import android.view.LayoutInflater
import android.widget.LinearLayout
import com.example.myapplication.databinding.WidgetMyEditBinding

class MyEdit(ctx: Context,attrs:AttributeSet):LinearLayout(ctx,attrs) {
    private var viewBinding: WidgetMyEditBinding

    init{
        val layoutInflator = LayoutInflater.from(ctx)
        viewBinding = WidgetMyEditBinding.inflate(layoutInflator,this,true)
    }

    fun setOnModClickListener(listner:()->Unit){
        viewBinding.clickButton.setOnClickListener { listner() }
    }

    fun setInputText(text:String){
        viewBinding.input.setText(text)
    }

    fun getInputText():String{
        return viewBinding.input.text.toString()
    }
}
使用WidgetMyEditBinding.inflate来实例化这个布局,并插入到根节点上
<?xml version="1.0" encoding="utf-8"?>
<LinearLayout xmlns:android="http://schemas.android.com/apk/res/android"
    xmlns:app="http://schemas.android.com/apk/res-auto"
    android:orientation="vertical"
    xmlns:tools="http://schemas.android.com/tools"
    android:layout_width="match_parent"
    android:layout_height="match_parent"
    tools:context=".ViewBinding1">
    <TextView
        android:id="@+id/title"
        android:layout_width="match_parent"
        android:layout_height="wrap_content"
        android:gravity="center"
        android:textSize="20sp"
        android:text="数据"/>
    <Button
        android:id="@+id/click_button"
        android:layout_width="match_parent"
        android:layout_height="wrap_content"
        android:textAllCaps="true"
        android:text="点击"/>
    <TextView
        android:id="@+id/edit"
        android:layout_width="match_parent"
        android:layout_height="wrap_content"
        android:gravity="center"
        android:textSize="20sp"
        android:text="数据"/>
    <com.example.myapplication.MyEdit
        android:id="@+id/edit2"
        android:layout_width="match_parent"
        android:layout_height="wrap_content"/>
</LinearLayout>
布局文件,activiy_view_binding1.xml文件
package com.example.myapplication

import androidx.appcompat.app.AppCompatActivity
import android.os.Bundle
import android.widget.Toast
import com.example.myapplication.databinding.ActivityViewBinding1Binding

class ViewBinding1 : AppCompatActivity() {
    private lateinit var viewBinding: ActivityViewBinding1Binding

    override fun onCreate(savedInstanceState: Bundle?) {
        super.onCreate(savedInstanceState)

        this.viewBinding = ActivityViewBinding1Binding.inflate(layoutInflater)

        setContentView(viewBinding.root)

        viewBinding.title.text = "我是标题"
        //名称自动转驼峰形式
        viewBinding.clickButton.text = "我是按钮"

        viewBinding.edit.setText("我是输入")

        //可以使用自定义的控件
        viewBinding.edit2.setOnModClickListener {
            val text = viewBinding.edit2.getInputText()
            Toast.makeText(this,text,Toast.LENGTH_SHORT).show()
        }
        viewBinding.edit2.setInputText("123")
    }
}
依然使用ActivityViewBinding1Binding来实例化布局,注意用viewBinding的root来传入setContentView里面,而不是直接传入一个R.layout.xxx。
12.6 DiffUtil
代码在这里
DiffUtil是辅助RecyclerView的工具,避免调用notifyDataSetChanged的低效率,通过类似React的Diff算法来比较进行notify。
参考资料:
plugins {
    id "kotlin-parcelize"
}
加入parcelize插件,DiffUtil自带在RecycerView的库里面,不需要额外加入依赖。
12.6.1 DiffUtil普通版本
package com.example.myapplication.normal

import android.os.Parcel
import android.os.Parcelable
import android.util.Log
import kotlinx.android.parcel.Parcelize

@Parcelize
data class Todo(val id:Int,var name:String):Parcelable

@Parcelize
data class TodoDataContainer(val data:List<Todo>):Parcelable

fun parcelCopy(input:List<Todo>):List<Todo>{
    //序列化
    val oldData = TodoDataContainer(data=input)
    val parcel = Parcel.obtain()
    oldData.writeToParcel(parcel,0)
    parcel.setDataPosition(0)

    //反序列化
    val clazz = TodoDataContainer::class.java
    val clazz2 = clazz.classLoader.loadClass("${clazz.name}\$Creator")
    val instance = clazz2.newInstance()
    val method = clazz2.getMethod("createFromParcel",Parcel::class.java)
    val newData = method.invoke(instance,parcel) as TodoDataContainer
    return newData.data
}
Todo的model,注意parcel的深拷贝实现
package com.example.myapplication.normal

import android.view.LayoutInflater
import android.view.View
import android.view.ViewGroup
import android.widget.Toast
import androidx.recyclerview.widget.RecyclerView
import com.example.myapplication.databinding.WidgetItemTodoBinding

class TodoAdapter(): RecyclerView.Adapter<TodoAdapter.ViewHolder>() {

    private var todoList:List<Todo> = ArrayList<Todo>()

    fun setData(data:List<Todo>){
        this.todoList = data
    }

    fun getData():List<Todo>{
        return this.todoList
    }

    var modListener:((todo:Todo)->Unit)? = null

    var delListener:((todo:Todo)->Unit)? = null

    inner class ViewHolder(val viewBinding: WidgetItemTodoBinding):RecyclerView.ViewHolder(viewBinding.root)

    override fun onCreateViewHolder(parent: ViewGroup, viewType: Int): ViewHolder {
        val viewBinding = WidgetItemTodoBinding.inflate(
            LayoutInflater.from(parent.context),
                parent,
        false)
        var viewHolder =  ViewHolder(viewBinding)
        //使用View点击的方式
        viewHolder.itemView.setOnClickListener {
            //取得当前ViewHolder的位置
            var position = viewHolder.adapterPosition
            var todo = todoList[position]
            Toast.makeText(parent.context,todo.name, Toast.LENGTH_SHORT).show()
        }
        viewHolder.viewBinding.modButton.setOnClickListener {
            var position = viewHolder.adapterPosition
            var todo = todoList[position]
            this.modListener?.invoke(todo)
        }
        viewHolder.viewBinding.delButton.setOnClickListener {
            var position = viewHolder.adapterPosition
            var todo = todoList[position]
            this.delListener?.invoke(todo)
        }
        return viewHolder
    }

    override fun onBindViewHolder(holder: ViewHolder, position: Int) {
        var todo = todoList[position]
        val viewBinding = holder.viewBinding
        viewBinding.id.text = todo.id.toString()
        viewBinding.name.text = todo.name
    }

    //返回Item数量
    override fun getItemCount() = todoList.size
}
TodoAdapter
<?xml version="1.0" encoding="utf-8"?>
<LinearLayout xmlns:android="http://schemas.android.com/apk/res/android"
    android:orientation="horizontal"
    android:layout_width="match_parent"
    android:layout_height="wrap_content">
    <TextView
        android:id="@+id/id"
        android:layout_width="30dp"
        android:layout_height="wrap_content"
        android:hint="100"/>
    <TextView
        android:id="@+id/name"
        android:layout_width="0dp"
        android:layout_weight="1"
        android:layout_height="wrap_content"
        android:background="@drawable/border"
        android:hint="请输入"/>
    <Button
        android:id="@+id/del_button"
        android:layout_width="wrap_content"
        android:layout_height="wrap_content"
        android:textAllCaps="false"
        android:layout_marginLeft="10dp"
        android:text="删除"/>
    <Button
        android:id="@+id/mod_button"
        android:layout_width="wrap_content"
        android:layout_height="wrap_content"
        android:textAllCaps="false"
        android:layout_marginLeft="10dp"
        android:text="修改"/>
</LinearLayout>
Todo的item布局文件
package com.example.myapplication.normal
import androidx.lifecycle.ViewModel
import com.example.myapplication.util.ListEvent
import kotlinx.coroutines.channels.Channel
import kotlinx.coroutines.flow.buffer
import kotlinx.coroutines.flow.receiveAsFlow
class NormalViewModel :ViewModel(){
private val _listEffect = Channel<ListEvent<List<Todo>>>()
val listEffect = _listEffect.receiveAsFlow().buffer()
private var list:ArrayList<Todo> = ArrayList()
fun init(size:Int):List<Todo>{
list = ArrayList()
for( i in (0 until size )){
this.list.add(Todo(
id = i +1 ,
name = "Fish_${i+1}"
))
}
return this.list
}
suspend fun add(){
var maxId = 0
this.list.forEach { v->
if( v.id > maxId ){
maxId = v.id
}
}
this.list.add(Todo(
id = maxId +1,
name = "Fish_${maxId+1}"
))
val lastIndex = this.list.size - 1
this._listEffect.send(ListEvent(
data = this.list,
effect = {view, adapter ->
view.scrollToPosition(lastIndex)
}
))
}
suspend fun del(id:Int){
this.list = ArrayList(this.list.filter { v->
v.id != id
})
this._listEffect.send(
ListEvent(
data = this.list,
effect = {view, adapter -> }
))
}
suspend fun mod(id:Int,name:String){
this.list.forEach { v->
if( v.id != id ){
return@forEach
}
v.name = name
}
this._listEffect.send(
ListEvent(
data = this.list,
effect = {view, adapter -> }
))
}
}做一个CURD的ViewModel
package com.example.myapplication.diff

import androidx.recyclerview.widget.DiffUtil
import com.example.myapplication.normal.Todo


class TodoDiffCallback(val oldTodo:List<Todo>, val newTodo:List<Todo>): DiffUtil.Callback(){
    override fun areContentsTheSame(oldItemPosition: Int, newItemPosition: Int): Boolean {
        //检查内容
        return oldTodo[oldItemPosition] == newTodo[newItemPosition]
    }

    override fun areItemsTheSame(oldItemPosition: Int, newItemPosition: Int): Boolean {
        //检查id
        return oldTodo[oldItemPosition].id == newTodo[newItemPosition].id
    }

    override fun getNewListSize(): Int {
        return newTodo.size
    }

    override fun getOldListSize(): Int {
        return oldTodo.size
    }

}
DiffUtil的第一步,是做一个TodoDiffCallback
package com.example.myapplication.diff

import androidx.appcompat.app.AppCompatActivity
import android.os.Bundle
import androidx.activity.viewModels
import androidx.lifecycle.lifecycleScope
import androidx.recyclerview.widget.DiffUtil
import androidx.recyclerview.widget.LinearLayoutManager
import com.example.myapplication.databinding.ActivityDiffOneBinding
import com.example.myapplication.databinding.ActivityNormalBinding
import com.example.myapplication.normal.NormalViewModel
import com.example.myapplication.normal.TodoAdapter
import kotlinx.coroutines.flow.collect

class DiffOneActivity : AppCompatActivity() {

    private lateinit var viewBinding:ActivityDiffOneBinding

    private val viewModel: NormalViewModel by viewModels()

    init {
        lifecycleScope.launchWhenStarted {
            viewModel.listEffect.collect { v->
                val oldData = adapter.getData()
                //深拷贝以后,保证ViewModel的data数据,与adpater的data数据不是同一个实例
                val newData = v.data.map { v->v.copy() }
                val diffResult = DiffUtil.calculateDiff(TodoDiffCallback(oldData,newData))

                //写入到adapter
                adapter.setData(newData)
                diffResult.dispatchUpdatesTo(adapter)
                v.effect(viewBinding.showList,adapter)
            }
        }
    }

    private lateinit var adapter: TodoAdapter

    override fun onCreate(savedInstanceState: Bundle?) {
        super.onCreate(savedInstanceState)

        viewBinding = ActivityDiffOneBinding.inflate(layoutInflater)
        setContentView(viewBinding.root)

        //初始化数据
        val initData = viewModel.init(10000)

        //初始化ui
        adapter = TodoAdapter()
        adapter.setData(initData.map { v->v.copy() })
        adapter.modListener = {v->
            lifecycleScope.launchWhenStarted {
                viewModel.mod(v.id,"测试")
            }
        }
        adapter.delListener = {v->
            lifecycleScope.launchWhenStarted {
                viewModel.del(v.id)
            }
        }

        val layoutManager = LinearLayoutManager(this)
        //要多传入一个排序属性
        viewBinding.showList.layoutManager = layoutManager
        viewBinding.showList.adapter = adapter

        viewBinding.add.setOnClickListener {
            lifecycleScope.launchWhenStarted {
                viewModel.add()
            }
        }
    }
}
DiffUtil的第二步是,使用DiffUtil.calculateDiff,传入自己的callback来计算数据的差异位置,然后使用dispatchUpdatesTo通知到adapter里面即可。DiffUtil的注意点是避免使用同一个数组,同一个引用作为比较操作,否则会刷新不了。
12.6.2 DiffUtil官方封装版本
DiffUtil的两步代码有点多,而且diff操作在UI线程执行,有点浪费,可以切换到IO线程中执行,官方提供了另外一种接口。
package com.example.myapplication.diff2

import androidx.recyclerview.widget.DiffUtil
import com.example.myapplication.normal.Todo

class TodoItemDiff : DiffUtil.ItemCallback<Todo>() {
    override fun areContentsTheSame(oldItem: Todo, newItem: Todo): Boolean {
        return oldItem == newItem
    }

    override fun areItemsTheSame(oldItem: Todo, newItem: Todo): Boolean {
        return oldItem.id == newItem.id
    }
}
使用DiffUtil.ItemCallback。
package com.example.myapplication.diff2

import com.example.myapplication.normal.Todo

import android.view.LayoutInflater
import android.view.View
import android.view.ViewGroup
import android.widget.Toast
import androidx.recyclerview.widget.ListAdapter
import androidx.recyclerview.widget.RecyclerView
import com.example.myapplication.databinding.WidgetItemTodoBinding

class TodoDiffAdapter: ListAdapter<Todo, TodoDiffAdapter.ViewHolder>(TodoItemDiff()){

    inner class ViewHolder(val viewBinding: WidgetItemTodoBinding):RecyclerView.ViewHolder(viewBinding.root)

    var modListener:((todo:Todo)->Unit)? = null

    var delListener:((todo:Todo)->Unit)? = null

    override fun onCreateViewHolder(parent: ViewGroup, viewType: Int): ViewHolder {
        val viewBinding = WidgetItemTodoBinding.inflate(
            LayoutInflater.from(parent.context),
            parent,
            false)
        var viewHolder =  ViewHolder(viewBinding)
        //使用View点击的方式
        viewHolder.itemView.setOnClickListener {
            //取得当前ViewHolder的位置
            var position = viewHolder.adapterPosition
            var todo = getItem(position)
            Toast.makeText(parent.context,todo.name, Toast.LENGTH_SHORT).show()
        }
        viewHolder.viewBinding.modButton.setOnClickListener {
            var position = viewHolder.adapterPosition
            var todo = getItem(position)
            this.modListener?.invoke(todo)
        }
        viewHolder.viewBinding.delButton.setOnClickListener {
            var position = viewHolder.adapterPosition
            var todo = getItem(position)
            this.delListener?.invoke(todo)
        }
        return viewHolder
    }

    override fun onBindViewHolder(holder: ViewHolder, position: Int) {
        var todo = getItem(position)
        val viewBinding = holder.viewBinding
        viewBinding.id.text = todo.id.toString()
        viewBinding.name.text = todo.name
    }
}
使用ListAdapter,传入Model,ViewHolder和Diff作为参数。
package com.example.myapplication.diff2

import androidx.appcompat.app.AppCompatActivity
import android.os.Bundle
import androidx.activity.viewModels
import androidx.lifecycle.lifecycleScope
import androidx.recyclerview.widget.DiffUtil
import androidx.recyclerview.widget.LinearLayoutManager
import com.example.myapplication.databinding.ActivityDiffOneBinding
import com.example.myapplication.databinding.ActivityDiffTwoBinding
import com.example.myapplication.databinding.ActivityNormalBinding
import com.example.myapplication.normal.NormalViewModel
import com.example.myapplication.normal.TodoAdapter
import com.example.myapplication.normal.parcelCopy
import kotlinx.coroutines.flow.collect

class DiffTwoActivity : AppCompatActivity() {

    private lateinit var viewBinding:ActivityDiffTwoBinding

    private val viewModel: NormalViewModel by viewModels()

    init {
        lifecycleScope.launchWhenStarted {
            viewModel.listEffect.collect { v->
                //注意,仍然需要进行深拷贝操作
                val newData = parcelCopy(v.data)
                adapter.submitList(newData) {
                    v.effect(viewBinding.showList, adapter)
                }

            }
        }
    }

    private lateinit var adapter: TodoDiffAdapter

    override fun onCreate(savedInstanceState: Bundle?) {
        super.onCreate(savedInstanceState)

        viewBinding = ActivityDiffTwoBinding.inflate(layoutInflater)
        setContentView(viewBinding.root)

        //初始化数据
        val initData = viewModel.init(10000)

        //初始化ui
        adapter = TodoDiffAdapter()
        adapter.submitList(parcelCopy(initData))
        adapter.modListener = {v->
            lifecycleScope.launchWhenStarted {
                viewModel.mod(v.id,"测试")
            }
        }
        adapter.delListener = {v->
            lifecycleScope.launchWhenStarted {
                viewModel.del(v.id)
            }
        }

        val layoutManager = LinearLayoutManager(this)
        //要多传入一个排序属性
        viewBinding.showList.layoutManager = layoutManager
        viewBinding.showList.adapter = adapter

        viewBinding.add.setOnClickListener {
            lifecycleScope.launchWhenStarted {
                viewModel.add()
            }
        }
    }
}
最后改用了adapter的submitList来提交列表,注意提交的操作是异步的,完成以后,才能执行effect操作。
12.6.3 性能比较
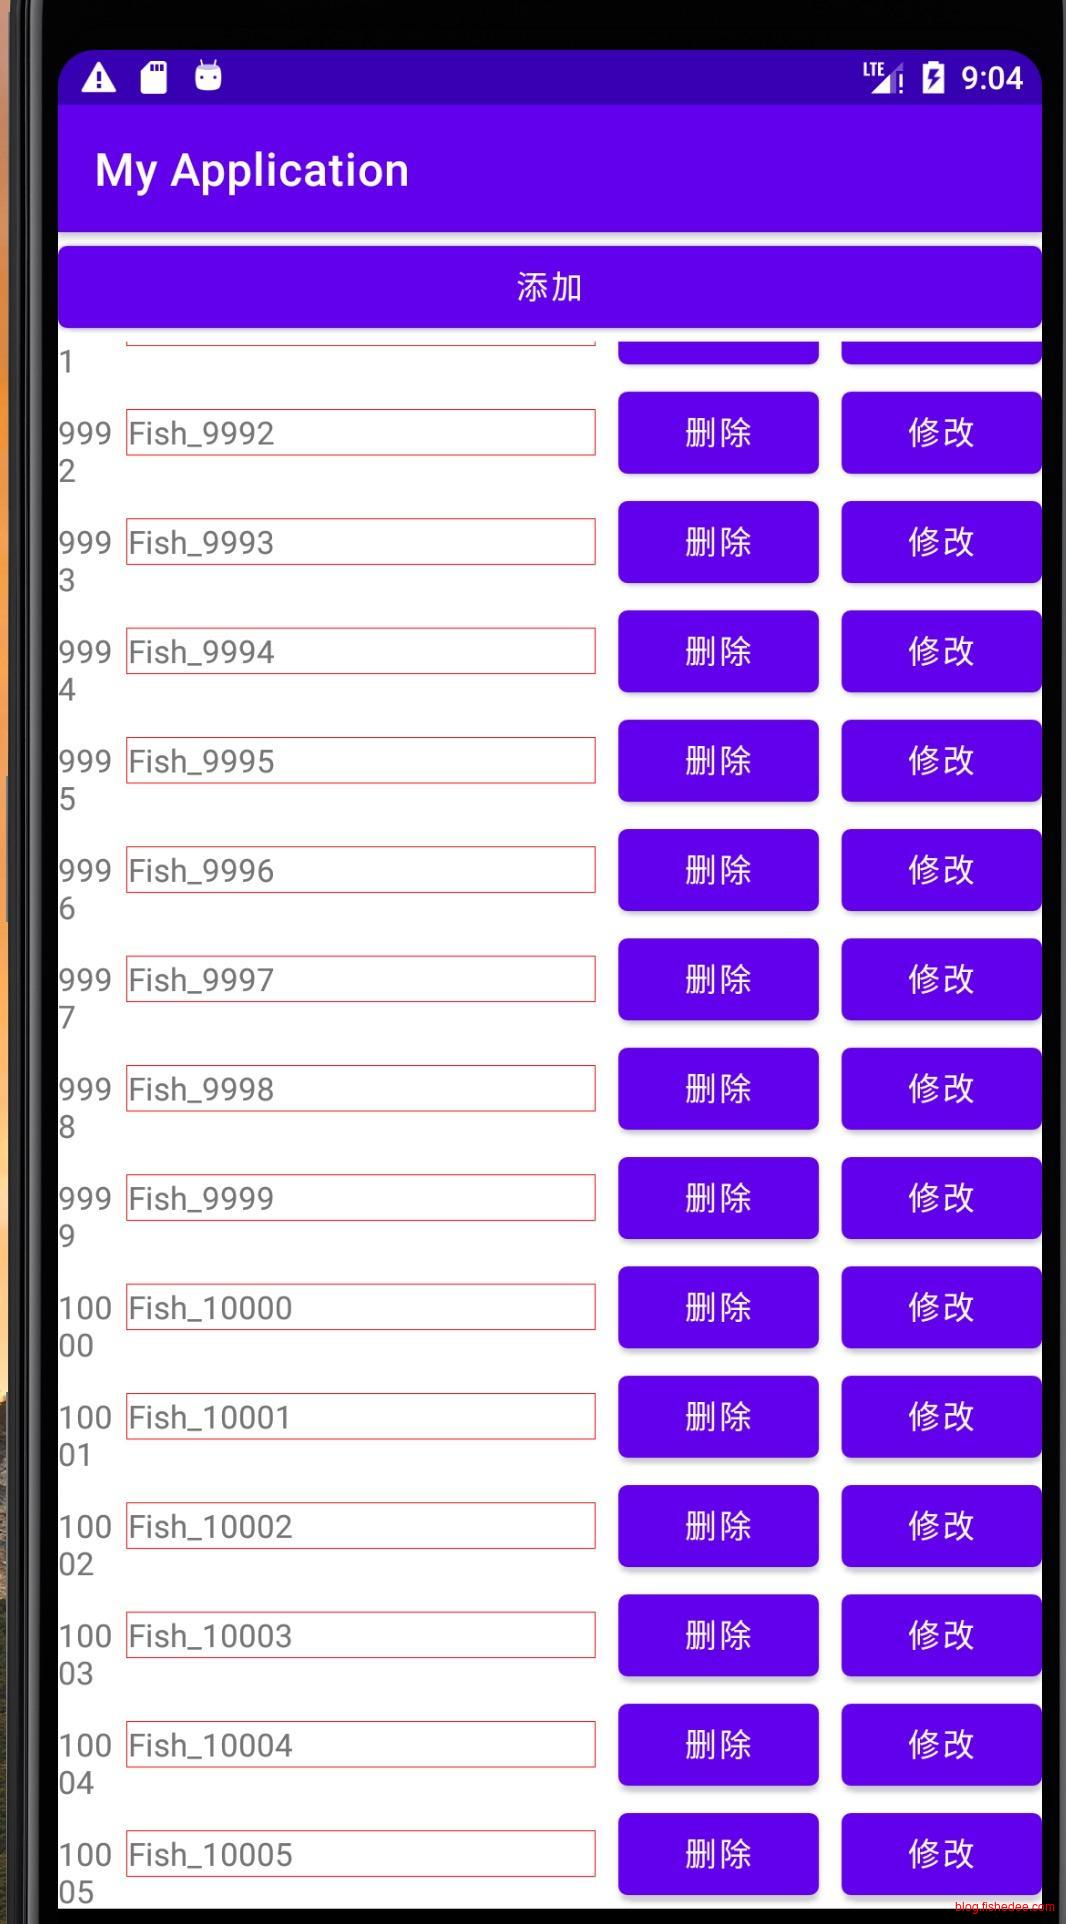
初始化1万条的数据。
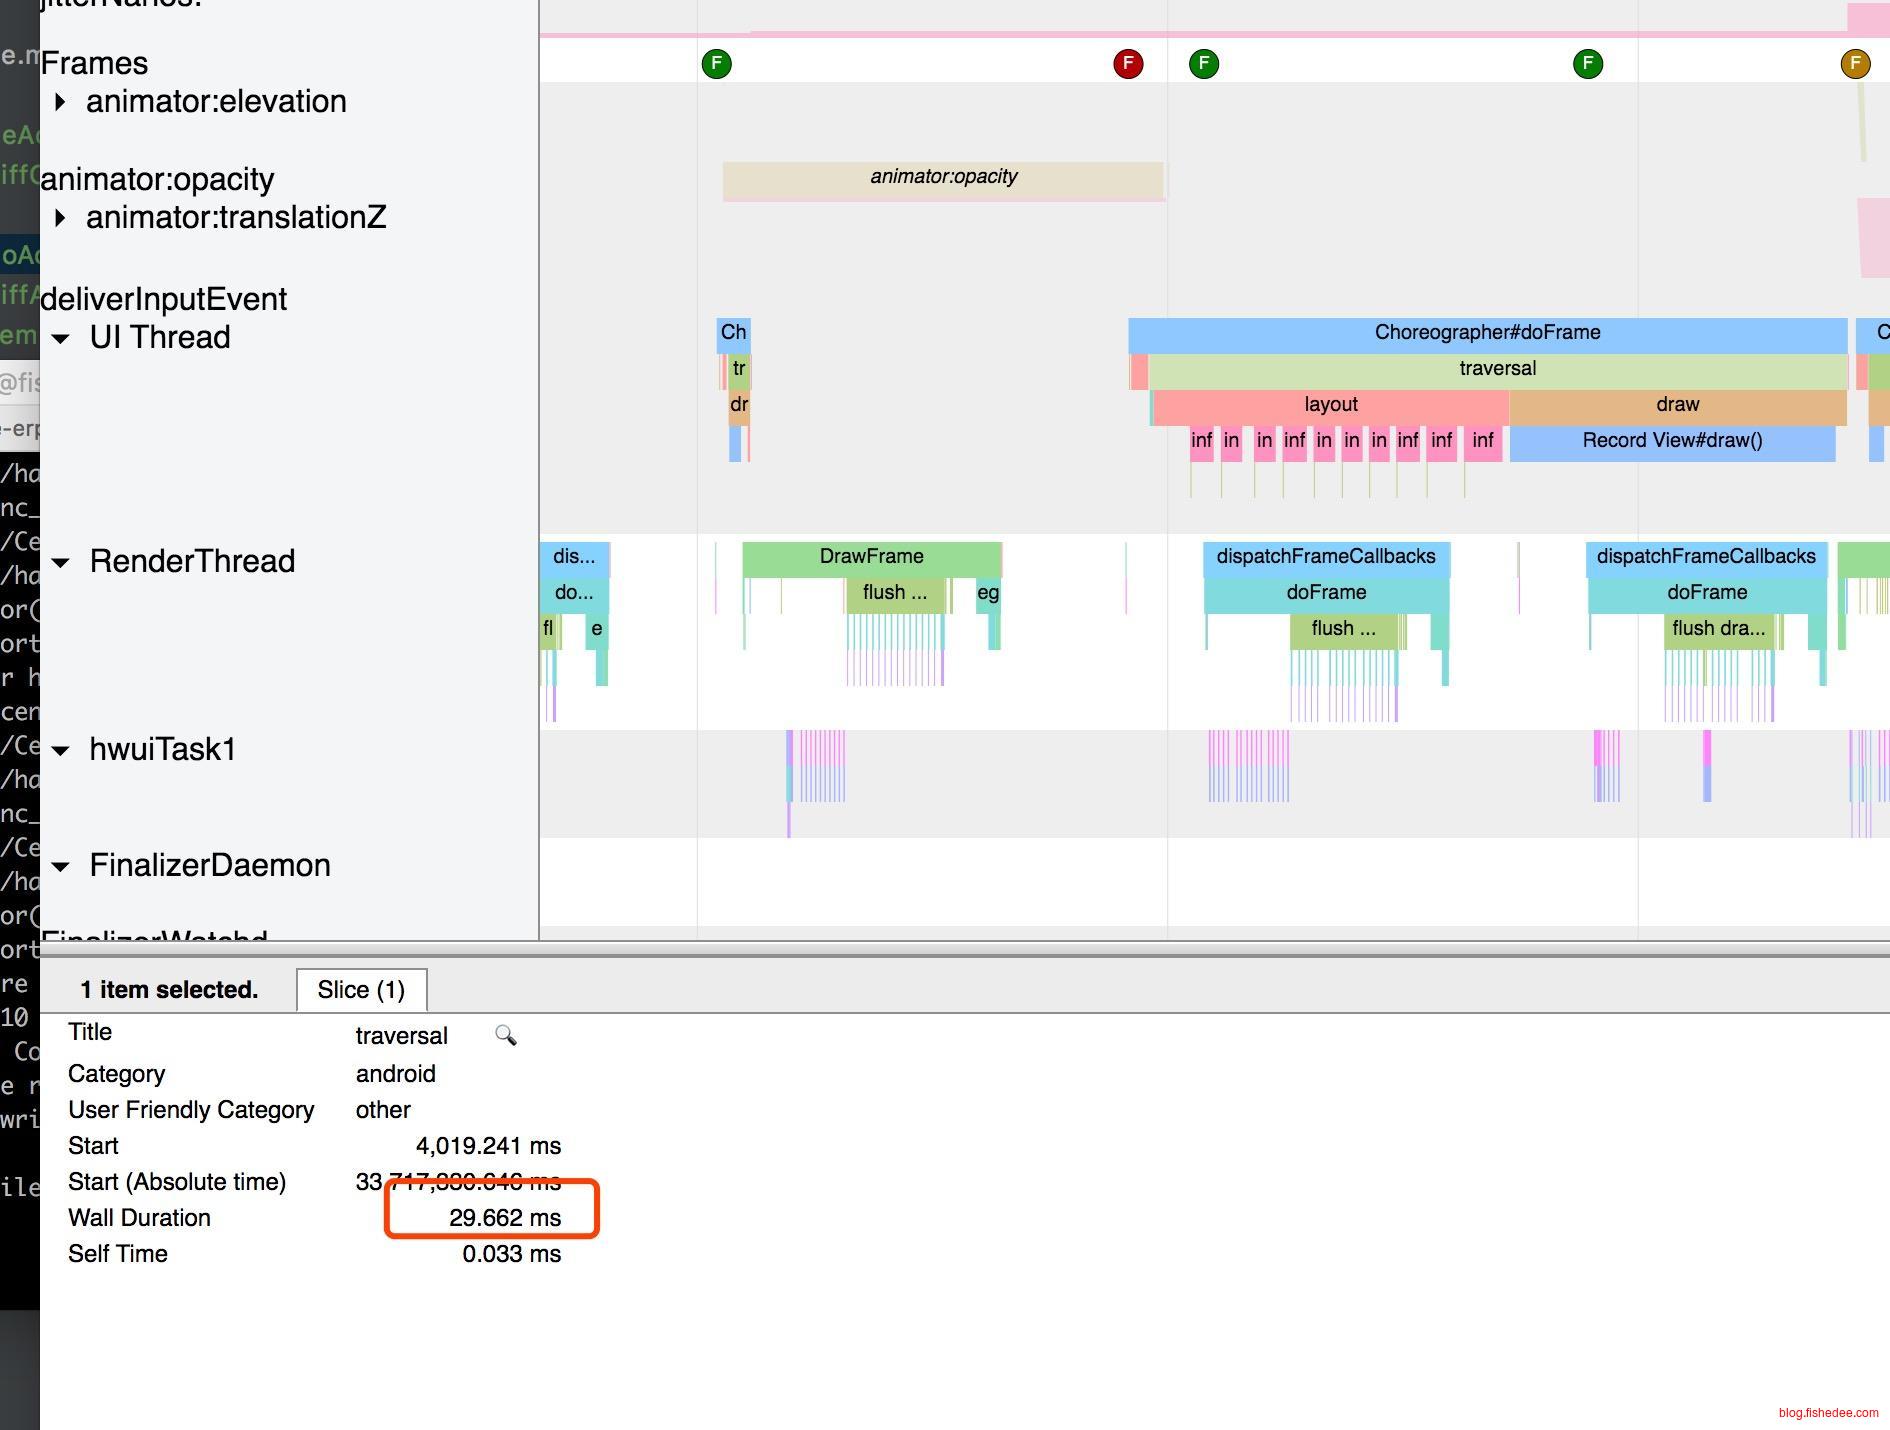
notifyDataSetChanged,尾部添加一条的性能是30ms
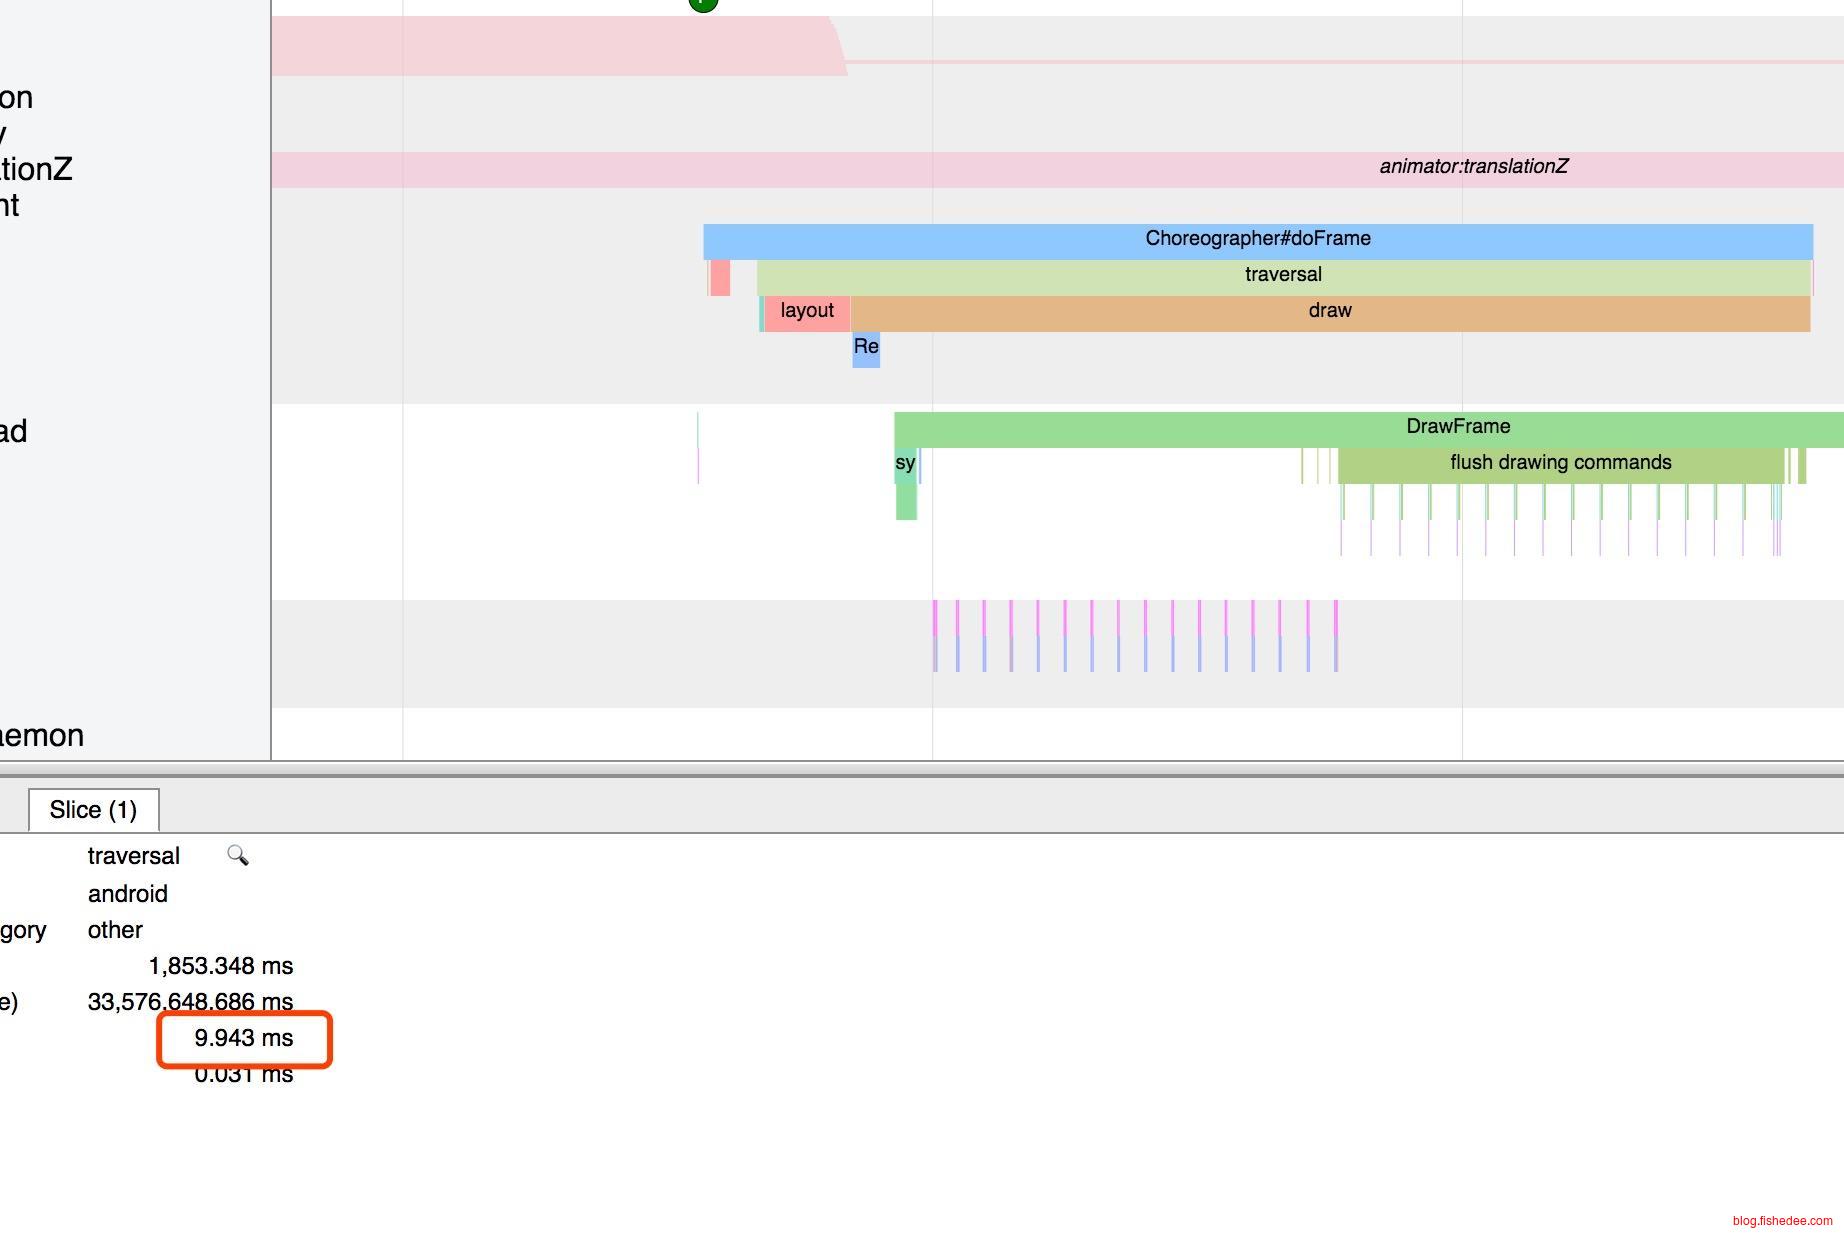
使用DiffUtil以后,尾部添加一条的性能是10ms,效率要好不少,而且有item的进场和退场的动画显示。
13 事件
代码看这里
13.1 基于回调的事件机制
package com.example.myapplication

import android.content.Context
import android.util.AttributeSet
import android.util.Log
import android.view.MotionEvent
import android.view.View

class MyTouchView(ctx: Context, attrs:AttributeSet) : View(ctx,attrs){
    override fun onTouchEvent(event: MotionEvent): Boolean {
        val x = event.x
        val y = event.y
        when(event.action){
            MotionEvent.ACTION_DOWN->{
                Log.d("MotionEvent","down x = ${x} , y = ${y}")
            }
            MotionEvent.ACTION_MOVE->{
                Log.d("MotionEvent","move x = ${x} , y = ${y}")
            }
            MotionEvent.ACTION_UP->{
                Log.d("MotionEvent","up x = ${x} , y = ${y}")
            }
        }
        return super.onTouchEvent(event)
    }
}
创建一个TouchView来倾听事件
<?xml version="1.0" encoding="utf-8"?>
<androidx.constraintlayout.widget.ConstraintLayout xmlns:android="http://schemas.android.com/apk/res/android"
    xmlns:app="http://schemas.android.com/apk/res-auto"
    xmlns:tools="http://schemas.android.com/tools"
    android:layout_width="match_parent"
    android:layout_height="match_parent"
    tools:context=".CallbackEventActivity">
    <com.example.myapplication.MyTouchView
        android:layout_width="100dp"
        android:layout_height="100dp"
        android:background="@drawable/border"
        app:layout_constraintLeft_toLeftOf="parent"
        app:layout_constraintRight_toRightOf="parent"
        app:layout_constraintTop_toTopOf="parent"
        app:layout_constraintBottom_toBottomOf="parent"/>
</androidx.constraintlayout.widget.ConstraintLayout>
布局文件
13.2 事件冒泡
package com.example.myapplication

import android.content.Context
import android.util.AttributeSet
import android.util.Log
import android.view.MotionEvent
import androidx.appcompat.widget.AppCompatButton

class MyButton(ctx:Context,attrs: AttributeSet) :AppCompatButton(ctx,attrs){
    private var shouldStopSpread = false

    fun setShouldStopSpread(target:Boolean){
        this.shouldStopSpread = target
    }

    override fun onTouchEvent(event: MotionEvent?): Boolean {
        Log.d("MyButton","onTouchEvent")
        super.onTouchEvent(event)
        //return false表示会往外传播
        return this.shouldStopSpread
    }
}
在onTouchEvent,返回false的话,将事件往上冒泡。
<?xml version="1.0" encoding="utf-8"?>
<LinearLayout xmlns:android="http://schemas.android.com/apk/res/android"
    xmlns:app="http://schemas.android.com/apk/res-auto"
    android:orientation="vertical"
    xmlns:tools="http://schemas.android.com/tools"
    android:layout_width="match_parent"
    android:layout_height="match_parent"
    tools:context=".BubbleEventActivity">
    <com.example.myapplication.MyButton
        android:id="@+id/not_bubble_button"
        android:layout_width="match_parent"
        android:layout_height="wrap_content"
        android:text="不触发冒泡"/>

    <com.example.myapplication.MyButton
        android:id="@+id/bubble_button"
        android:layout_width="match_parent"
        android:layout_height="wrap_content"
        android:text="触发冒泡"/>
</LinearLayout>
布局文件
package com.example.myapplication

import androidx.appcompat.app.AppCompatActivity
import android.os.Bundle
import android.util.Log
import android.view.MotionEvent
import kotlinx.android.synthetic.main.activity_bubble_event.*

class BubbleEventActivity : AppCompatActivity() {
    override fun onCreate(savedInstanceState: Bundle?) {
        super.onCreate(savedInstanceState)
        setContentView(R.layout.activity_bubble_event)
        not_bubble_button.setShouldStopSpread(true)
        bubble_button.setShouldStopSpread(false)
    }

    override fun onTouchEvent(event: MotionEvent): Boolean {
        Log.d("TouchEvent","Activity touch")
        return super.onTouchEvent(event)
    }
}
测试文件
从测试Activity可以看到,点击not_bubble_button的话,没有事件冒泡,点击bubble_button的话,有事件冒泡。
13.3 Handler事件处理UI
<?xml version="1.0" encoding="utf-8"?>
<LinearLayout xmlns:android="http://schemas.android.com/apk/res/android"
    xmlns:app="http://schemas.android.com/apk/res-auto"
    xmlns:tools="http://schemas.android.com/tools"
    android:orientation="vertical"
    android:layout_width="match_parent"
    android:layout_height="match_parent"
    tools:context=".HandlerEventActivity">
    <TextView
        android:id="@+id/showCount"
        android:layout_width="match_parent"
        android:layout_height="wrap_content"
        android:textSize="20sp"
        android:gravity="center_horizontal"/>
    <Button
        android:id="@+id/beginCount"
        android:layout_width="match_parent"
        android:layout_height="wrap_content"
        android:text="开始倒数"/>
</LinearLayout>
布局文件
package com.example.myapplication

import androidx.appcompat.app.AppCompatActivity
import android.os.Bundle
import android.os.Handler
import android.os.Message
import android.util.Log
import kotlinx.android.synthetic.main.activity_handler_event.*
import java.lang.ref.WeakReference
import java.util.*

class HandlerEventActivity : AppCompatActivity() {
    var timer:Timer? = null

    var currentCounter:Int = 10

    class MyHandler(val contenxt:HandlerEventActivity):Handler(){
        //使用WeakReference避免内存泄漏
        private val mActivty: WeakReference<HandlerEventActivity> = WeakReference(contenxt);

        override fun handleMessage(msg: Message) {
            if( msg.what == 110 ){
                val text = msg.data.getString("value") ?:""
                mActivty.get()?.setCounterText(text)
            }
        }
    }
    val handler = MyHandler(this)

    fun setCounterText(data:String){
        showCount.text = data
    }
    override fun onCreate(savedInstanceState: Bundle?) {
        super.onCreate(savedInstanceState)
        setContentView(R.layout.activity_handler_event)
        beginCount.setOnClickListener {
            if( timer != null ){
                timer?.cancel()
                timer = null
            }
            //Timer在额外的线程上
            timer = Timer()
            currentCounter = 11
            timer?.schedule(object :TimerTask(){
                override fun run() {
                    if( currentCounter <= 0 ){
                        timer?.cancel()
                        timer = null
                        return
                    }
                    currentCounter--

                    val message = Message()
                    message.what = 110
                    val bundle = Bundle()
                    bundle.putString("value",currentCounter.toString())
                    message.data = bundle
                    handler.sendMessage(message)
                }
            },0,1000)
        }
    }
}
要点如下:
- 使用Timer来创建定时器,注意用Timer.cancel来取消定时器,Timer在非UI线程进行操作
- 使用Handler来做UI线程的修改操作,对Handler的通信需要用sendMessage来处理,最后,注意Handler不能直接持有Activity引用,需要用WeakReference来避免内存泄漏。
13.4 焦点
代码在这里
13.4.1 回车跳焦点
<?xml version="1.0" encoding="utf-8"?>
<LinearLayout xmlns:android="http://schemas.android.com/apk/res/android"
    android:orientation="vertical"
    xmlns:app="http://schemas.android.com/apk/res-auto"
    xmlns:tools="http://schemas.android.com/tools"
    android:layout_width="match_parent"
    android:layout_height="match_parent"
    tools:context=".DefaultFocusActivity"
    android:padding="10dp"
    android:divider="@drawable/divider">
    <EditText
        android:background="@drawable/border"
        android:layout_width="match_parent"
        android:layout_height="wrap_content"
        android:inputType="text"
        android:maxLines="1"
        android:text="选择1"/>
    <EditText
        android:background="@drawable/border"
        android:layout_width="match_parent"
        android:layout_height="wrap_content"
        android:inputType="text"
        android:maxLines="1"
        android:text="选择2"/>
    <LinearLayout
        android:layout_width="match_parent"
        android:layout_height="wrap_content">
        <EditText
            android:background="@drawable/border"
            android:layout_width="0dp"
            android:layout_weight="1"
            android:layout_height="wrap_content"
            android:inputType="text"
            android:maxLines="1"
            android:text="选择3"/>
        <EditText
            android:background="@drawable/border"
            android:layout_width="0dp"
            android:layout_weight="1"
            android:layout_height="wrap_content"
            android:inputType="text"
            android:maxLines="1"
            android:text="选择4"/>
    </LinearLayout>
    <EditText
        android:background="@drawable/border"
        android:layout_width="match_parent"
        android:layout_height="wrap_content"
        android:inputType="text"
        android:maxLines="1"
        android:text="选择5"/>
</LinearLayout>
代码在这里
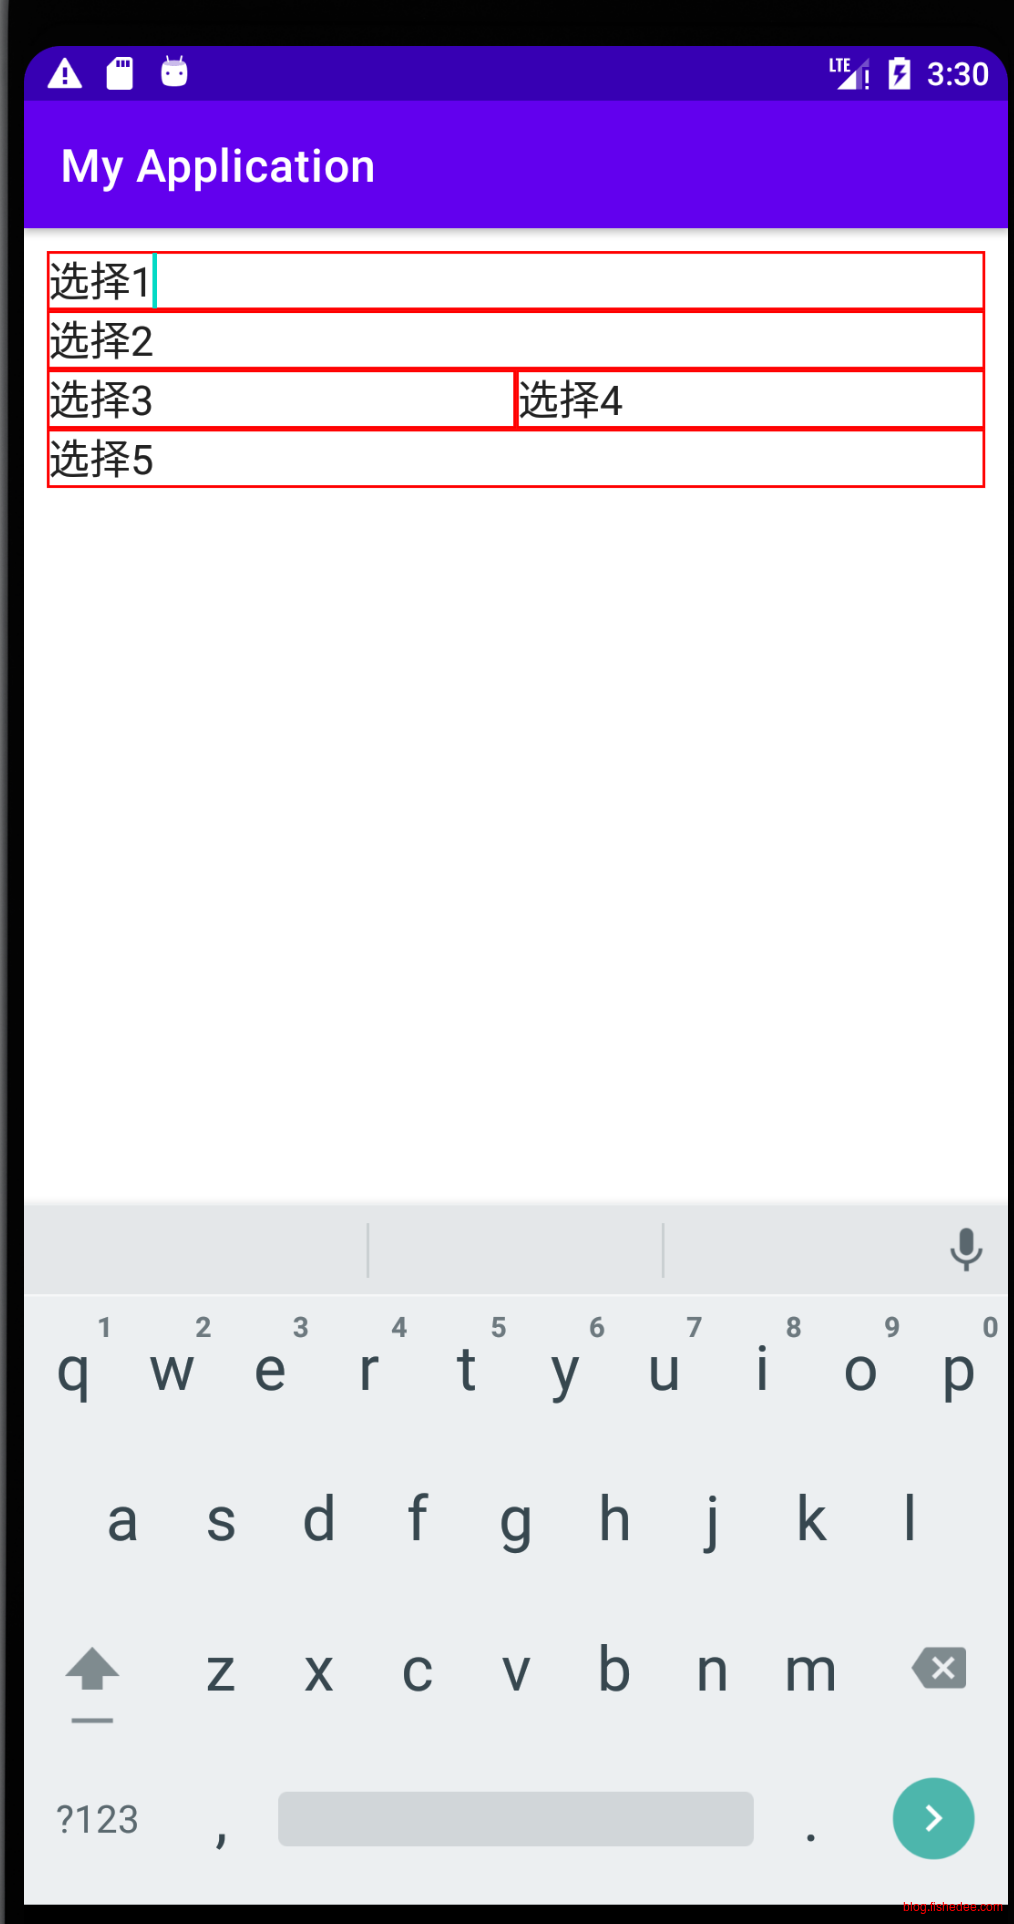
效果如上
默认情况下,输入回车键会自动跳动到下一个EditText上。注意,回车的跳动是,往下跳动,不往右跳动的。所以,从1 -> 2 -> 3 -> 5 ,不会经过4的。
13.4.2 ViewGroup自身焦点
<?xml version="1.0" encoding="utf-8"?>
<LinearLayout xmlns:android="http://schemas.android.com/apk/res/android"
    android:orientation="vertical"
    xmlns:app="http://schemas.android.com/apk/res-auto"
    xmlns:tools="http://schemas.android.com/tools"
    android:layout_width="match_parent"
    android:layout_height="match_parent"
    tools:context=".FocusableActivity"
    android:padding="10dp"
    android:divider="@drawable/divider">
    <EditText
        android:background="@drawable/border"
        android:layout_width="match_parent"
        android:layout_height="wrap_content"
        android:inputType="text"
        android:maxLines="1"
        android:text="选择1"/>
    <EditText
        android:background="@drawable/border"
        android:layout_width="match_parent"
        android:layout_height="wrap_content"
        android:inputType="text"
        android:maxLines="1"
        android:text="选择2"/>
    <LinearLayout
        android:orientation="vertical"
        android:layout_width="match_parent"
        android:layout_height="wrap_content">
        <LinearLayout
            android:layout_width="match_parent"
            android:layout_height="wrap_content"
            android:orientation="horizontal"
            android:background="@drawable/focus_bg"
            android:padding="10dp"
            android:focusable="true"
            android:focusableInTouchMode="true">
            <EditText
                android:background="@drawable/border"
                android:layout_width="wrap_content"
                android:layout_height="wrap_content"
                android:inputType="text"
                android:maxLines="1"
                android:text="选择3"/>
        </LinearLayout>
        <LinearLayout
            android:layout_width="match_parent"
            android:layout_height="wrap_content"
            android:orientation="horizontal"
            android:background="@drawable/focus_bg"
            android:padding="10dp"
            android:focusable="false"
            android:focusableInTouchMode="false">
            <EditText
                android:background="@drawable/border"
                android:layout_width="wrap_content"
                android:layout_height="wrap_content"
                android:inputType="text"
                android:maxLines="1"
                android:text="选择4"/>
        </LinearLayout>
        <LinearLayout
            android:layout_width="match_parent"
            android:layout_height="wrap_content"
            android:orientation="horizontal"
            android:background="@drawable/focus_bg"
            android:padding="10dp"
            android:focusable="true"
            android:focusableInTouchMode="true">
            <EditText
                android:background="@drawable/border"
                android:layout_width="wrap_content"
                android:layout_height="wrap_content"
                android:inputType="text"
                android:maxLines="1"
                android:text="选择5"/>
        </LinearLayout>
        <LinearLayout
            android:layout_width="match_parent"
            android:layout_height="wrap_content"
            android:orientation="horizontal"
            android:background="@drawable/focus_bg"
            android:padding="10dp">
            <EditText
                android:background="@drawable/border"
                android:layout_width="wrap_content"
                android:layout_height="wrap_content"
                android:inputType="text"
                android:maxLines="1"
                android:text="选择6"/>
        </LinearLayout>
    </LinearLayout>
</LinearLayout>
代码如上
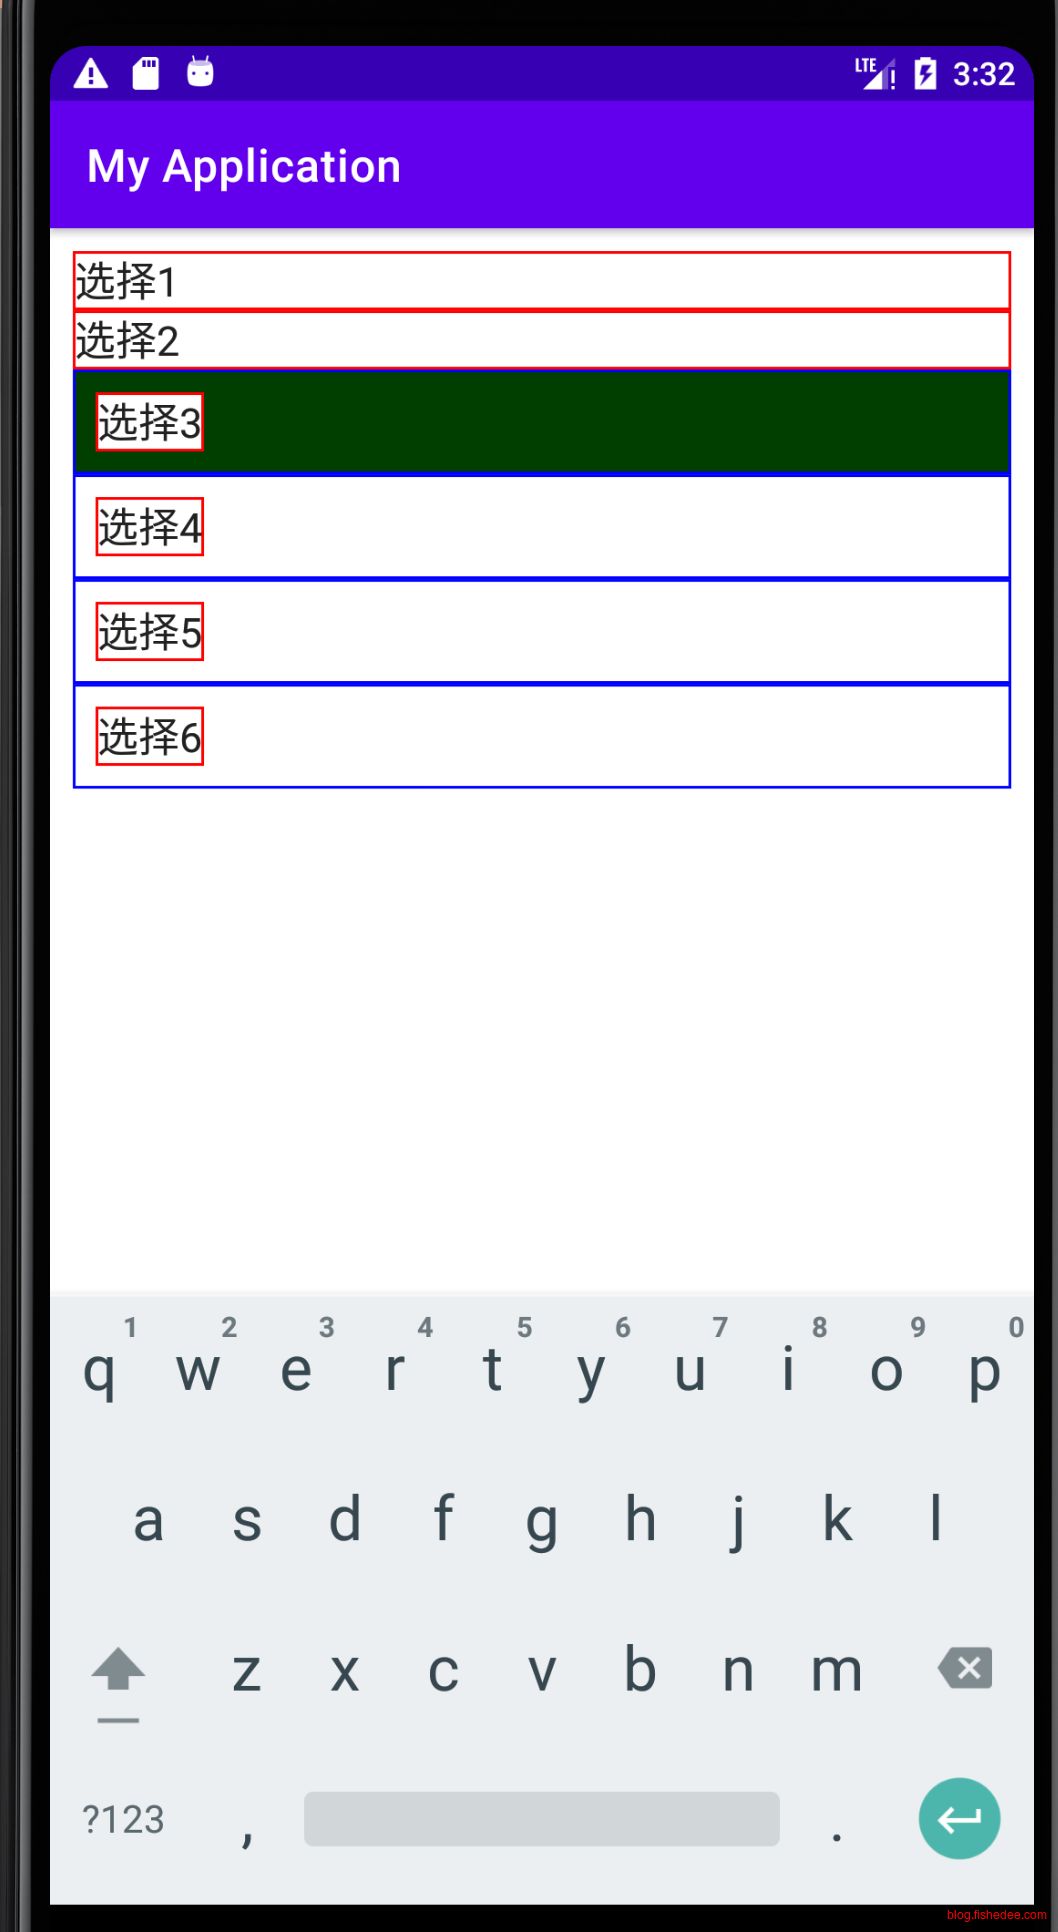
默认情况下,ViewGroup是没有焦点的。但是,我们可以通过focusable让他称为焦点。当在2的位置,输入回车的时候,焦点就会聚焦在LinearLayout上面了,而不是在3号的EditText上。
13.4.3 descendantFocusability
<?xml version="1.0" encoding="utf-8"?>
<LinearLayout xmlns:android="http://schemas.android.com/apk/res/android"
    android:orientation="vertical"
    xmlns:app="http://schemas.android.com/apk/res-auto"
    xmlns:tools="http://schemas.android.com/tools"
    android:layout_width="match_parent"
    android:layout_height="match_parent"
    tools:context=".FocusableActivity"
    android:padding="10dp"
    android:divider="@drawable/divider">
    <EditText
        android:background="@drawable/border"
        android:layout_width="match_parent"
        android:layout_height="wrap_content"
        android:inputType="text"
        android:maxLines="1"
        android:text="选择1"/>
    <EditText
        android:background="@drawable/border"
        android:layout_width="match_parent"
        android:layout_height="wrap_content"
        android:inputType="text"
        android:maxLines="1"
        android:text="选择2"/>
    <LinearLayout
        android:orientation="vertical"
        android:layout_width="match_parent"
        android:layout_height="wrap_content"
        android:focusable="true"
        android:focusableInTouchMode="true"
        android:descendantFocusability="beforeDescendants">
        <LinearLayout
            android:layout_width="match_parent"
            android:layout_height="wrap_content"
            android:orientation="horizontal"
            android:background="@drawable/focus_bg"
            android:padding="10dp"
            android:focusable="true"
            android:focusableInTouchMode="true">
            <EditText
                android:background="@drawable/border"
                android:layout_width="wrap_content"
                android:layout_height="wrap_content"
                android:inputType="text"
                android:maxLines="1"
                android:text="选择3"/>
        </LinearLayout>
        <LinearLayout
            android:layout_width="match_parent"
            android:layout_height="wrap_content"
            android:orientation="horizontal"
            android:background="@drawable/focus_bg"
            android:padding="10dp"
            android:focusable="true"
            android:focusableInTouchMode="true"
            android:descendantFocusability="afterDescendants">
            <EditText
                android:background="@drawable/border"
                android:layout_width="wrap_content"
                android:layout_height="wrap_content"
                android:inputType="text"
                android:maxLines="1"
                android:text="选择4"/>
        </LinearLayout>
        <LinearLayout
            android:layout_width="match_parent"
            android:layout_height="wrap_content"
            android:orientation="horizontal"
            android:background="@drawable/focus_bg"
            android:padding="10dp"
            android:focusable="true"
            android:focusableInTouchMode="true"
            android:descendantFocusability="blocksDescendants">
            <EditText
                android:background="@drawable/border"
                android:layout_width="wrap_content"
                android:layout_height="wrap_content"
                android:inputType="text"
                android:maxLines="1"
                android:text="选择5"/>
        </LinearLayout>
        <LinearLayout
            android:layout_width="match_parent"
            android:layout_height="wrap_content"
            android:orientation="horizontal"
            android:background="@drawable/focus_bg"
            android:padding="10dp">
            <EditText
                android:background="@drawable/border"
                android:layout_width="wrap_content"
                android:layout_height="wrap_content"
                android:inputType="text"
                android:maxLines="1"
                android:text="选择6"/>
        </LinearLayout>
    </LinearLayout>
</LinearLayout>
当focusable与descendantFocusability一起的使用的时候,有这些效果:
- beforeDescendants:viewgroup会优先其子类控件而获取到焦点
- afterDescendants:viewgroup只有当其子类控件不需要获取焦点时才获取焦点
- blocksDescendants:viewgroup会覆盖子类控件而直接获得焦点。子类控件无法获取焦点,这个属性比较常用。
14 资源
14.1 值资源
14.1.1 字符串
<resources>
    <string name="app_name">My Application</string>
    <string name="str1">你好</string>
    <string name="str2">再见</string>
</resources>
res/values/strings.xml
14.1.2 颜色
<?xml version="1.0" encoding="utf-8"?>
<resources>
    <color name="purple_200">#FFBB86FC</color>
    <color name="purple_500">#FF6200EE</color>
    <color name="purple_700">#FF3700B3</color>
    <color name="teal_200">#FF03DAC5</color>
    <color name="teal_700">#FF018786</color>
    <color name="black">#FF000000</color>
    <color name="white">#FFFFFFFF</color>
    <color name="real">#FF0000</color>
</resources>
res/values/colors.xml
14.1.3 布尔资源
<?xml version="1.0" encoding="utf-8"?>
<resources>
    <bool name="male">true</bool>
    <bool name="female">false</bool>
</resources>
res/values/bools.xml
14.1.4 尺寸资源
<?xml version="1.0" encoding="utf-8"?>
<resources>
    <dimen name="cell_with">20dp</dimen>
    <dimen name="cell_height">30dp</dimen>
</resources>
res/values/dimens.xml
14.1.5 数组资源
<?xml version="1.0" encoding="utf-8"?>
<resources>
    <array name="plain_arr">
        <item>@color/black</item>
        <item>@color/white</item>
        <item>@color/real</item>
    </array>
    <string-array name="Books">
        <item>DDIA</item>
        <item>DDD架构</item>
        <item>第一行安卓代码</item>
    </string-array>
</resources>
res/values/arrays.xml
14.1.6 xml引用资源
<?xml version="1.0" encoding="utf-8"?>
<LinearLayout xmlns:android="http://schemas.android.com/apk/res/android"
    xmlns:app="http://schemas.android.com/apk/res-auto"
    android:orientation="vertical"
    xmlns:tools="http://schemas.android.com/tools"
    android:showDividers="middle"
    android:padding="10dp"
    android:divider="@drawable/divider"
    android:layout_width="match_parent"
    android:layout_height="match_parent"
    tools:context=".ValueResourceActivity">
    <!--XML的方式获取资源-->
    <Button
        android:background="@color/white"
        android:layout_width="match_parent"
        android:layout_height="wrap_content"
        android:text="点我"/>
    <Button
        android:layout_width="match_parent"
        android:layout_height="wrap_content"
        android:text="@string/str1"/>
    <Button
        android:layout_width="match_parent"
        android:layout_height="@dimen/cell_height"
        android:text="点我2"/>
    <Button
        android:layout_width="match_parent"
        android:layout_height="wrap_content"
        android:enabled="@bool/female"
        android:text="点我3"/>
    <ListView
        android:layout_width="match_parent"
        android:layout_height="0dp"
        android:layout_weight="1"
        android:entries="@array/Books"/>
</LinearLayout>@xxx/yy,引用方式还是比较简单的
14.1.7 代码引用资源
package com.example.myapplication

import androidx.appcompat.app.AppCompatActivity
import android.os.Bundle
import android.util.Log
import java.util.*

class ValueResourceActivity : AppCompatActivity() {
    override fun onCreate(savedInstanceState: Bundle?) {
        super.onCreate(savedInstanceState)
        setContentView(R.layout.activity_value_resource)

        //代码的方式获取资源
        val bool = resources.getBoolean(R.bool.female)
        val color = resources.getColor(R.color.black)
        val str = resources.getString(R.string.str2)
        val dimen = resources.getDimension(R.dimen.cell_with)
        val array = resources.getStringArray(R.array.Books)
        val array2 = resources.obtainTypedArray(R.array.plain_arr)

        Log.d("ValueResource","Bool ${bool}")
        Log.d("ValueResource","Color ${color}")
        Log.d("ValueResource","String ${str}")
        Log.d("ValueResource","Dimen ${dimen}")
        Log.d("ValueResource","StringArray ${array.toList()}")
        //getColor,第一个参数是index索引,第二个参数是不存在时的默认值
        Log.d("ValueResource","TypedArray ${array2} ${array2.getColor(0,0)}")
    }
}
注意一下Array分为StringArray与TypedArray两种
14.2 动画资源
14.2.1 属性动画
属性动画就是描述一个数值如何随着时间变化。
<?xml version="1.0" encoding="utf-8"?>
<animator xmlns:android="http://schemas.android.com/apk/res/android"
    android:duration="300"
    android:valueFrom="0"
    android:valueTo="500"
    android:startOffset="0"
    android:repeatCount="2"
    android:repeatMode="restart"
    android:valueType="floatType">
</animator>
res/animator/normal.xml,普通的属性动画
<?xml version="1.0" encoding="utf-8"?>
<objectAnimator xmlns:android="http://schemas.android.com/apk/res/android"
    android:propertyName="backgroundColor"
    android:duration="300"
    android:valueFrom="#FF8080"
    android:valueTo="#8080FF"
    android:startOffset="0"
    android:repeatCount="infinite"
    android:repeatMode="reverse"
    android:valueType="intType">
</objectAnimator>
res/animator/property.xml,普通的对象属性动画,普通属性动画的增强,绑定了View的某个属性
<?xml version="1.0" encoding="utf-8"?>
<set xmlns:android="http://schemas.android.com/apk/res/android" android:ordering="together">
    <animator
        android:duration="300"
        android:valueFrom="0"
        android:valueTo="200"
        android:startOffset="0"
        android:repeatCount="10"
        android:repeatMode="restart"
        android:valueType="floatType"/>
    <objectAnimator
        android:propertyName="backgroundColor"
        android:duration="300"
        android:valueFrom="#FF8080"
        android:valueTo="#8080FF"
        android:startOffset="0"
        android:repeatCount="10"
        android:repeatMode="reverse"
        android:valueType="intType"/>
</set>
res/animator/set.xml,属性动画集合,将多种动画合并在一起
package com.example.myapplication

import android.animation.*
import androidx.appcompat.app.AppCompatActivity
import android.os.Bundle
import android.util.Log
import android.view.animation.AccelerateDecelerateInterpolator
import android.view.animation.AnimationSet
import androidx.core.view.marginLeft
import androidx.core.view.marginTop
import kotlinx.android.synthetic.main.activity_property_animation.*

class PropertyAnimationActivity : AppCompatActivity() {
    override fun onCreate(savedInstanceState: Bundle?) {
        super.onCreate(savedInstanceState)
        setContentView(R.layout.activity_property_animation)
        animator_button1.setOnClickListener {
            val valueAnimator = AnimatorInflater.loadAnimator(this,R.animator.default_normal_animator) as ValueAnimator
            valueAnimator.addUpdateListener { animateValue->
                animator_button1.translationY = animateValue.animatedValue as Float
            }
            //避免内存泄漏
            valueAnimator.setTarget(animator_button1)
            valueAnimator.start()
        }
        animator_button2.setOnClickListener {
            var objectAnimator = AnimatorInflater.loadAnimator(this,R.animator.default_object_animator) as ObjectAnimator
            objectAnimator.target = animator_button2
            objectAnimator.start()
        }
        animator_button3.setOnClickListener {
            var setAnimator = AnimatorInflater.loadAnimator(this,R.animator.default_set_animator) as AnimatorSet
            val firstAnimator = setAnimator.childAnimations[0] as ValueAnimator
            firstAnimator.addUpdateListener { animationValue->
                animator_button3.translationX = animationValue.animatedValue as Float
            }
            firstAnimator.setTarget(animator_button3)
            val secondAnimator = setAnimator.childAnimations[1] as ObjectAnimator
            secondAnimator.target = animator_button3
            setAnimator.start()
        }

    }
}
代码的使用方式
14.2.2 补间动画
补间动画,就是View特定的平移,缩放,旋转,透明度变化的动画,有特别的性能优化。
<?xml version="1.0" encoding="utf-8"?>
<set xmlns:android="http://schemas.android.com/apk/res/android"
    android:shareInterpolator="true"
    android:duration="500">
    <alpha
        android:fromAlpha="0.1"
        android:toAlpha="1"/>
    <scale
        android:fromXScale="1.0"
        android:toXScale="1.4"
        android:fromYScale="1.0"
        android:toYScale="0.6"
        android:pivotX="50%"
        android:pivotY="50%"/>
    <translate
        android:fromXDelta="-100"
        android:toXDelta="230"
        android:fromYDelta="30"
        android:toYDelta="-80"/>
    <rotate
        android:fromDegrees="0"
        android:toDegrees="90"
        android:pivotX="50%"
        android:pivotY="50%"/>
</set>
res/anim/tween.xml文件
package com.example.myapplication

import androidx.appcompat.app.AppCompatActivity
import android.os.Bundle
import android.view.animation.AnimationUtils
import android.view.animation.LinearInterpolator
import kotlinx.android.synthetic.main.activity_tween_animation.*

class TweenAnimationActivity : AppCompatActivity() {
    override fun onCreate(savedInstanceState: Bundle?) {
        super.onCreate(savedInstanceState)
        setContentView(R.layout.activity_tween_animation)
        begin.setOnClickListener {
            val anim = AnimationUtils.loadAnimation(this,R.anim.default_tween)
            //动画结束后保持结束状态
            anim.fillAfter = true
            anim.interpolator = LinearInterpolator()
            myImage.startAnimation(anim)
        }
    }
}
动画的使用方式,也比较简单
14.2.3 帧动画
帧动画就是指定动画的多个关键帧,然后由系统来自动插值生成中间帧。
<?xml version="1.0" encoding="utf-8"?>
<animation-list xmlns:android="http://schemas.android.com/apk/res/android">
    <item android:drawable="@drawable/run1" android:duration="100"/>
    <item android:drawable="@drawable/run2" android:duration="100"/>
    <item android:drawable="@drawable/run3" android:duration="100"/>
</animation-list>
res/drawable/frame_anim.xml,注意要放在drawable目录下
<?xml version="1.0" encoding="utf-8"?>
<LinearLayout xmlns:android="http://schemas.android.com/apk/res/android"
    xmlns:app="http://schemas.android.com/apk/res-auto"
    android:orientation="vertical"
    xmlns:tools="http://schemas.android.com/tools"
    android:layout_width="match_parent"
    android:layout_height="match_parent"
    tools:context=".FrameAnimationActivity">
    <Button
        android:id="@+id/beginFrame"
        android:layout_width="match_parent"
        android:layout_height="wrap_content"
        android:text="开始动画"/>
    <ImageView
        android:id="@+id/frameView"
        android:layout_width="match_parent"
        android:layout_height="wrap_content"/>
</LinearLayout>
布局文件
package com.example.myapplication

import android.graphics.drawable.AnimationDrawable
import androidx.appcompat.app.AppCompatActivity
import android.os.Bundle
import kotlinx.android.synthetic.main.activity_frame_animation.*

class FrameAnimationActivity : AppCompatActivity() {
    override fun onCreate(savedInstanceState: Bundle?) {
        super.onCreate(savedInstanceState)
        setContentView(R.layout.activity_frame_animation)
        beginFrame.setOnClickListener {
            val animationDrawable = resources.getDrawable(R.drawable.frame_anim) as AnimationDrawable
            frameView.setImageDrawable(animationDrawable)
            animationDrawable.start()
        }
    }
}
启动动画的方式
14.3 样式与主题资源
<?xml version="1.0" encoding="utf-8"?>
<resources>
    <style name="style1">
        <item name="android:textSize">30dp</item>
        <item name="android:textColor">@color/black</item>
    </style>
    <style name="style2" parent="@style/style1">
        <item name="android:padding">10dp</item>
        <item name="android:textColor">@color/teal_200</item>
    </style>
</resources>
res/values/styles.xml,定义样式。注意样式有继承的能力
<?xml version="1.0" encoding="utf-8"?>
<resources>
    <style name="CrazyTheme">
        <item name="android:windowNoTitle">true</item>
        <item name="android:windowFullscreen">true</item>
        <item name="android:windowFrame">@drawable/border</item>
    </style>
</resources>
res/values/theme_styles.xml,定义主题
<?xml version="1.0" encoding="utf-8"?>
<LinearLayout xmlns:android="http://schemas.android.com/apk/res/android"
    xmlns:app="http://schemas.android.com/apk/res-auto"
    android:orientation="vertical"
    xmlns:tools="http://schemas.android.com/tools"
    android:layout_width="match_parent"
    android:layout_height="match_parent"
    tools:context=".StyleAndThemeActivity">
    <EditText
        android:layout_width="match_parent"
        android:layout_height="wrap_content"
        style="@style/style1"
        android:text="输入1"/>
    <EditText
        android:layout_width="match_parent"
        android:layout_height="wrap_content"
        style="@style/style2"
        android:text="输入2"/>
</LinearLayout>
在布局文件中引用我们自己写的style文件
package com.example.myapplication

import androidx.appcompat.app.AppCompatActivity
import android.os.Bundle

class StyleAndThemeActivity : AppCompatActivity() {
    override fun onCreate(savedInstanceState: Bundle?) {
        super.onCreate(savedInstanceState)
        setContentView(R.layout.activity_style_and_theme)
        setTheme(R.style.CrazyTheme)
    }
}
在代码中使用主题的方式
14.4 原始资源
xxxProject/app/src/main/assets/b.mp3
xxxProject/app/src/main/res/raw/a.mp3
在Android中,有两个地方可以设置原始资源文件,分别是assets目录和res/raw目录
package com.example.myapplication

import android.media.MediaPlayer
import android.net.Uri
import androidx.appcompat.app.AppCompatActivity
import android.os.Bundle
import kotlinx.android.synthetic.main.activity_raw.*
import java.io.FileDescriptor

class RawActivity : AppCompatActivity() {
    private lateinit var mediaPlayer1:MediaPlayer
    private lateinit var mediaPlayer2:MediaPlayer

    override fun onCreate(savedInstanceState: Bundle?) {
        super.onCreate(savedInstanceState)
        setContentView(R.layout.activity_raw)

        //读取raw资源
        mediaPlayer1 = MediaPlayer.create(this,R.raw.a)

        //raw资源不能用prepare
        //mediaPlayer1.prepareAsync()

        //读取assets资源,获取FileDescriptor的方式
        val afd = resources.assets.openFd("b.mp3")
        mediaPlayer2 = MediaPlayer()
        mediaPlayer2.setDataSource(afd.fileDescriptor,afd.startOffset,afd.length)
        mediaPlayer2.prepareAsync()
        play1.setOnClickListener {
            mediaPlayer1.start()
        }
        pause1.setOnClickListener {
            if( mediaPlayer1.isPlaying ){
                mediaPlayer1.pause()
            }
        }
        play2.setOnClickListener {
            mediaPlayer2.start()
        }
        pause2.setOnClickListener {
            if( mediaPlayer2.isPlaying ){
                mediaPlayer2.pause()
            }
        }
    }
}
代码中引用原始资源的方式
14.5 绘图资源
<resources xmlns:tools="http://schemas.android.com/tools">
<!-- Base application theme. -->
<style name="Theme.MyApplication" parent="Theme.MaterialComponents.DayNight.NoActionBar.Bridge">
<!-- Primary brand color. -->
<item name="colorPrimary">@color/purple_500</item>
<item name="colorPrimaryVariant">@color/purple_700</item>
<item name="colorOnPrimary">@color/white</item>
<!-- Secondary brand color. -->
<item name="colorSecondary">@color/teal_200</item>
<item name="colorSecondaryVariant">@color/teal_700</item>
<item name="colorOnSecondary">@color/black</item>
<!-- Status bar color. -->
<item name="android:statusBarColor" tools:targetApi="l">?attr/colorPrimaryVariant</item>
<!-- Customize your theme here. -->
</style>
</resources>绘图资源的代码中要将系统主题从NoActionBar.Bridge继承,否则不生效
14.5.1 图片
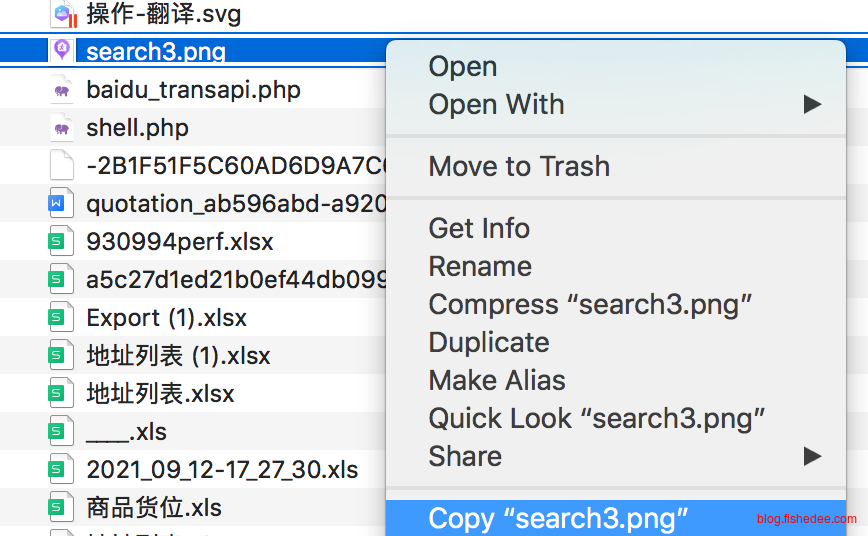
在Finder选择Copy
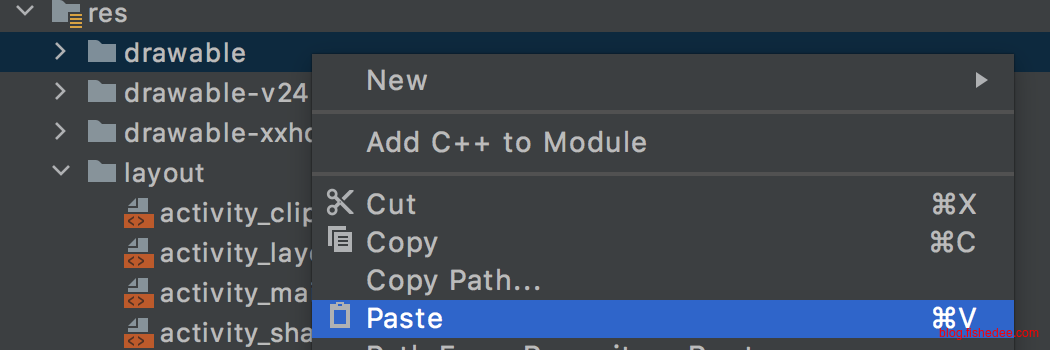
在drawable中选择Paste,就能新增一个图片资源了
14.5.2 Shape
<?xml version="1.0" encoding="utf-8"?>
<LinearLayout xmlns:android="http://schemas.android.com/apk/res/android"
xmlns:app="http://schemas.android.com/apk/res-auto"
xmlns:tools="http://schemas.android.com/tools"
android:orientation="vertical"
android:layout_width="match_parent"
android:layout_height="match_parent"
tools:context=".ShapeActivity">
<EditText
android:layout_width="match_parent"
android:layout_height="wrap_content"
android:background="@drawable/shape_bg"
android:textAllCaps="false"
android:text="Shape"/>
<EditText
android:layout_width="match_parent"
android:layout_height="wrap_content"
android:background="@drawable/gradient_bg"
android:textAllCaps="false"
android:text="Gradient渐变填充"/>
<EditText
android:layout_width="match_parent"
android:layout_height="wrap_content"
android:background="@drawable/solid_bg"
android:textAllCaps="false"
android:text="Solid纯色填充"/>
<EditText
android:layout_width="match_parent"
android:layout_height="wrap_content"
android:background="@drawable/padding_bg"
android:textAllCaps="false"
android:text="Padding留白"/>
<EditText
android:layout_width="match_parent"
android:layout_height="wrap_content"
android:background="@drawable/stroke_bg"
android:textAllCaps="false"
android:text="Stroke边框"/>
<EditText
android:layout_width="match_parent"
android:layout_height="wrap_content"
android:background="@drawable/size_bg"
android:textAllCaps="false"
android:text="Size大小"/>
<EditText
android:layout_width="match_parent"
android:layout_height="wrap_content"
android:background="@drawable/corner_bg"
android:textAllCaps="false"
android:text="Corner大小"/>
</LinearLayout>布局文件
<?xml version="1.0" encoding="utf-8"?>
<shape xmlns:android="http://schemas.android.com/apk/res/android"
android:shape="oval">
</shape>res/drawable/shape_bg.xml
<?xml version="1.0" encoding="utf-8"?>
<shape xmlns:android="http://schemas.android.com/apk/res/android"
android:shape="rectangle">
<gradient
android:startColor="#FFFF00"
android:endColor="#FF00FF"
android:angle="45"
android:type="linear"/>
</shape>res/drawable/gradient_bg.xml
<?xml version="1.0" encoding="utf-8"?>
<shape xmlns:android="http://schemas.android.com/apk/res/android"
android:shape="rectangle">
<solid
android:color="#ff0000"/>
</shape>res/drawable/solid_bg.xml
<?xml version="1.0" encoding="utf-8"?>
<shape xmlns:android="http://schemas.android.com/apk/res/android">
<padding
android:left="10dp"
android:right="8dp"
android:top="5dp"
android:bottom="3dp"/>
</shape>res/drawable/padding_bg.xml
<?xml version="1.0" encoding="utf-8"?>
<shape xmlns:android="http://schemas.android.com/apk/res/android">
<stroke
android:width="2dp"
android:color="#ff0000"/>
</shape>res/drawable/stroke_bg.xml
<?xml version="1.0" encoding="utf-8"?>
<shape xmlns:android="http://schemas.android.com/apk/res/android"
android:shape="rectangle">
<size
android:width="50dp"
android:height="50dp"/>
</shape>res/drawable/size_bg.xml
<?xml version="1.0" encoding="utf-8"?>
<shape xmlns:android="http://schemas.android.com/apk/res/android"
android:shape="rectangle">
<corners
android:bottomLeftRadius="3dp"
android:bottomRightRadius="3dp"
android:topLeftRadius="3dp"
android:topRightRadius="3dp"/>
<solid
android:color="#ff0000"/>
</shape>res/drawable/corner_bg.xml
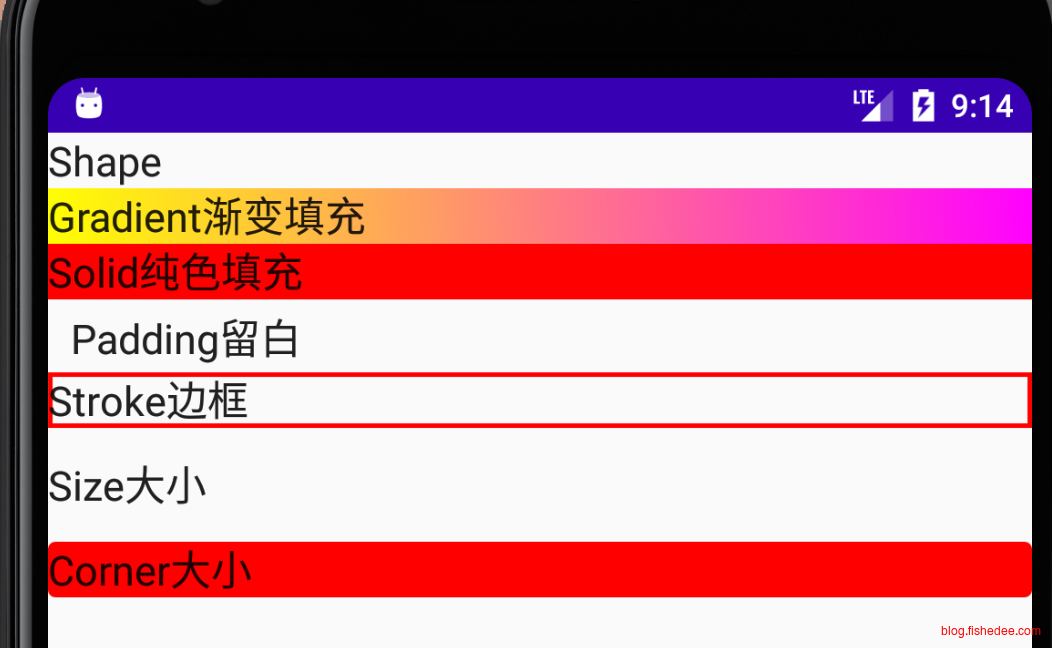
效果如上
要点如下:
- Shape包括有shape,gradient,solid,padding,stroke,size和corner属性可以配置。
- Shape可以用background,或者drawableLeft,color等View属性上。
- Shape上的属性会影响控件的布局,例如将size的height设置大一点(比文字更大的时候),View的自身高度也会高一点。
- Shape上的属性只能是固定值,不能是百分比,权重等数值。
14.5.3 Selector
Selector相当于css上的hover,active这些伪属性
<?xml version="1.0" encoding="utf-8"?>
<LinearLayout xmlns:android="http://schemas.android.com/apk/res/android"
xmlns:app="http://schemas.android.com/apk/res-auto"
android:orientation="vertical"
xmlns:tools="http://schemas.android.com/tools"
android:layout_width="match_parent"
android:layout_height="match_parent"
tools:context=".StateListActivity">
<Button
android:layout_width="match_parent"
android:layout_height="wrap_content"
android:background="@drawable/state_list_bg"
android:text="按钮1"/>
<EditText
android:layout_width="match_parent"
android:layout_height="wrap_content"
android:textColor="@drawable/state_list_color"
android:text="输入"/>
<EditText
android:layout_width="match_parent"
android:layout_height="wrap_content"
android:drawableEnd="@drawable/search2"
android:text="输入2"/>
</LinearLayout>布局文件
<?xml version="1.0" encoding="utf-8"?>
<selector xmlns:android="http://schemas.android.com/apk/res/android">
<item android:state_pressed="true"
android:drawable="@drawable/gradient_bg"/>
<item>
<bitmap android:gravity="center" android:src="@drawable/flower"/>
</item>
</selector>res/drawable/state_list_bg.xml
<?xml version="1.0" encoding="utf-8"?>
<selector xmlns:android="http://schemas.android.com/apk/res/android">
<item android:state_focused="true" android:color="#ff0000"/>
<item android:state_focused="false" android:color="#00ff00"/>
</selector>res/drawable/state_list_color.xml
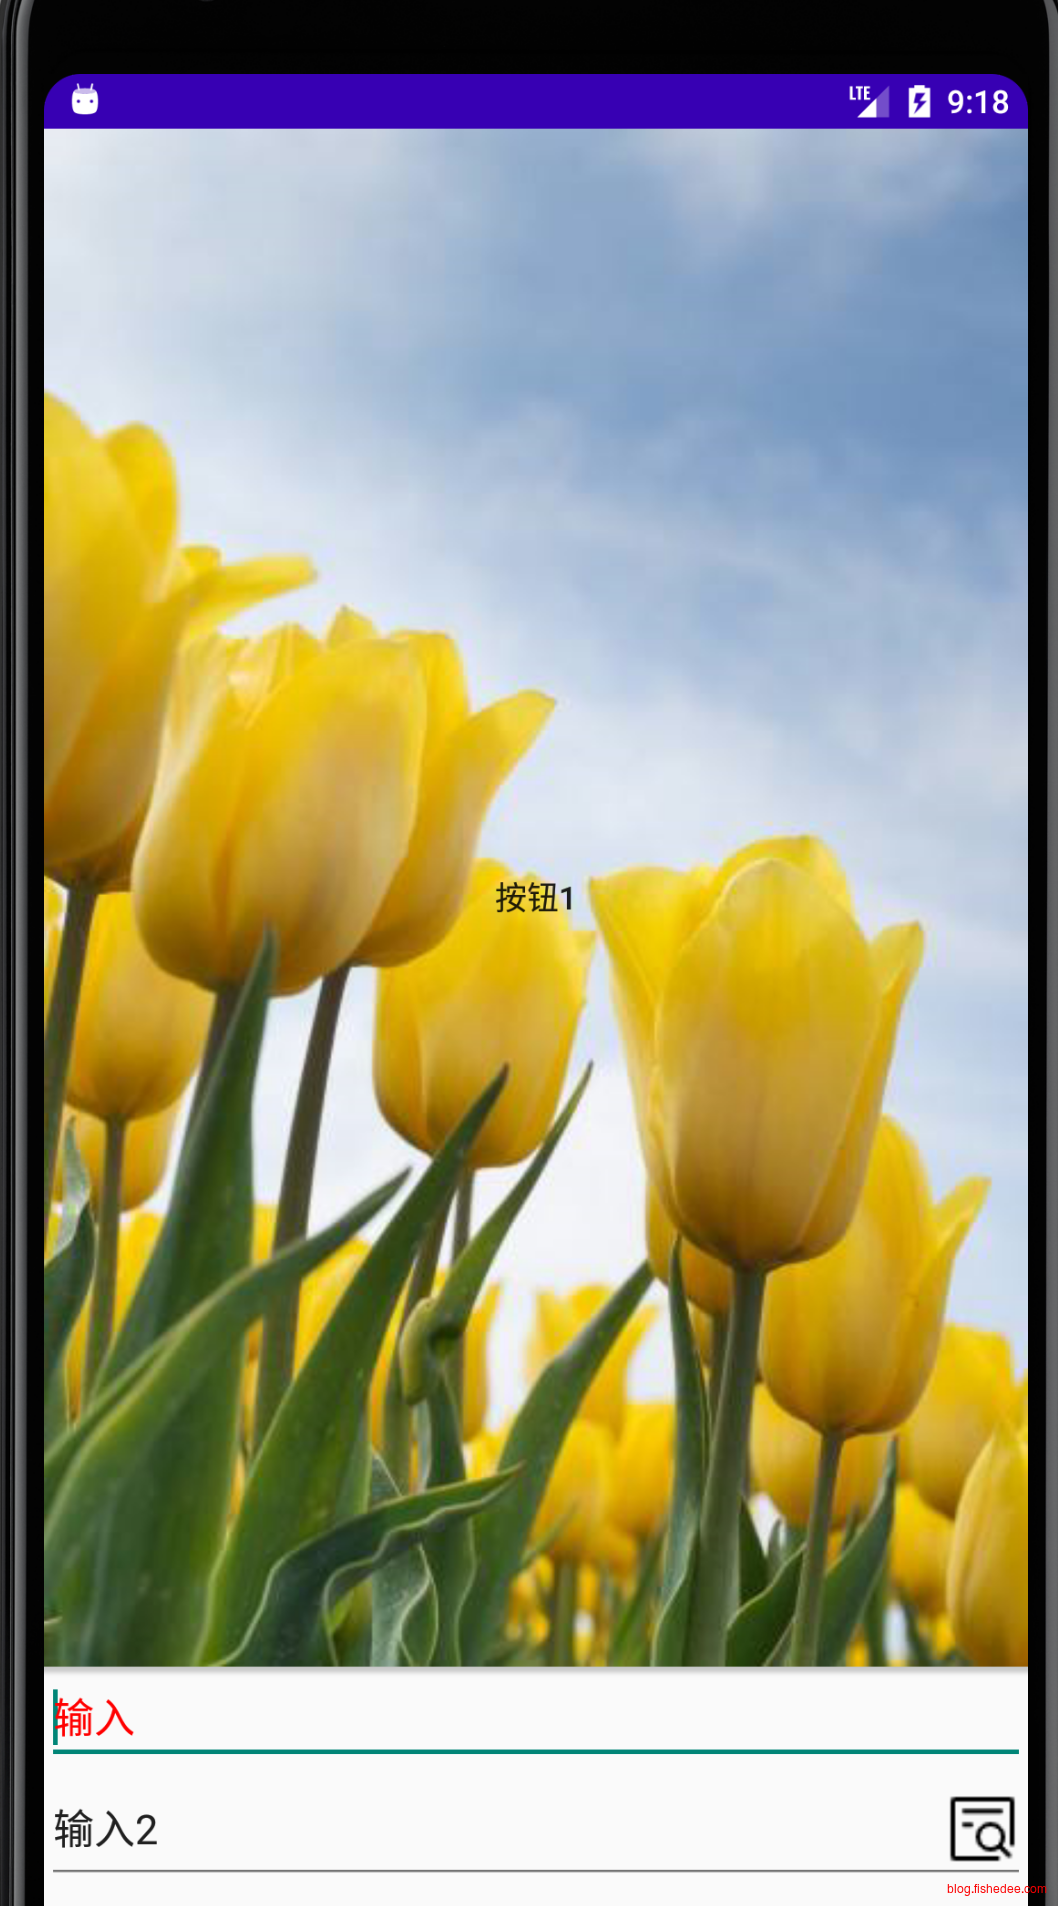
效果如上
要点如下:
- selector的多个item,在布局的时候,会取各个item中的最大值作为布局依据
- item可以用drawable嵌套其他绘图资源,可以用color指定颜色,也可以用bitmap指定图片
14.5.4 Layer-list
<?xml version="1.0" encoding="utf-8"?>
<LinearLayout xmlns:android="http://schemas.android.com/apk/res/android"
android:orientation="vertical"
xmlns:app="http://schemas.android.com/apk/res-auto"
xmlns:tools="http://schemas.android.com/tools"
android:layout_width="match_parent"
android:layout_height="match_parent"
tools:context=".LayerableActivity">
<SeekBar
android:layout_width="match_parent"
android:layout_height="wrap_content"
android:max="100"
android:progress="80"
android:progressDrawable="@drawable/layer_id_bg"/>
<ImageView
android:layout_width="match_parent"
android:layout_height="wrap_content"
android:background="@drawable/border"
android:src="@drawable/layer_bg"/>
</LinearLayout>布局文件
<?xml version="1.0" encoding="utf-8"?>
<layer-list xmlns:android="http://schemas.android.com/apk/res/android">
<!--使用id来区分设置的是ProgressBar的哪一部份,background是ProgressBar的背景-->
<item android:id="@android:id/background"
android:drawable="@drawable/search2"/>
<!--progress是ProgressBar的进度-->
<item android:id="@android:id/progress"
android:drawable="@drawable/search3"/>
</layer-list>res/drawable/layer_id_bg.xml
<?xml version="1.0" encoding="utf-8"?>
<layer-list xmlns:android="http://schemas.android.com/apk/res/android">
<item >
<bitmap android:gravity="center" android:src="@drawable/flower"/>
</item>
<item android:left="40dp" android:top="40dp">
<bitmap android:gravity="center" android:src="@drawable/flower"/>
</item>
</layer-list>res/drawable/layer_bg.xml
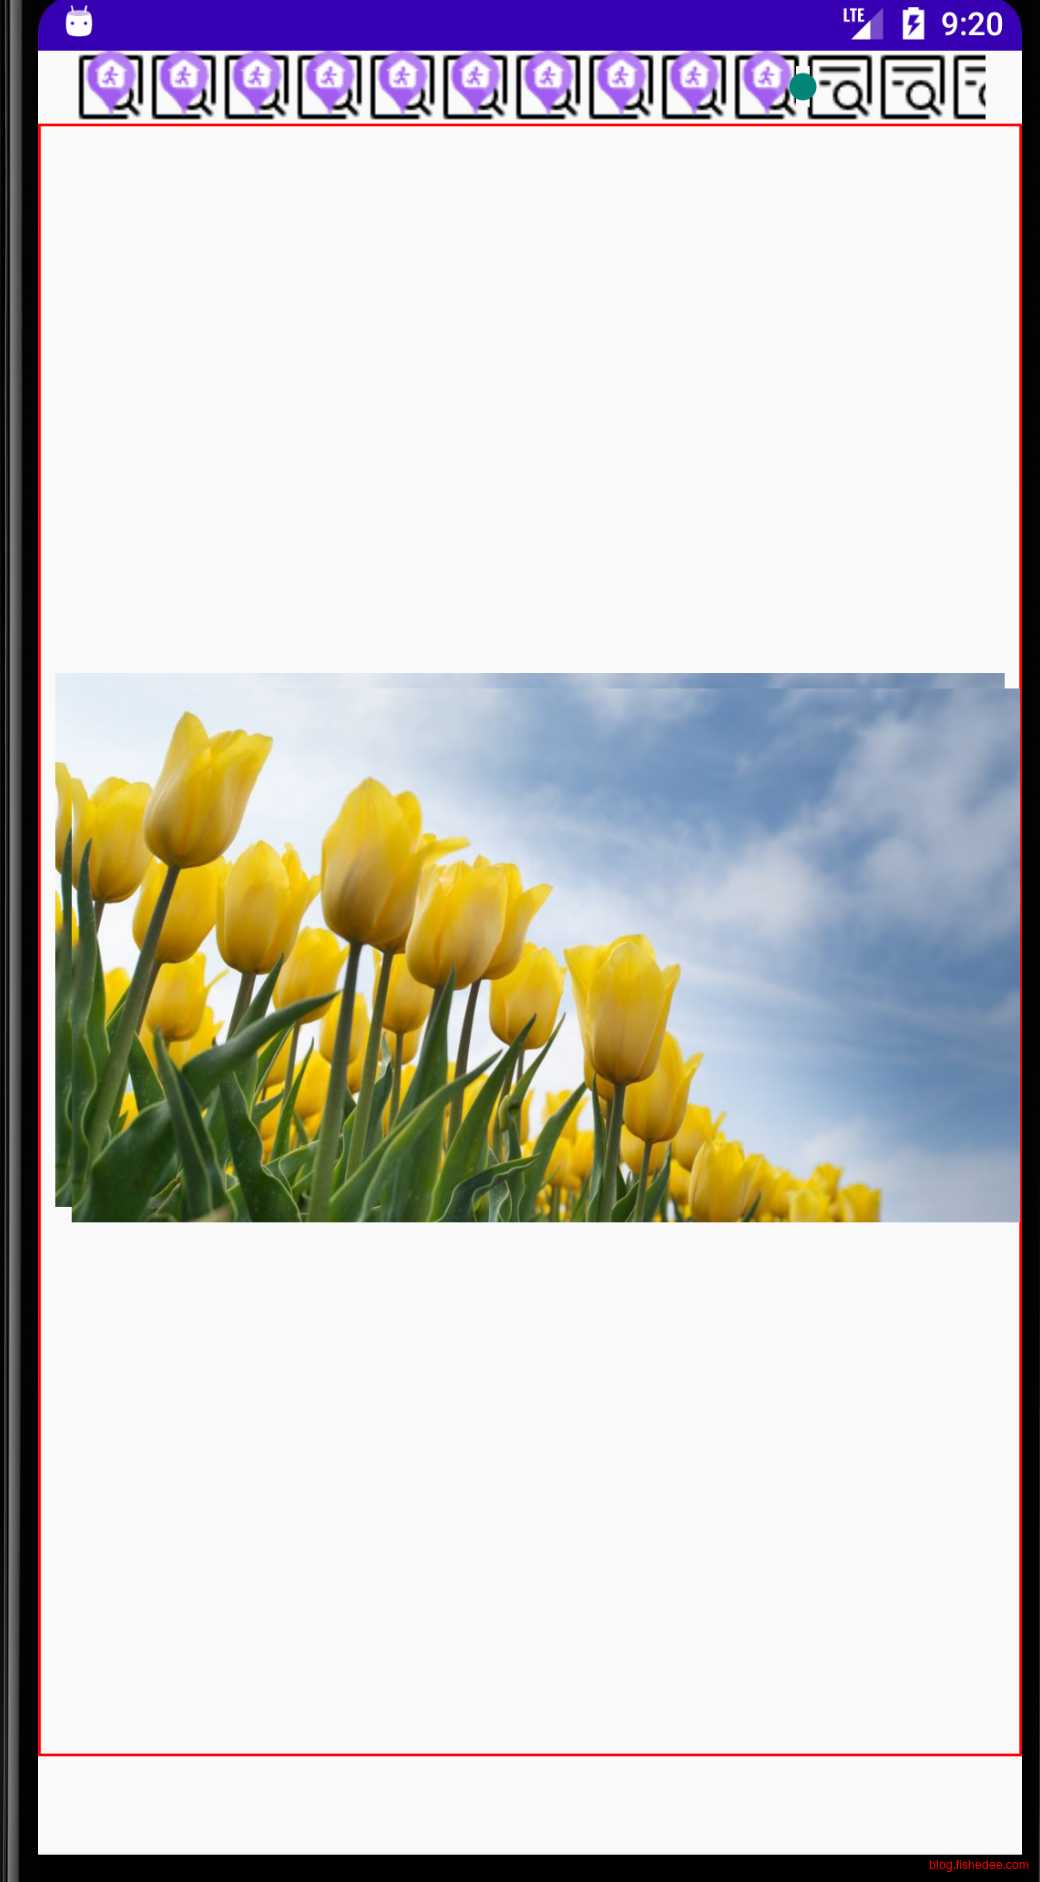
效果如上
要点如下:
- layer-list既可以做一个background绘图,也可以做progressDrawable的这种根据ID的复合绘图
- layer-list支持组合多个层来绘图,不同层之间可以用left,top来做偏移
- layer-list的缺陷在于,在ImageView中使用adjustViewBounds是无效的,ImageView无法做到高度自适应。
14.5.5 Clip
<?xml version="1.0" encoding="utf-8"?>
<LinearLayout xmlns:android="http://schemas.android.com/apk/res/android"
xmlns:app="http://schemas.android.com/apk/res-auto"
android:orientation="vertical"
xmlns:tools="http://schemas.android.com/tools"
android:layout_width="match_parent"
android:layout_height="match_parent"
tools:context=".ClipDrawable">
<ImageView
android:id="@+id/imageClip"
android:layout_width="match_parent"
android:layout_height="wrap_content"
android:src="@drawable/clip_bg"/>
</LinearLayout>布局文件
<?xml version="1.0" encoding="utf-8"?>
<clip xmlns:android="http://schemas.android.com/apk/res/android"
android:drawable="@drawable/flower"
android:clipOrientation="horizontal"
android:gravity="center"
android:level="8000">
</clip>res/drawable/clip.xml文件。Level是切除的比例,10000为最大值。可以分为水平切割,或者垂直切割两种
package com.example.myapplication
import androidx.appcompat.app.AppCompatActivity
import android.os.Bundle
import android.os.Handler
import android.os.Message
import kotlinx.android.synthetic.main.activity_clip_drawable.*
import java.lang.ref.WeakReference
import java.util.*
class ClipDrawable : AppCompatActivity() {
class MyHandler(val context:ClipDrawable):Handler(){
private val ctx:WeakReference<ClipDrawable> = WeakReference(context);
override fun handleMessage(msg: Message) {
super.handleMessage(msg)
ctx.get()?.setLevel(msg.arg1)
}
}
val myHandler = MyHandler(this)
private fun setLevel(level:Int){
val clipDrawable = imageClip.drawable as android.graphics.drawable.ClipDrawable
clipDrawable.level = level
}
private var level = 0;
override fun onCreate(savedInstanceState: Bundle?) {
super.onCreate(savedInstanceState)
setContentView(R.layout.activity_clip_drawable)
val timer = Timer()
timer.schedule(object:TimerTask(){
override fun run() {
if( level >= 10000 ){
timer.cancel()
return;
}
val newLevel = level+100
level = newLevel
val msg = Message()
msg.what = 123
msg.arg1 = newLevel
myHandler.sendMessage(msg)
}
},0,300)
}
}代码如上
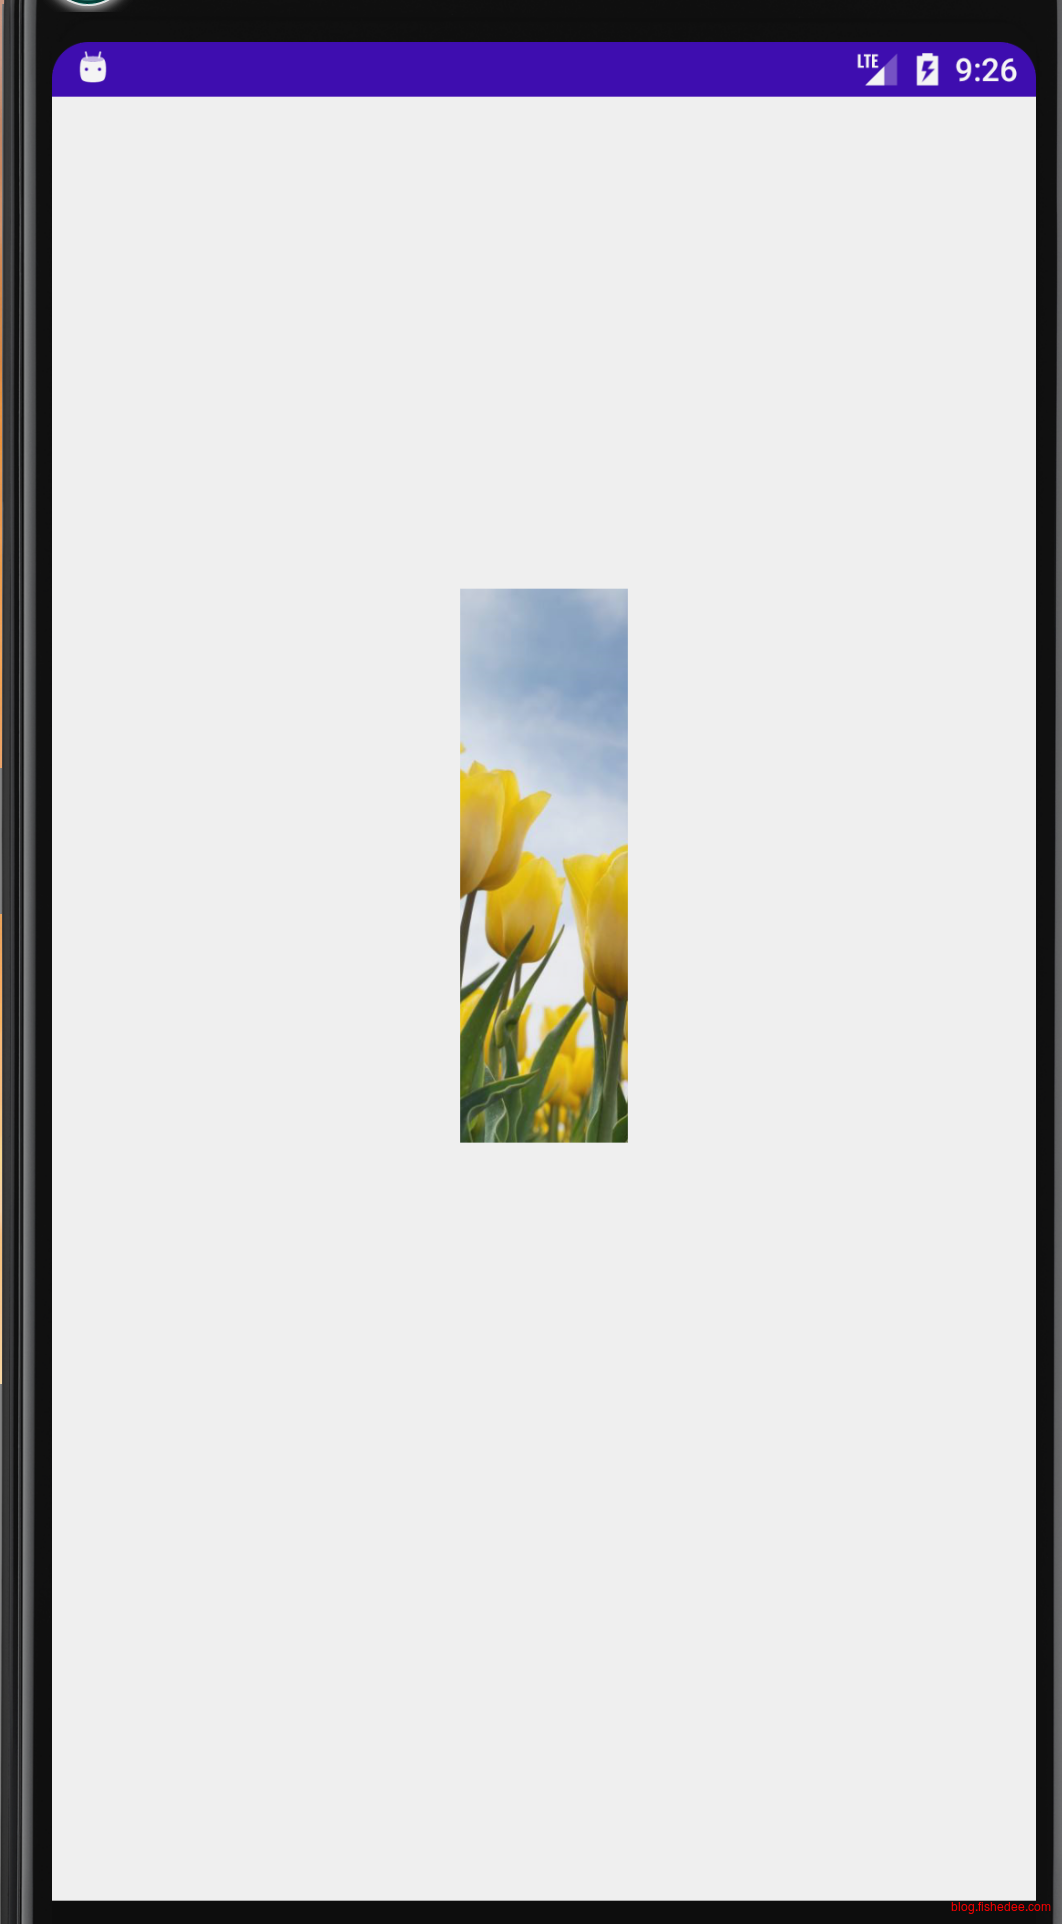
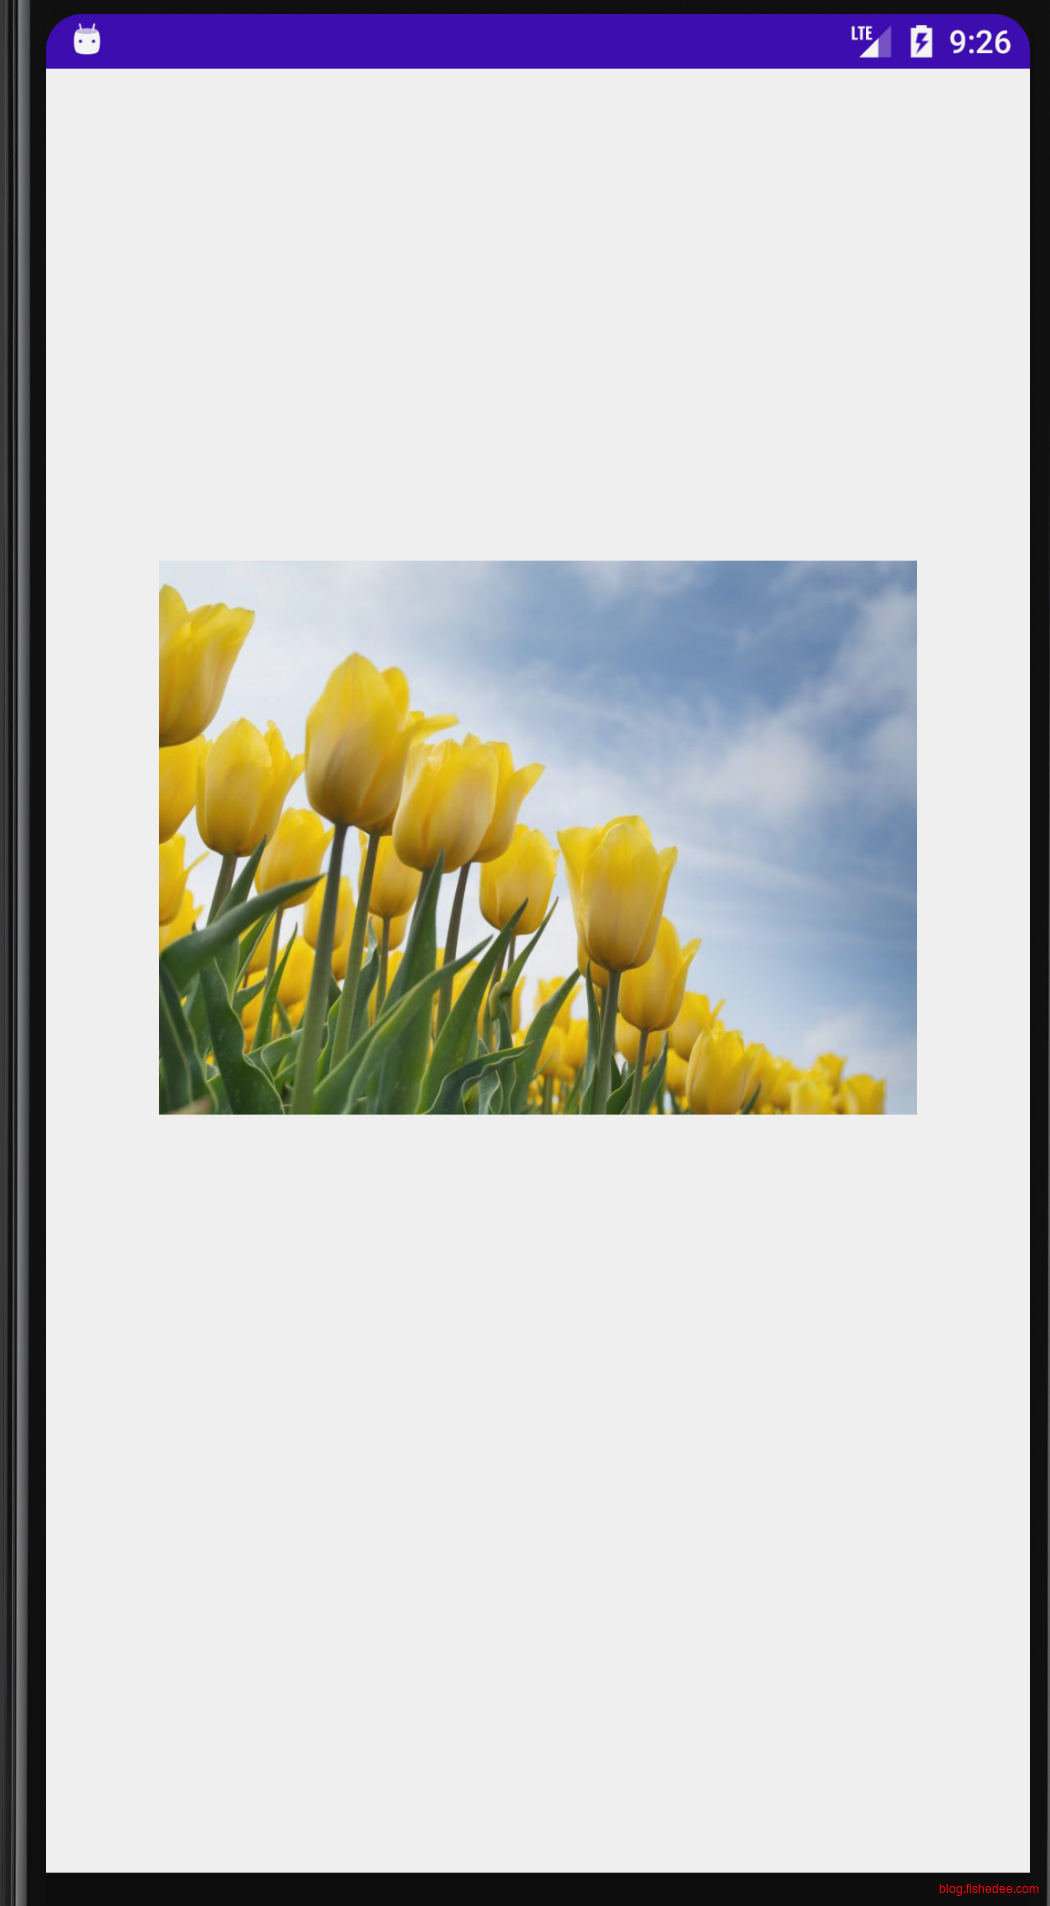
效果如上,随着时间的展开,会自动往外伸展。这个功能比较少用到。
14.5.6 Inset
Android的盒子模型是这样。
- 最外层是inset,外留白
- 然后是stroke,边框
- 最里层是padding,内留白
inset+stroke+padding+内容的总宽度就是View的width了
<?xml version="1.0" encoding="utf-8"?>
<inset xmlns:android="http://schemas.android.com/apk/res/android"
android:insetLeft="10dp"
android:insetRight="10dp"
android:insetTop="10dp"
android:insetBottom="10dp">
<shape android:shape="rectangle">
<solid android:color="@color/black"/>
<stroke android:color="#FF0000" android:width="2dp"/>
<padding android:top="10dp" android:bottom="10dp" android:right="10dp" android:left="10dp"/>
<corners android:radius="15dp"/>
</shape>
</inset>定义一个inset标签
<?xml version="1.0" encoding="utf-8"?>
<LinearLayout xmlns:android="http://schemas.android.com/apk/res/android"
xmlns:app="http://schemas.android.com/apk/res-auto"
android:orientation="vertical"
xmlns:tools="http://schemas.android.com/tools"
android:layout_width="match_parent"
android:layout_height="match_parent"
tools:context=".InsetDrawable">
<TextView
android:layout_width="wrap_content"
android:layout_height="wrap_content"
android:background="@drawable/inset_bg"
android:scaleType="centerCrop"
android:textColor="@color/white"
android:gravity="center"
android:text="你好"/>
</LinearLayout>布局文件
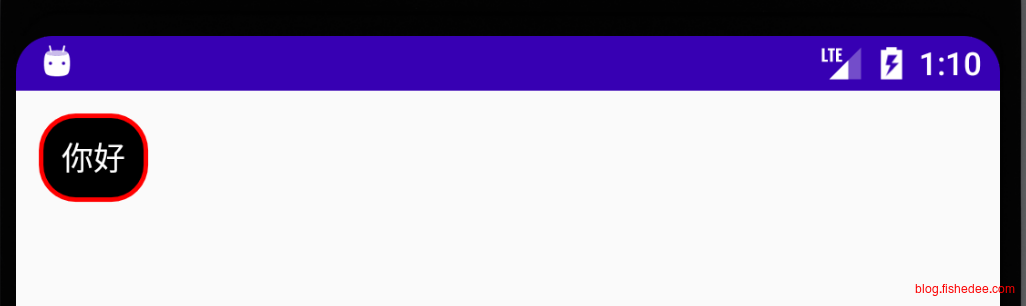
效果如上,没啥好说的
14.5.7 单边边框
默认的stroke是四边边框的,我们可以通过用layer-list来更改这种行为
<?xml version="1.0" encoding="utf-8"?>
<layer-list xmlns:android="http://schemas.android.com/apk/res/android">
<item android:left="-2dp"
android:right="-2dp"
android:top="-2dp">
<shape android:shape="rectangle">
<stroke
android:color="#FF0000"
android:width="2dp"/>
</shape>
</item>
</layer-list>绘图描述。left+width = 0dp,所以不显示。方法就是item偏移的值加上width为负数的就不显示,其他的显示。
<?xml version="1.0" encoding="utf-8"?>
<LinearLayout xmlns:android="http://schemas.android.com/apk/res/android"
android:orientation="vertical"
xmlns:app="http://schemas.android.com/apk/res-auto"
xmlns:tools="http://schemas.android.com/tools"
android:layout_width="match_parent"
android:layout_height="match_parent"
android:padding="10dp"
tools:context=".SingleBorderActivity">
<TextView
android:layout_width="match_parent"
android:layout_height="wrap_content"
android:background="@drawable/single_border_bg"
android:text="你好"/>
<TextView
android:layout_width="match_parent"
android:layout_height="wrap_content"
android:background="@drawable/single_border_bg"
android:text="你好"/>
</LinearLayout>布局文件

效果如上
14.6 自定义资源目录
参考资料在这里
代码在这里
14.6.1 多目录约束
App变得复杂的时候,资源目录超级多,放在一个res文件夹中很难维护。Android Studio是支持多个资源目录,但是可能与你想象的不太一样。
src/main/res
src/main/res/drawable这称为一个res资源目录,这个资源目录下面有drawable子目录,和layout子目录等等。
src/main/res2
src/main/res2/drawable
src/main/res2/layoutAndroid Studio 支持新增一个res2资源目录,这个资源目录依然允许包含有drawable子目录,和layout子目录等等。注意,子目录的名称不能改变。
src/main/res
src/main/res/drawable/sub_drawable1
src/main/res/drawable/sub_drawable2
src/main/res/layout/sub_layout1
src/main/res/layout/sub_layout2Android Studio不支持直接在原来的子目录下面新增新的子目录。
也就是说,要么你新增一整套资源目录,不能仅仅在单个子目录(drawable或者layout)下面新增子目录
14.6.2 操作
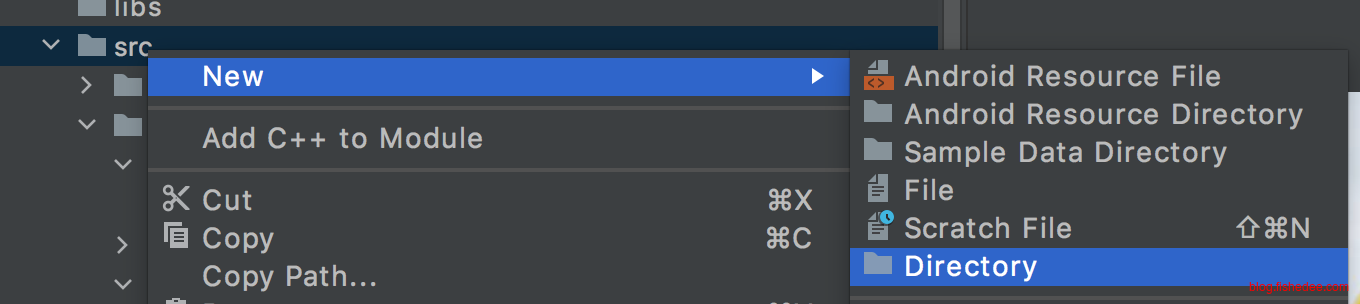
先在main目录下面新增一个kk文件

然后将这个kk目录,设置为Resource Folder
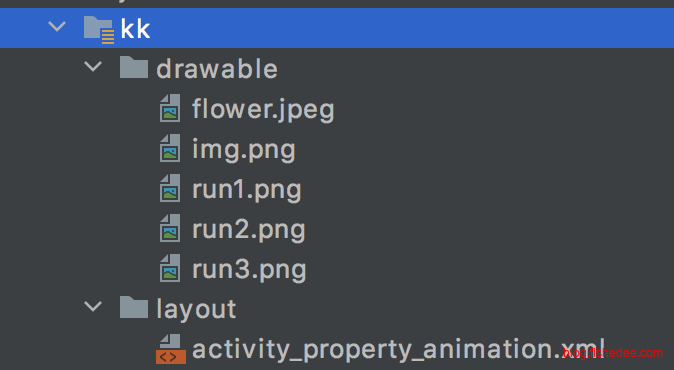
在kk目录下面新增对应的子目录文件夹,名字不能改变
android {
compileSdk 31
//....
sourceSets {
main {
res.srcDirs = [
'src/main/res',
'src/main/kk'
]
}
}
//....
}在构建配置中,加入sourceSets配置即可
20 技巧集合
代码在这里
20.1 ApplicationContext
package com.example.myapplication
import android.annotation.SuppressLint
import android.app.Application
import android.content.Context
class MyApplication : Application(){
companion object{
@SuppressLint("StaticFieldLeak")
lateinit var context:Context
}
override fun onCreate() {
super.onCreate()
context = applicationContext
}
}加入MyApplication
<application
android:name=".MyApplication"
android:allowBackup="true"
android:icon="@mipmap/ic_launcher"
android:label="@string/app_name"
android:networkSecurityConfig="@xml/network_config"
android:roundIcon="@mipmap/ic_launcher_round"
android:supportsRtl="true"
android:theme="@style/Theme.MyApplication">
</application>在AndroidManifest.xml中做好android.name的注册。那么当应用启动的时候,我们就能获取到applicationContext了。
package com.example.myapplication
import android.widget.Toast
fun showToast( text:String){
Toast.makeText(MyApplication.context,text,Toast.LENGTH_SHORT).show()
}有了一个全局的ApplicationContext,我们能轻松做一些全局的方法
20.2 Intent的Extra
package com.example.myapplication
import android.content.Context
import android.content.Intent
import androidx.appcompat.app.AppCompatActivity
import android.os.Bundle
import com.google.gson.Gson
import com.google.gson.GsonBuilder
import kotlinx.android.parcel.Parcelize
import kotlinx.android.synthetic.main.activity_intent.*
import java.io.Serializable
class Person(val name:String,val age:Int):Serializable
class Country(val name:String,val personList:List<Person>):Serializable
class IntentActivity : AppCompatActivity() {
val gson:Gson
init{
val gsonBuilder = GsonBuilder()
gsonBuilder.serializeNulls()
gsonBuilder.disableHtmlEscaping()
gson = gsonBuilder.create()
}
override fun onCreate(savedInstanceState: Bundle?) {
super.onCreate(savedInstanceState)
setContentView(R.layout.activity_intent)
var country = intent.getSerializableExtra("data") as Country
show.text = gson.toJson(country)
}
companion object{
fun actionStart(context:Context,country:Country){
var intent = Intent(context,IntentActivity::class.java)
intent.putExtra("data",country)
context.startActivity(intent)
}
}
}使用Serializable来让Intent的Extra放入复杂的数据
20.3 图标
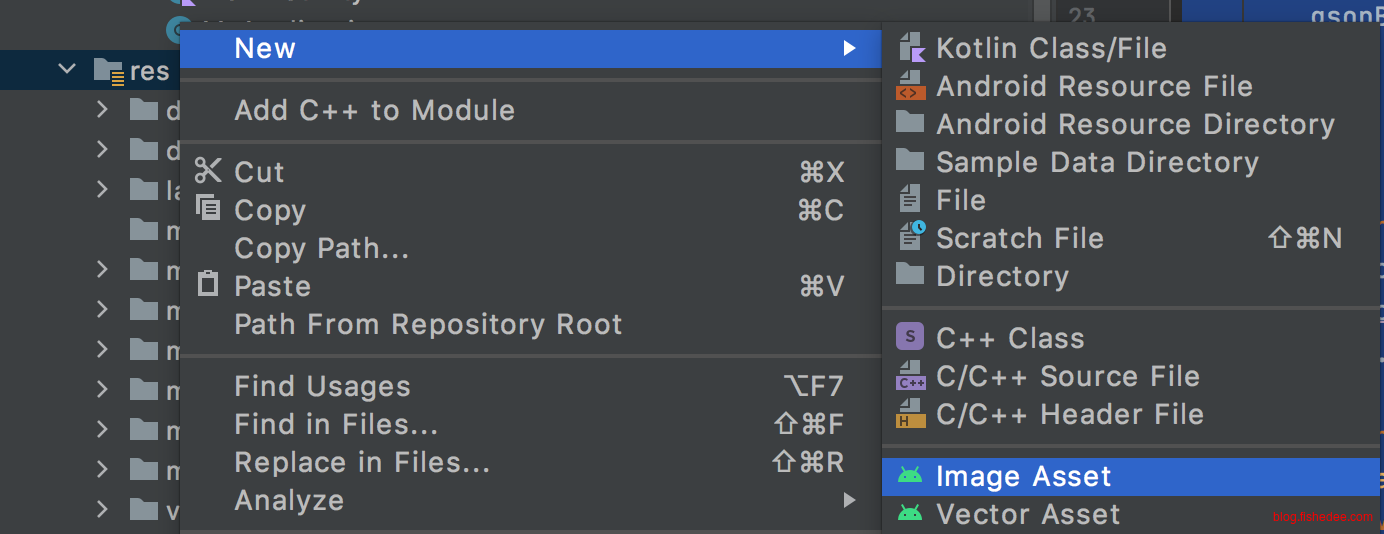
在src/main/res下点击右键,New,Image Assets。
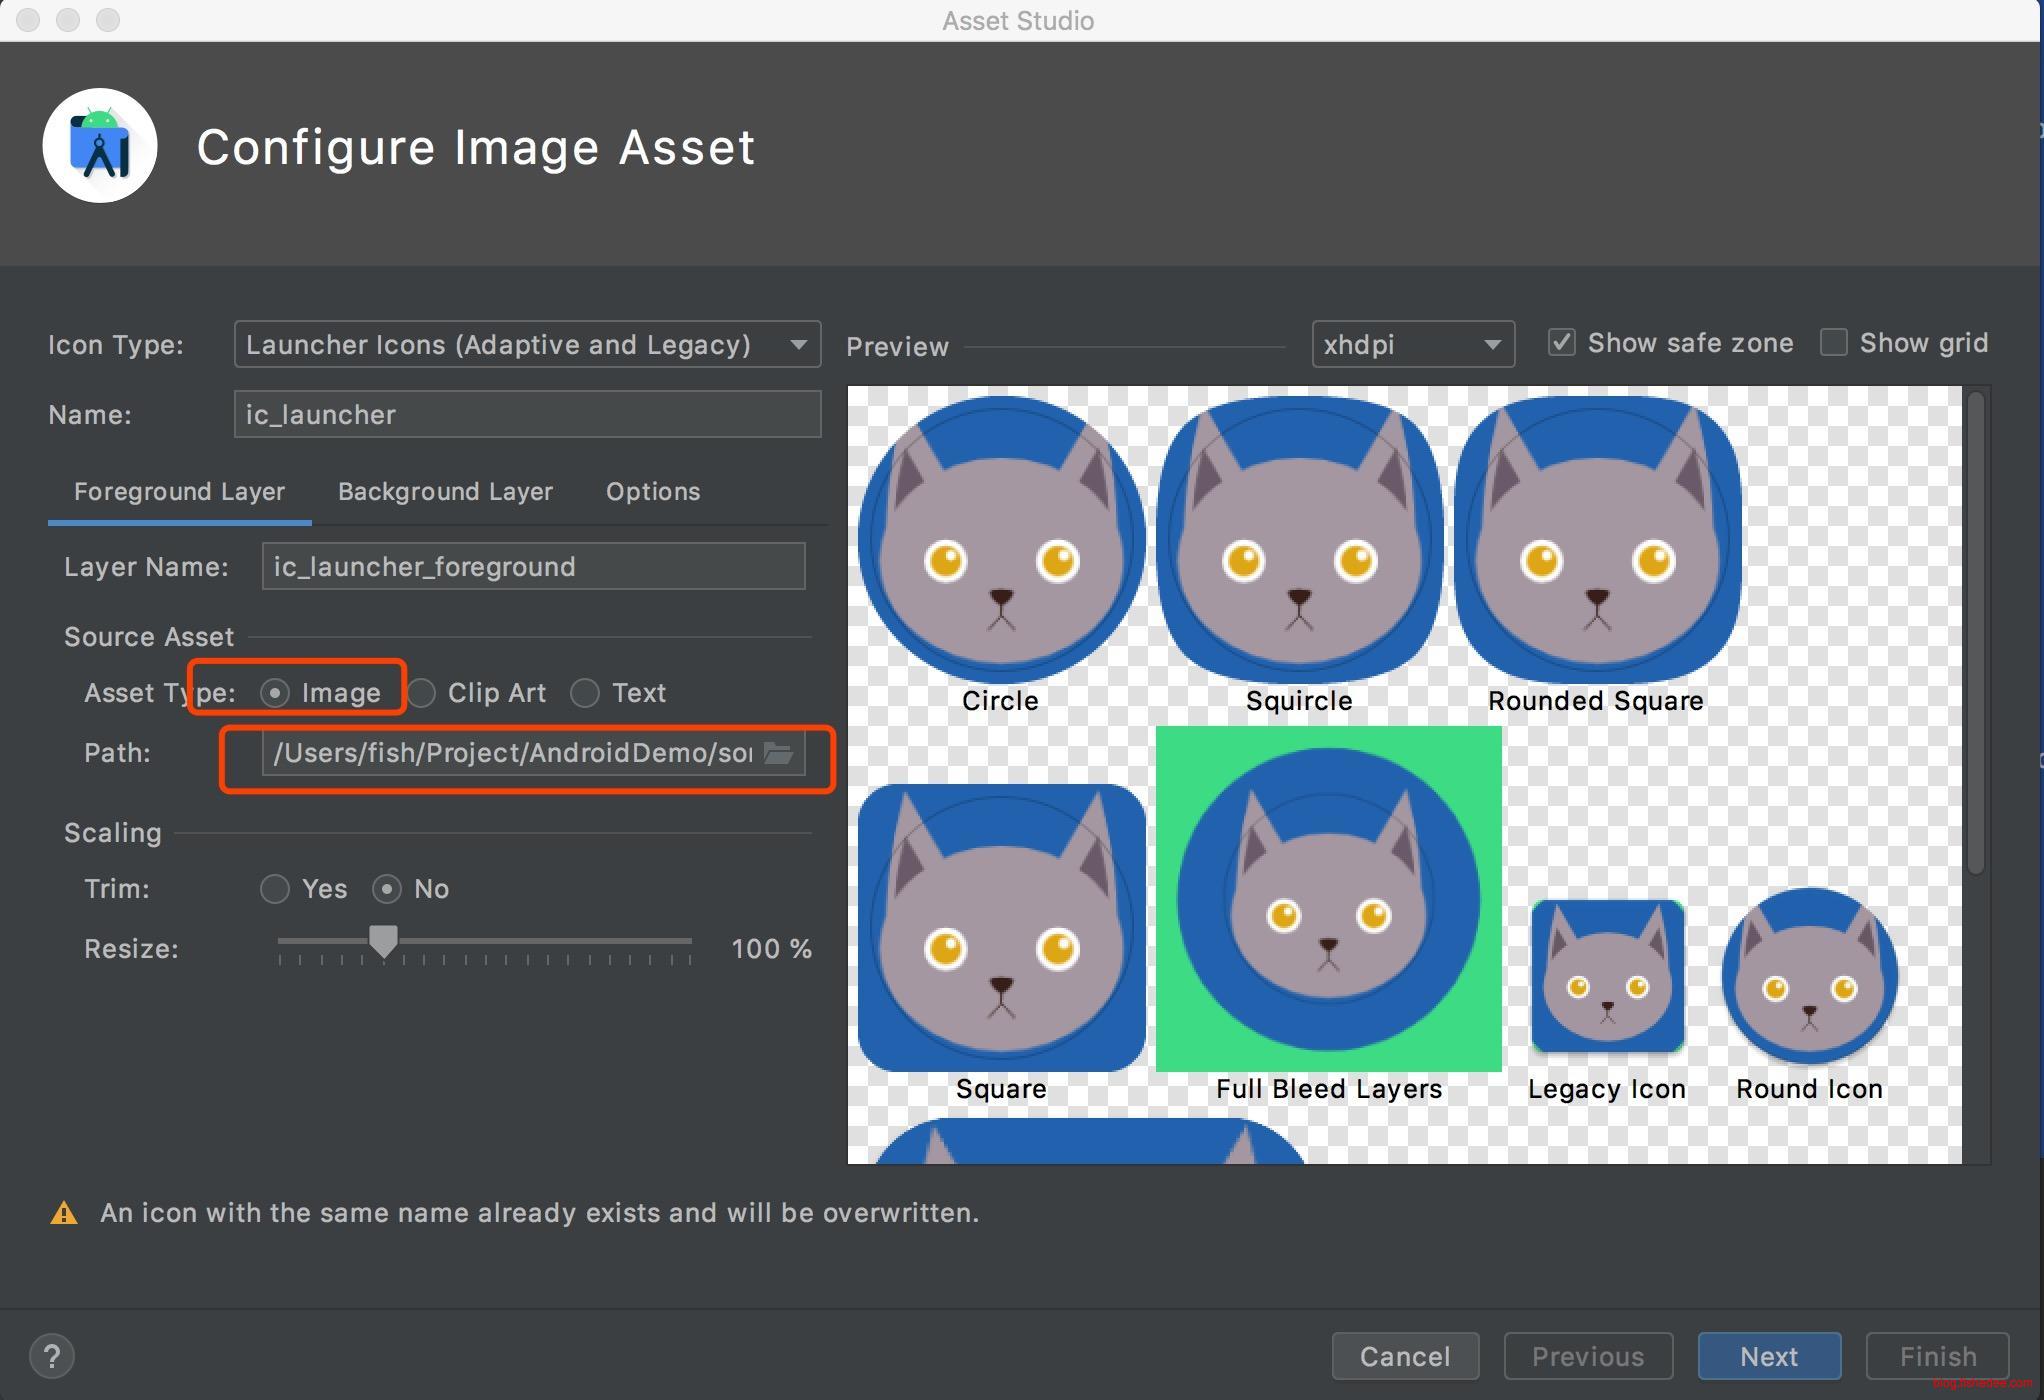
在弹出的对话框中,图片名为ic_launcher,Foreground Layer选择Image,和Image对应的路径。
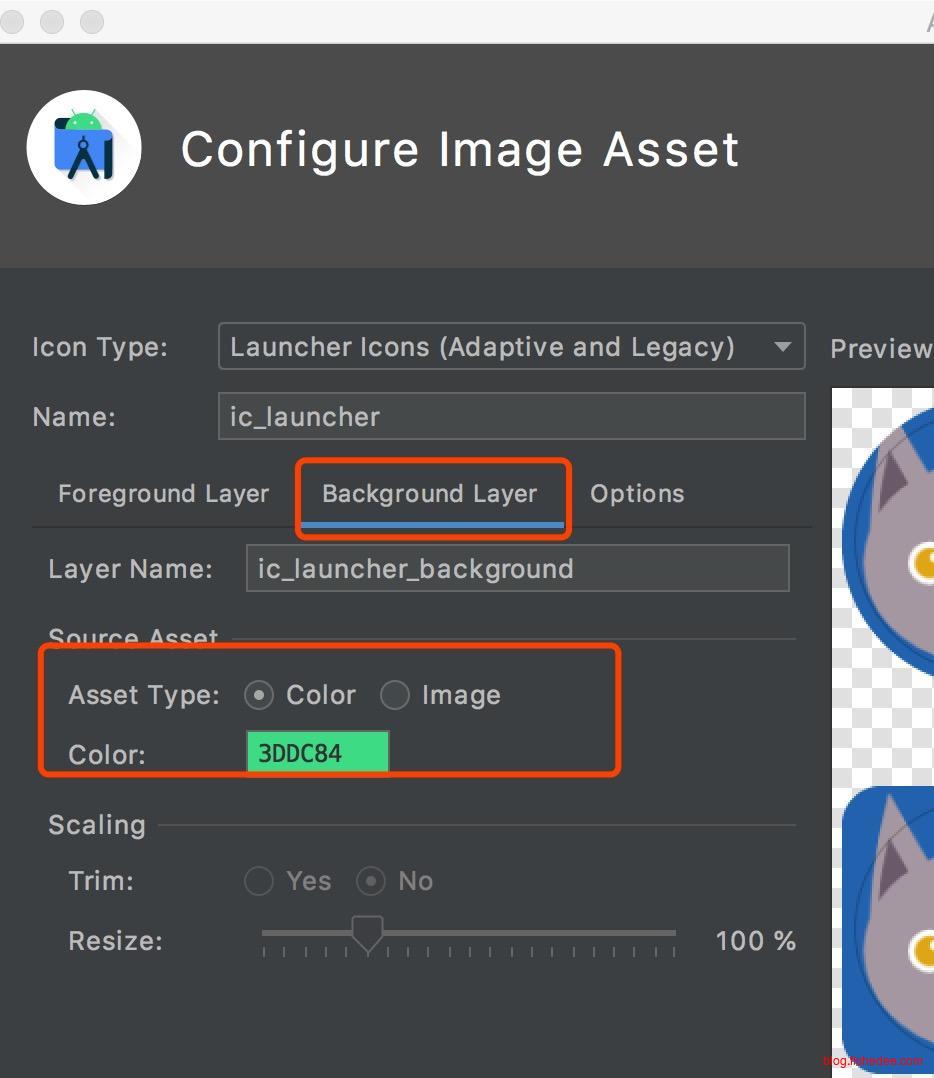
在Background Layer中,选择Color,以及Color对应的颜色
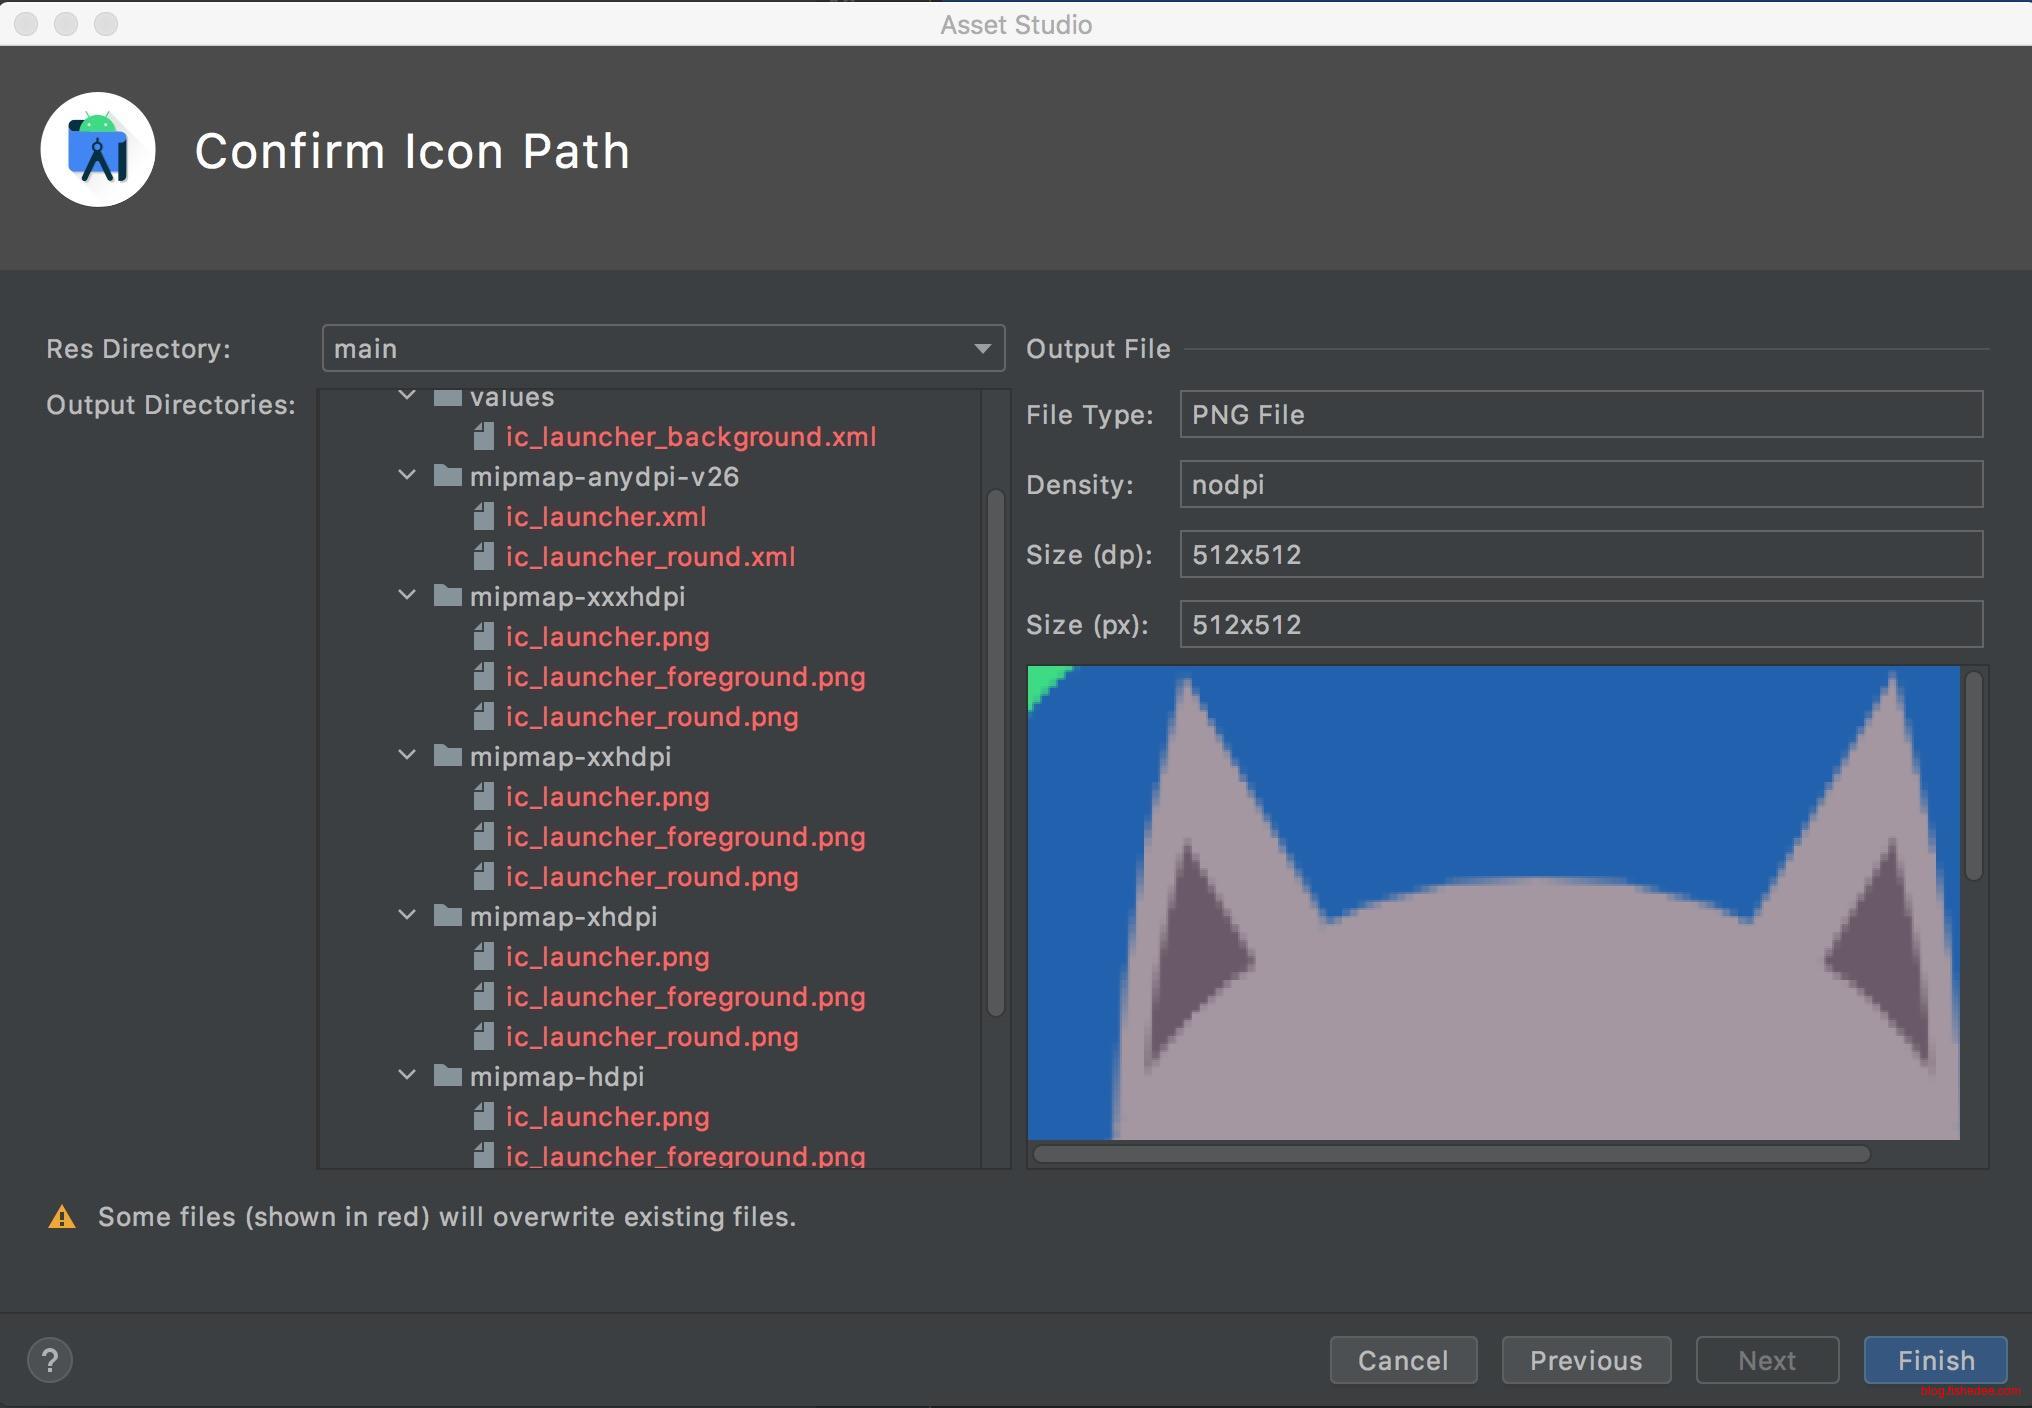
最后点击下一步,和Finish就可以了。
要注意的是,图标一般为png或者webp格式的,如果同一个文件夹中同时存在两个格式的,要先删除其中一个格式,否则编译错误。

这是启动后的效果。
附上图表网站,在这里
20.4 签名apk
20.4.1 Debug签名
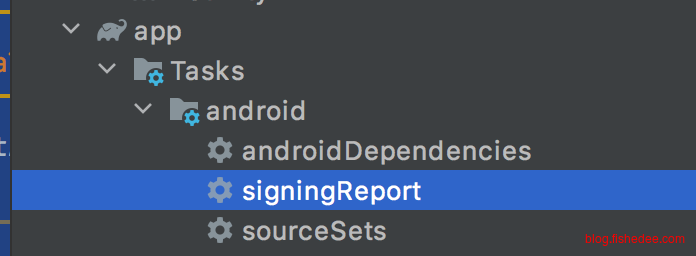
选择SigningReport就能用自带的debug.keystore来做apk签名了,这仅仅适用于开发阶段。
20.4.2 IDE签名
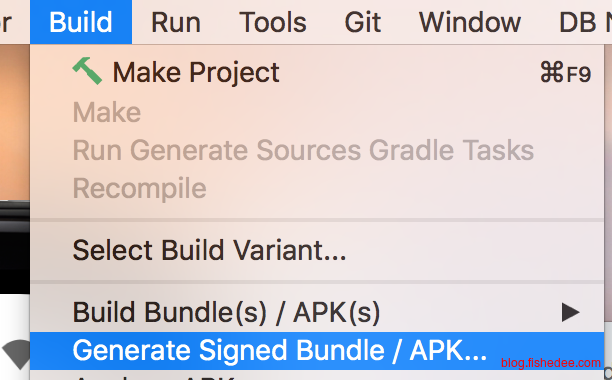
选择Build/Generated Signed Bundle Apk
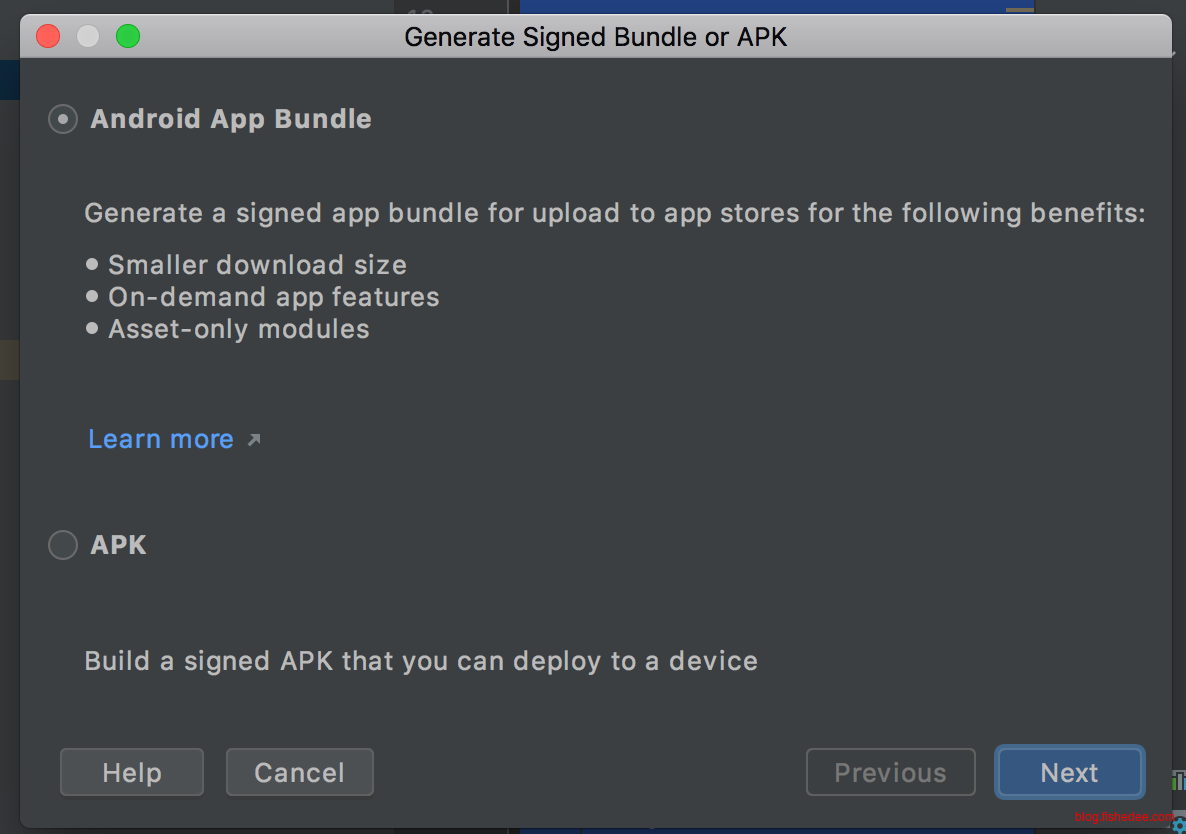
选择AAB格式
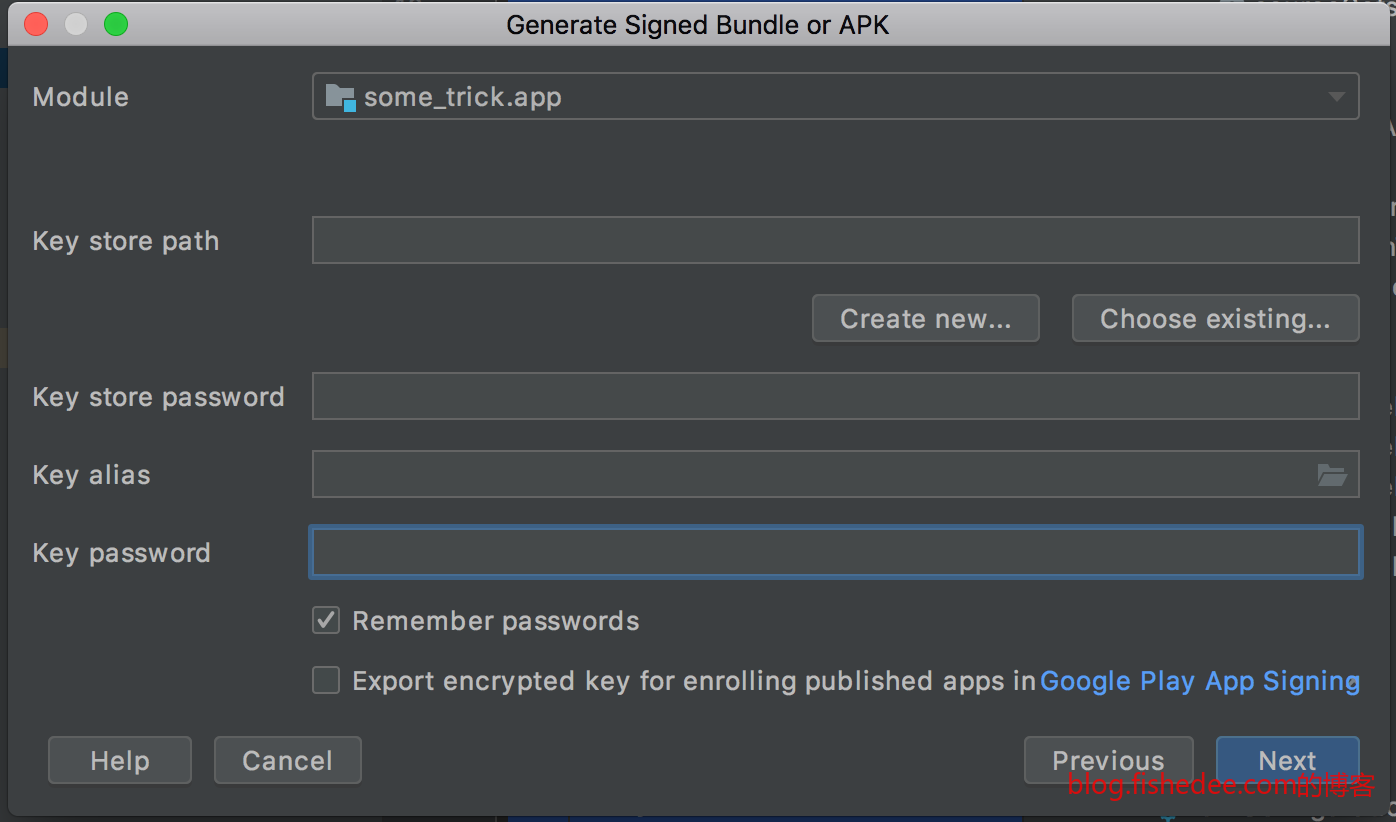
选择Create New一个Key Store
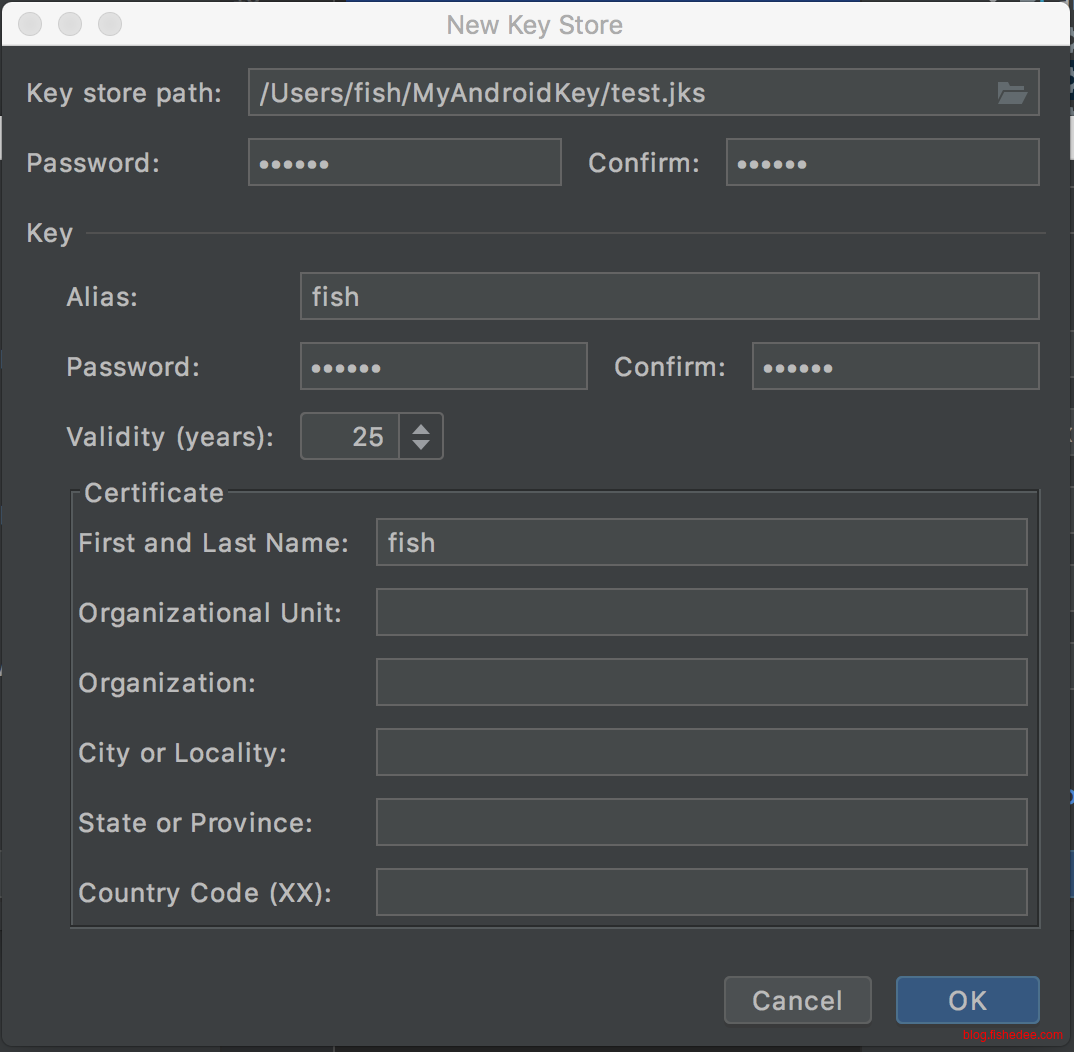
随便填好内容
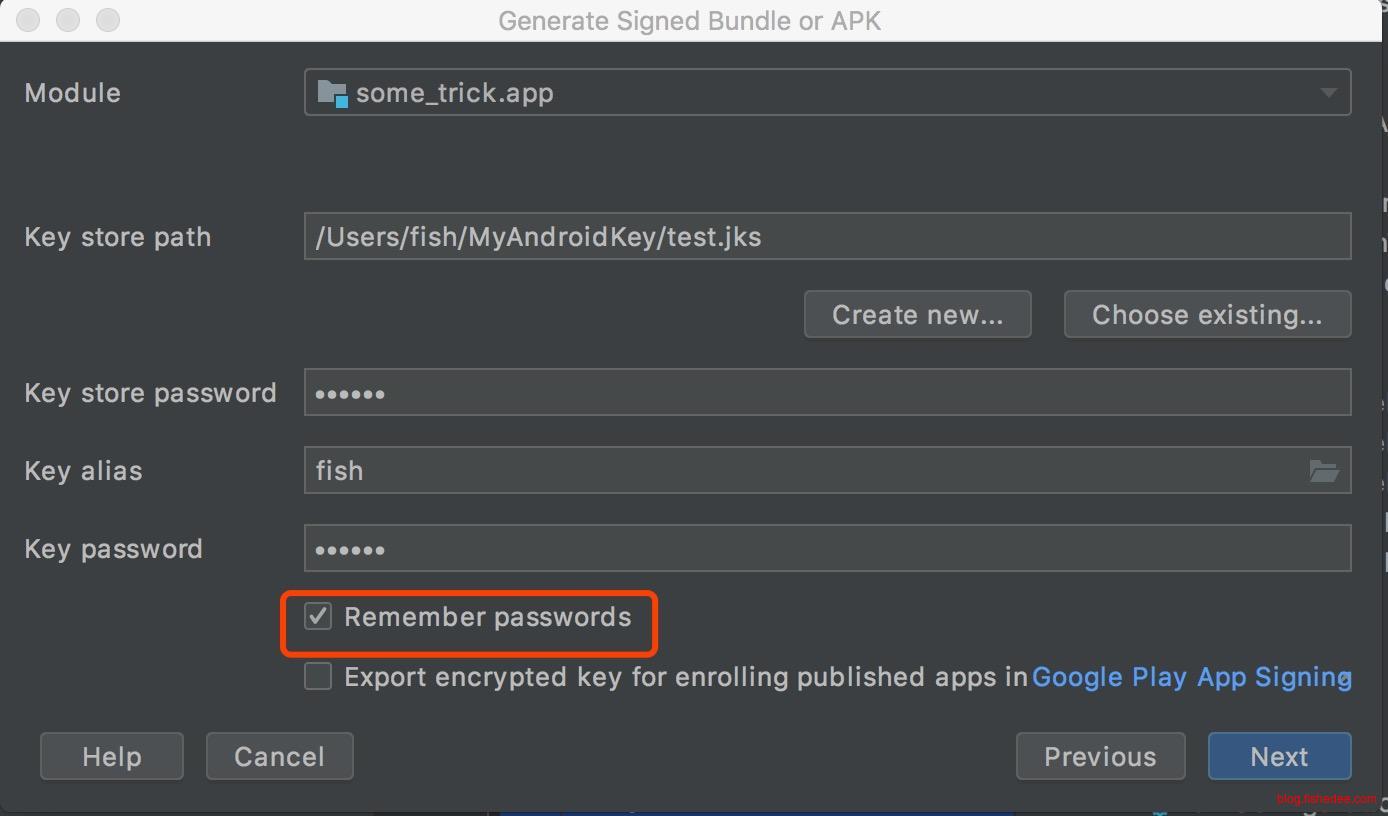
选择好Key Store以后,可以选择是否记住密码
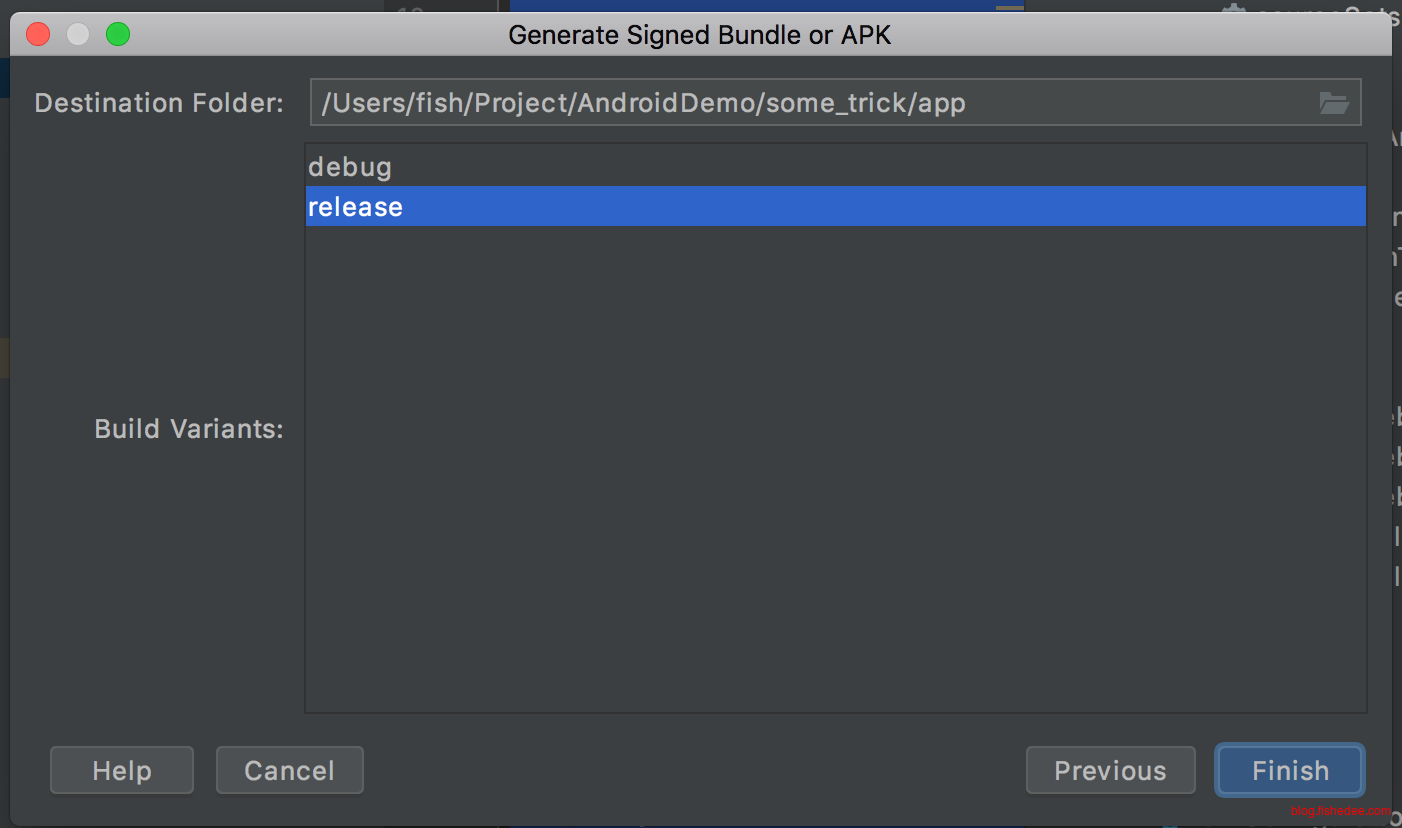
选择release版本,Finish即可,最终生成在app文件夹的release文件中。
20.4.3 Gradle签名
signingConfigs{
config {
storeFile file('/Users/fish/MyAndroidKey/test.jks')
storePassword '123456'
keyAlias = 'fish'
keyPassword '123456'
}
}
buildTypes {
release {
xxxx
signingConfig signingConfigs.config
}
}在build.gradle中加入以上的脚本即可
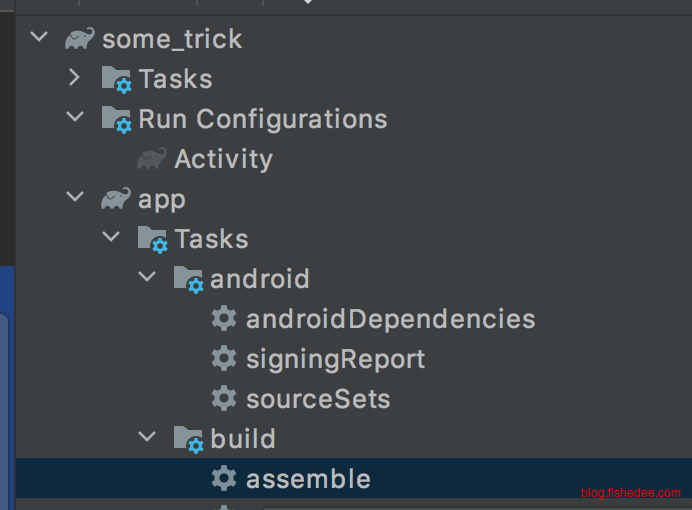
然后在Task中选择build/assemble即可
JAVA_HOME="/Applications/Android Studio.app/Contents/jre/Contents/Home" ./gradlew使用命令行签名也行,问题不大
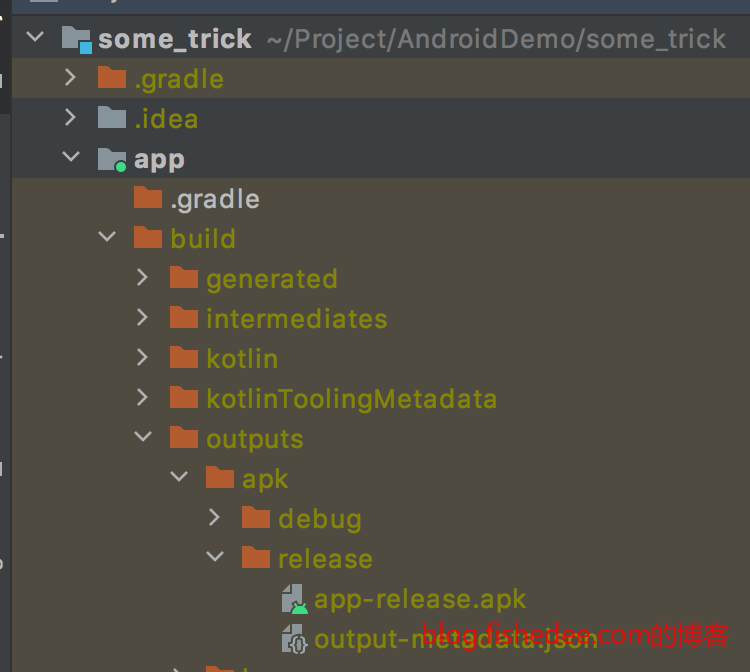
在app/build/outputs目录中同时输出debug与release的apk。
实际应用中,我们会用Gradle环境变量来替换脚本中的账号密码,具体看书本的P666页。
21 总结
Android的开发难度不会太高,就是知识点比较多比较杂一点而已。
参考资料:
- 本文作者: fishedee
- 版权声明: 本博客所有文章均采用 CC BY-NC-SA 3.0 CN 许可协议,转载必须注明出处!